


A widget is an essential element in Magento 2 and helps the visitors view and surf your website with ease. It’s an important part of a Magento 2 store
According to WhatIs.com, a widget is an element of a graphical user interface (GUI) that displays information or provides a specific way for a user to interact with the operating system or an application. Similarly, Widgets in Magento 2 can be explained as small blocks which perform a definite function on your website.
Magento2 have many types of already created and installed widgets such as CMS Page Link, CMS Static Block, Catalog Category Link, Catalog New Products List, Catalog Product Link, and Recently Viewed Products, etc. Correspondingly, store admins can use a widget to improve the user experience as well as the functionality of the store.
Suggested Post: How to begin with Magento – Pro Tips
Here are some achievable performance of Magento2 widgets:
- Dynamic product show,
- Dynamic recently-viewed-product lists,
- Advertising images placed on different Magento frontend,
- Attractive navigation elements and action blocks,
- Dynamic flash elements that can be easily configured and embedded in content pages,
- And much more.
In fact, the method to create a widget in Magento 2 is almost the as easy as creating front-end extension with a simple module. Hence, there is no complexity since customization for widgets. A custom widget can sometimes offer an even better way of editing or be adding quality content inside Magento blocks or pages.
Let’s start!
Creating a Magento 2 Widget
Create folder structure in your directory Magento_root\app\code\WeblizarWidget\Weblizarwidget
A) Create registration.php file in Weblizarwidget folder with following code
<?php

\Magento\Framework\Component\ComponentRegistrar::register(

\Magento\Framework\Component\ComponentRegistrar::MODULE,

'Weblizar_Widget',

__DIR__

);
B) Create etc folder in Weblizarwidget folder and create file module.xml in etc folder with following code
<?xml version="1.0"?>
<config xmlns:xsi="http://www.w3.org/2001/XMLSchema-instance" xsi:noNamespaceSchemaLocation="urn:magento:framework:Module/etc/module.xsd">

<module name="Weblizar_Widget" setup_version="1.0.0">

</module>

</config>
C) Create file widget.xml in etc folder with following code
<?xml version="1.0" encoding="UTF-8"?>

<widgets xmlns:xsi="http://www.w3.org/2001/XMLSchema-instance"

xsi:noNamespaceSchemaLocation="urn:magento:module:Magento_Widget:etc/widget.xsd">

<widget id="weblizar_demowidget" class="WeblizarWidget\Weblizarwidget\Block\Widget\WeblizarWidget">

<label translate="true">Weblizar Widget

<description>Widget in Magento2

<parameters>

<parameter name="title" xsi:type="text" required="false" visible="true">

<label>Title</label>

</parameter>

<parameter name="description" xsi:type="text" required="false" visible="true">

<label>Description</label>

</parameter>

</parameters>

</widget>

</widgets>
Suggested Post: Launched Finest Ever Fashion Theme On Magento 2.0
D) Create folder Block\Widget in Weblizarwidget folder and create file WeblizarWidget.php in Widget folder with following code
<?php

namespace WeblizarWidget\Weblizarwidget\Block\Widget;

class WeblizarWidget extends \Magento\Framework\View\Element\Template implements \Magento\Widget\Block\BlockInterface

{

protected function _construct()

{

parent::_construct();

$this->setTemplate('widget\weblizar_widget.phtml');

}

}
E) Create folder view\frontend\templates\widget in Weblizarwidget folder and create weblizar_widget.phtml file with following code
<?php

$title = $this->getData("title");

$description = $this->getData("description");

?>

<?php if($title){ ?>

<div>

<h1><?php echo $title ?></h1>

</div>

<?php } ?>

<?php if($description){ ?>

<div>

<h2><?php echo $description ?></h2>

</div>

<?php } ?>
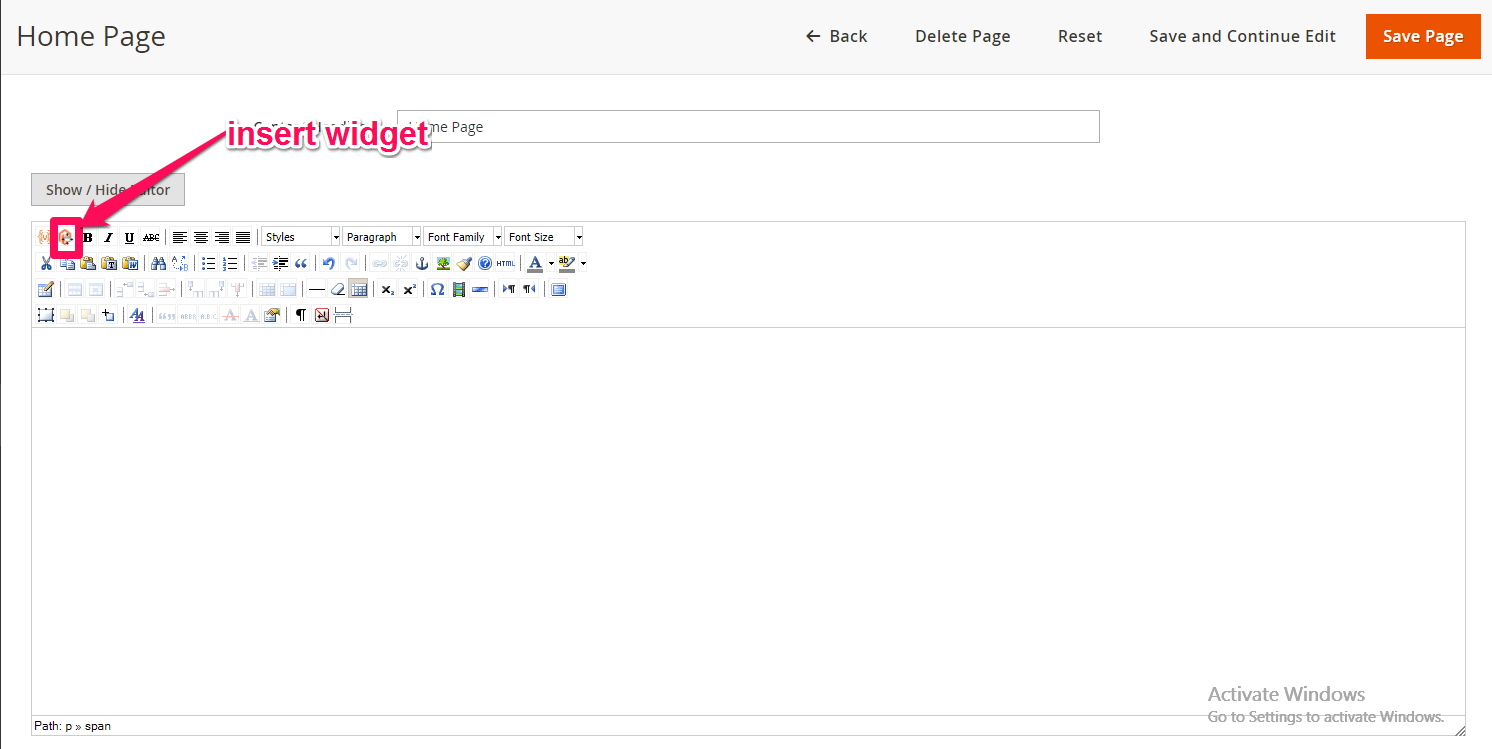
- Then go to Admin panel > Content > Pages > Homepage > Edit
- In the Content tab, click on Insert Widget icon.

And here is the result, and you will see the Weblizar Widget in the widget list.


The output of widget

