InstituteManagement
The only software need to run your Institute.
New Ver. 2.3 ReleasedEmail: lizarweb@gmail.com
Website: Institute Management
Beautifully Designed and Intelligently Developed Institute Management System for Best User Experience
Email: lizarweb@gmail.com
Website: Institute Management
Institute Management Institute Management Pro is a comprehensive plugin to manage institute related activities such as courses, batches, enquirers, registrations, fees, students, staff etc. It can generate fee receipt, fees report, ID card, completion certificate etc. in printable format. Administrators can be assigned to manage particular records. Also, you can send notifications to students by batch, course, pending fees and more. Students can pay their fees with PayPal or Razorpay payment methods.
Advanced version of this plugin also supports exam results management and multiple custom fee types like admission fee, tuition fee, course fee etc. Also, students can pay their fees by choosing custom fee type or overall pending fees with PayPal or Razorpay payment methods. Also, with advanced version, you can view overall reports of students and fees filtering by custom period, duration etc.
Step 1. First download the plugin from your Codecanyon Account.
Step 2. Upload, Install & Activate plugin into a WordPress site.
Step 1. First download the plugin. Codecanyon
Step 2. Upload, Install & Activate plugin into a WordPress site.
Step 1. First download the plugin.
Step 2. Upload, Install & Activate plugin into a WordPress site.
Add courses, their duration and fees.
Add multiple batches in a course.
Receive enquiries from front-end or add directly from admin panel.
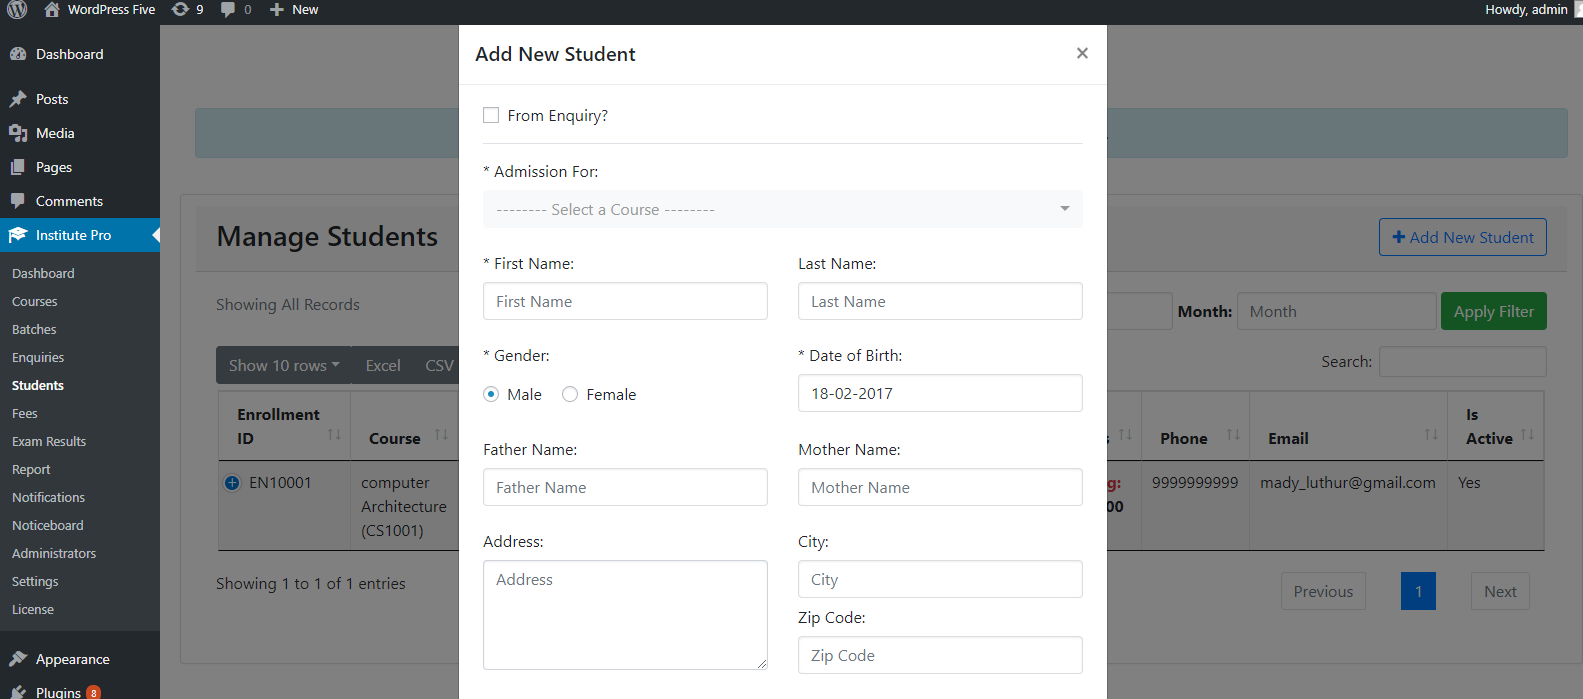
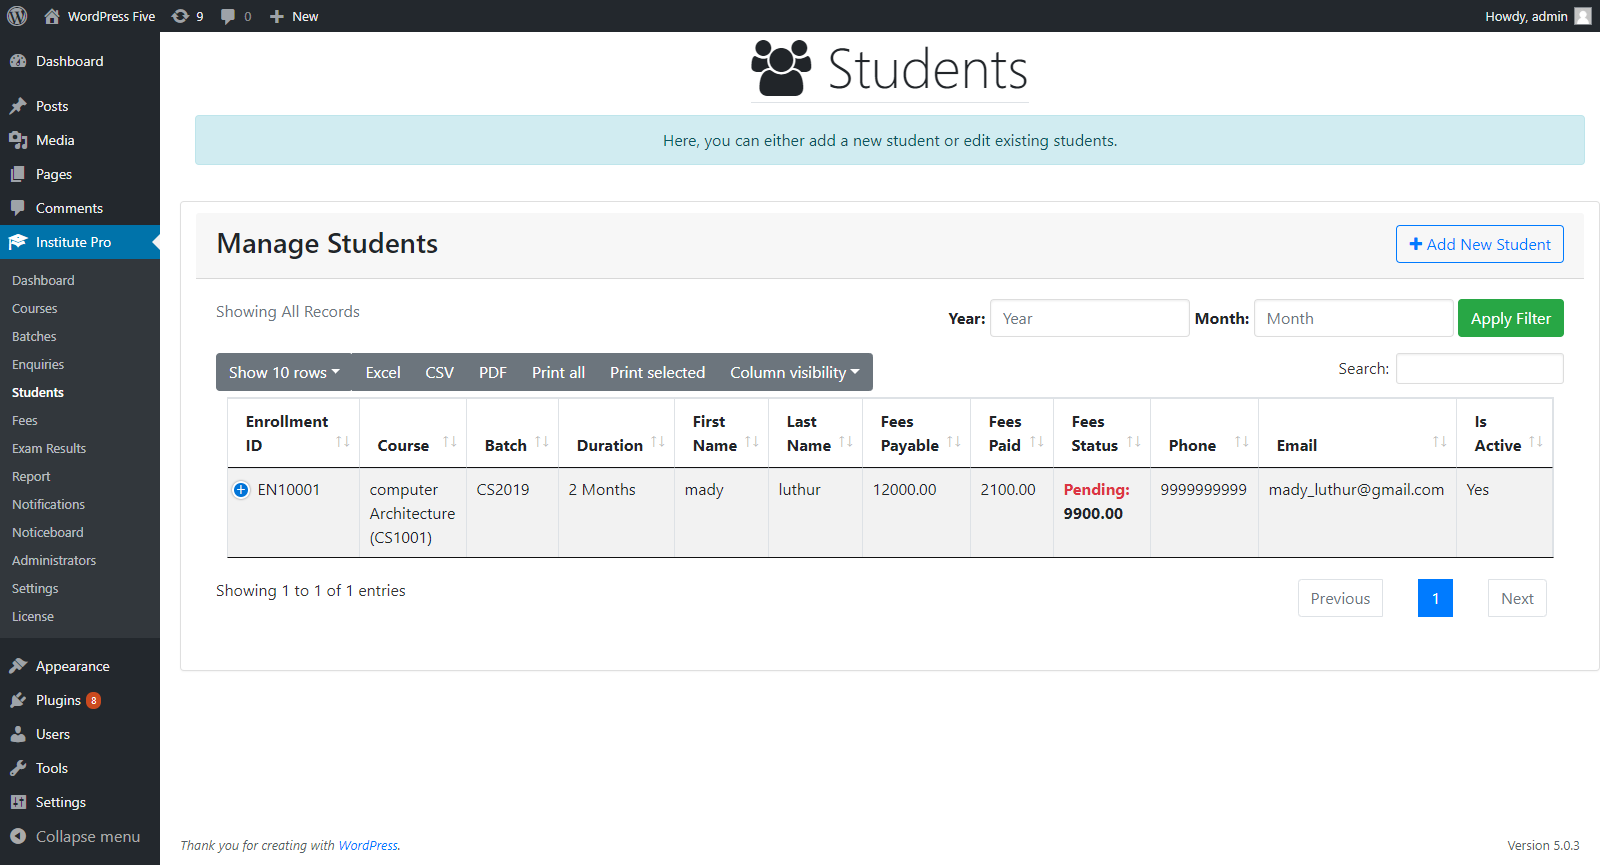
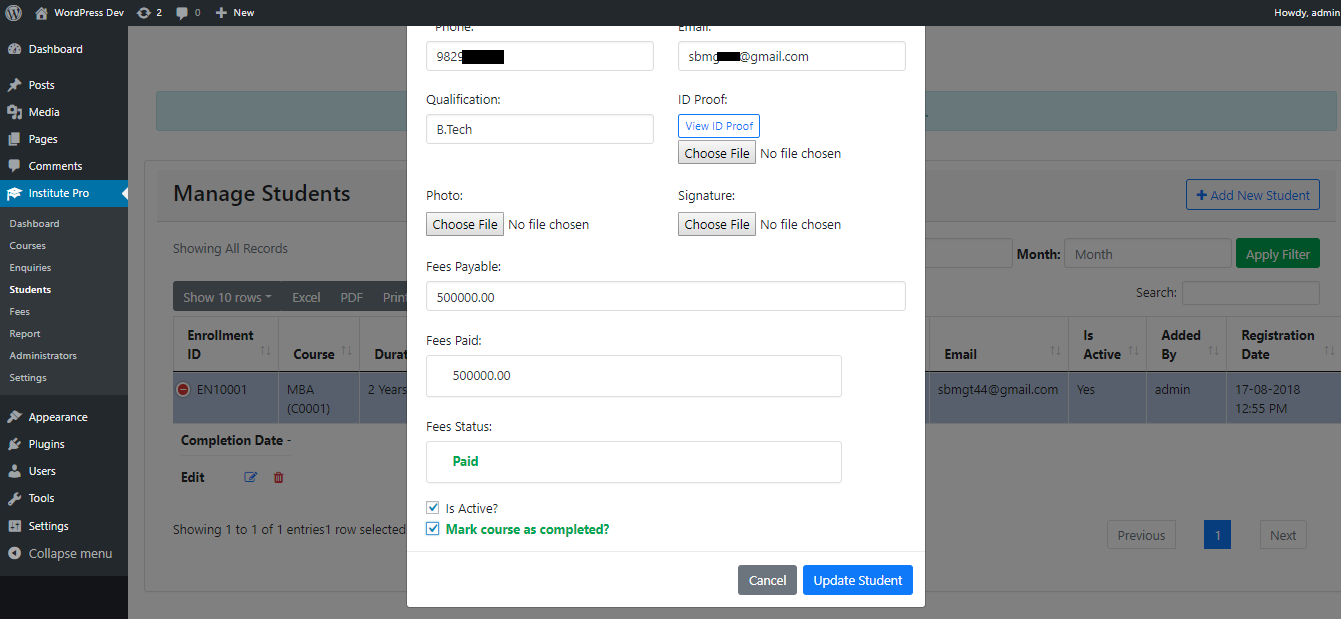
Register a new student for a course, which can also be done from active enquiry. Then, enquiry can be removed or marked as inactive. Also, mark the course as completed.
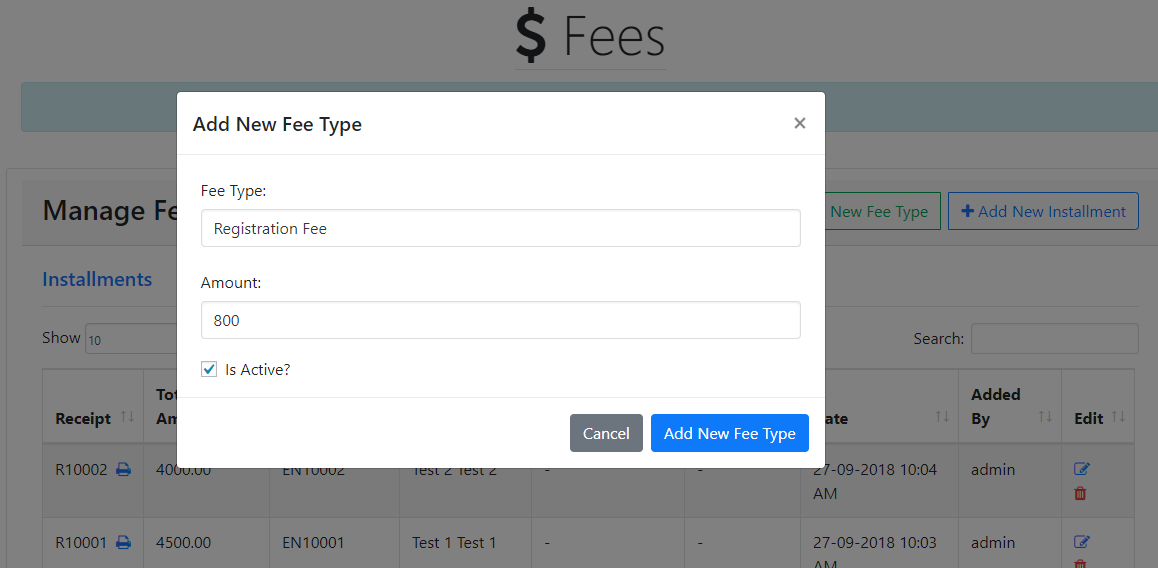
Easy to manage fee, shows pending fees, supports payment in installments for a student enrolled in a course.
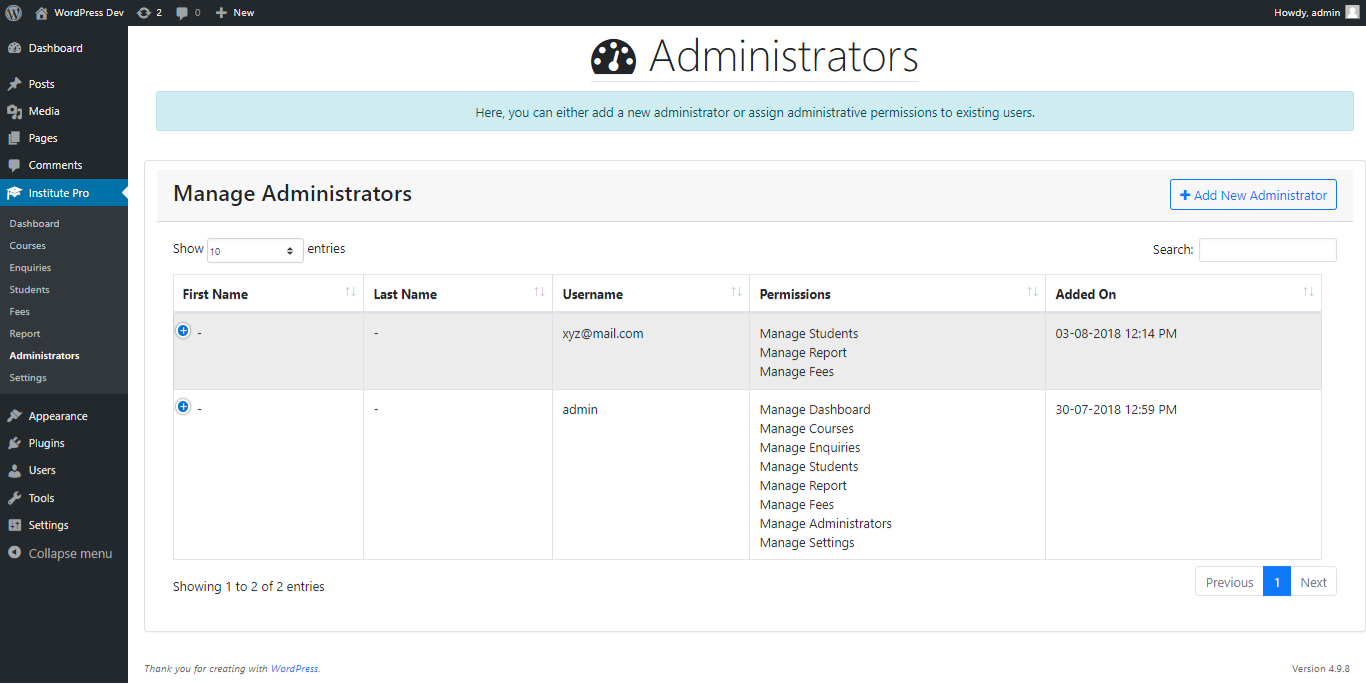
Add an administrator to manage courses, enquiries, fees, students etc.
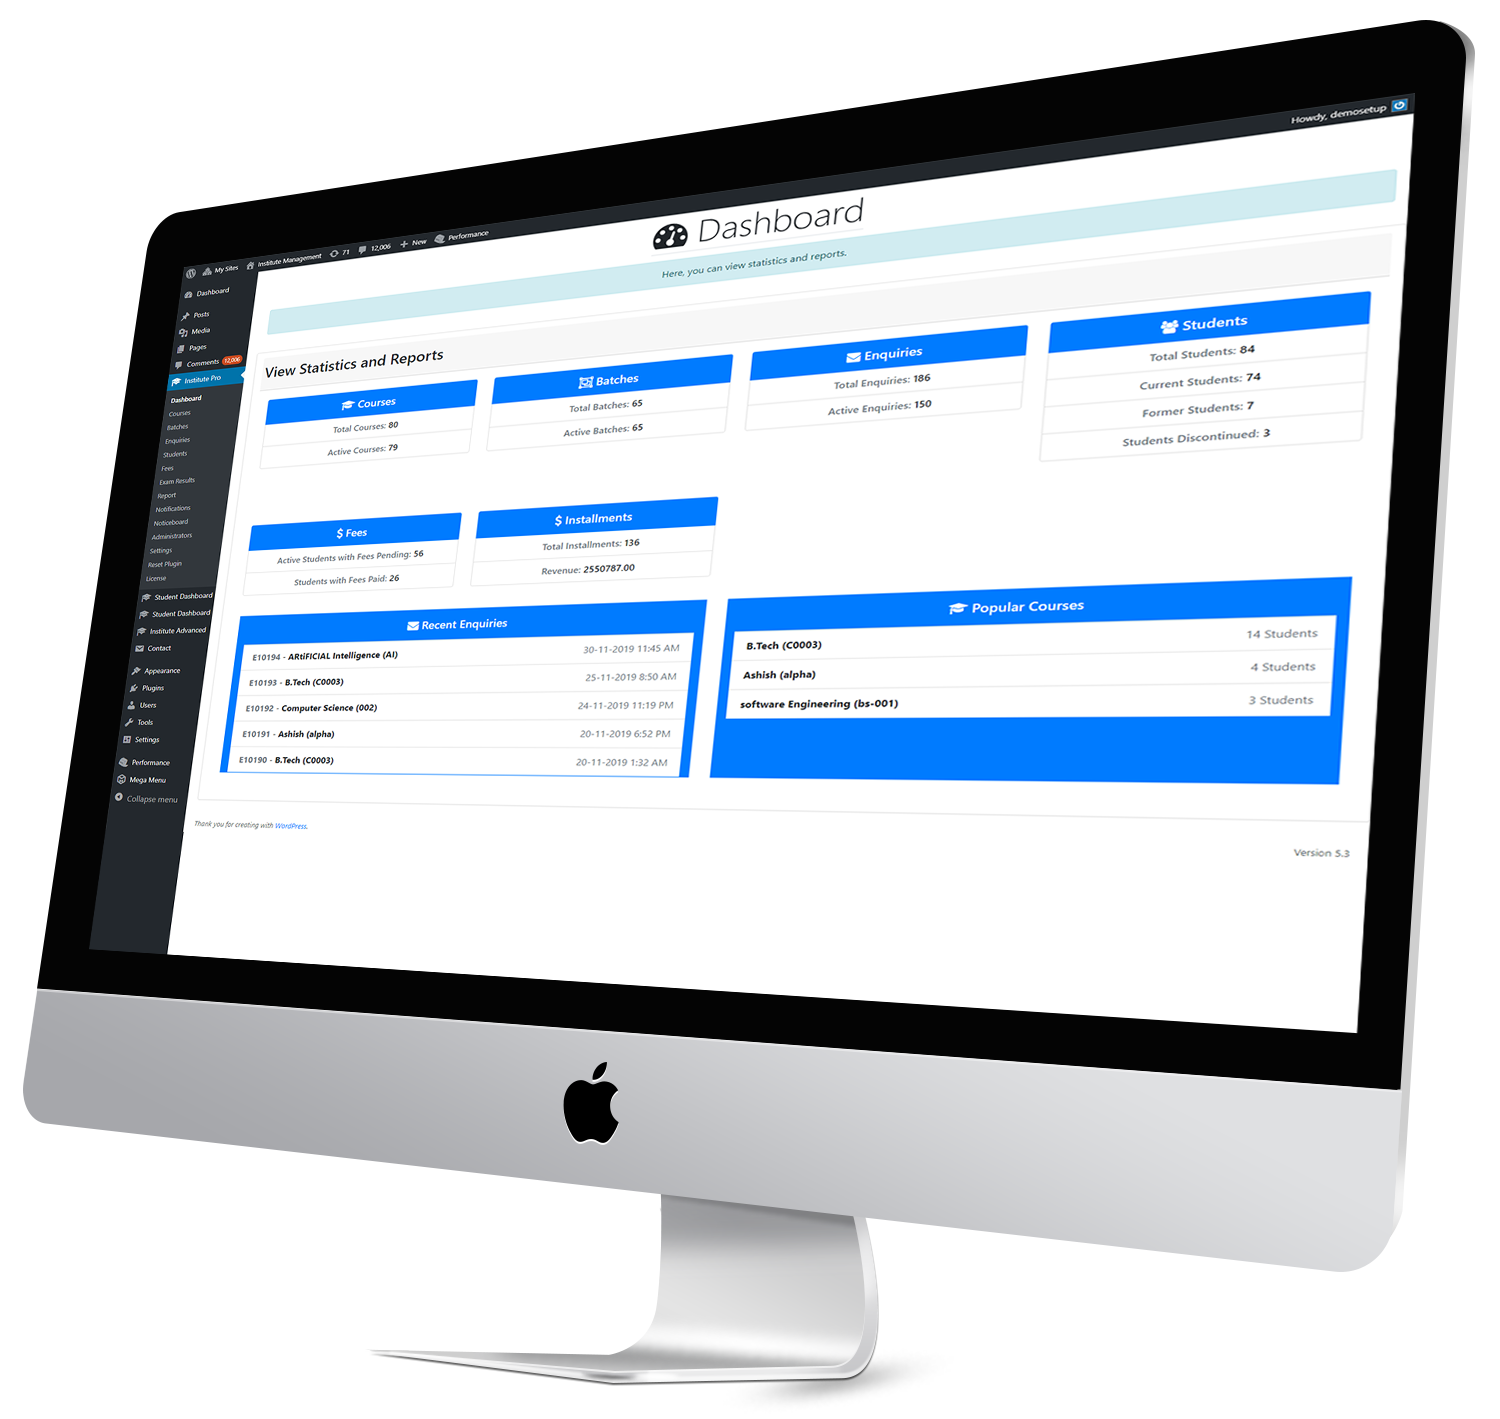
View popular courses, recent enquiries and number of active courses, students, enquiries, etc.
Take daily attendance of students. Print attendance sheet of a class. Also, students can view their attendance report in dashboard.
Assign task to an administrator having certain permissions to perform the task.
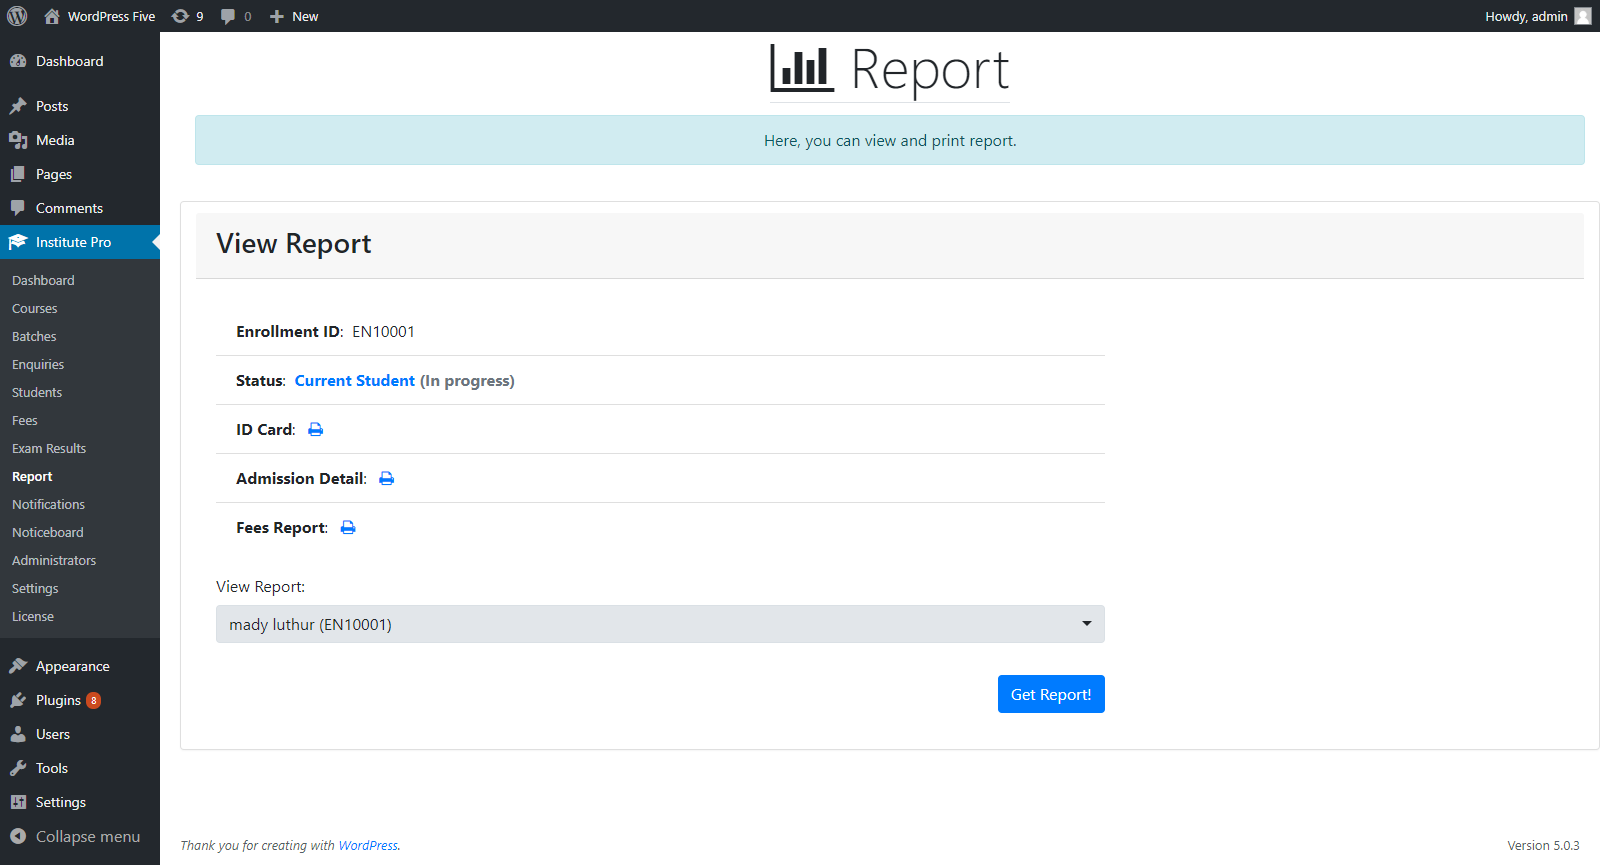
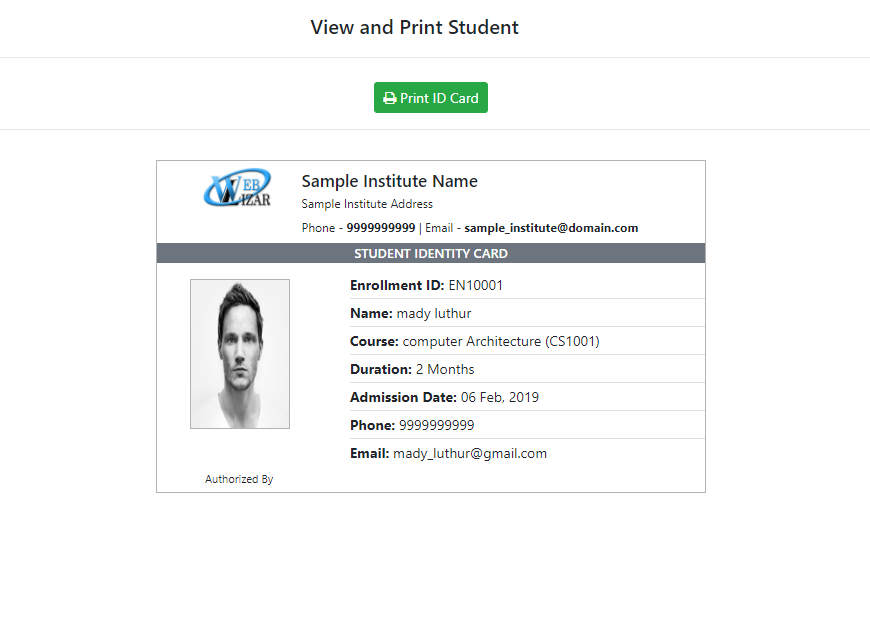
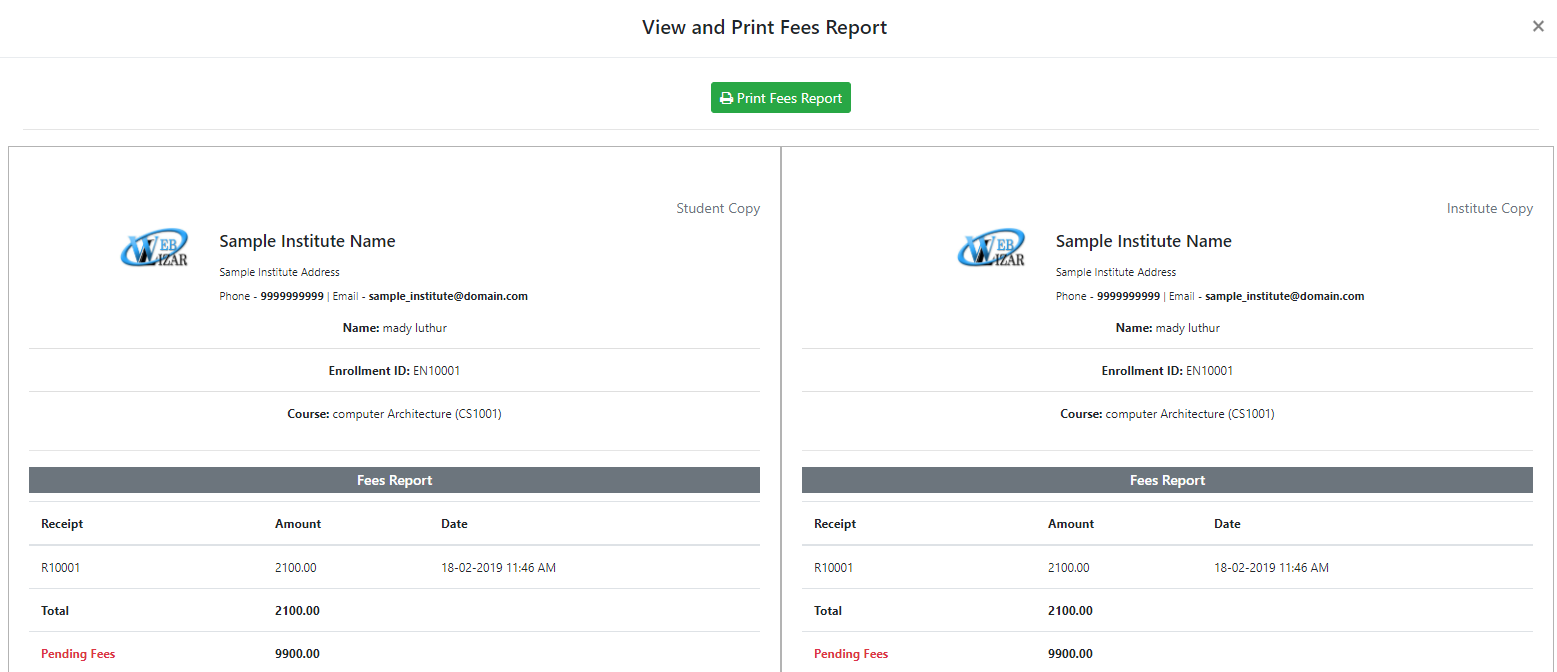
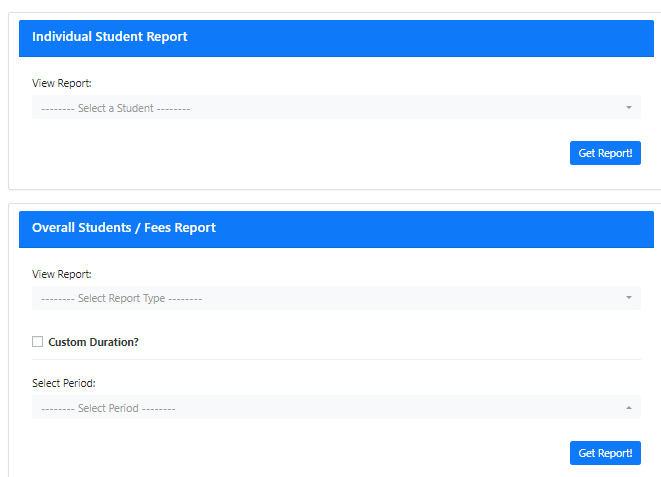
Select a student and generate reports such as fees report, admission details, ID card etc.
Print fee receipt for each installment, print fees report, admission details, student’s ID card and completion certificate.
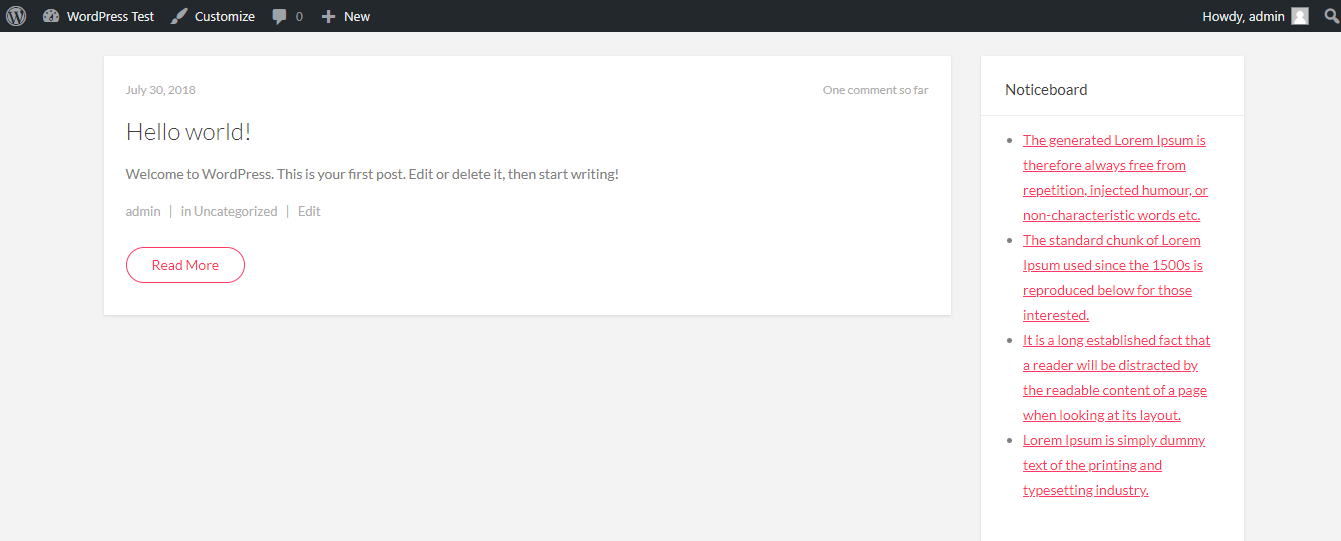
Display important notices on your website with Institute Noticeboard Widget.
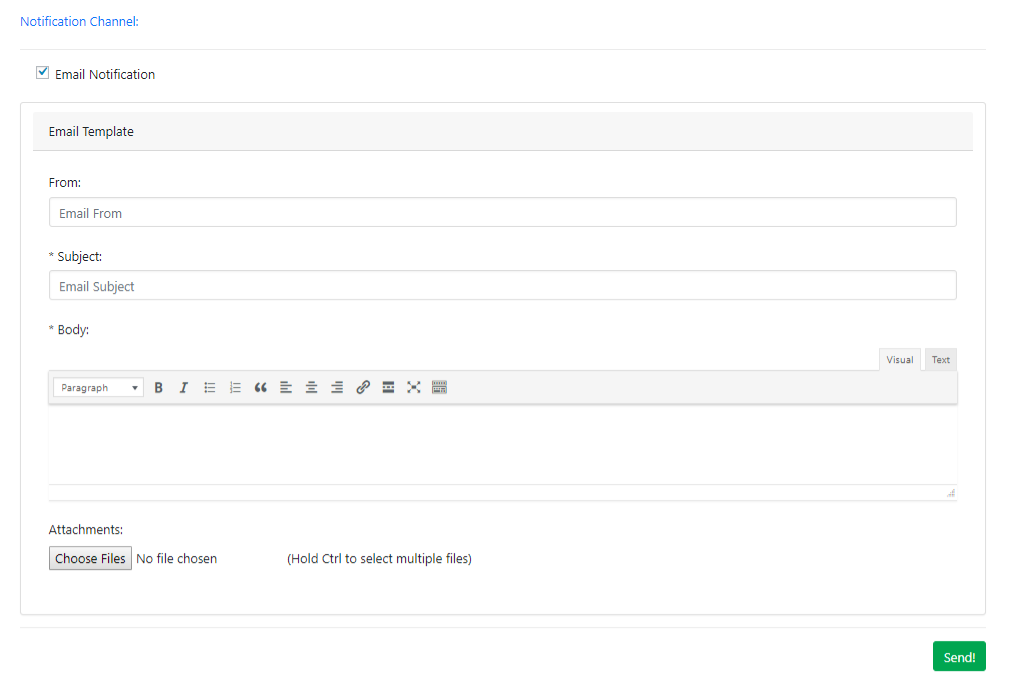
Send notifications to a batch or individual students with attachments (to send notes, time table etc.).
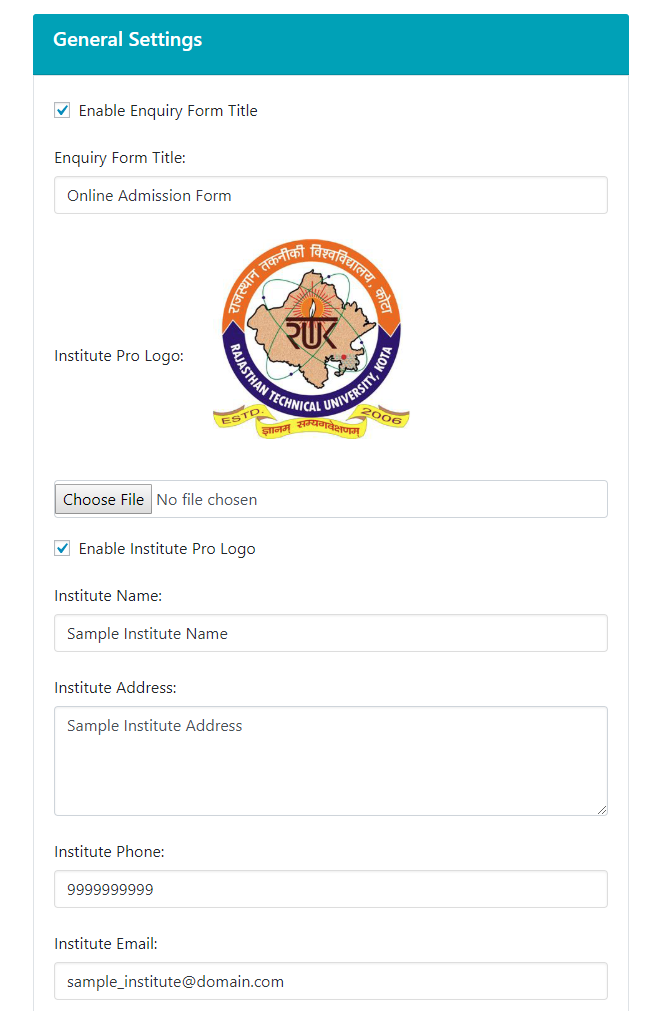
Set institute details such as name, address, logo, phone, email etc. which show up in printable documents.
Easy to export student records to excel or pdf format.
Search and filter courses, enquiries, students, fee receipts.
Here, you can view statistics of institute such as number of courses, batches, enquiries, students, fees, installments, recent enquiries and popular courses.

You can add a new administrators with necessary permissions to manage particular sections.

Here, you can configure institute details like name of institute, address, phone, email, logo etc. Also, you can set the enquiry form title to be displayed via shortcode on post/page.
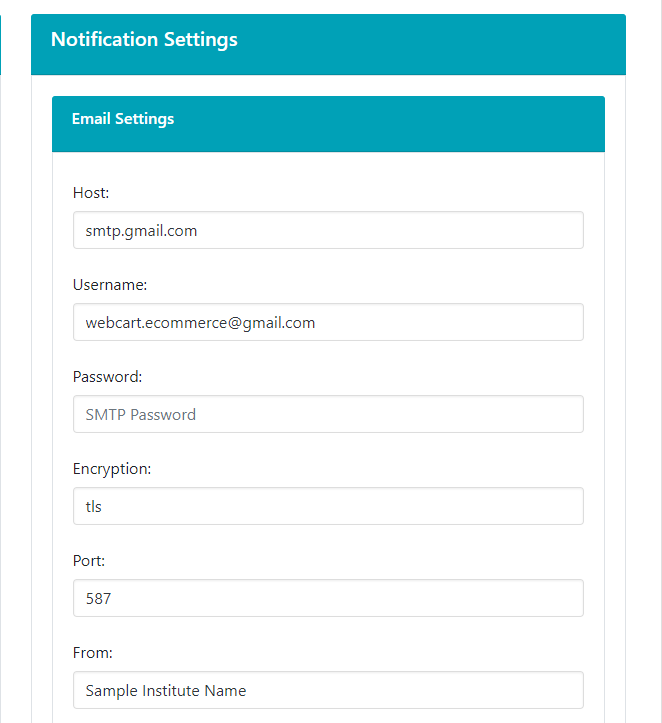
Here, you can configure notification settings. Currently, email notifications are available. To send emails notifications to students, you will first need to configure SMTP settings.
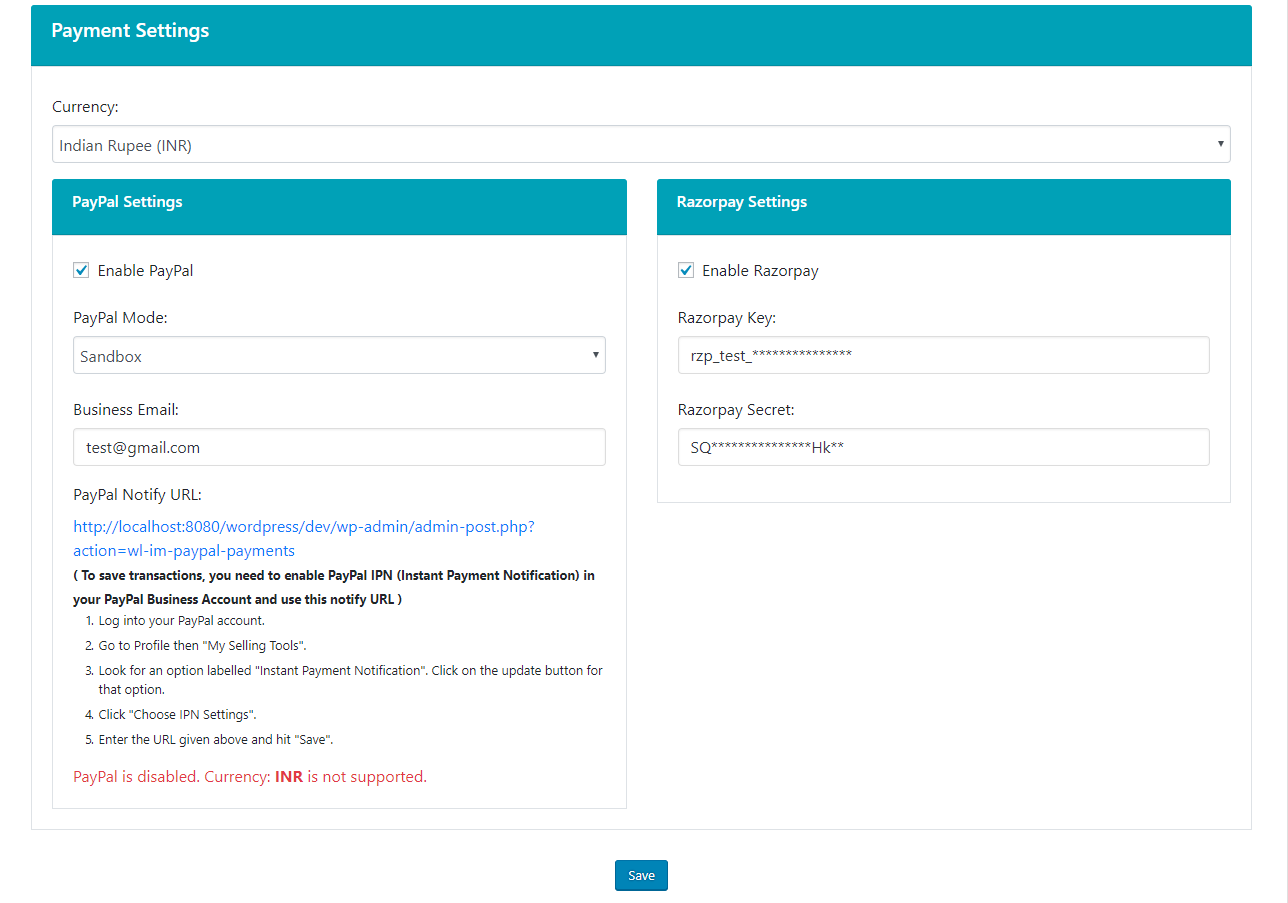
Currently, two payment methods are available: PayPal and Razorpay. You can set Currency and enable or disable payment methods. For PayPal, you will need to enable IPN Notifications and set Notify URL in your PayPal Business Account.
1). Go to "Schools" > "Add New School" under "School Management".
2). Here, you can add a new school by giving its name, address, phone and email.

1). Go to "Classes" under "School Management".
2). Here, you can add a new class.
3). After adding classes, you can assign these classes to schools.
4). For each class, a default section is created. And, there must be at least one section for each class.

1). Go to "Schools" under "School Management".
2). For each school, you can click on "Assign Admins" to assign an administrator to particular school.

1). Go to "Schools" under "School Management".
2). For each school, you can click on "Assign Classes" to assign classes to particular school.

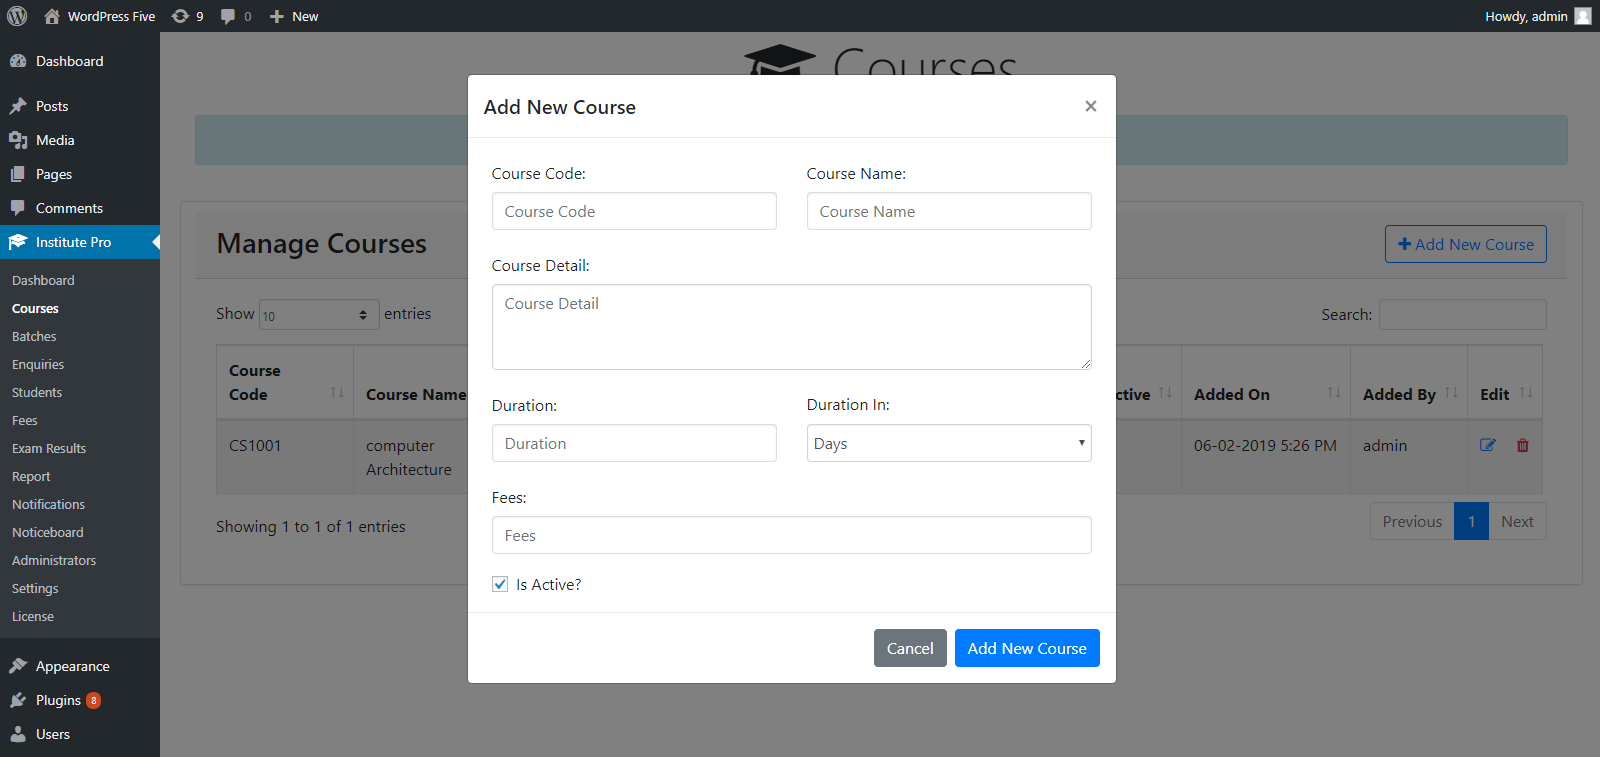
Here, you can add a new course, its name, duration and fees. The course code should be unique.
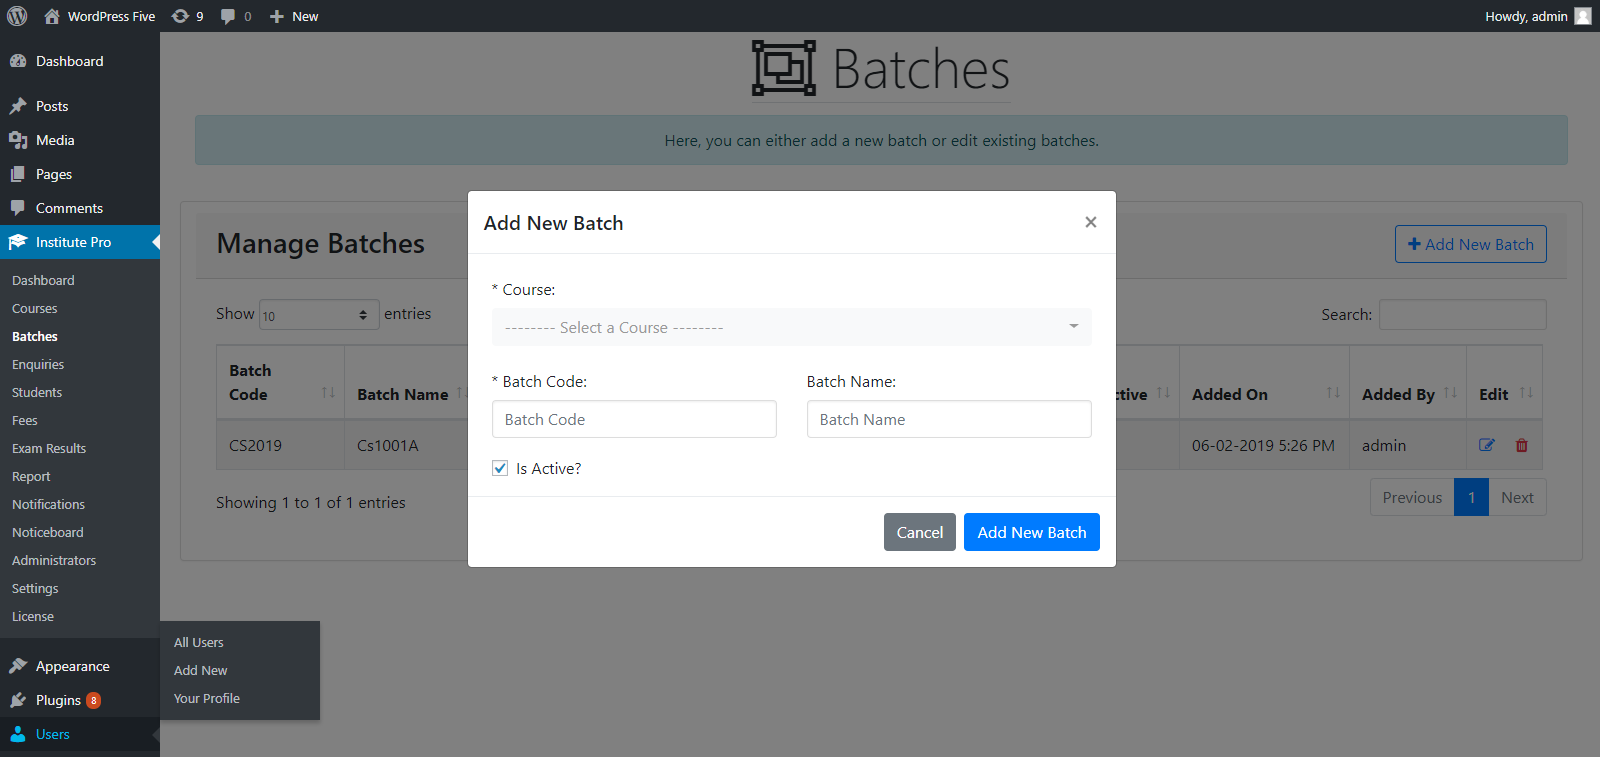
You may want to add multiple batches in a course. To do so, navigate to “Batches” tab and click “Add New Batch”, select “Course” in which you want to add this batch and provide batch code, batch name (optional).
1). Go to "Roles" under "SM Administrator".
2). Click on "Add New Role".
3). Here, you can specify the role name and assign permissions to this role.


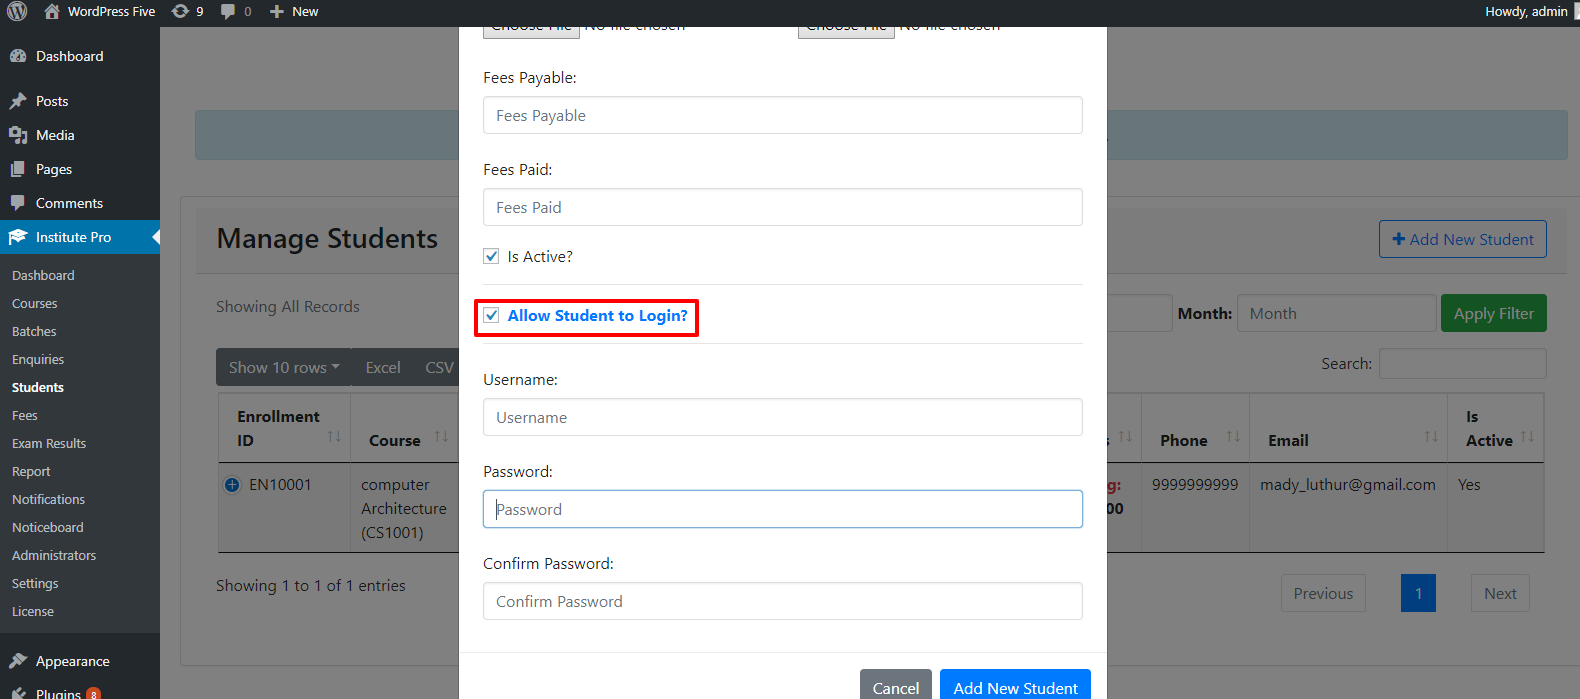
There are two ways to add a new student registration, either from existing active enquiry or directly. Also, you can provide first fee installment at the time of registration of a new student.
To allow students to access their respective dashboard, check Allow Student to Login checkbox and also provide Username and Password as login credentials for a student. Only then, they can login to their dashboards and view their fees report, admission details, ID card, completion certificate and also pay their fees via suitable payment method.
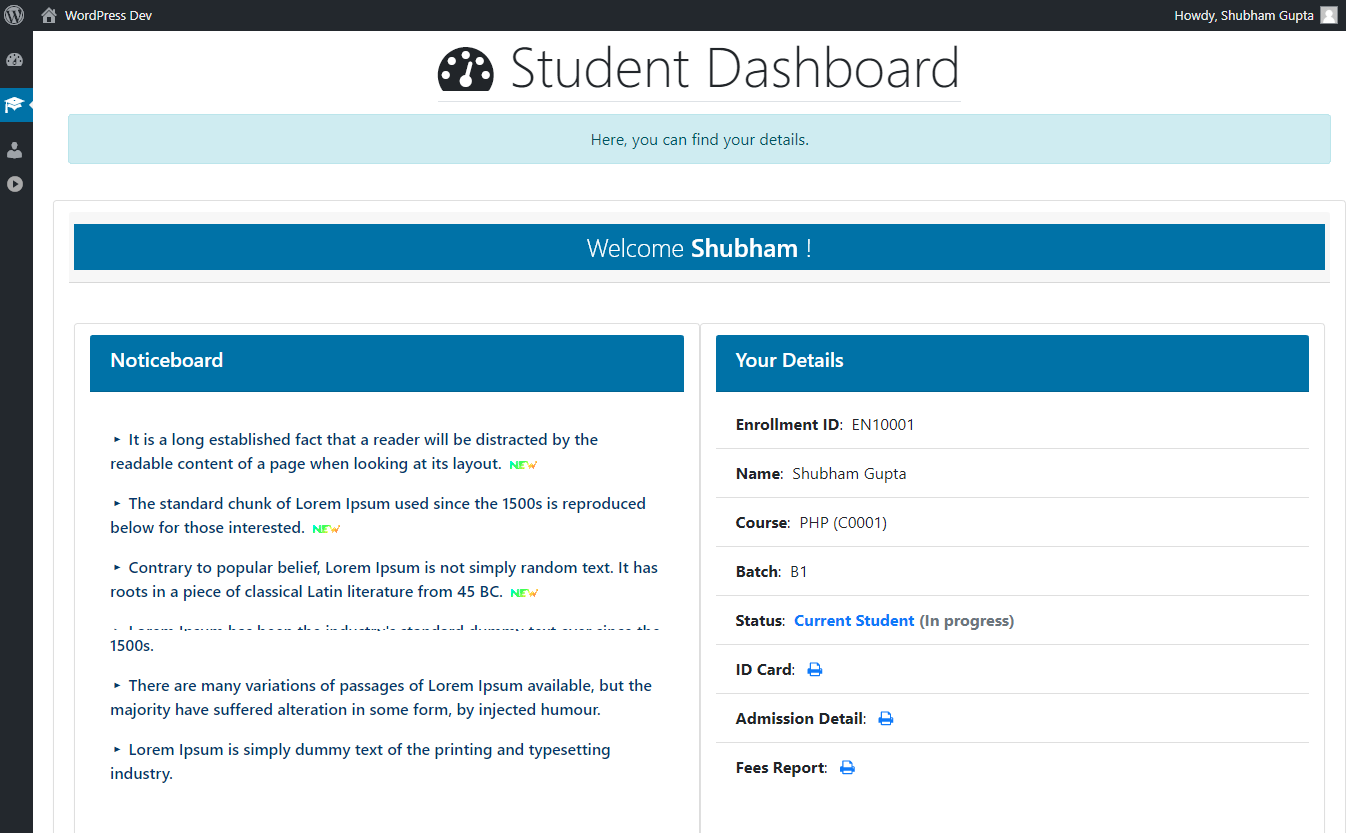
Student dashboard allows student to view their details, fees report, notices etc. and pay fees.
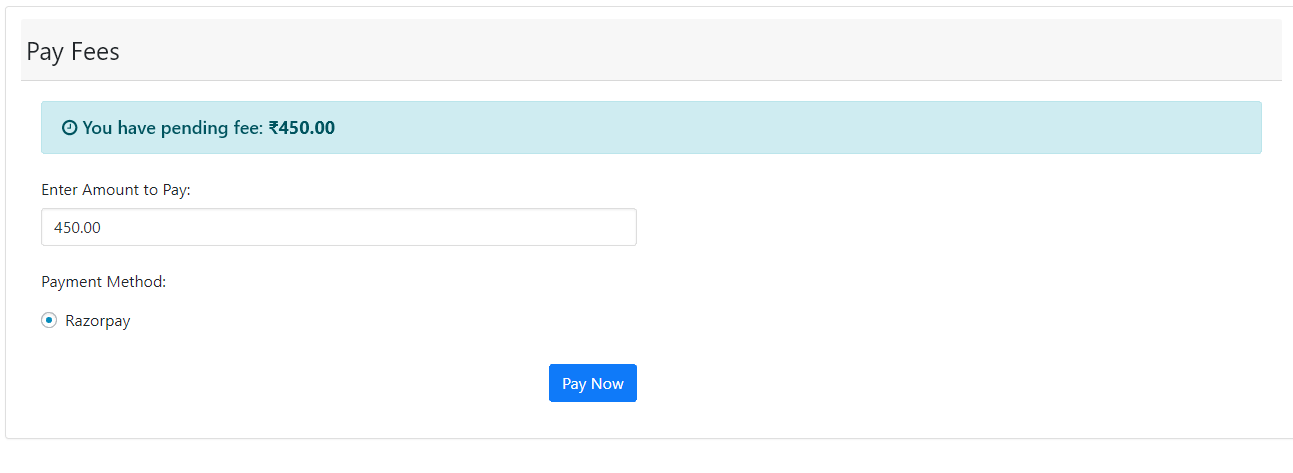
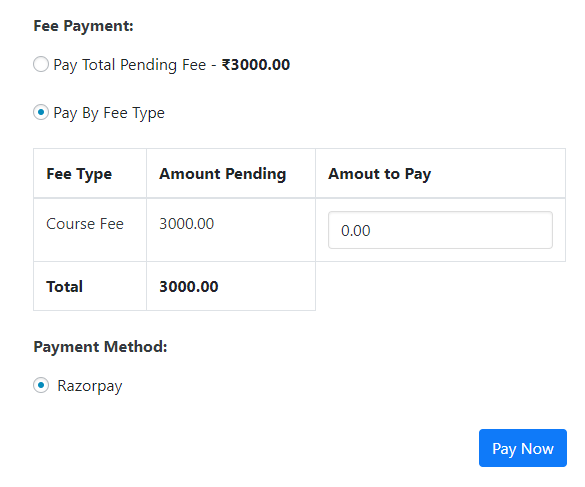
Students can pay their pending fees by selecting a suitable payment method.
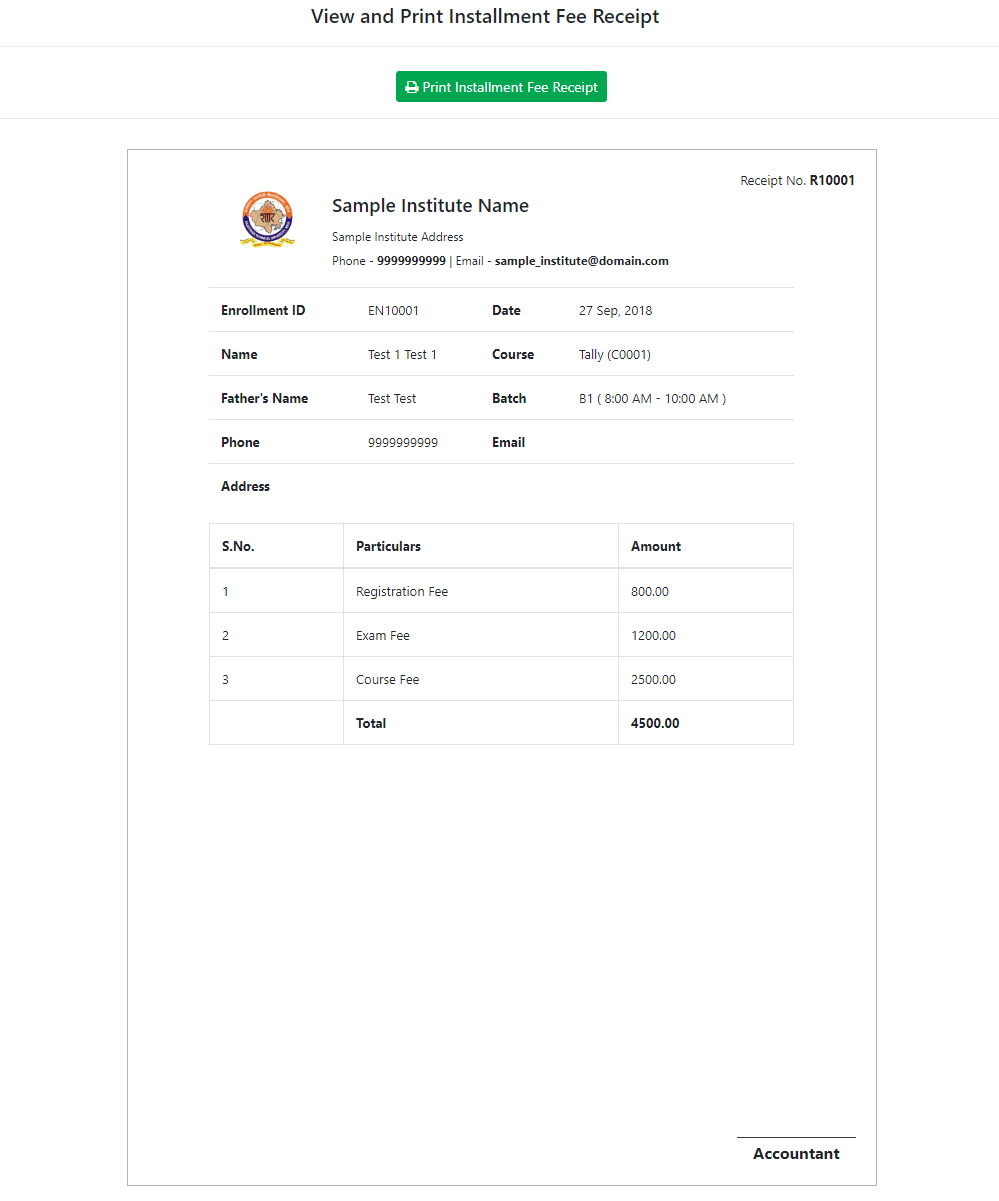
After adding an installment, you can print fee installment receipt.

In “Reports” menu, you can select a student and print ID card, fees report, admission details or completion certificate of that student.
After fees is paid by the student for a course, you can mark the course as completed for that student.
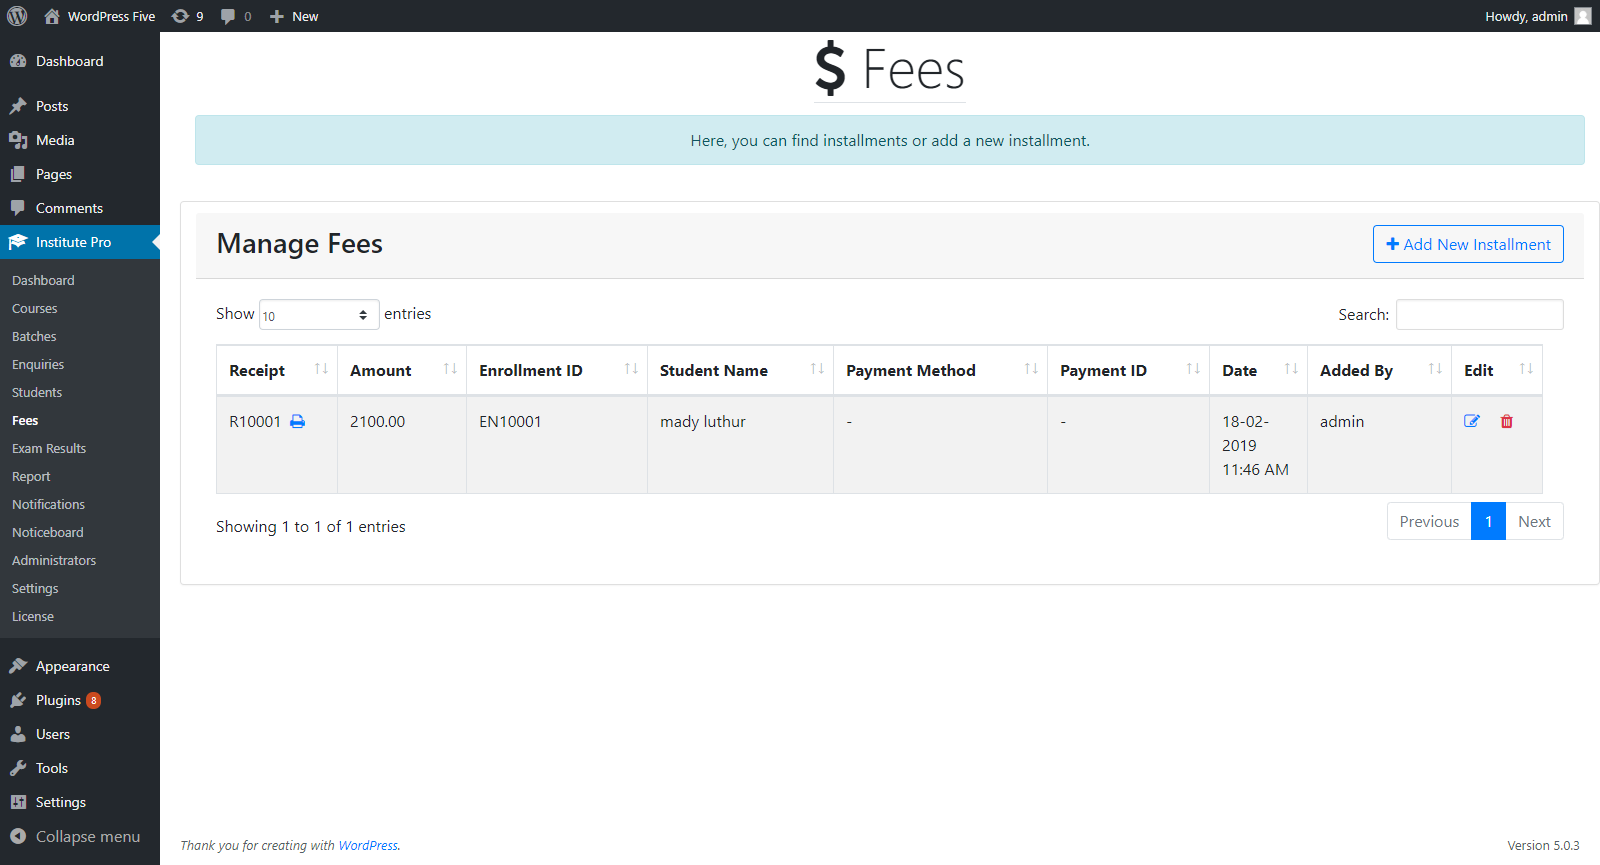
In “Fees” menu, you can select a student and add a new fee installment.
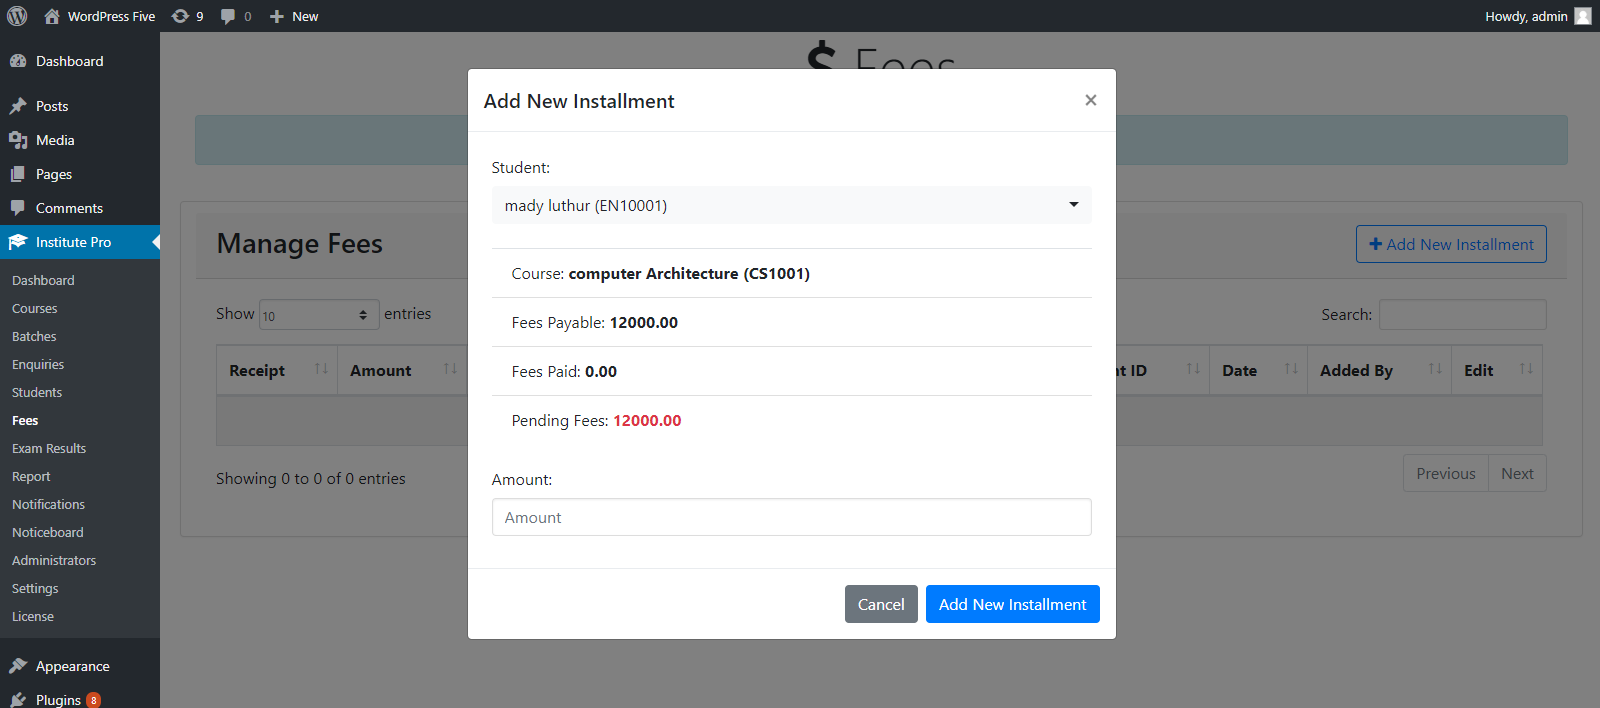
After adding an installment, you can print fee installment receipt.
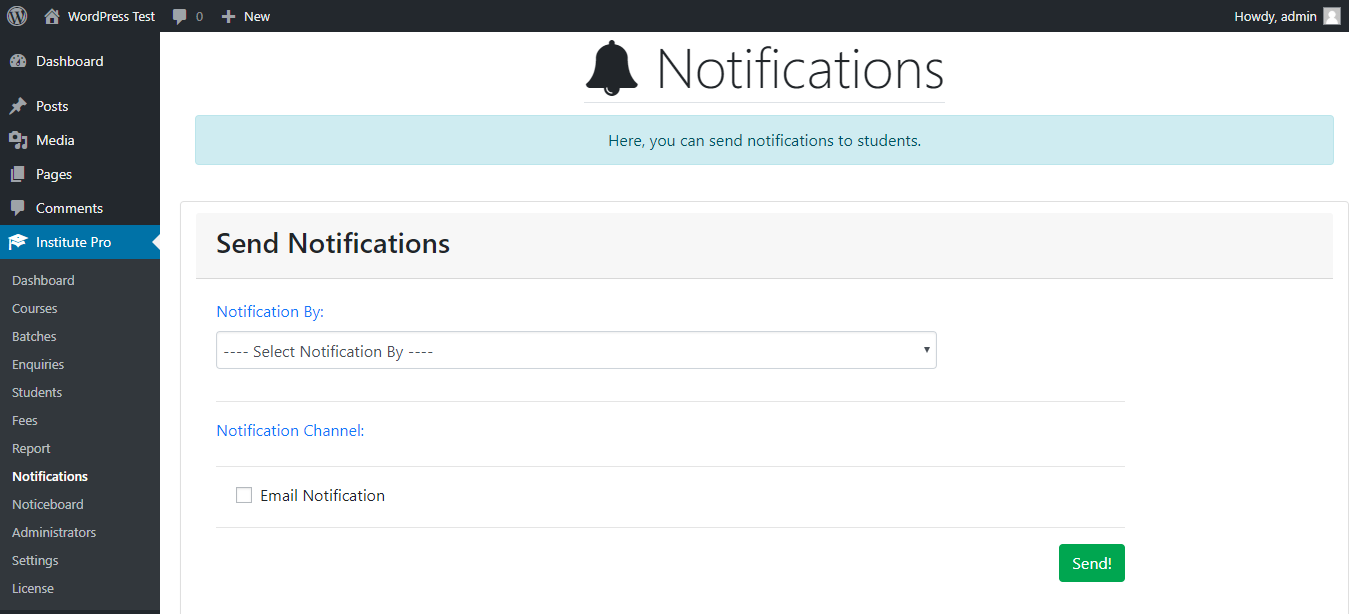
Under “Notifications” tab, you can send email notifications to students (individually or by a group). To send a notification, you will first need to configure SMTP settings under “Settings” and then select “Notification By”, here are the options which you can choose:
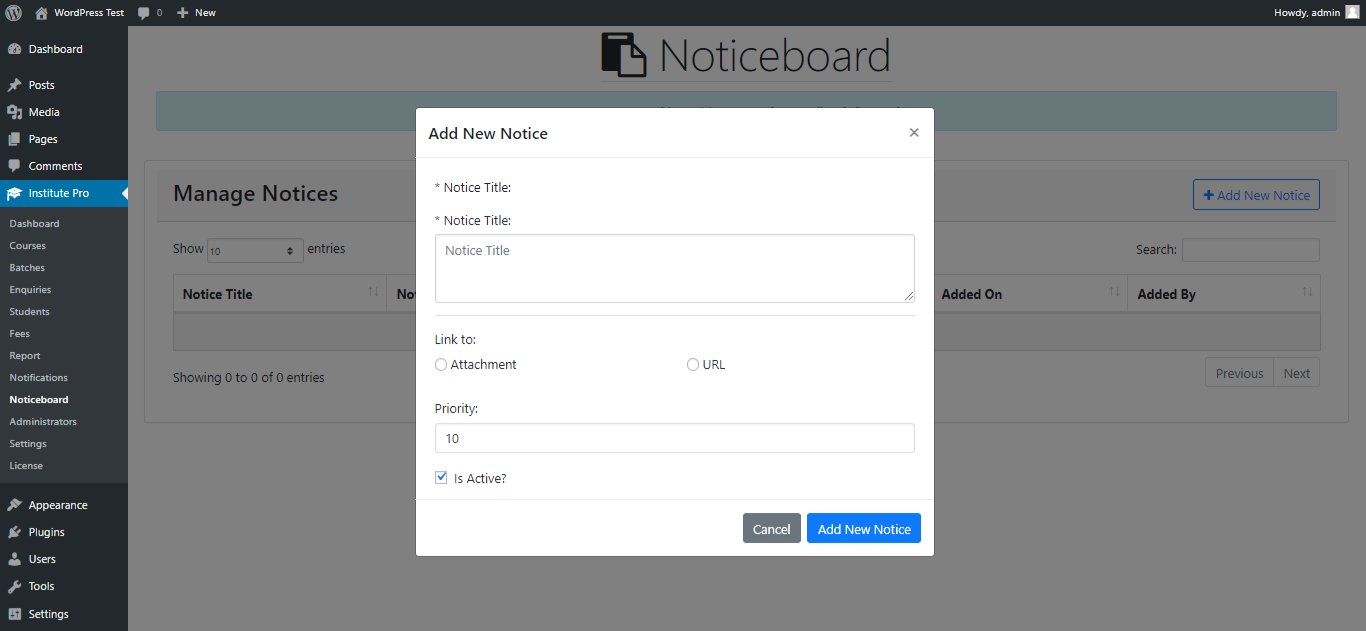
Noticeboard widget can be used to display notices on your website. To add a new notice to noticeboard, navigate to “Notices” section and click “Add New Notice”.
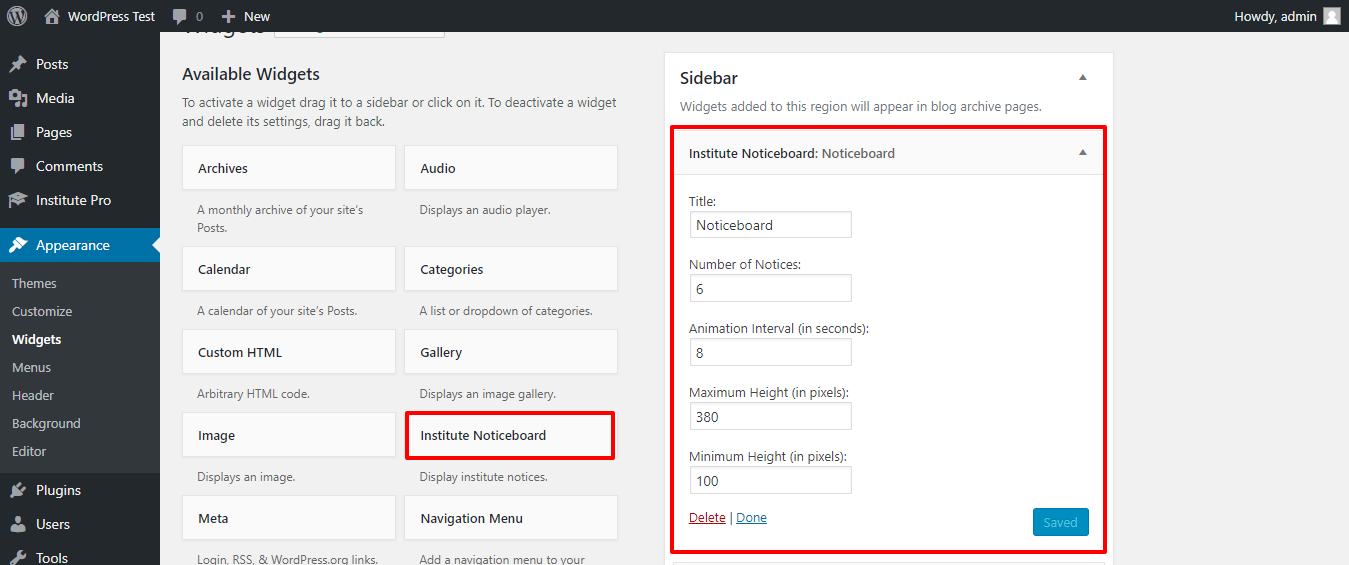
To display noticeboard widget on your website, go to “Appearance” > “Widgets” and then look for “Institute Noticeboard” under available widgets section. Place it at appropriate position. Here, you can find the follow settings: Title
You can either use a shortcode to receive enquiry from admission form on front-end or you can also add a new enquiry from admin panel directly.
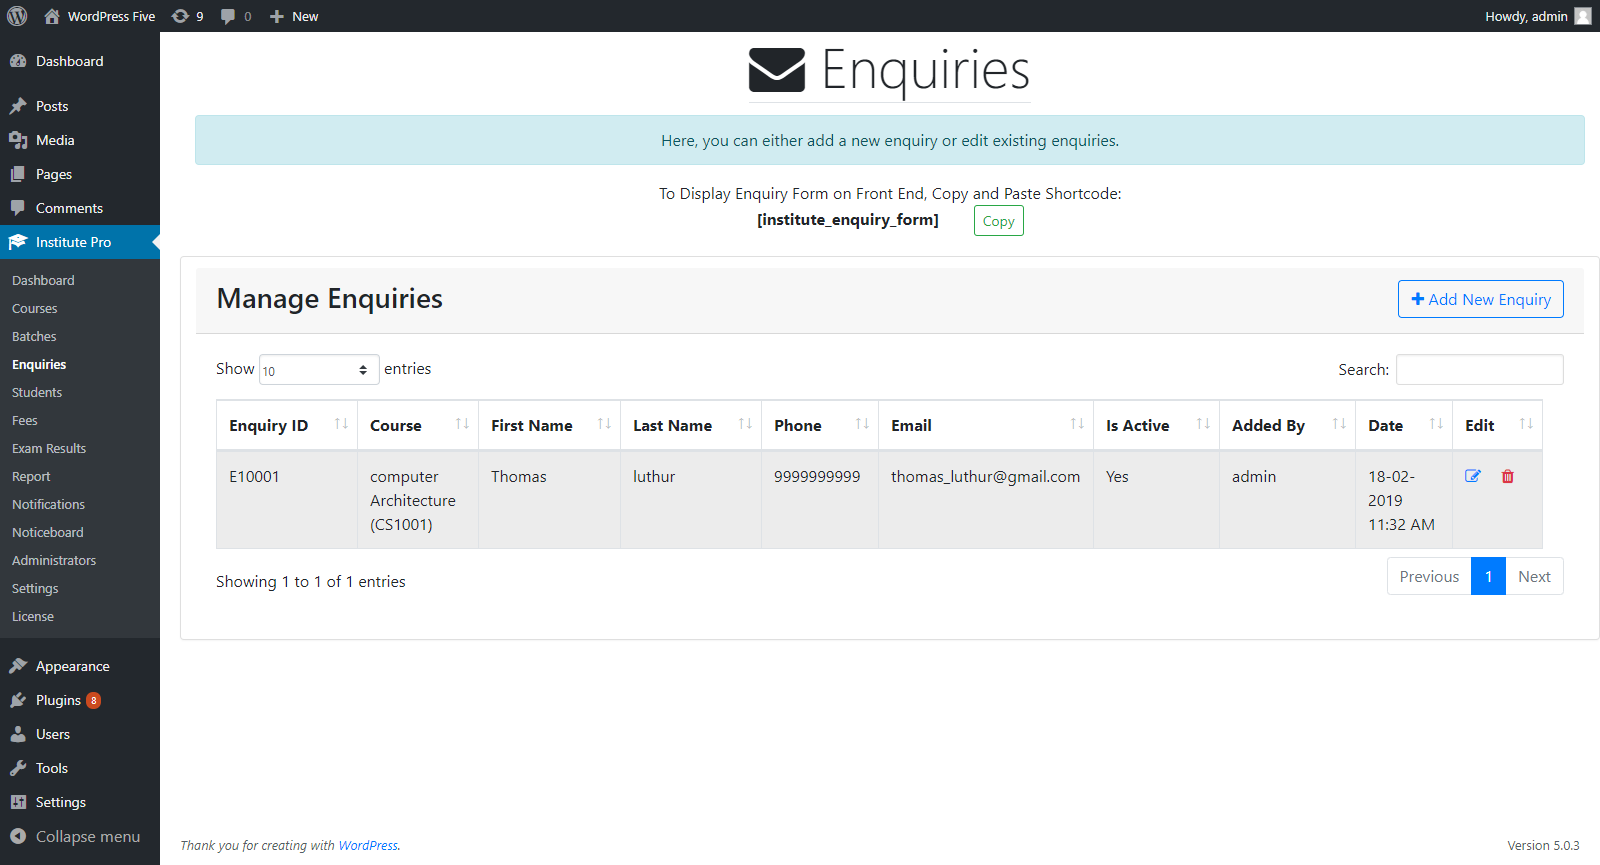
To display admission form on posts/pages, use the following shortcode: [institute_enquiry_form]
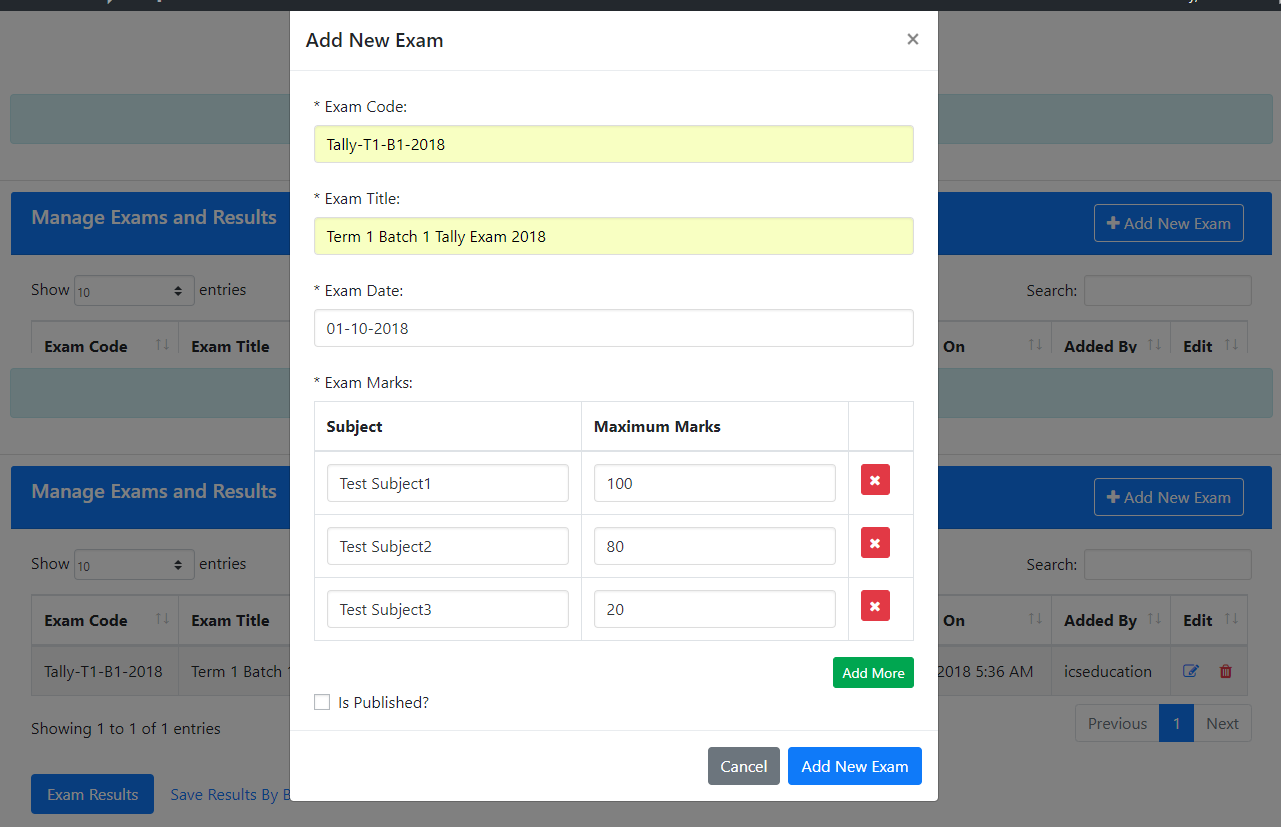
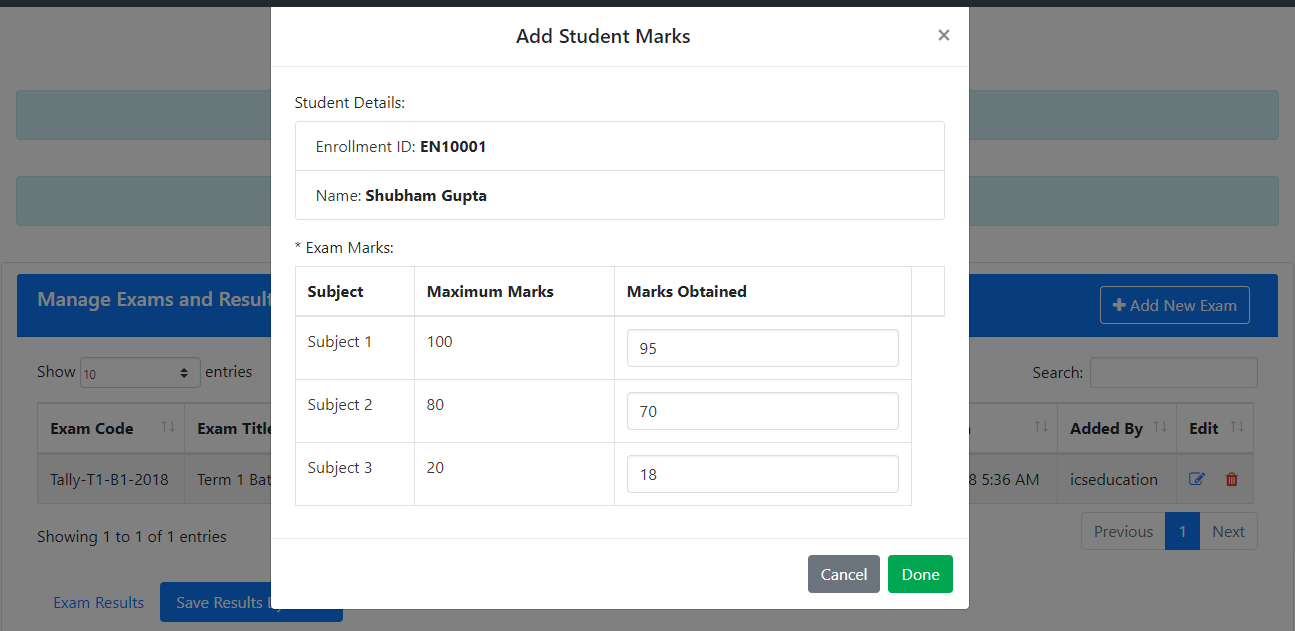
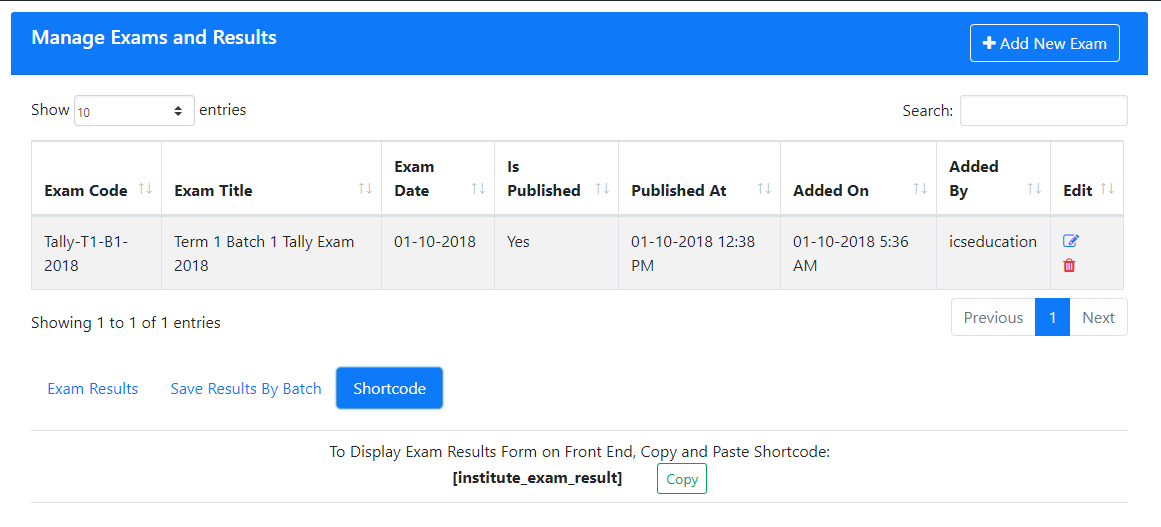
Advanced version also supports exams and results management. Administrators with appropriate permissions can add a new exam having any number of subjects with maximum marks respectively. Also, administrator can add student results which include marks obtained in each subject. And, using short-code [institute_exam_result], result form can be display on a page or post. From there, student can select an exam and provide enrollment ID to view the result.
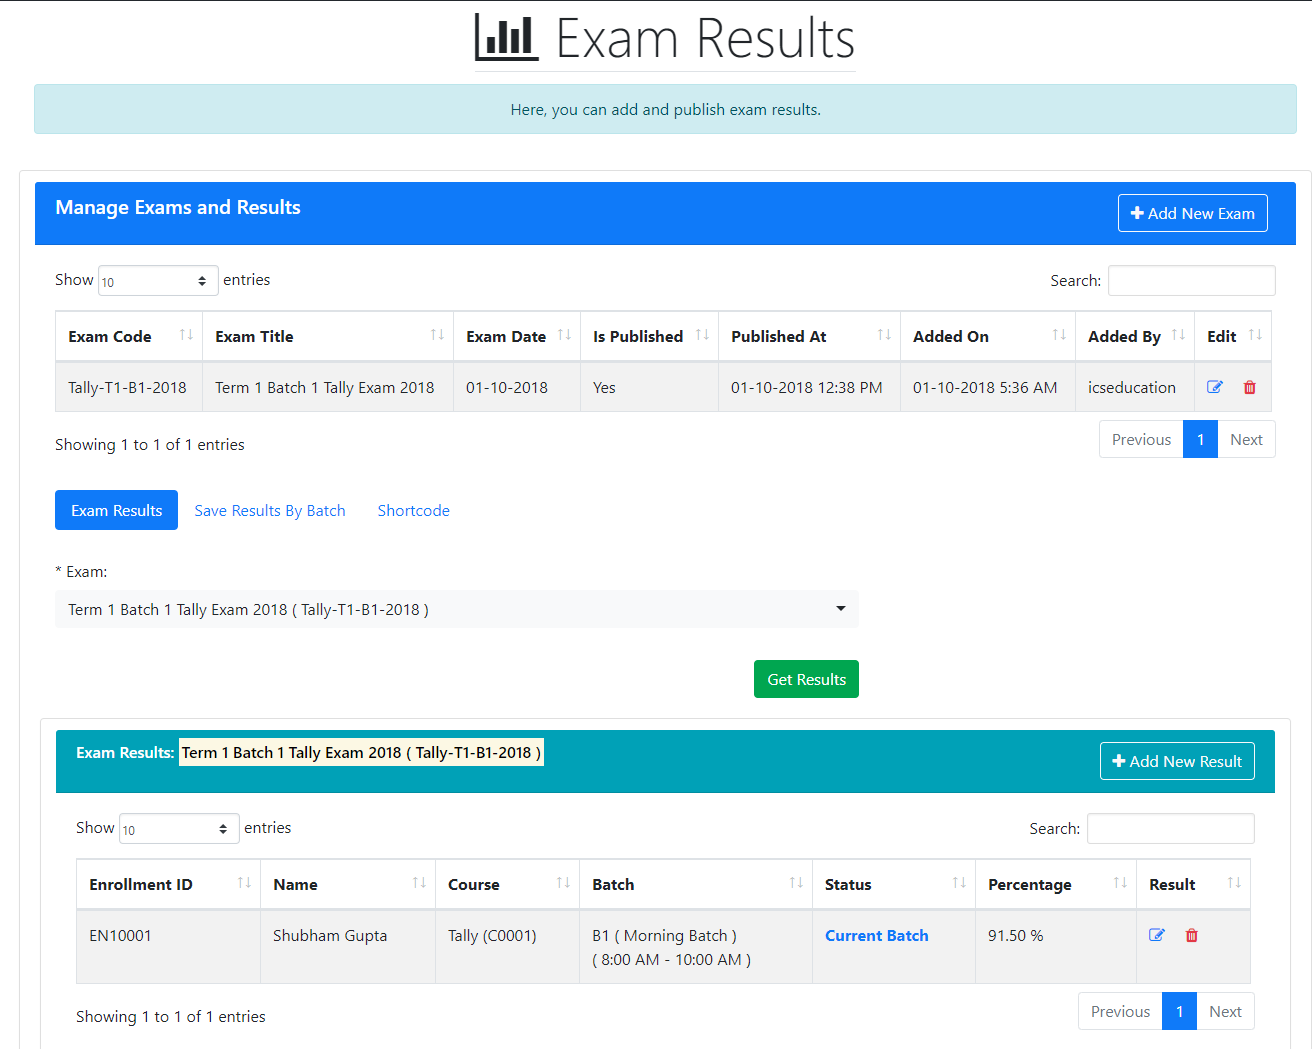
When adding a new exam, you can provide a unique “Exam Code”, exam title, date and maximum marks for each subject.
When adding an exam result, you can select a student and provide marks obtained in each subject of the exam.
To display exam results form on your website, you can use the following short-code in a page or a post: [institute_exam_result]
In your website front-end, you can select an exam and provide an enrollment ID to get the result.

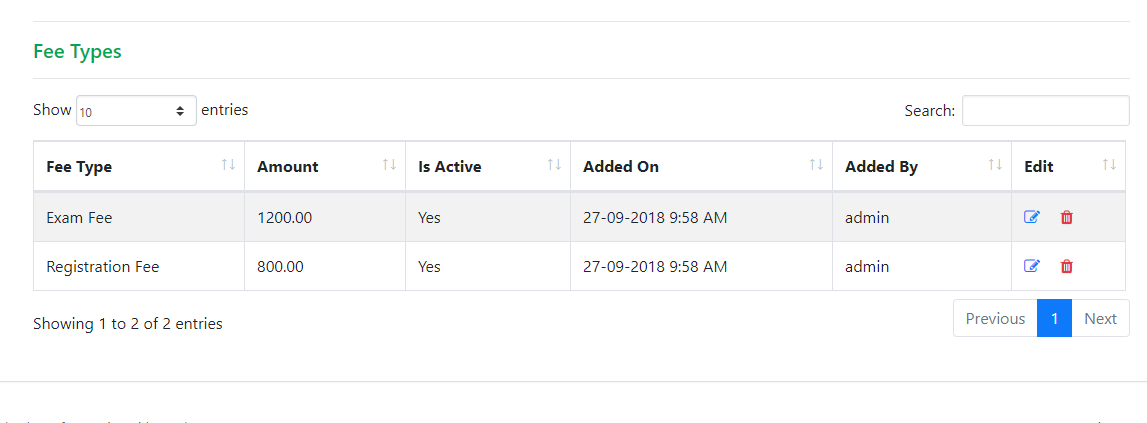
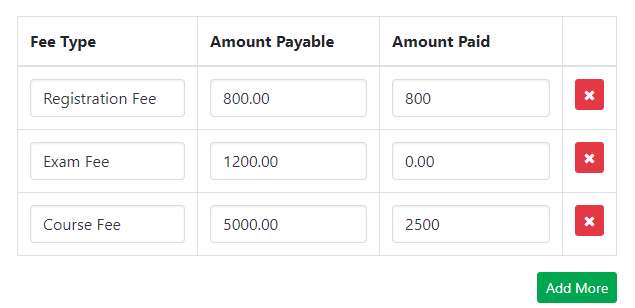
At the time of adding a new student, the “Course Fee” along with all other custom “Fee Type” will be populated. Here, you can specify the custom amount payable and amount paid for each fee type. Also, you can add new fee type directly if required for a particular student.
When student is added, the first installment will be generated if any of the amount was paid for a fee type. To add new installments for that student, navigate to “Fees” section and click “Add New Installment”. Here, you can find the amount which is pending for a fee type and add respective installment amount for that fee type.
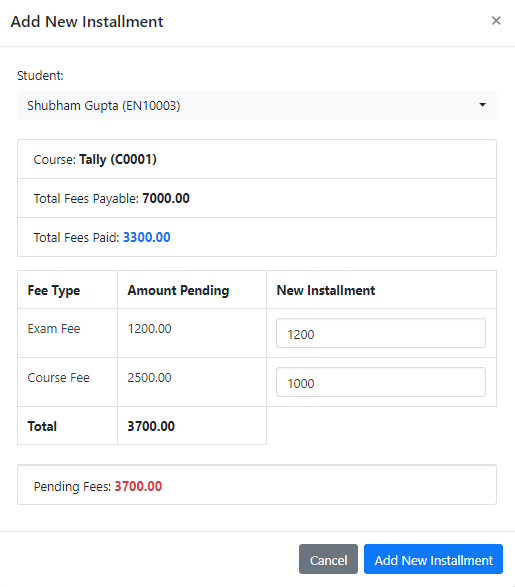
The receipt will show the total installment amount along with fee types.
In advanced version, you can also view overall students or fees report for a custom duration or period ( today, yesterday, last week, last month, last year etc. ).
In advanced version, students can pay their fees on the basis of fee type or all at once by selecting “Pay Total Pending Fee”.
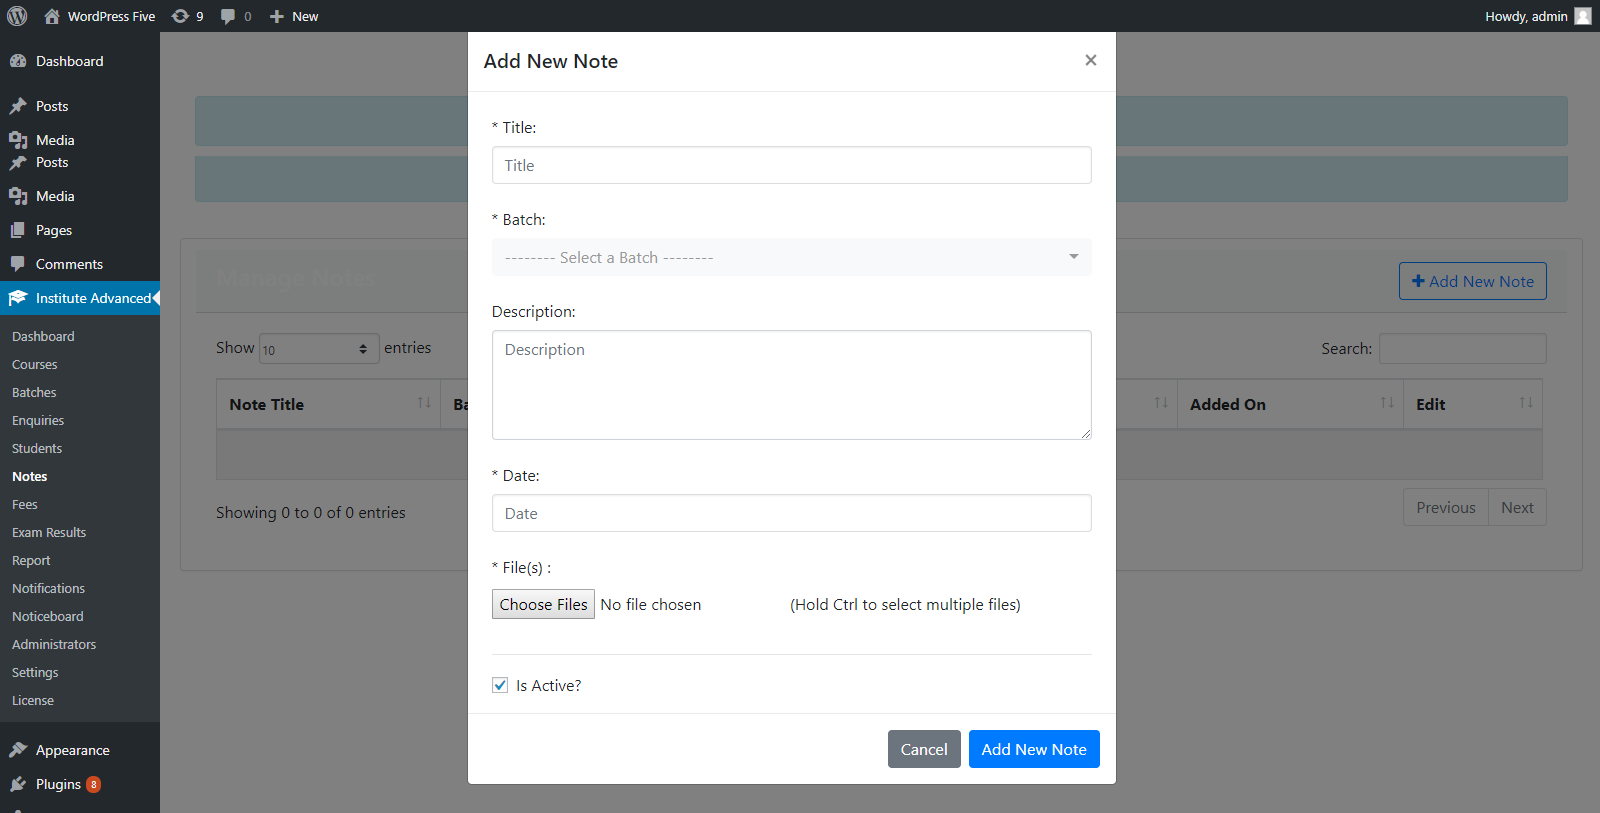
In advanced version, you can add a new note, its title, notes according to batches, date and also uploads files in different formats.
If you face any trouble OR required any assistance to set up and configure the plugin, please post your query on Support Forum. We will try our best to resolve our query on the forum.
And your suggestions for more features and improvements for our plugin is really appreciated.
Thanks for reading this documentation.