The SchoolManagement
The only software need to run your school Management.
Email: [email protected]
Website: theschool-management
Beautifully Designed and Intelligently Developed School Management System for Best User Experience
Email: [email protected]
Website: theschool-management
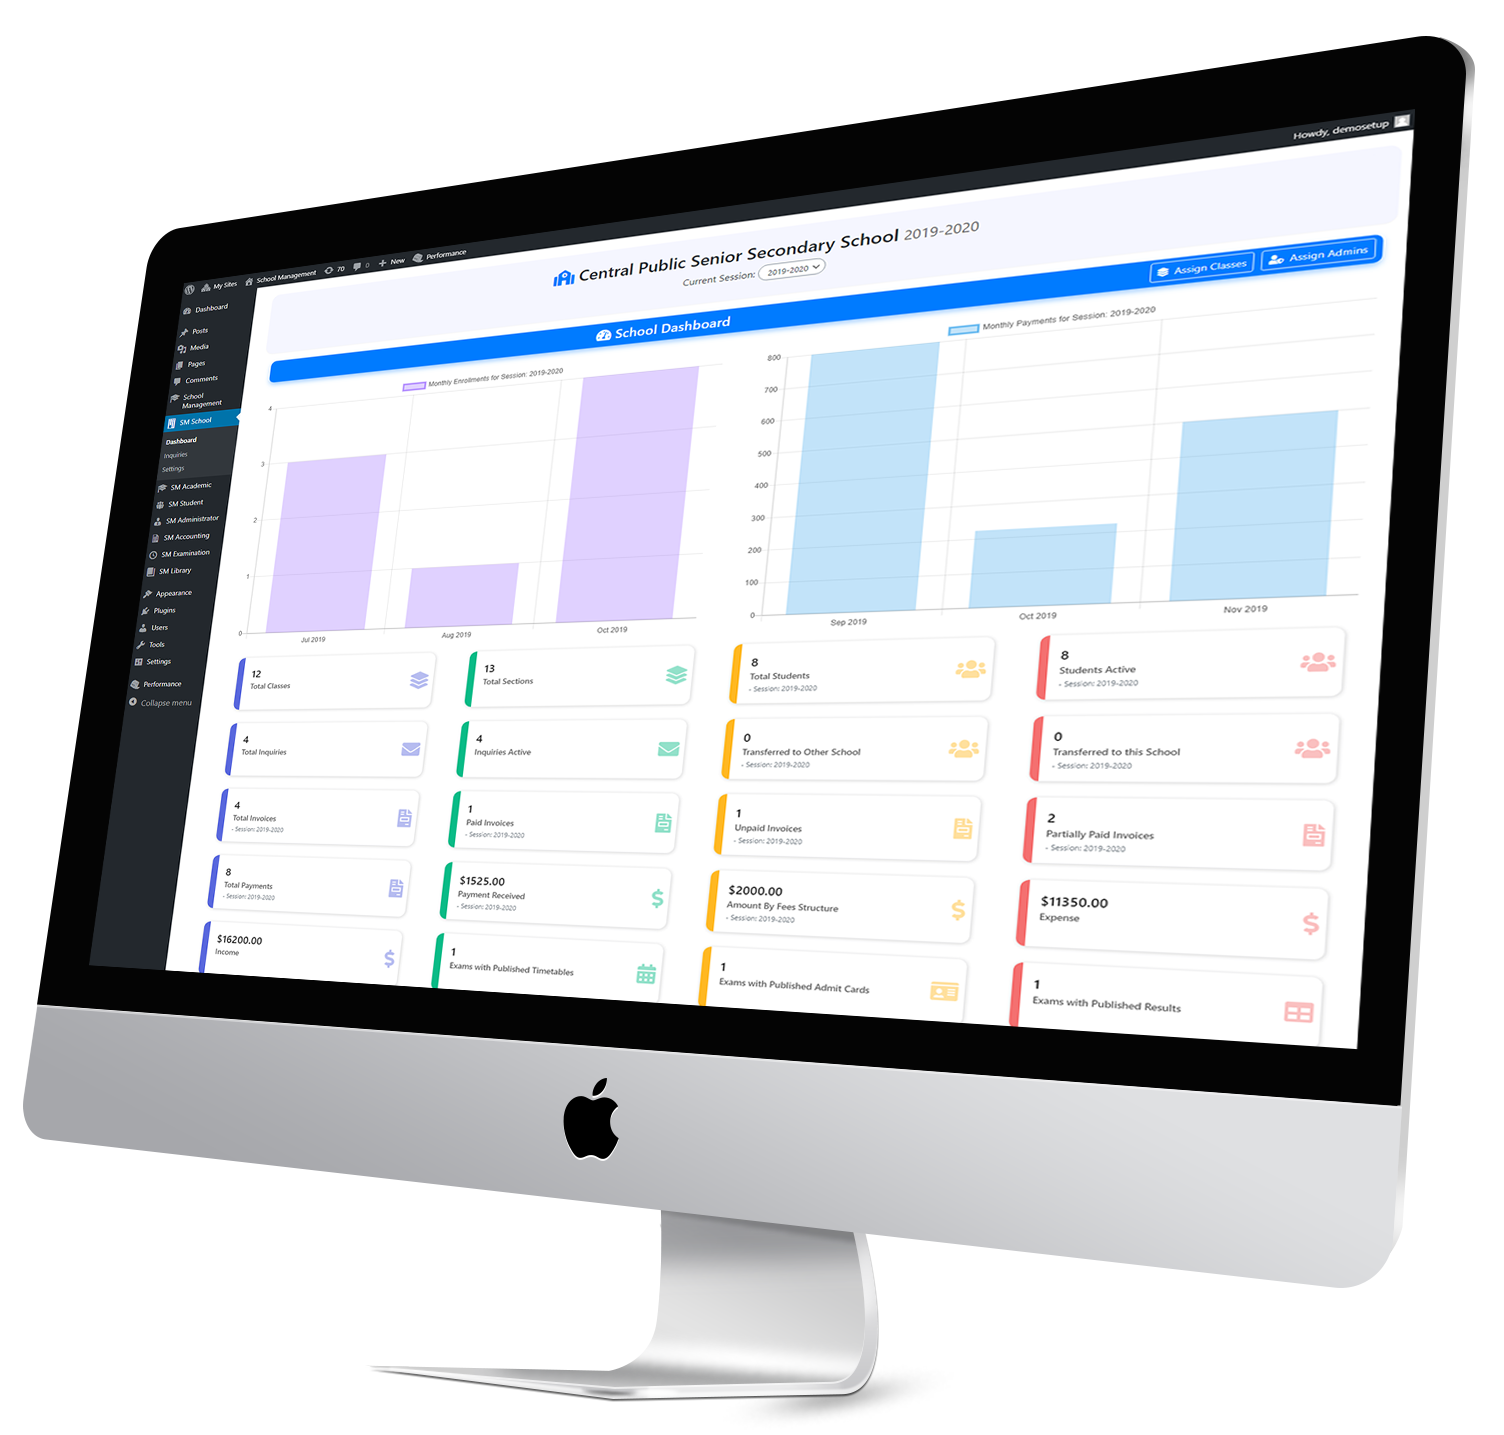
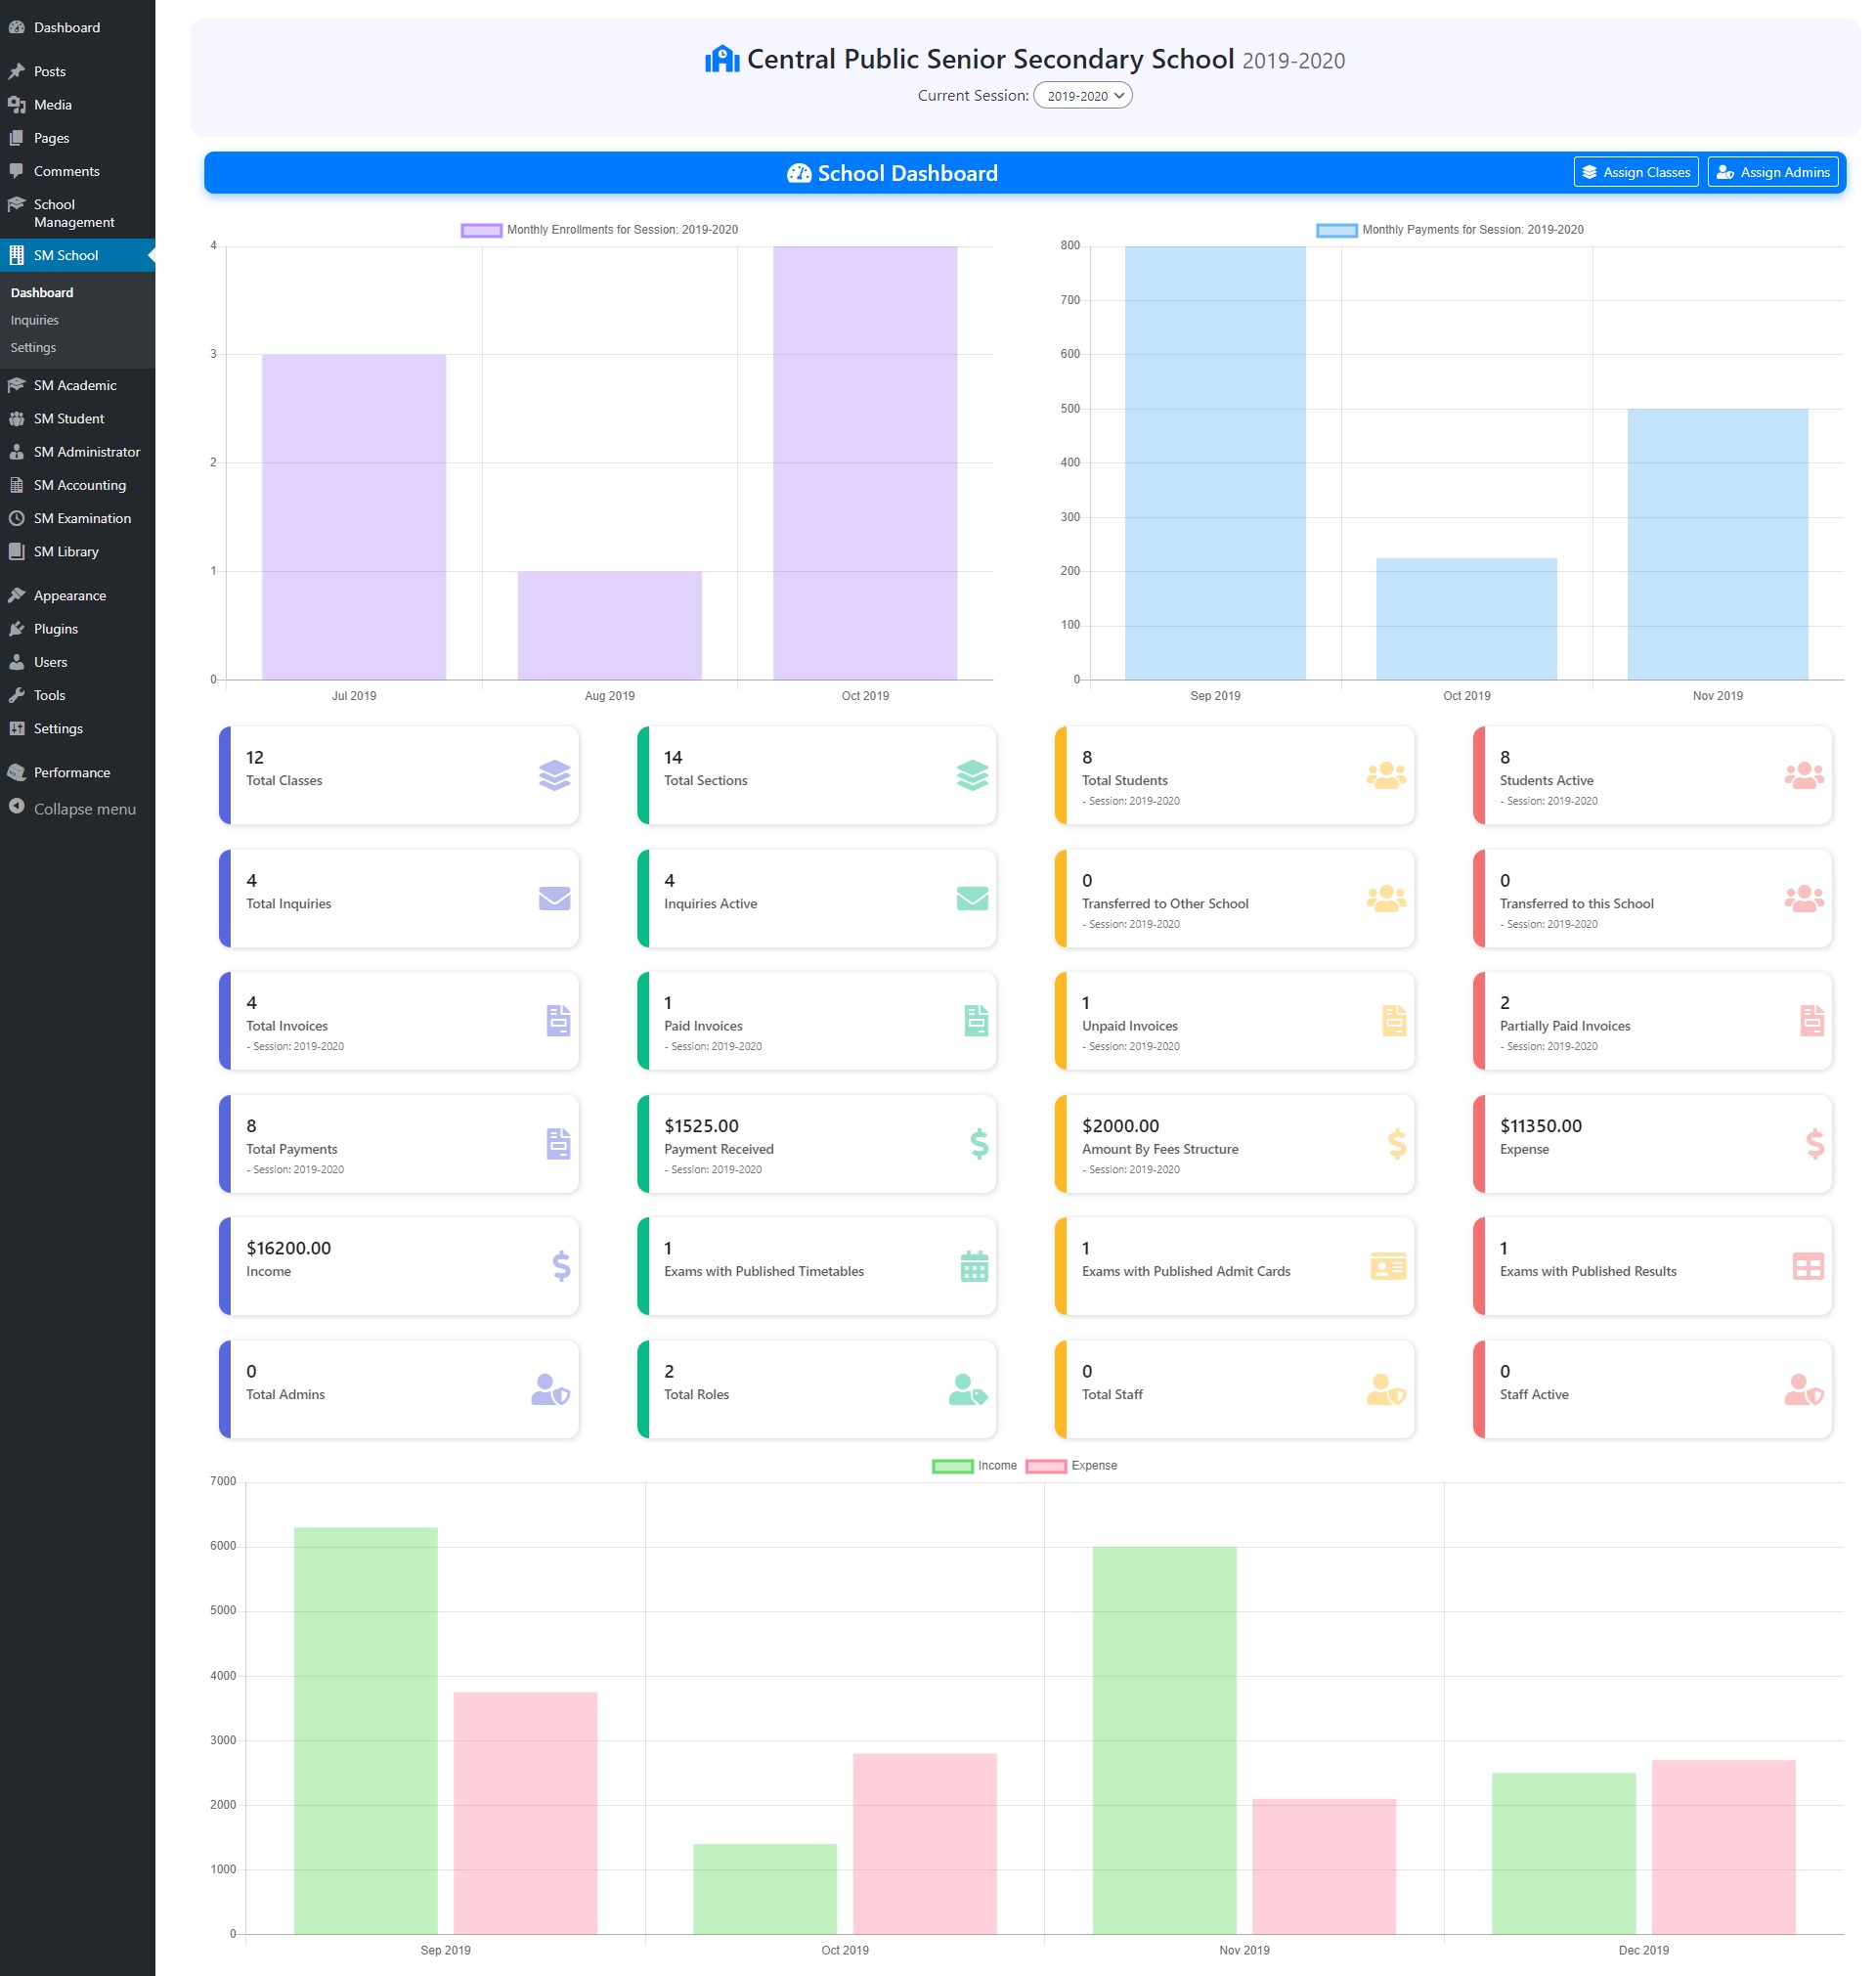
School Management is a WordPress plugin to manage multiple schools and their entities such as classes, sections, students, attendance, exams, ID cards, admit cards, teachers, staff, fees, invoices, income, expense, noticeboard, study materials and much more. It supports payment methods such as Stripe, Razorpay, Pesapal, Paystack or PayPal. It also includes SMS notifications through SMS providers which include Nexmo, MsgClub, Msg91, Twilio, SMS Striker, Textlocal, EBulkSMS etc.
Step 1. First download the plugin from your Codecanyon Account.
Step 2. Upload, Install & Activate plugin into a WordPress site.
Step 1. First download the plugin.
Step 2. Upload, Install & Activate plugin into a WordPress site.
Step 1. First download the plugin.
Step 2. Upload, Install & Activate plugin into a WordPress site.
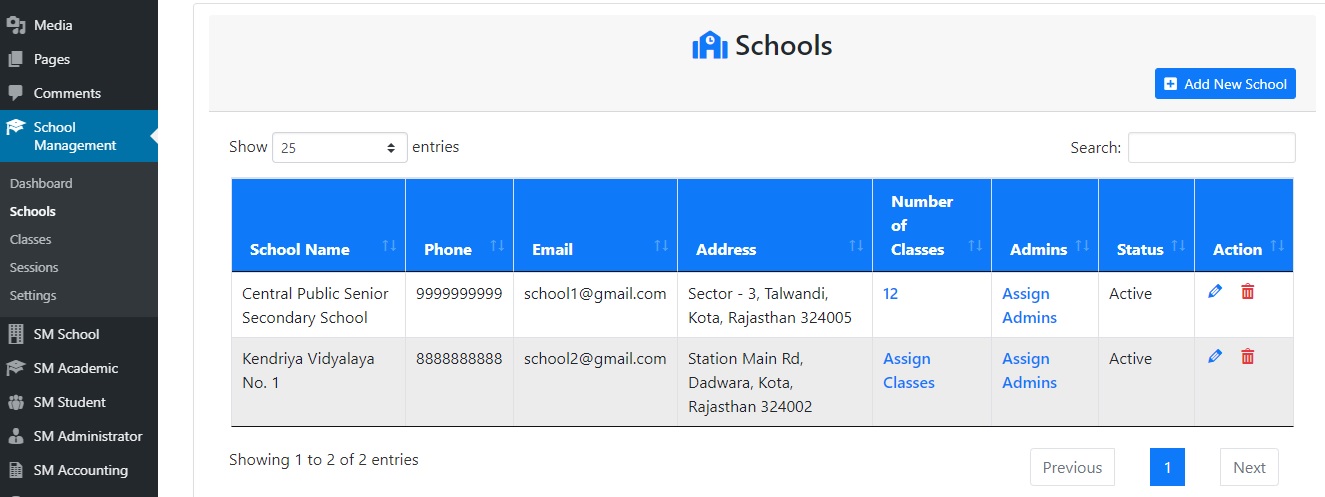
Add multiple schools, assign admins and classes to each school to manage individual school.
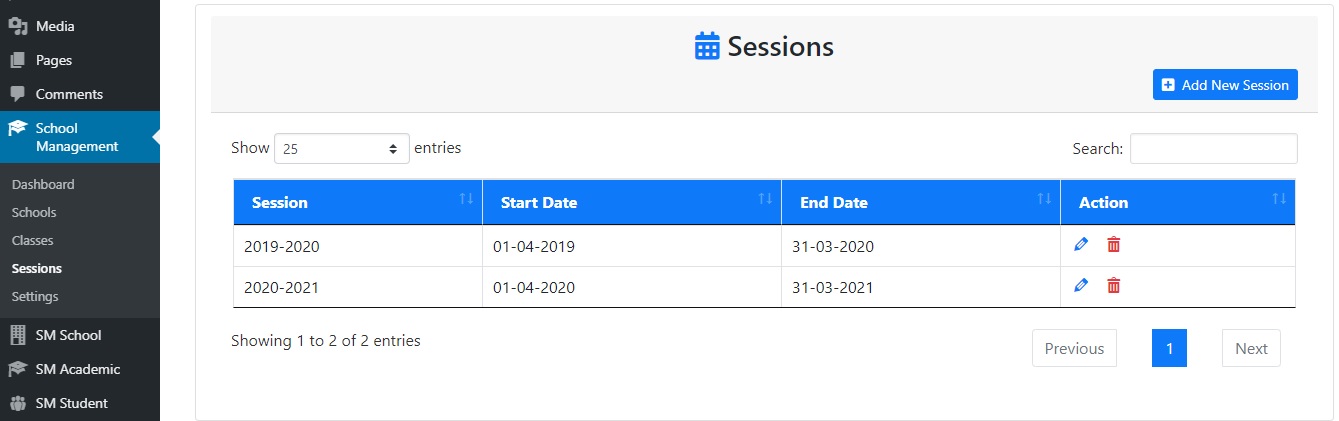
Create new session and keep all the records of previous sessions.
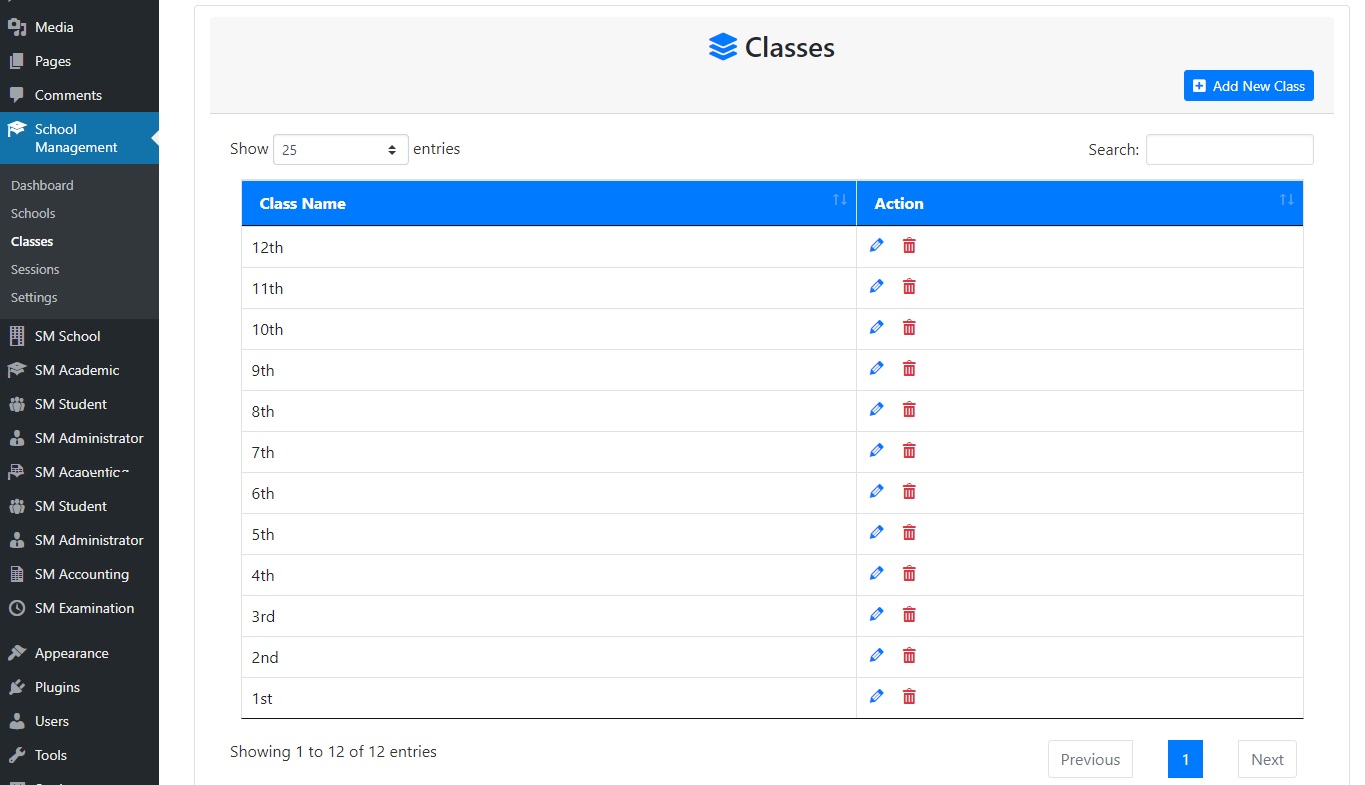
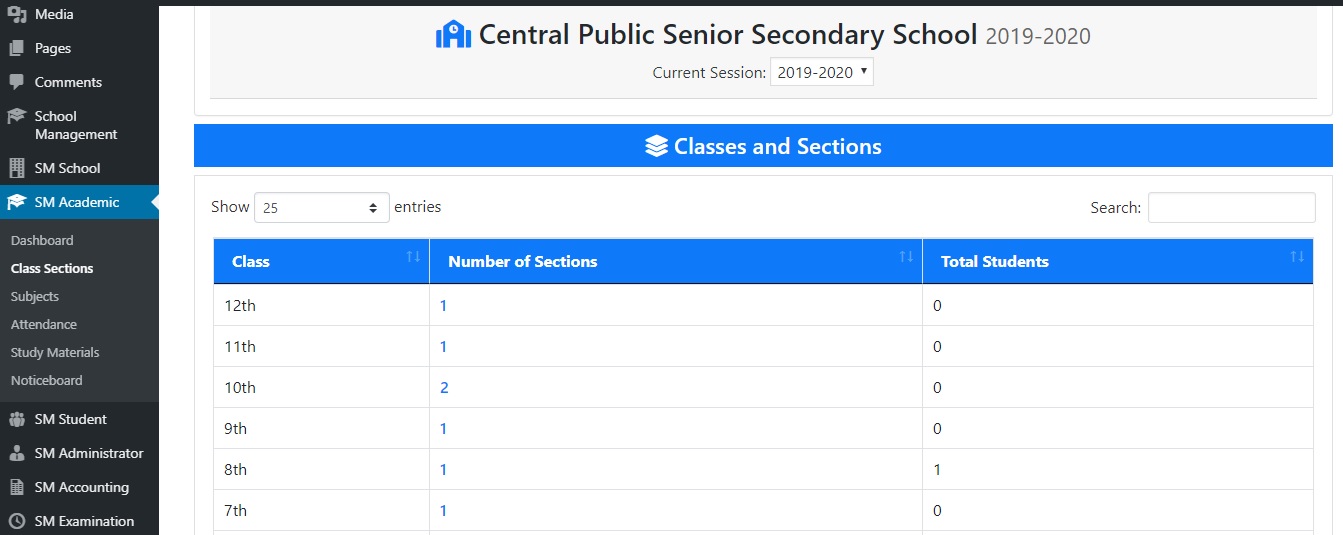
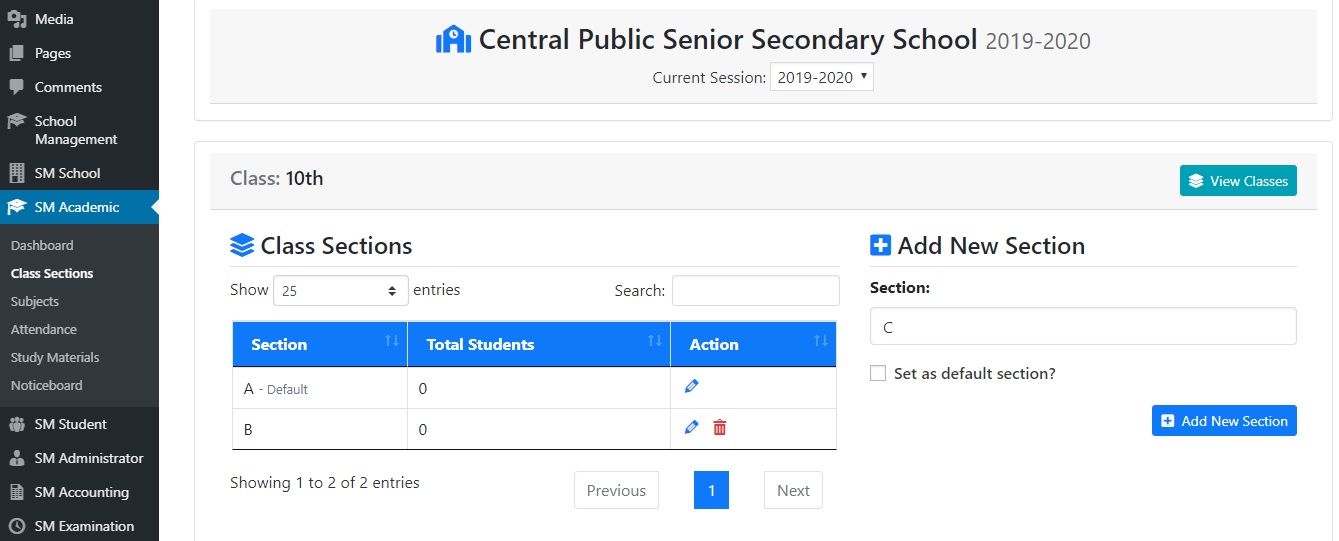
Administrators can create classes and assign them to schools. With each class, there can be multiple class sections.
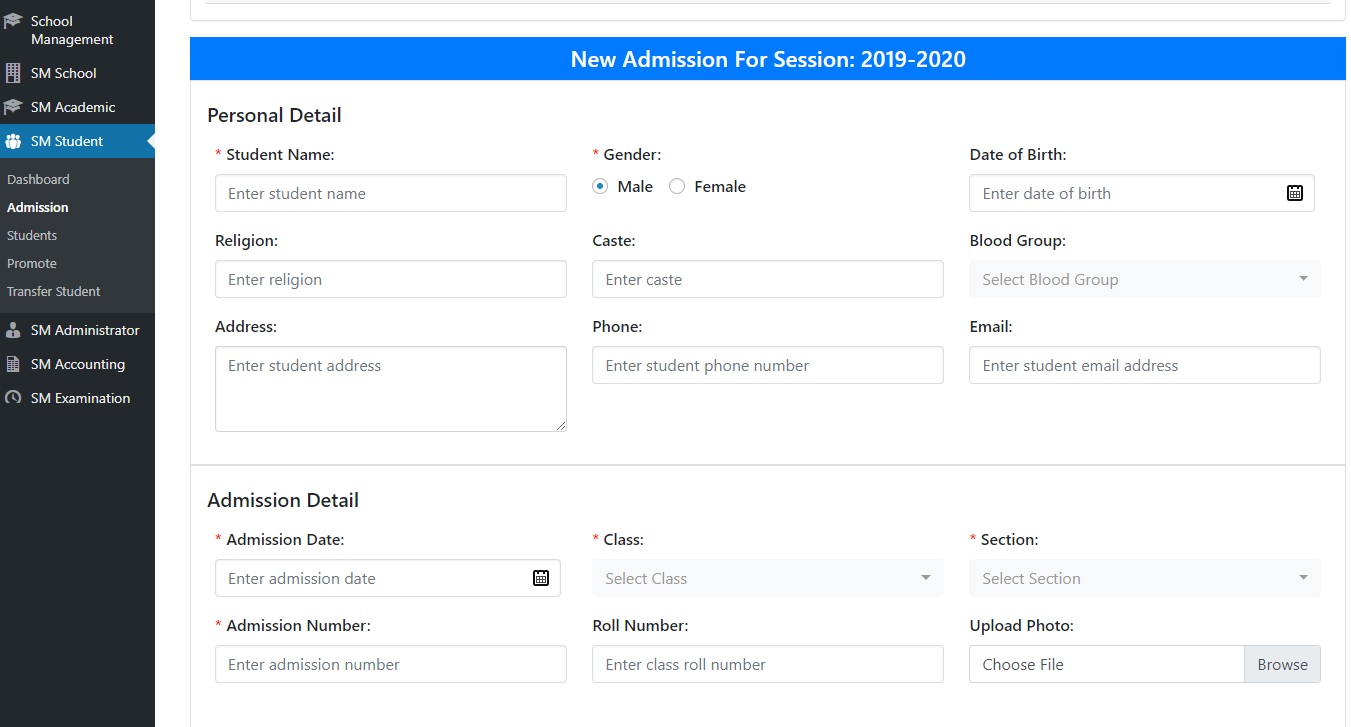
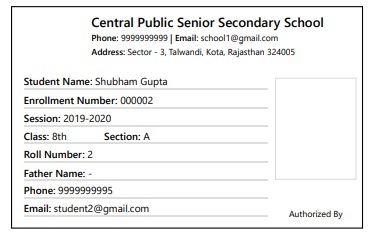
School admins and staff with neccessary permissions can new admissions to school by assigning them admission number, class, section and roll number. Also, for each student record in a session, a new enrollment number is generated automatically.
Display inquiry form for a school in a page using shortcode. Also, receive inquiries school-wise, add next follow up date and notes for the inquiry.
Promote students to a new class for a new session. This creates a new enrollment of a student for the next session.
Transfer student from one school to another. This also keep track of students transferred to and transferred from the school.
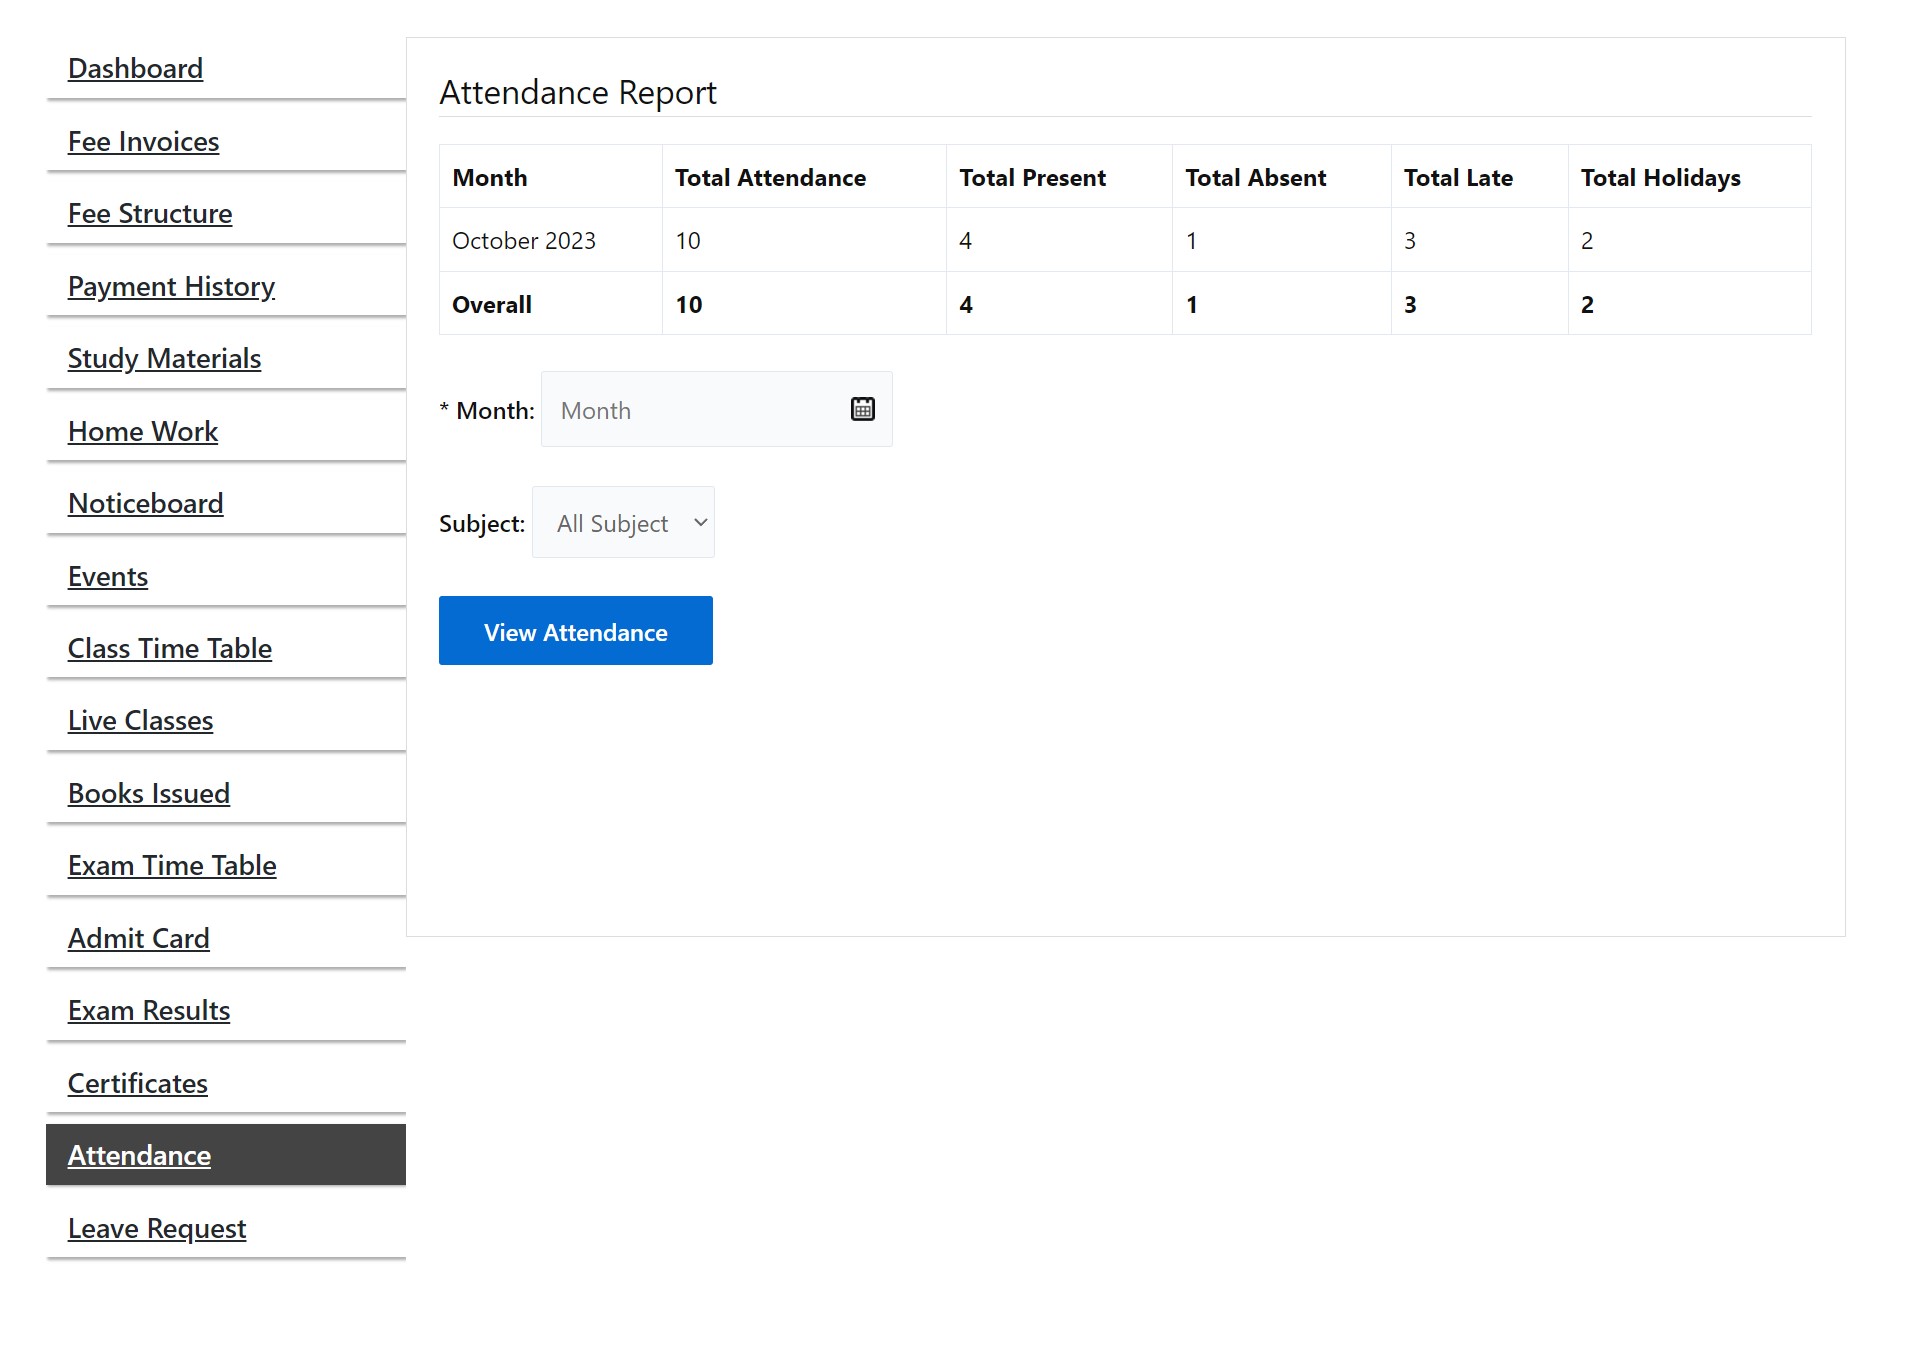
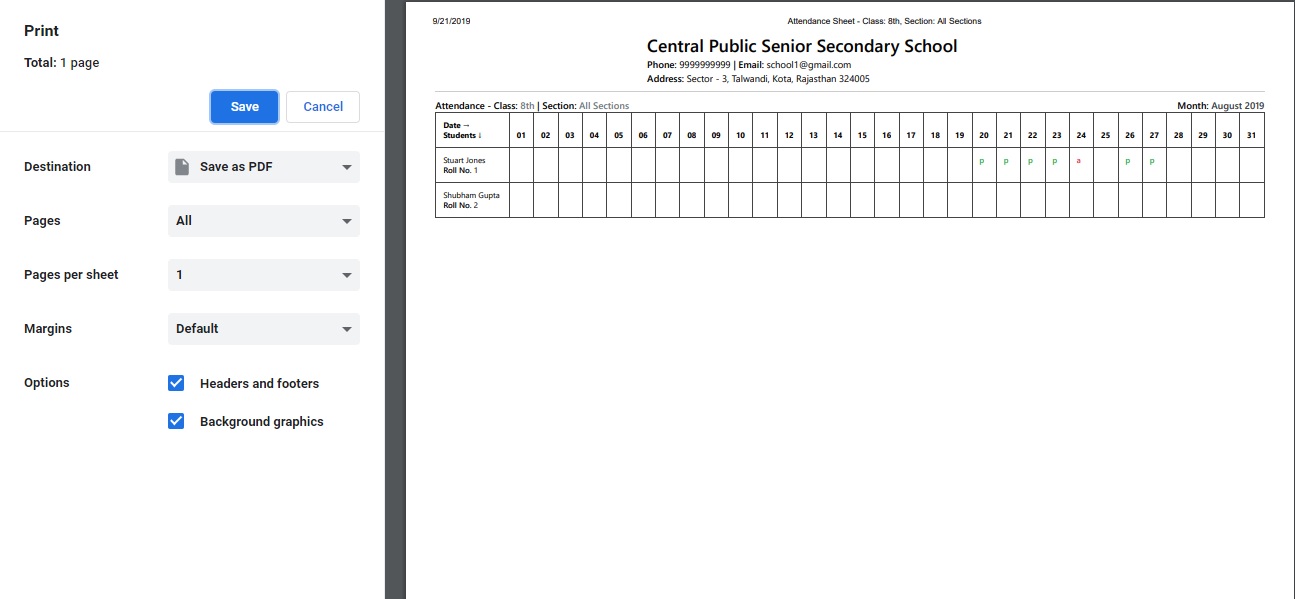
Take daily attendance of students. Print attendance sheet of a class. Also, students can view their attendance report in dashboard.
Students view their fees report, admission details, ID card etc. and pay remaining fees using suitable payment method.
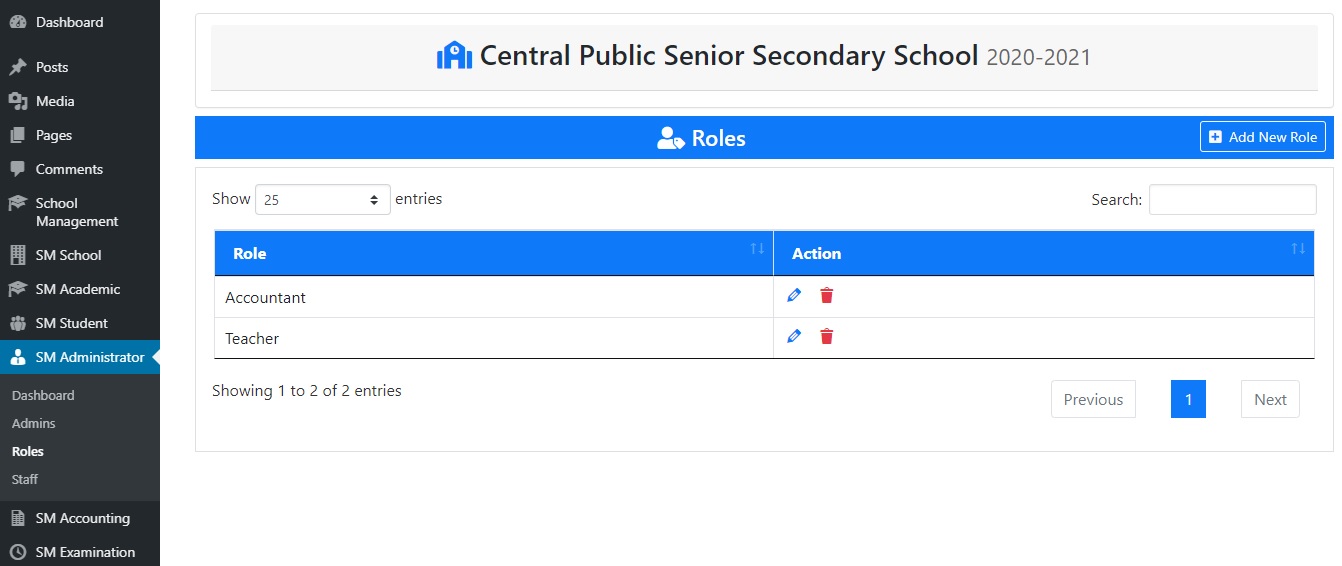
Create custom roles like teacher, accountant and assign them neccessary permissions as per the role so they are restricted to the management of school entities assigned to them.
Multi-School admins assign an administrator to a school. School administrator can create any number of staff with roles to manage the school.
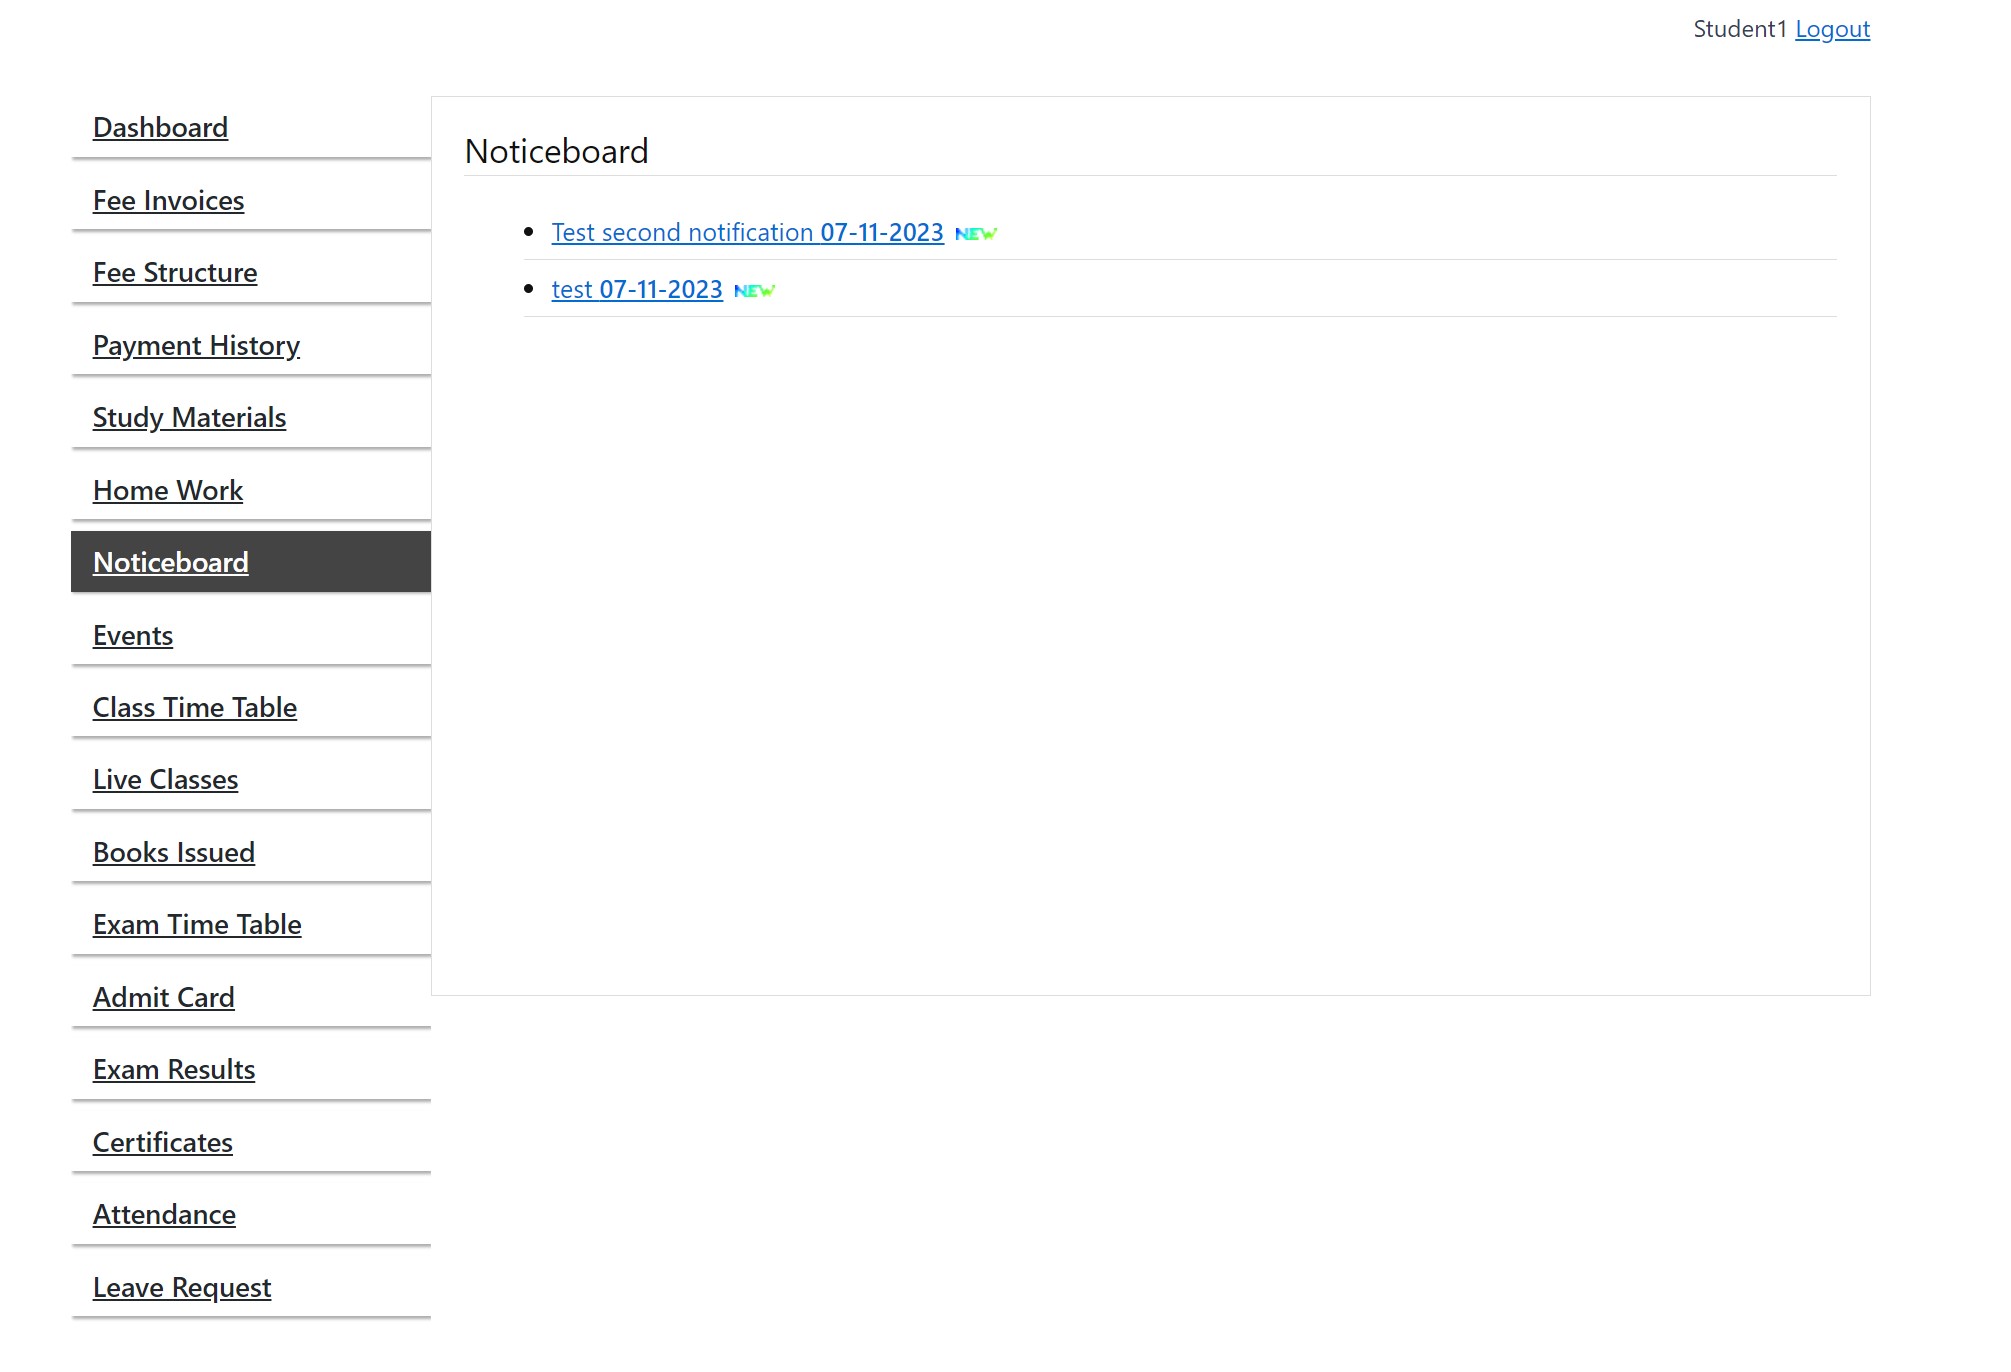
It has noticeboard widget which displays notices to the widget section of your website. Here, you can change the number of notices, widget height and width to incorporate the design of your website.
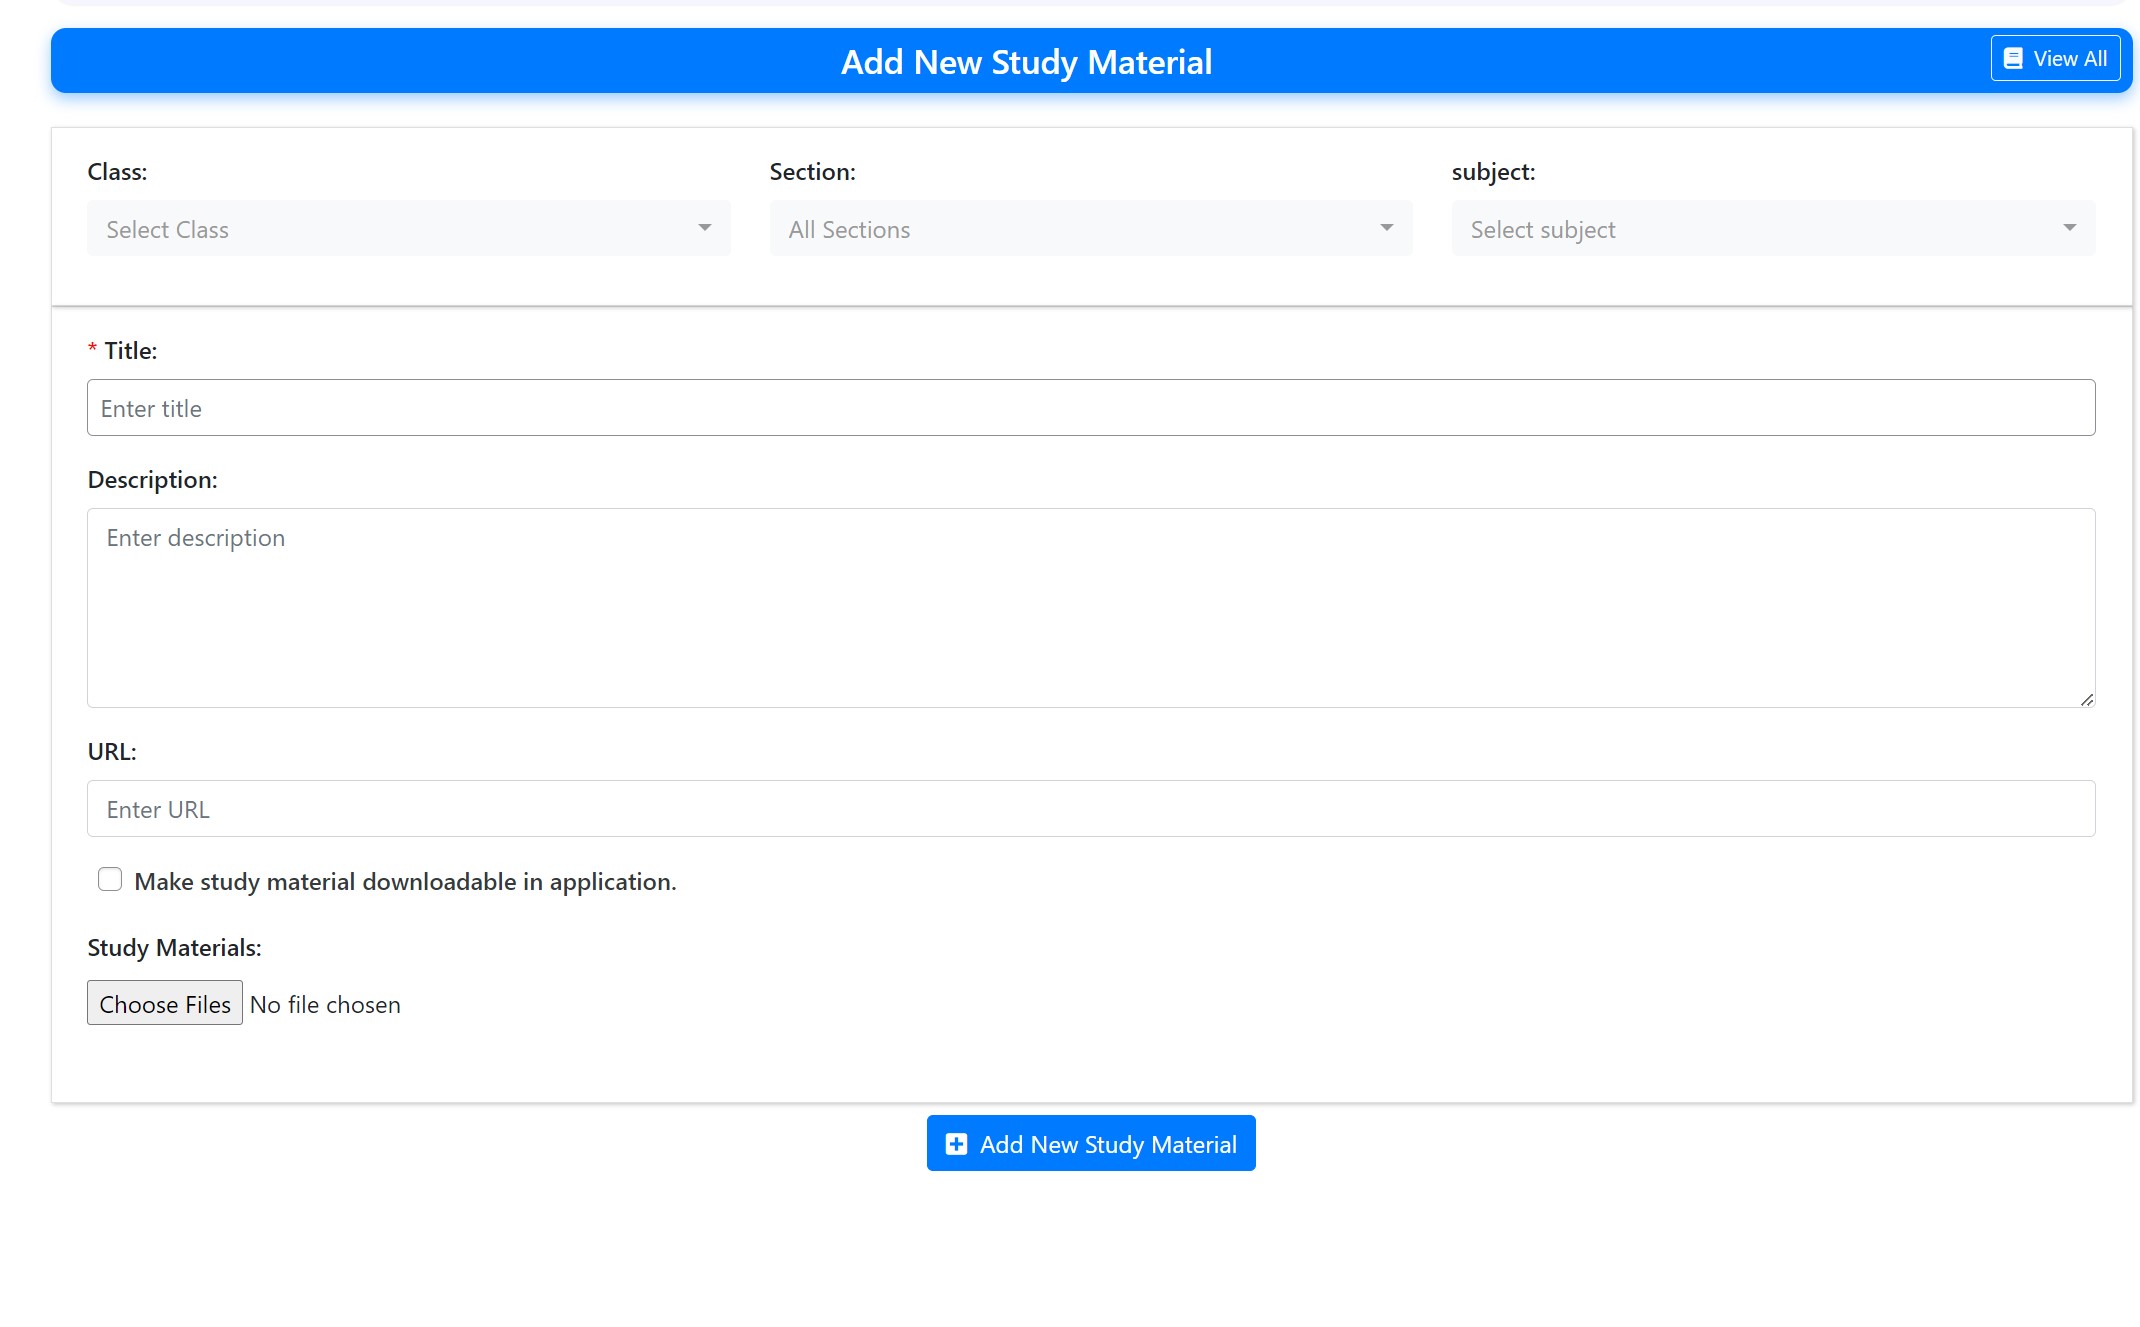
School staff with neccessary permission can add study materials of classes. These study materials will show up on student dashboard section, allowing them to download and view the study materials.
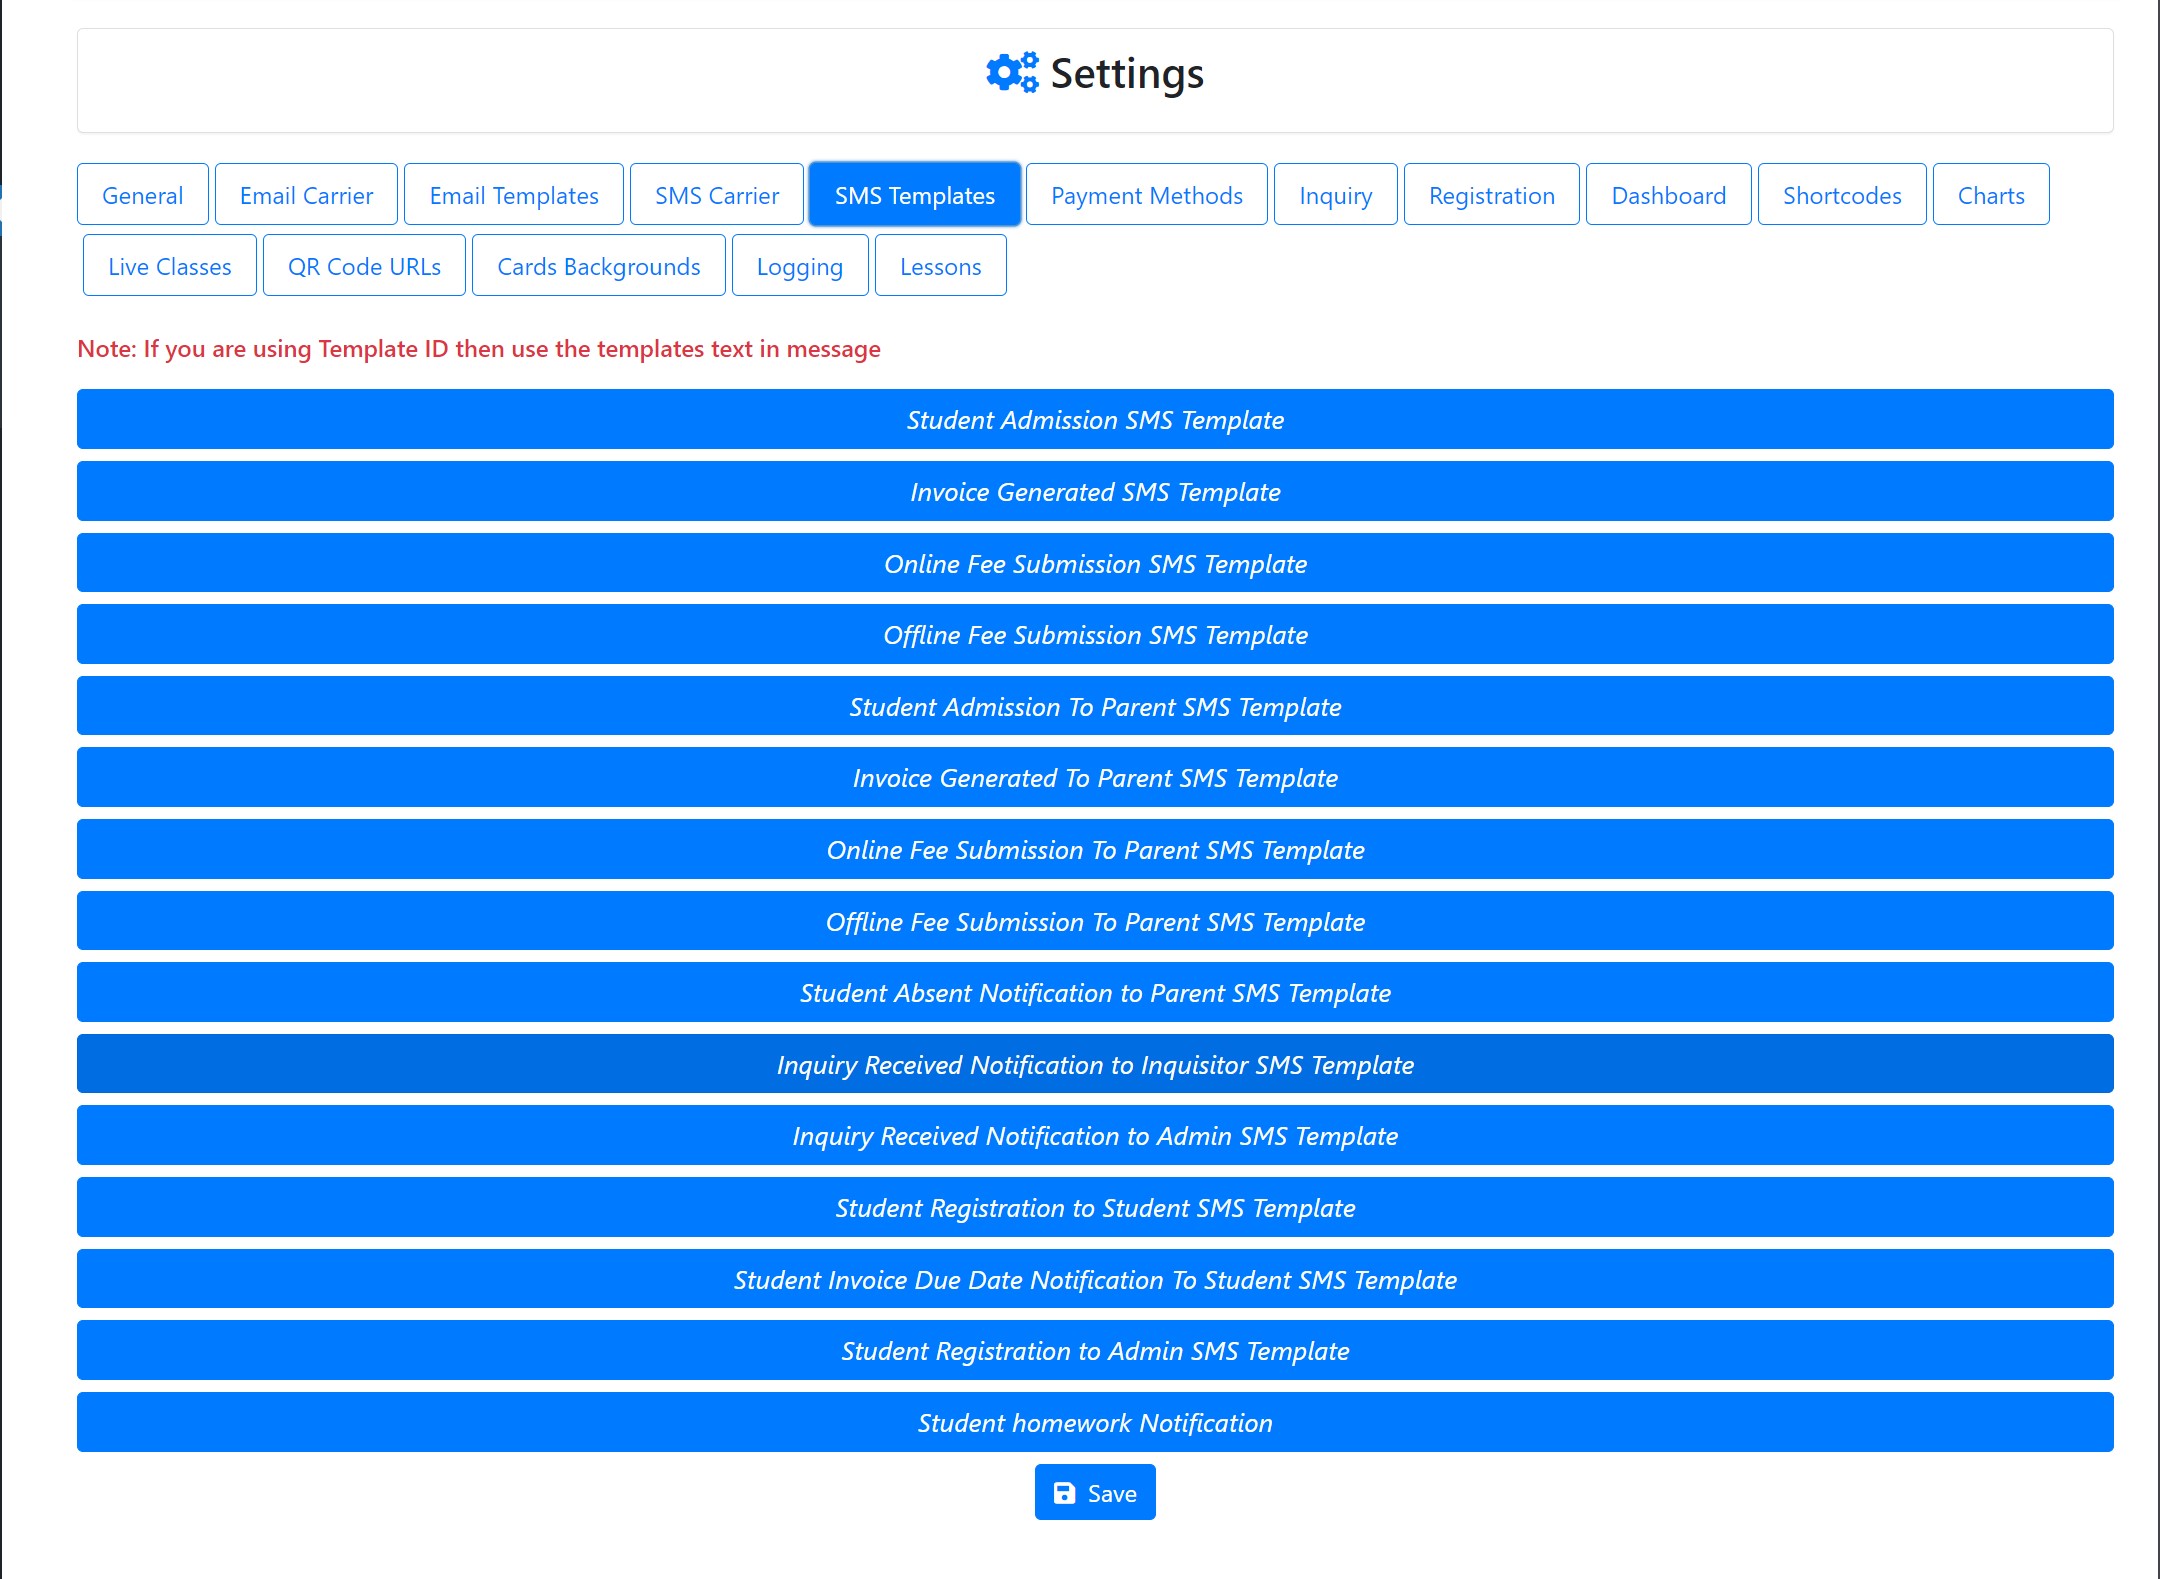
Send SMS and email notifications to students at the time of new admissions, fee invoice generation, payment receipts generation etc. SMS providers include Nexmo, Twilio, MsgClub, SMS Striker, Textlocal and more.
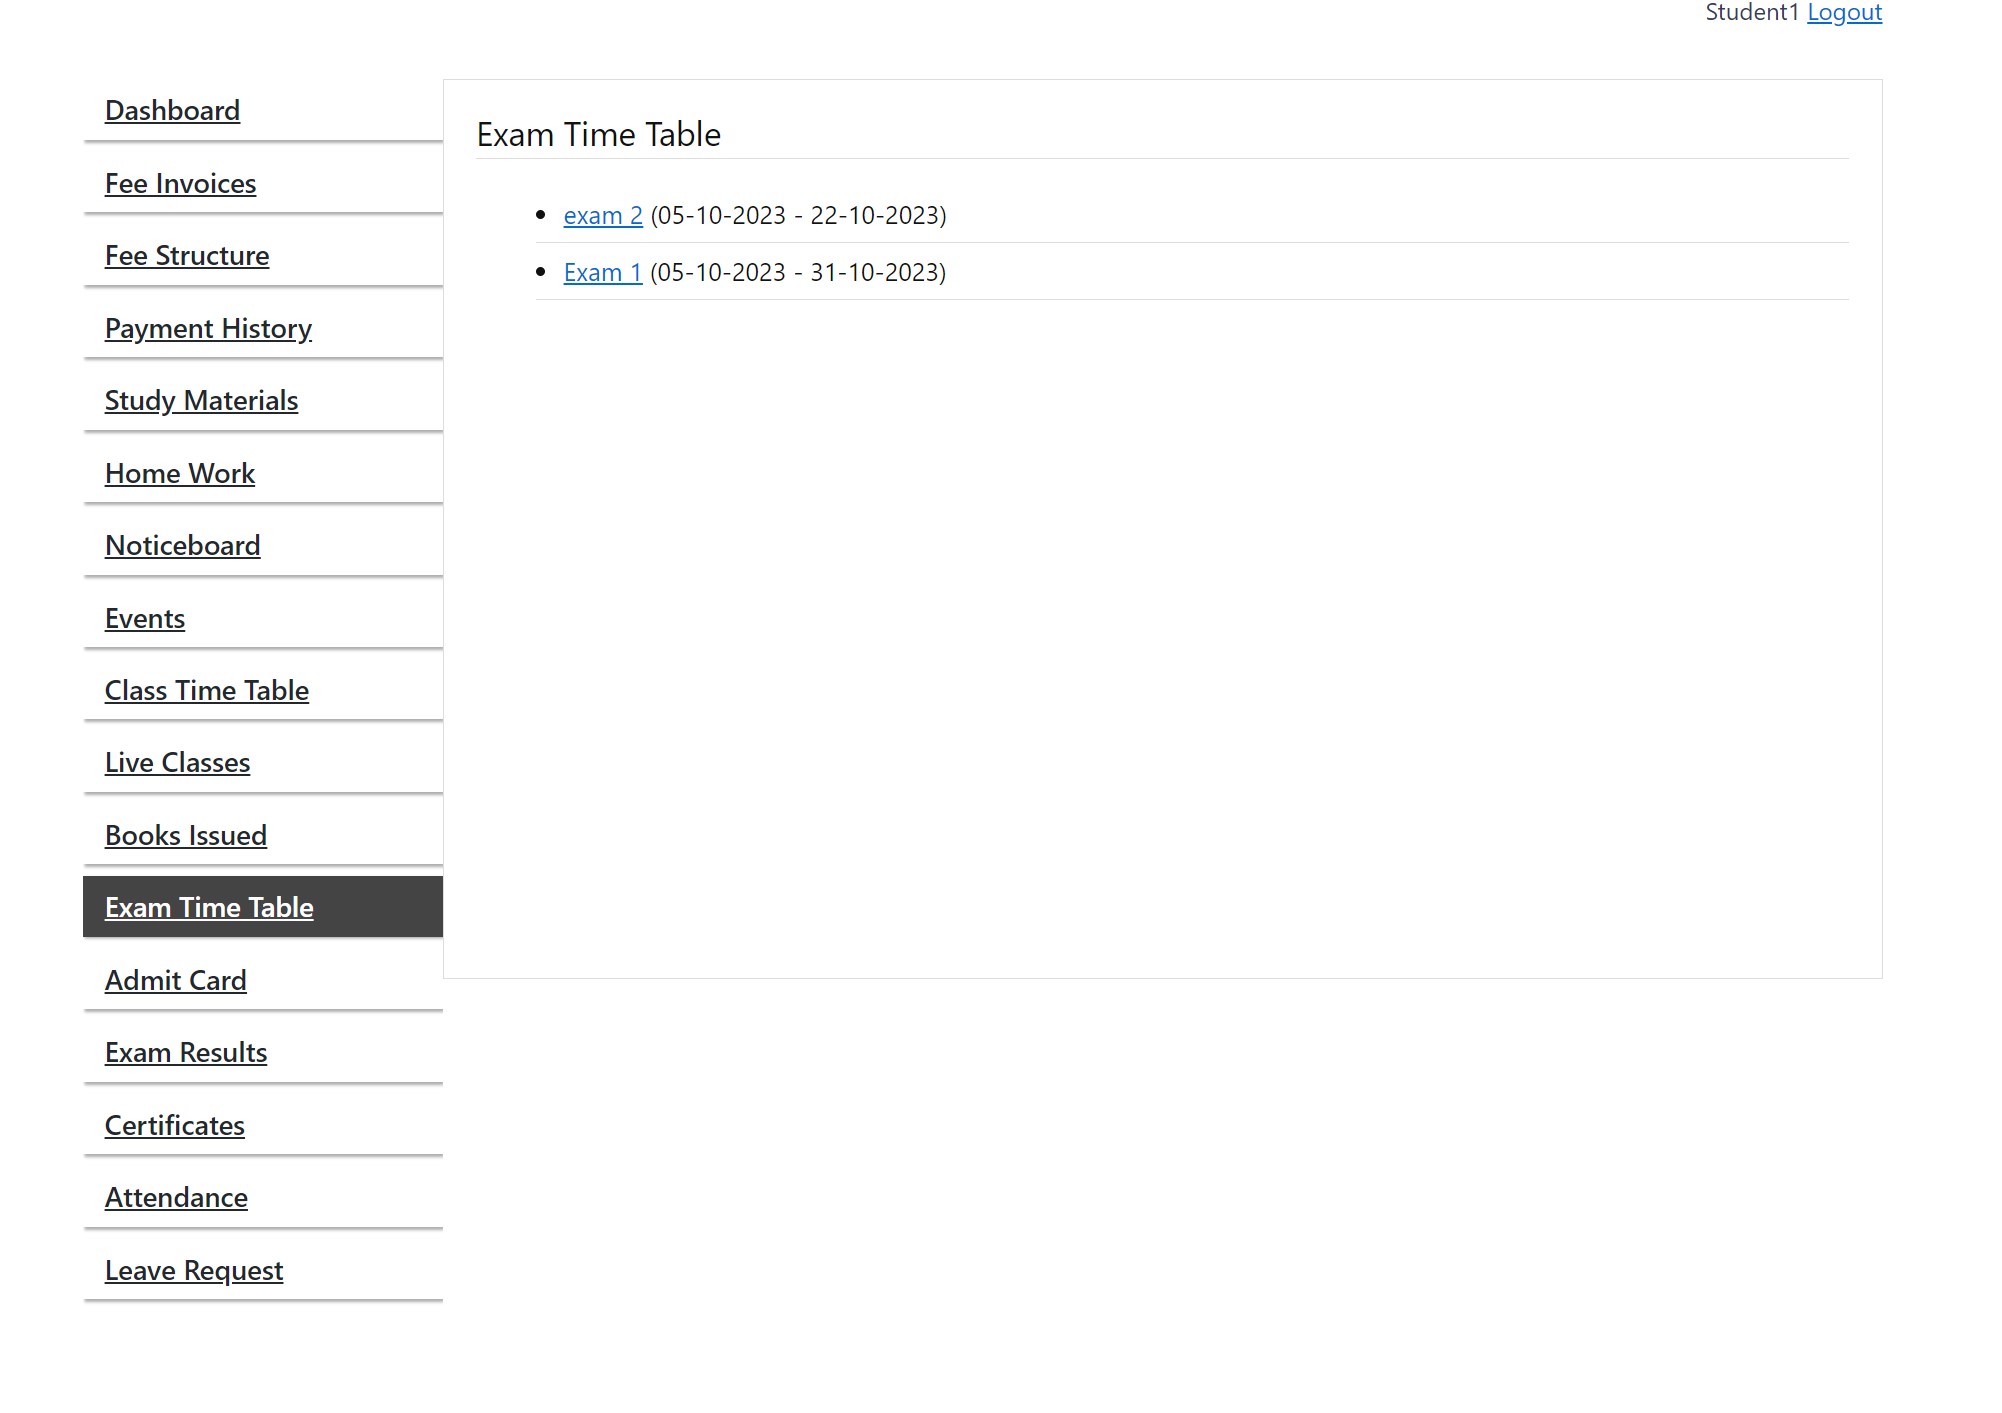
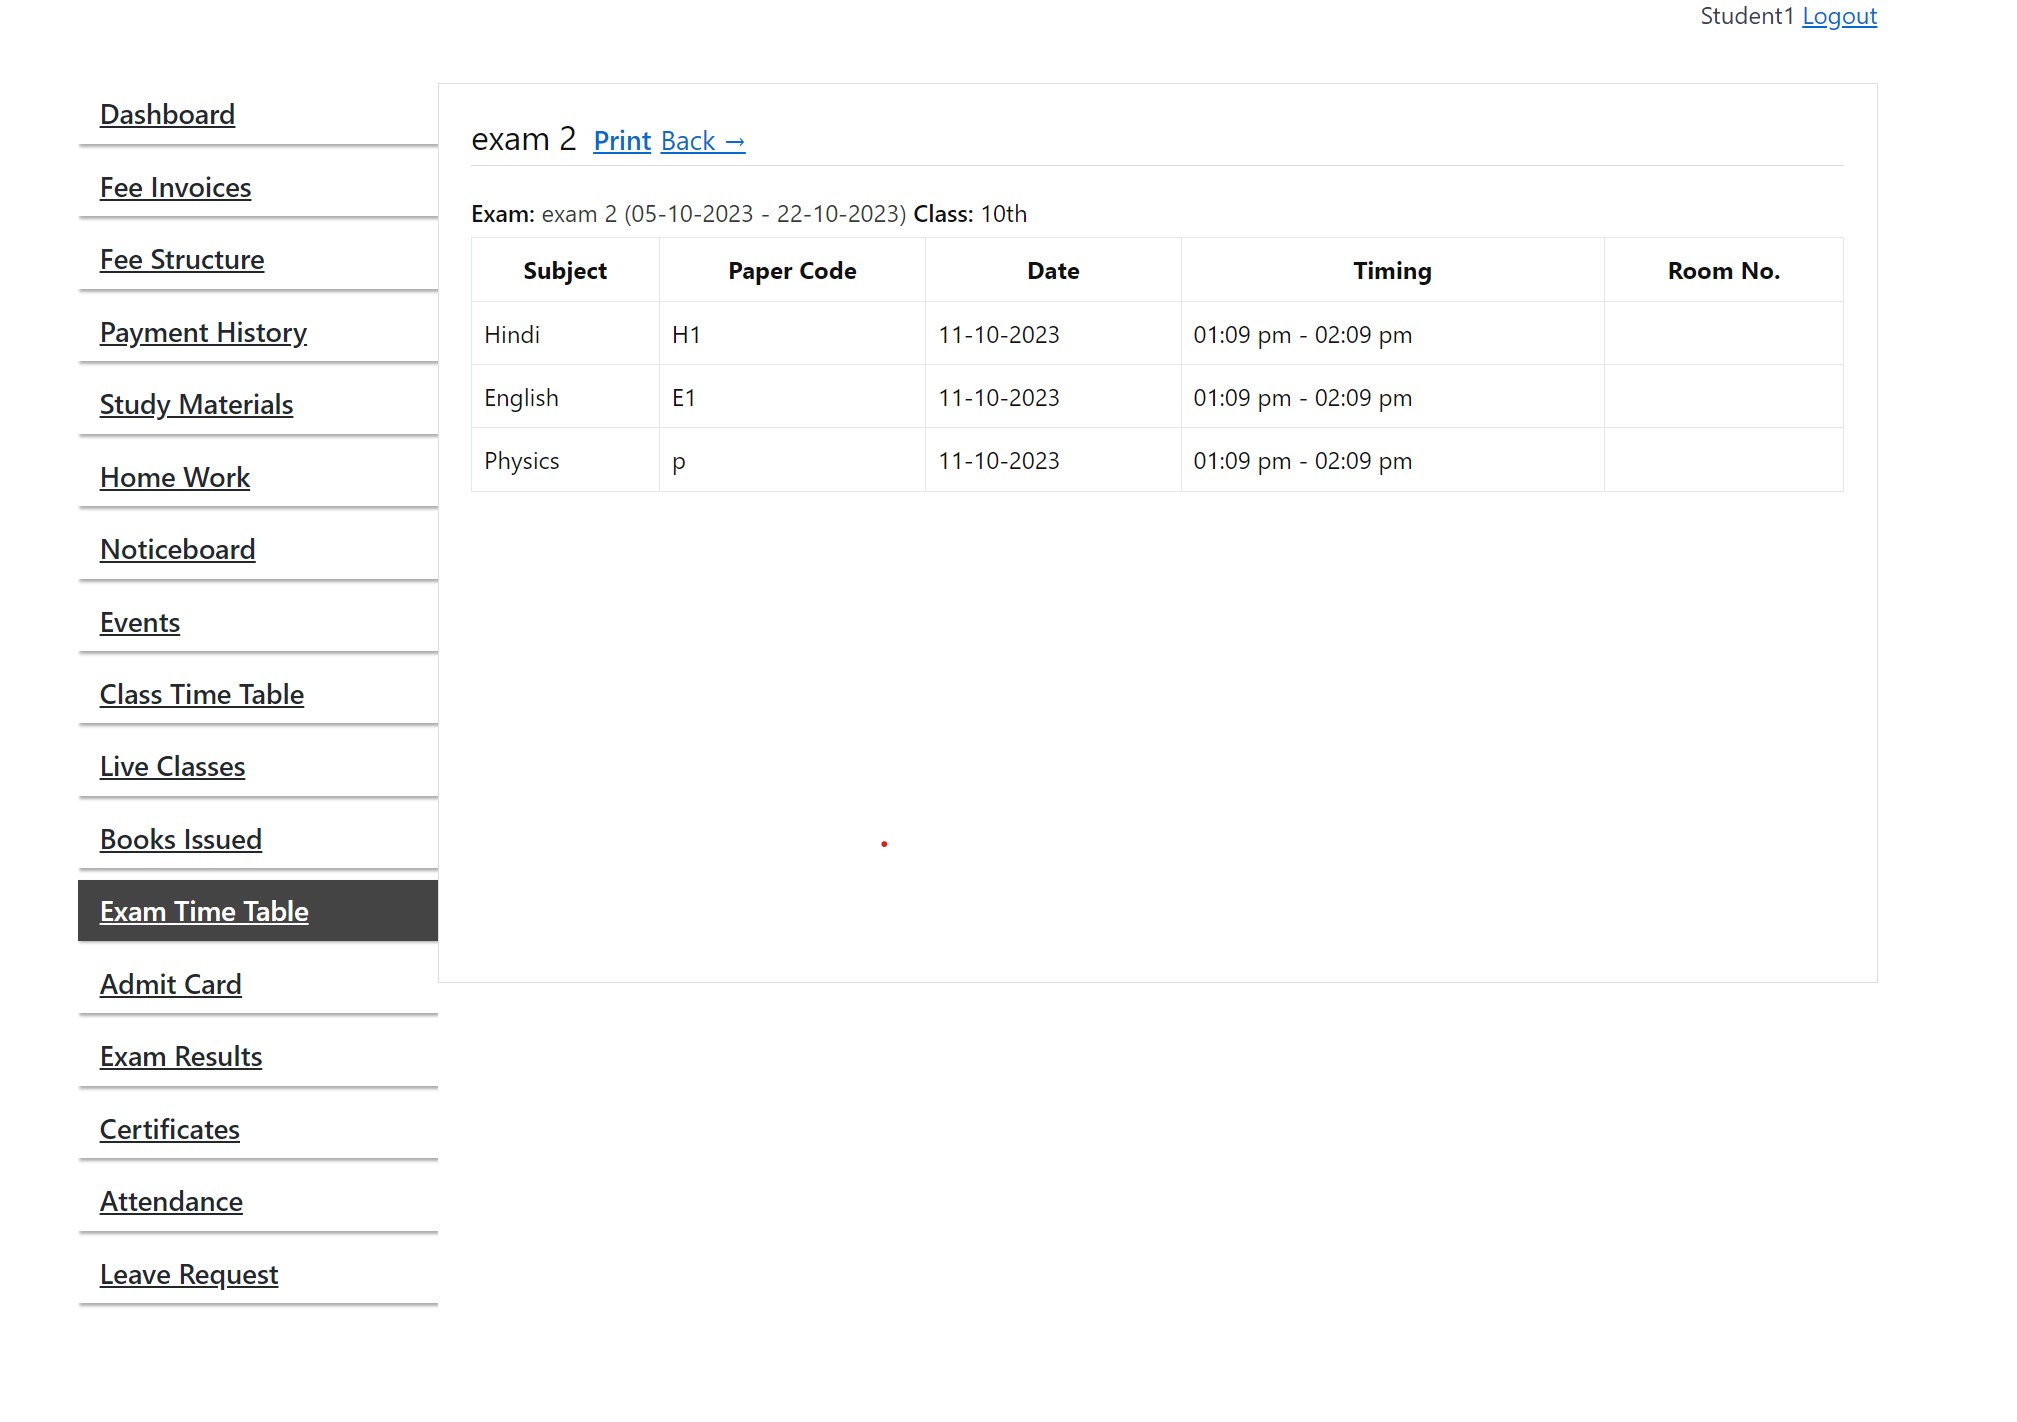
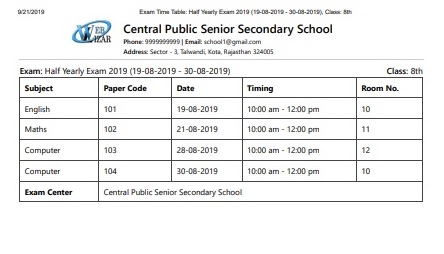
Create exam, add exam papers, exam center, timings, date and room number for single class or multiple classes.
Option to publish exam time table which will show up on student dashboard or you can use the shortcode to display exam time table on a particular page of your website.
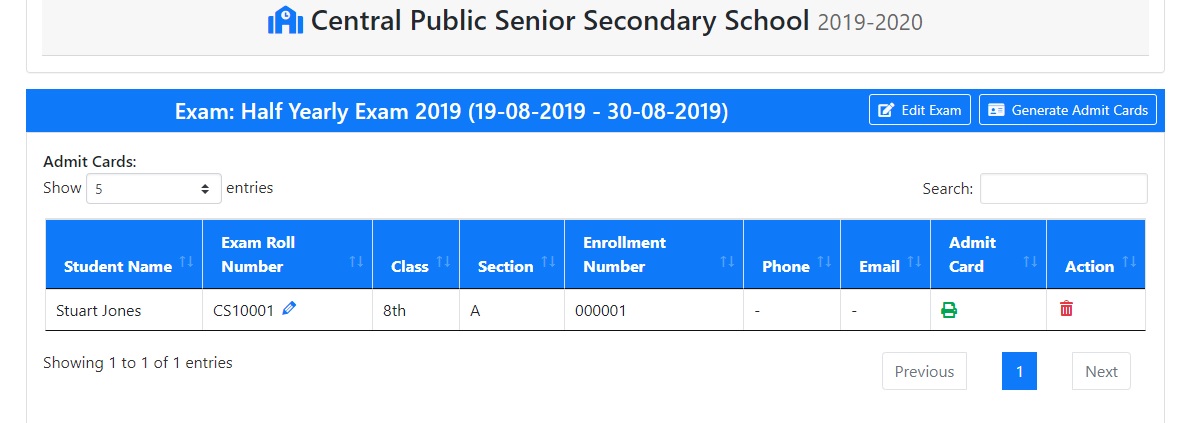
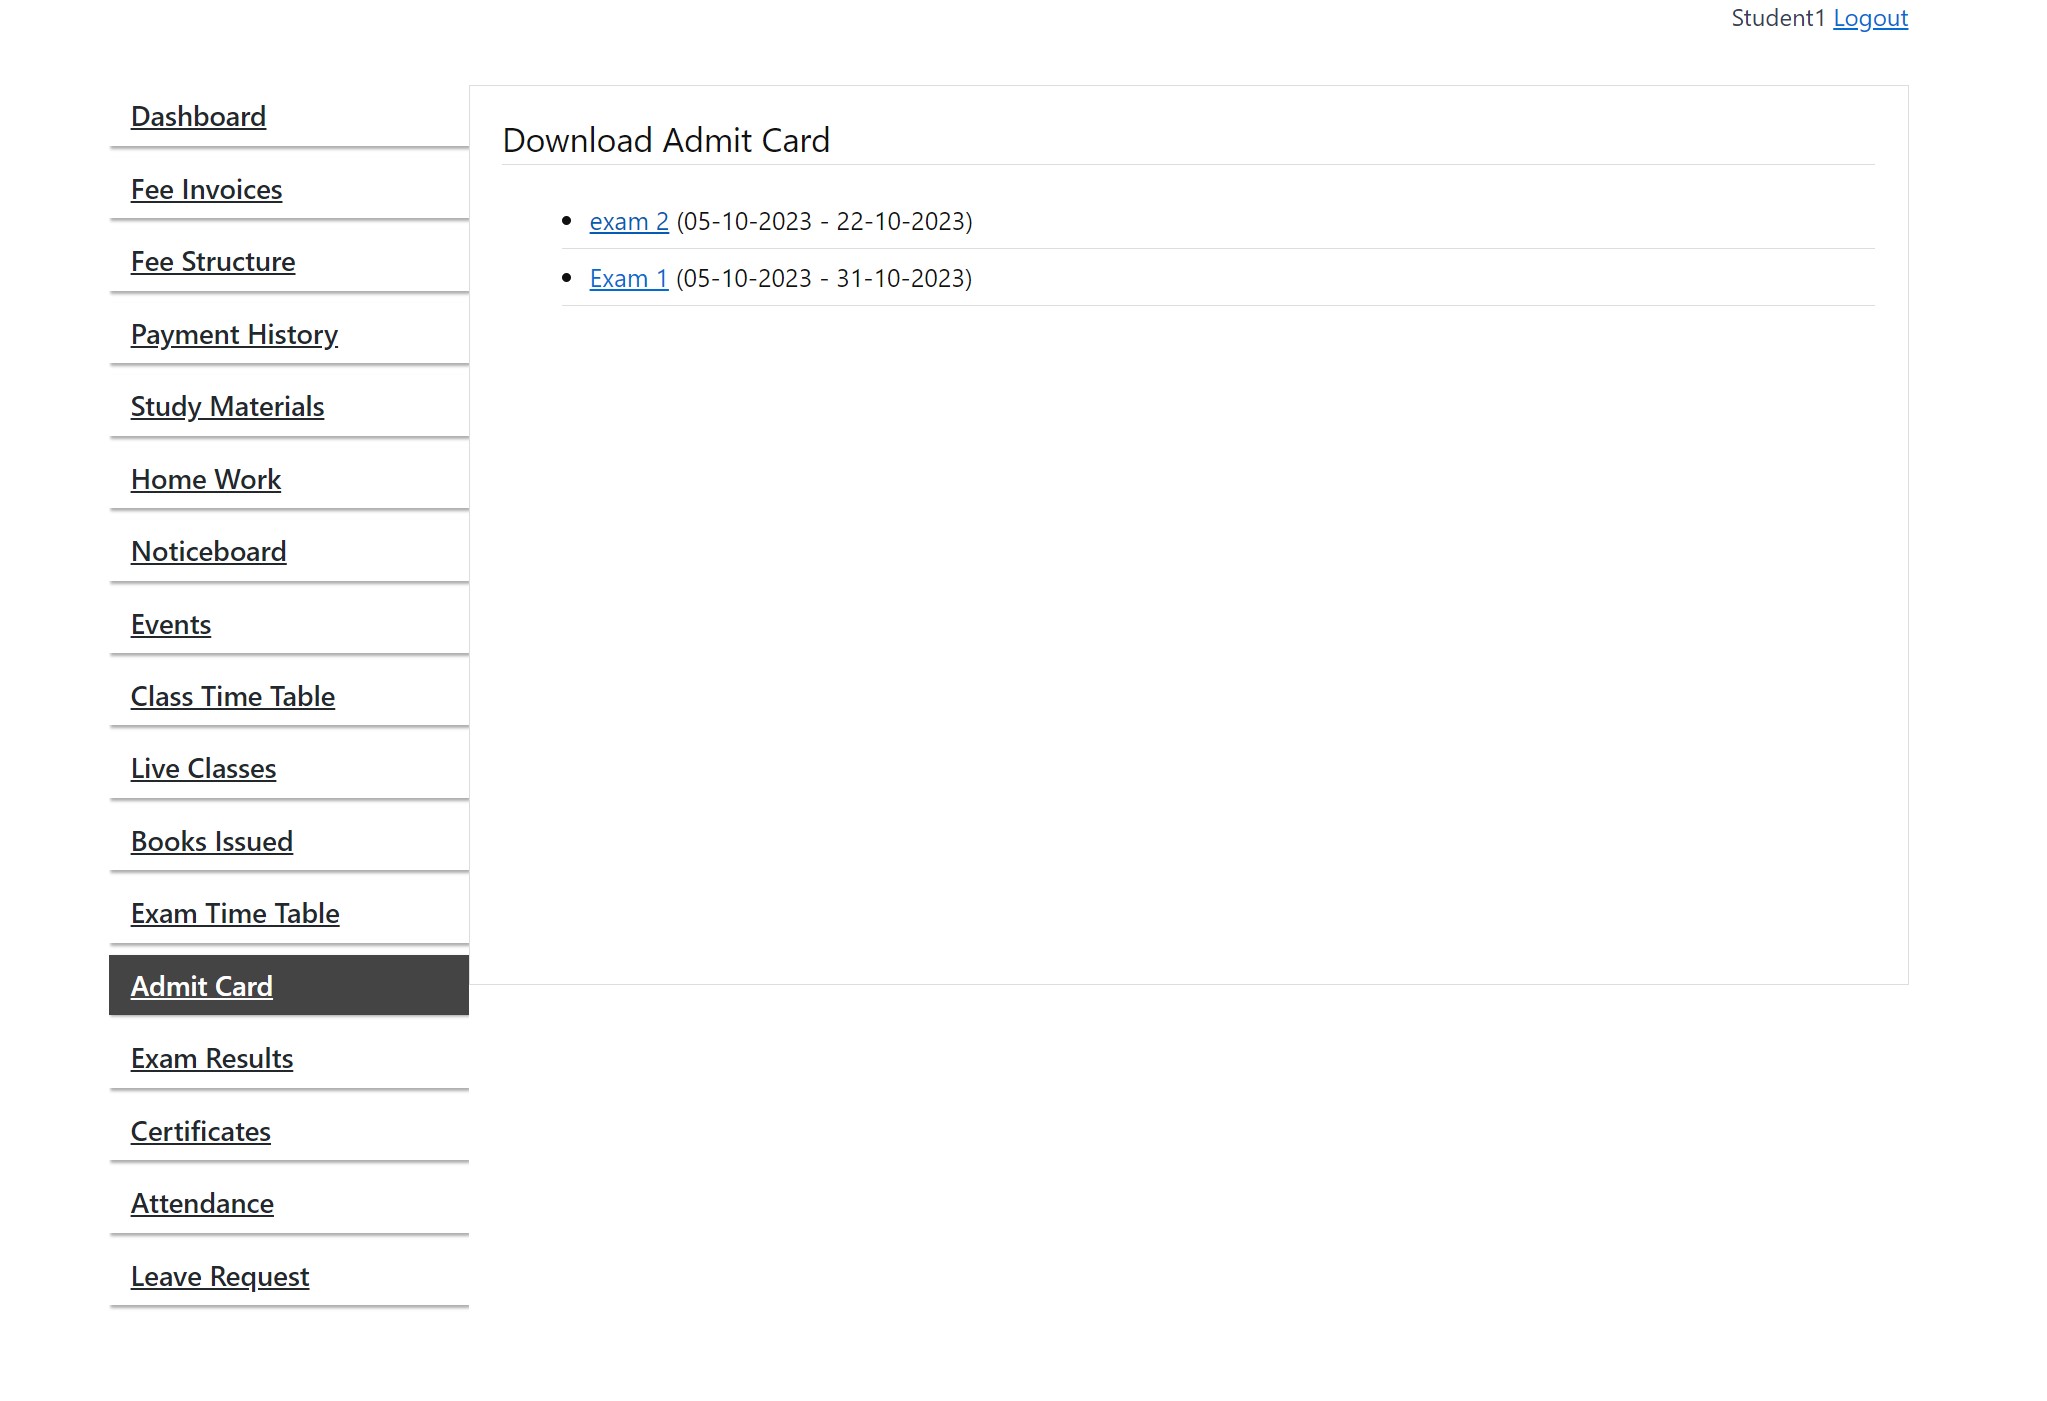
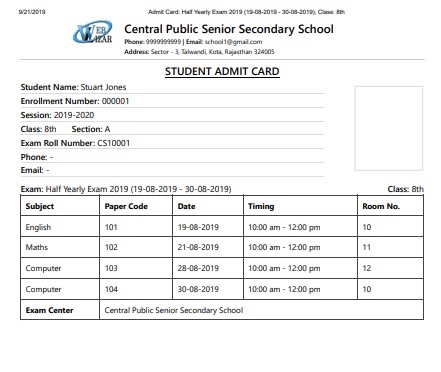
For each exam, generate admit cards for students. Also, publish the admit cards which students can download from student dashboard section.
This include fee invoice generation, fee payment collection, income management and expense management.
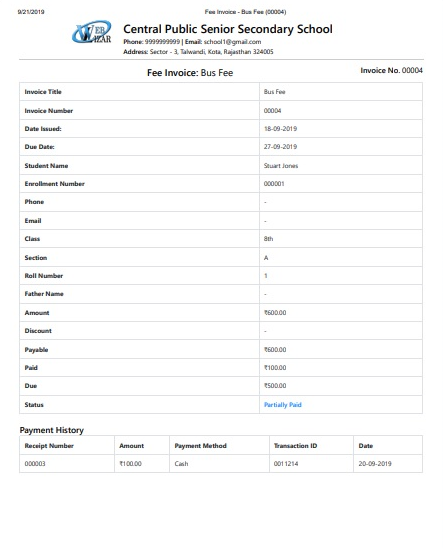
Select students from classes and generate fees invoices in bulk or for single student. This also supports partial payment collection or one time payment collection.
Display fees collection form on a page using shortcode which allows students to search their names and view pending fee invoices. Students can pay their fees by using a payment method.
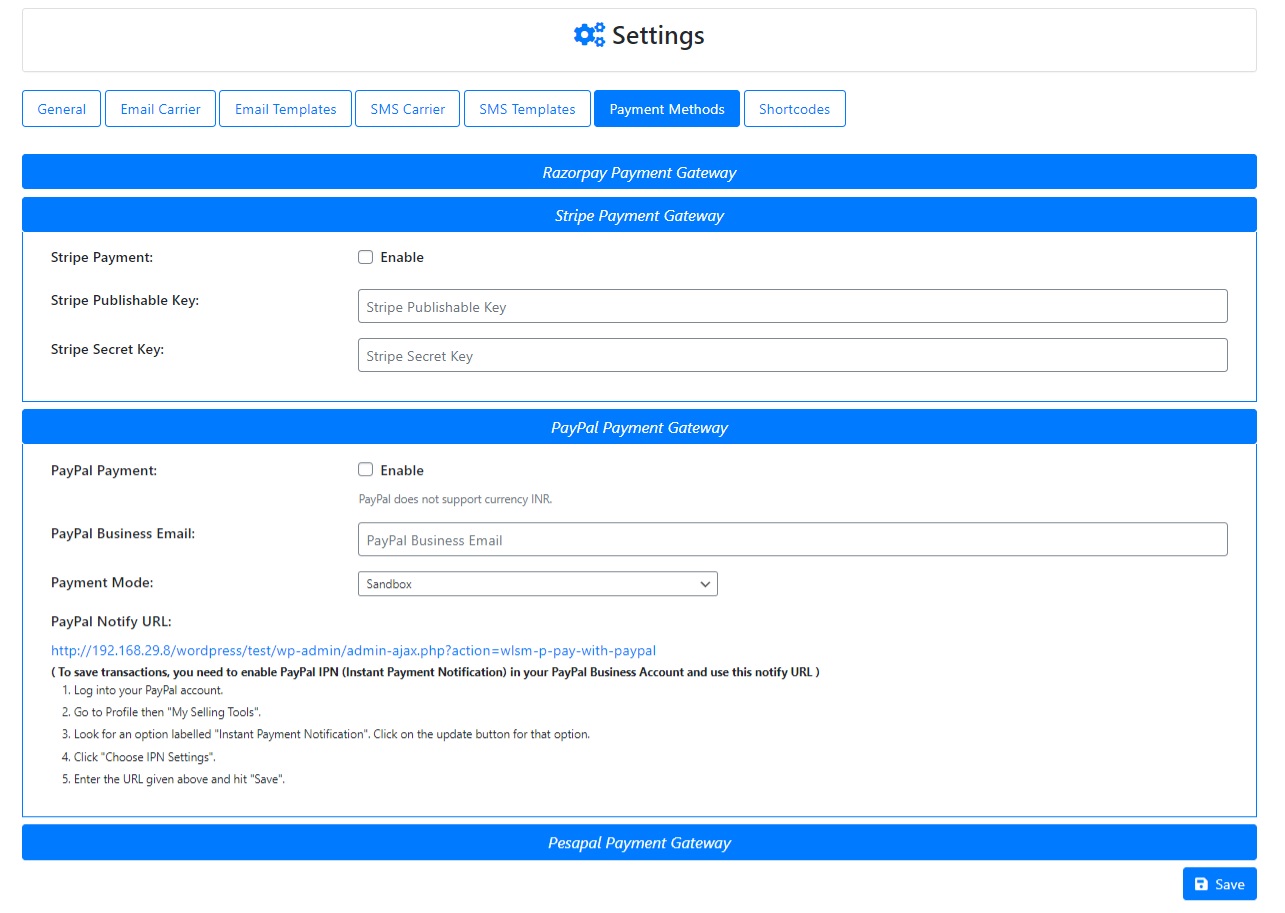
Fee payment can be done by using Stripe, Razorpay, Pesapal, Paystack or PayPal payment gateway.
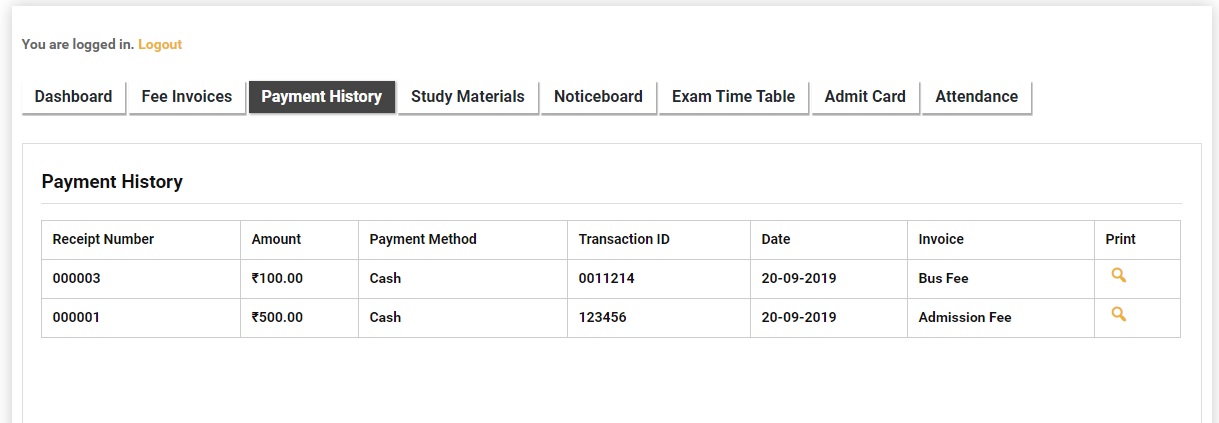
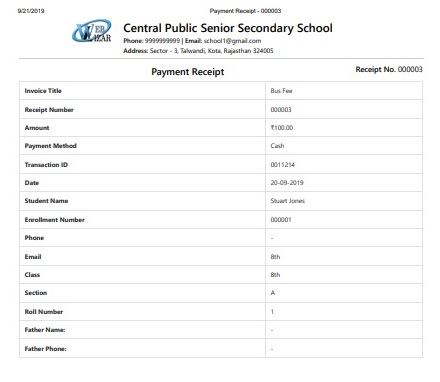
After adding a fee invoice, it supports printing of fee invoices. Also, after making a payment, students or staff can print the payment receipt.
Add expense categories and income categories. Add expense and icome date wise for a school.
Manage library books, generate and print student library cards, issue books to students and keep track of books issued and books return.
In student dashboard, students can view noticeboard, print their ID cards, view pending fee invoices, make payments and view their payment history. Also, they can download study materials, exam time table, admit cards and much more.
Student login form can be display on page via shortcode and also you can place login widget on your website.
The teacher can create a live class or schedule for a specific date.
Multiple teachers can create a live class or schedule for a specific date at the same time
Invoices Will automatically generated if fee type exists for that class
Invoices Will automatically generated if fee type exists for that class
you can see the changes made inside settings after update
1). Go to the "School Management".
2). Add New School.
3). Go to "Dashboard" under "School Management".
4). Select to set the school which you want to in active.

5). Now the school is active school and all the entities under "SM School" corresponds to that school.
1). Go to "Sessions" under "School Management".
2). Add and Manage Sessions.
3). You can add a new session every year by setting its label, start date and end date.
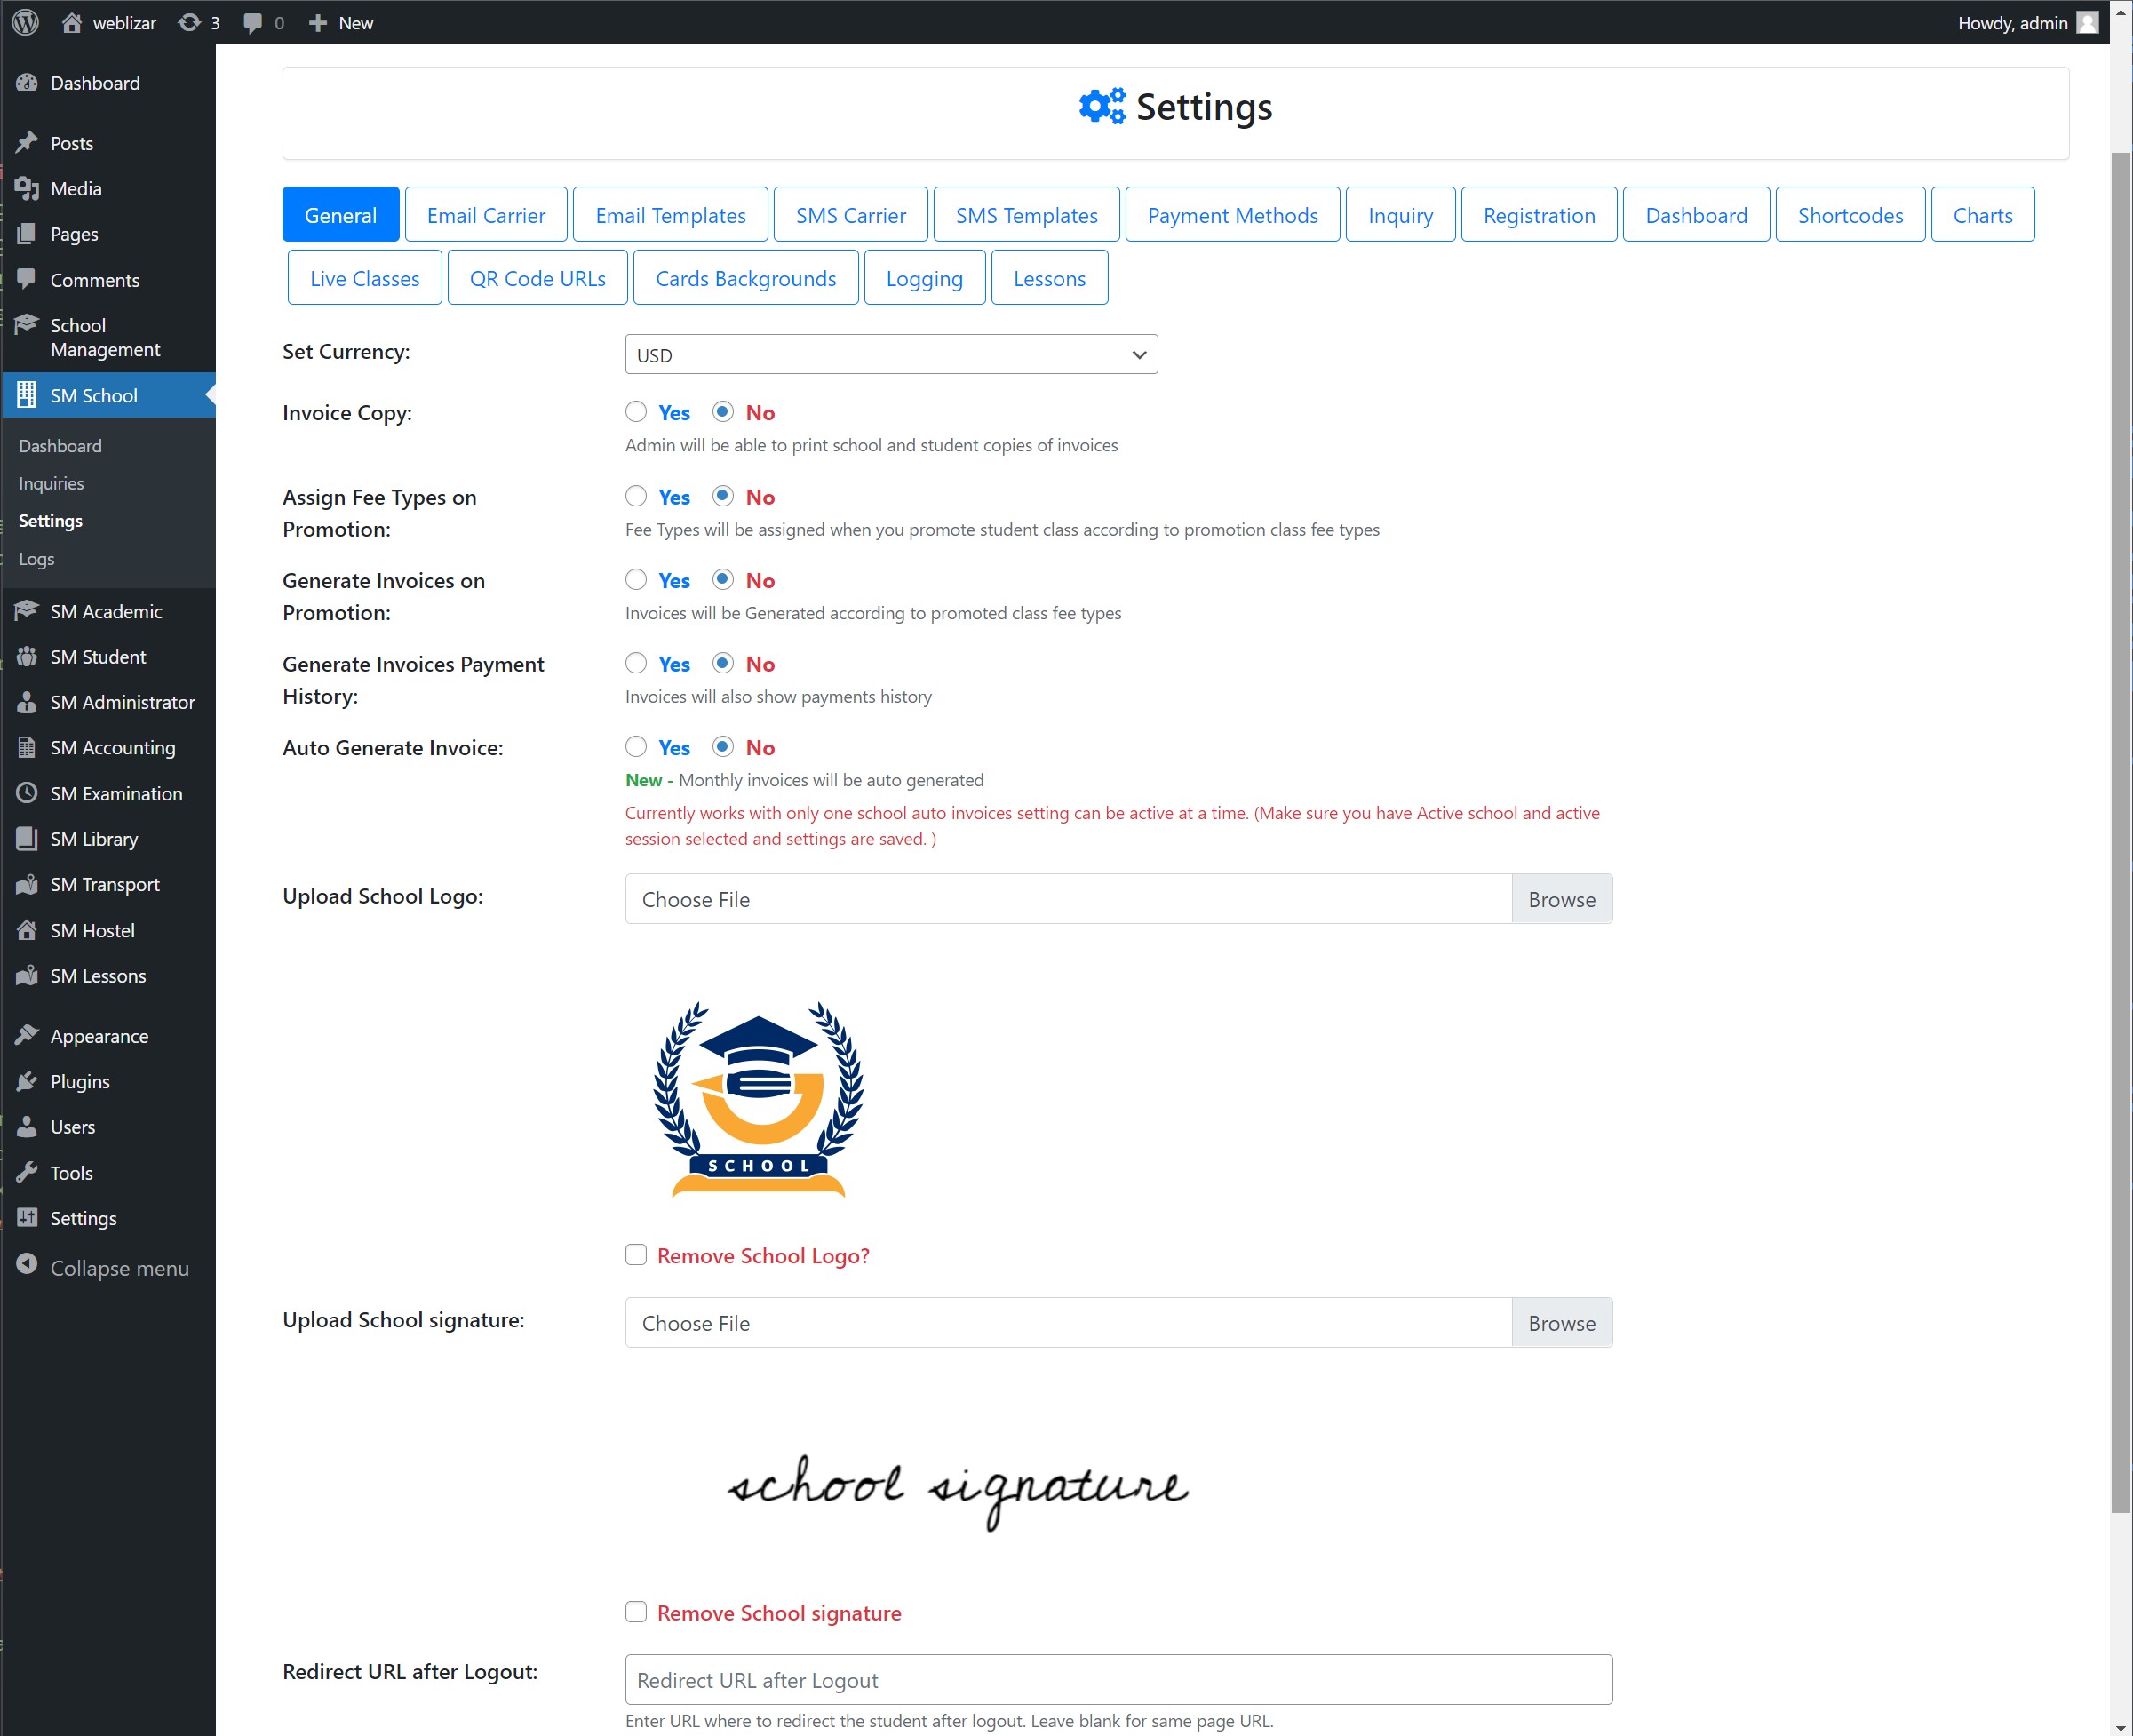
1). Go to "Settings" under "School Management".
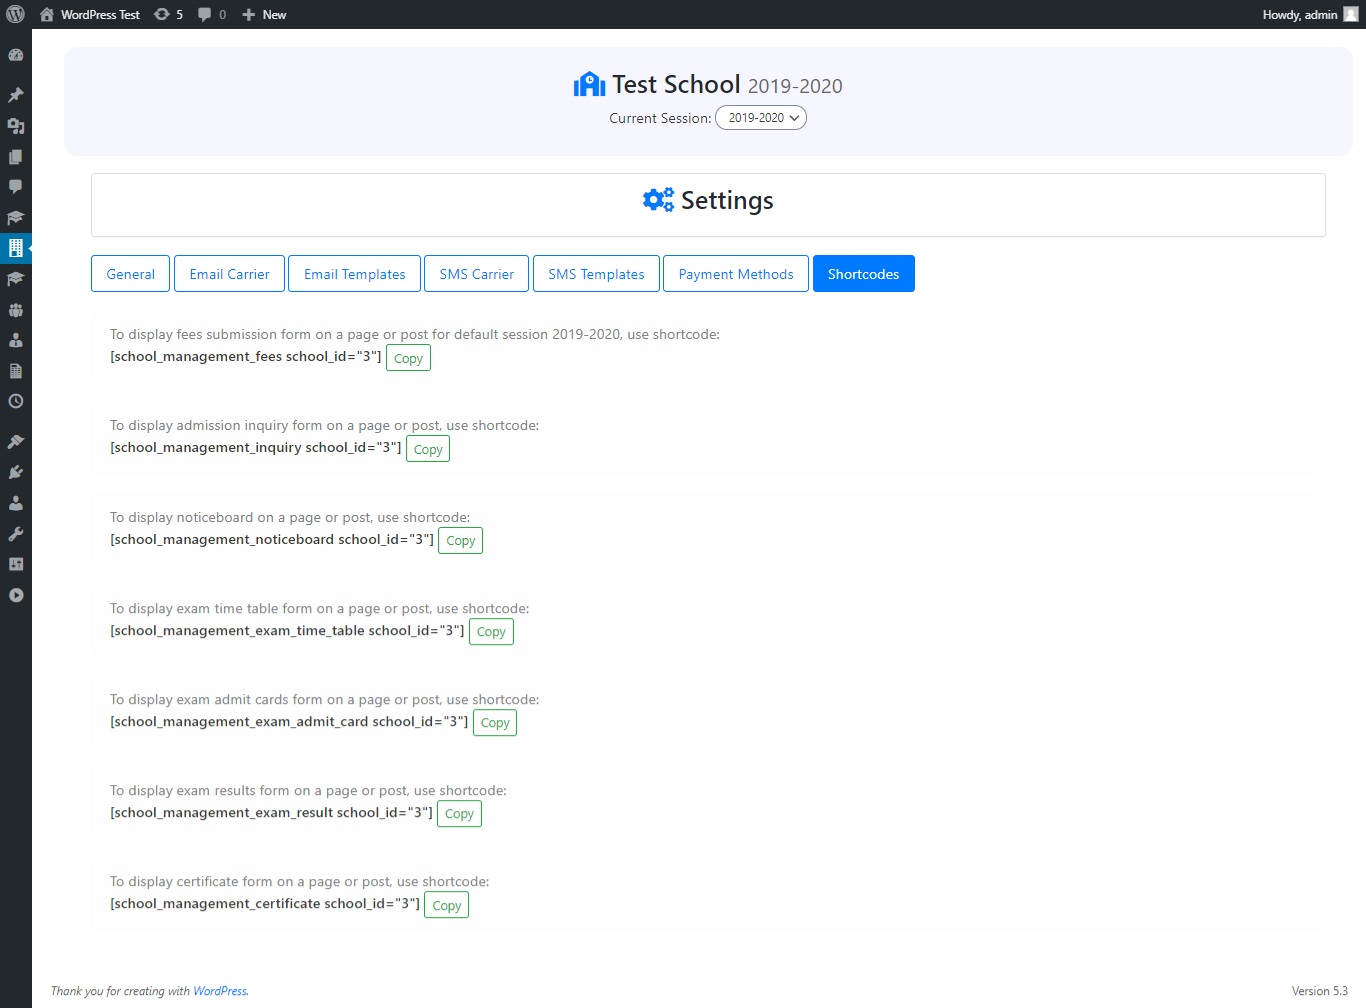
2). Here, you can set current default session, currency and date formatting for all the dates. Also, you can find the shortocdes which you can use in pages.
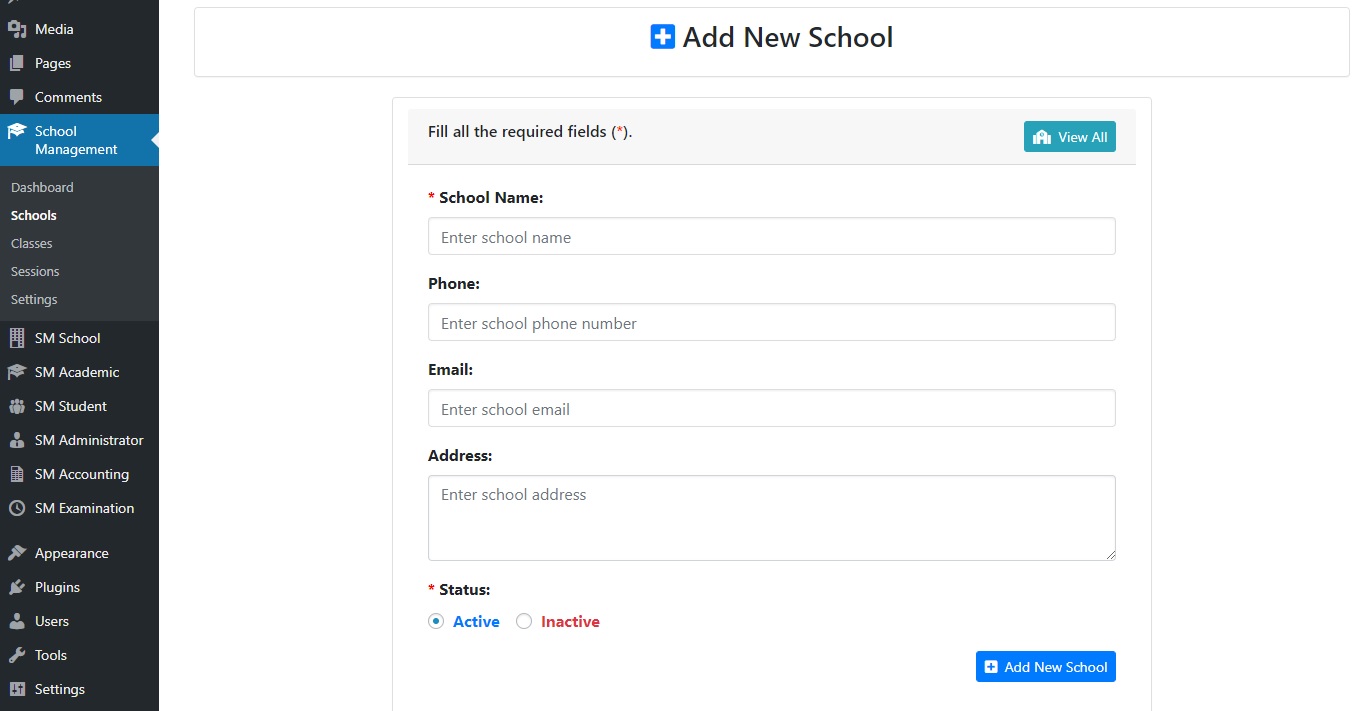
1). Go to "Schools" > "Add New School" under "School Management".
2). Here, you can add a new school by giving its name, address, phone and email.
1). Go to "Classes" under "School Management".
2). Here, you can add a new class.
3). After adding classes, you can assign these classes to schools.
4). For each class, a default section is created. And, there must be at least one section for each class.
1). Go to "Schools" under "School Management".
2). For each school, you can click on "Assign Admins" to assign an administrator to particular school.
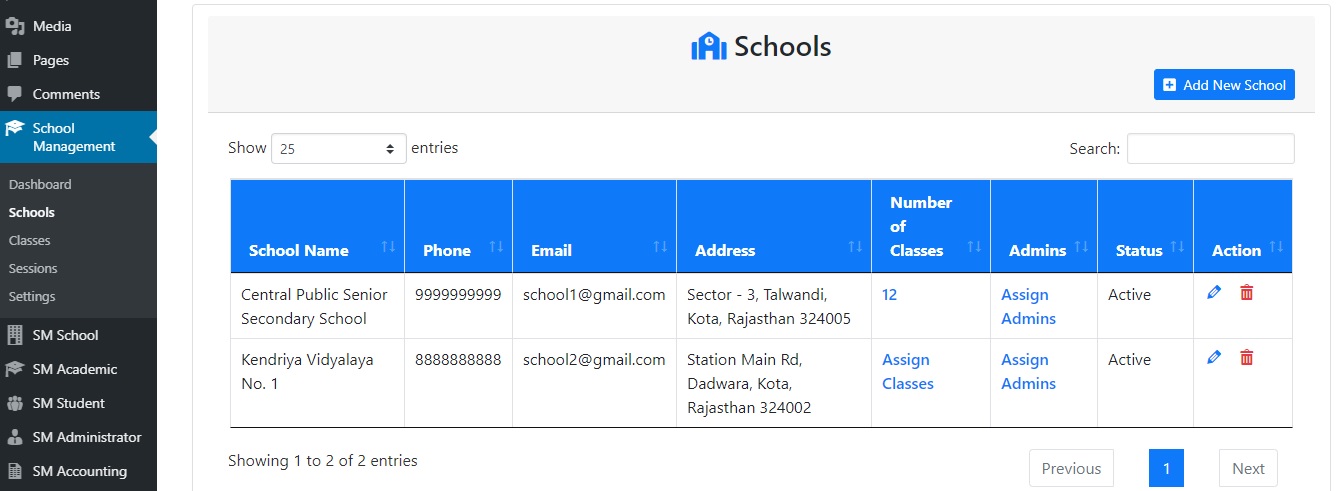
1). Go to "Schools" under "School Management".
2). For each school, you can click on "Assign Classes" to assign classes to particular school.

1). Go to "Settings" under "SM School".
2). Here, you can setup school related settings like SMS templates, SMS providers and email templates and payment methods etc.
3). There are also a number of shortcodes which you can use to show different forms and entities on your website. This includes fees submission form, school noticeboard, class time table, exam time table, admit cards, exam results, certificate form etc.
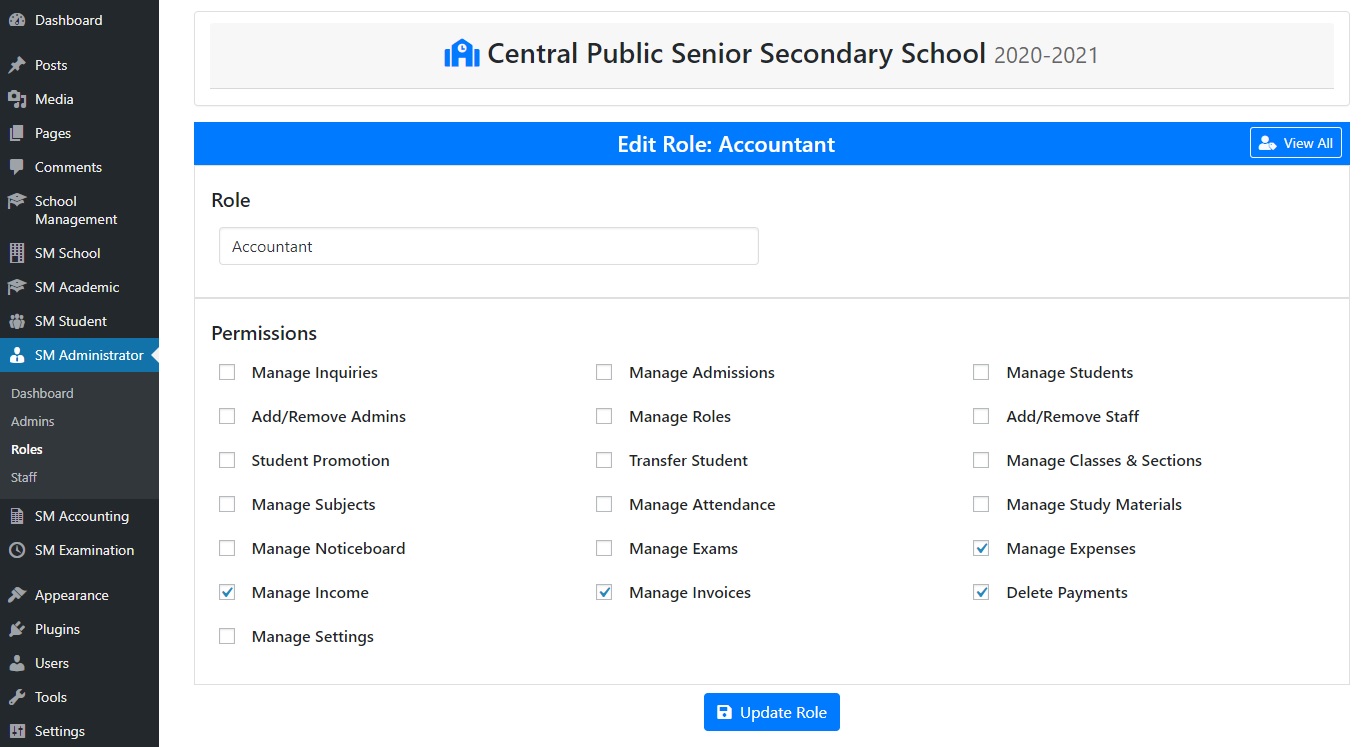
1). Go to "Roles" under "SM Administrator".
2). Click on "Add New Role".
3). Here, you can specify the role name and assign permissions to this role.
1). Go to "Class Sections" under "SM Academic".
3). Here, you can click on number of section and add new section for the class or change the default section.
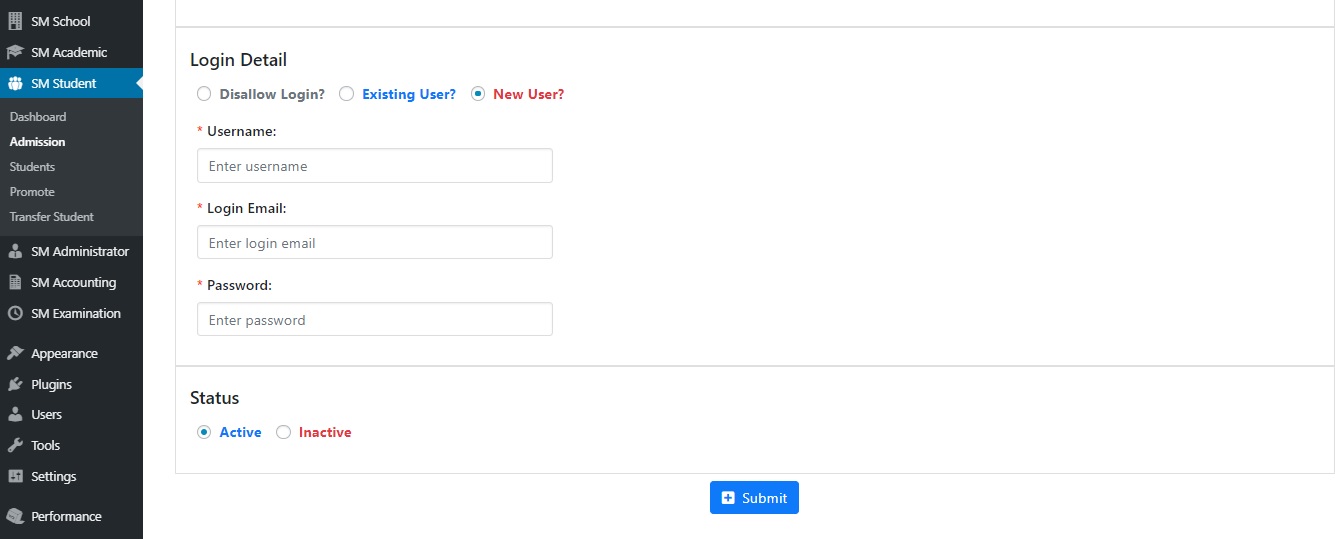
1). Go to "Admission" under "SM Student".
2). Here, you can add a new admission of a student.
3). You need to provide admission number, date, class, section and roll number of a student. For each new admission of a session, a new enrollment number is generated.
4). You can also provide login details for this student which the student can use to login to the student dashboard on a page of your website.
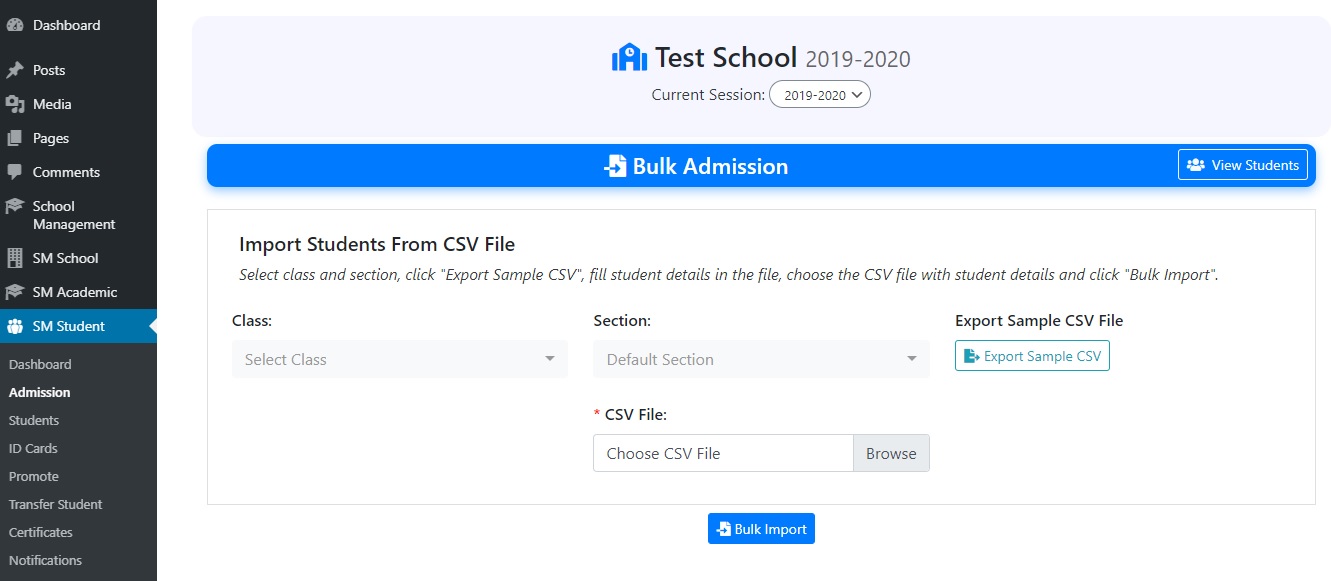
4). You can also import students from CSV file. For this click on "Bulk Admission", select class and section, then click on "Export Sample CSV". Fill student details in the file, choose the CSV file with student details and click "Bulk Import".
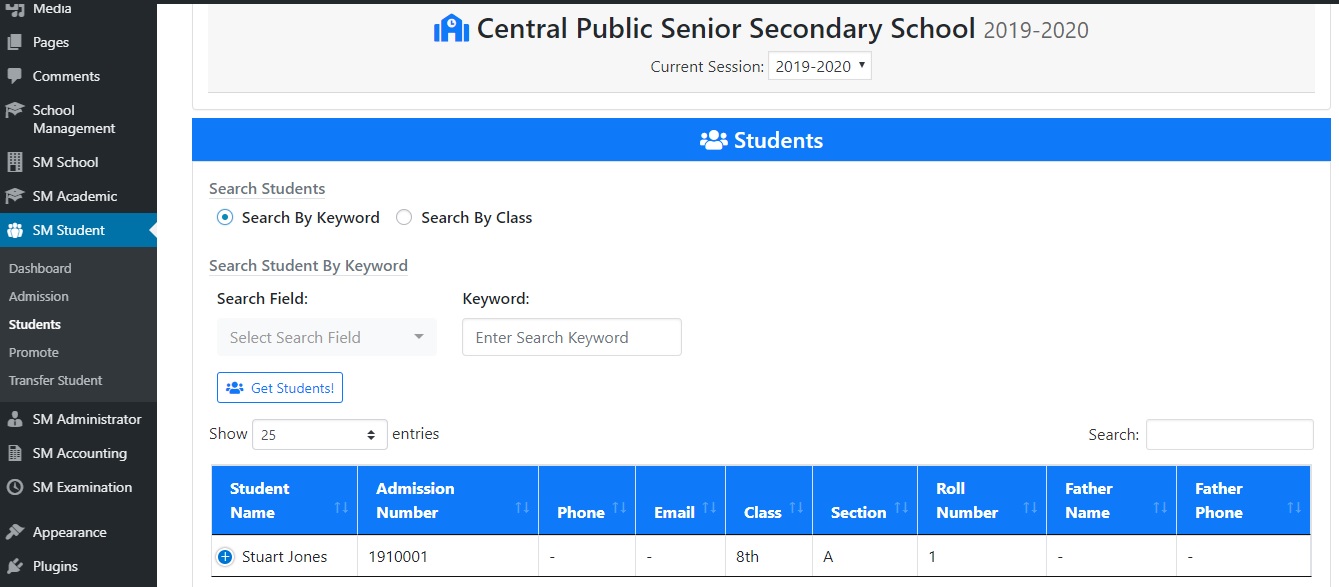
1). Go to "Students" under "SM Student".
2). Here, you can manage the students, edit their profile.
3). Also, you can search and filter the students class wise, section wise and by keyword.
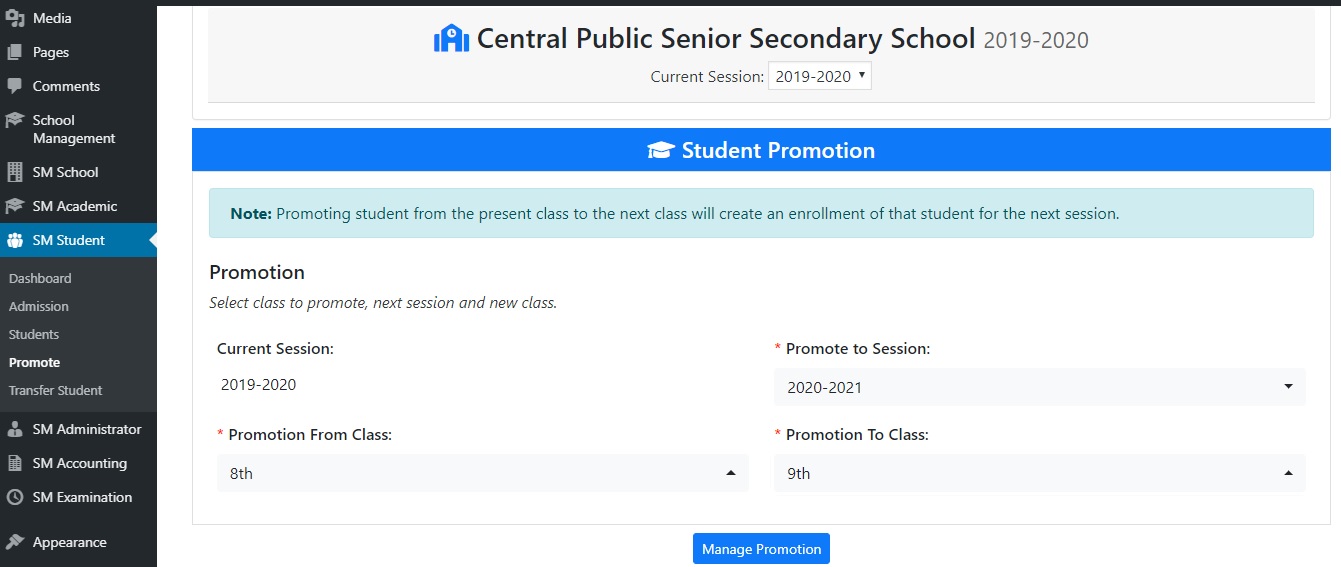
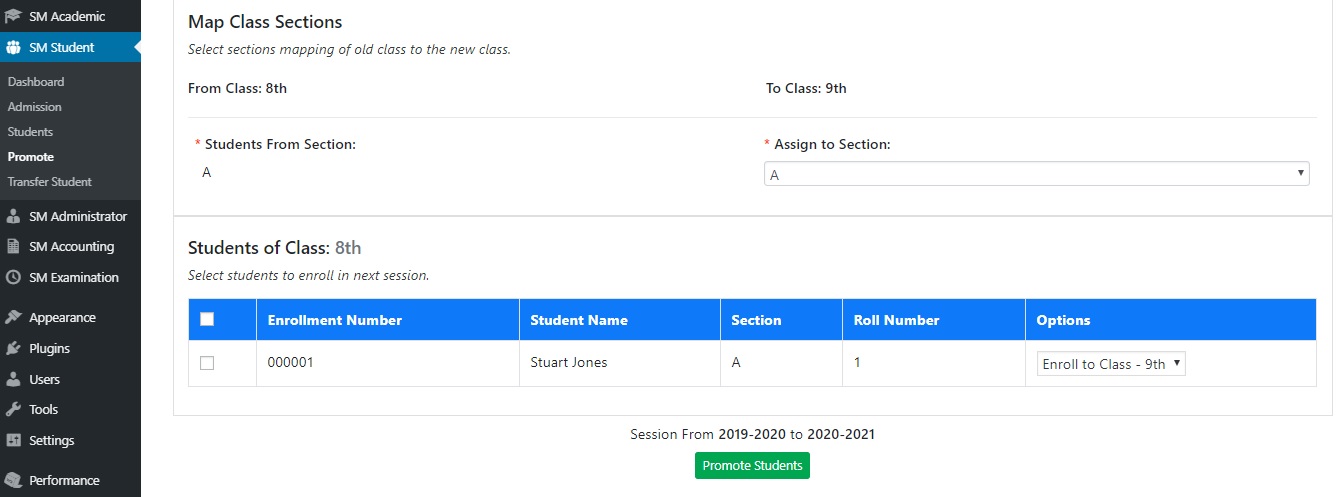
1). Go to "Promote" under "SM Student".
2). Here, you can promote a class students to new class and new session.
3). To promote a student, select class to promote and next class, then click "Manage Promotion". map class sections.
4). Next, map the class sections from old class to new class.
5). Click "Promote Student" and confirm.
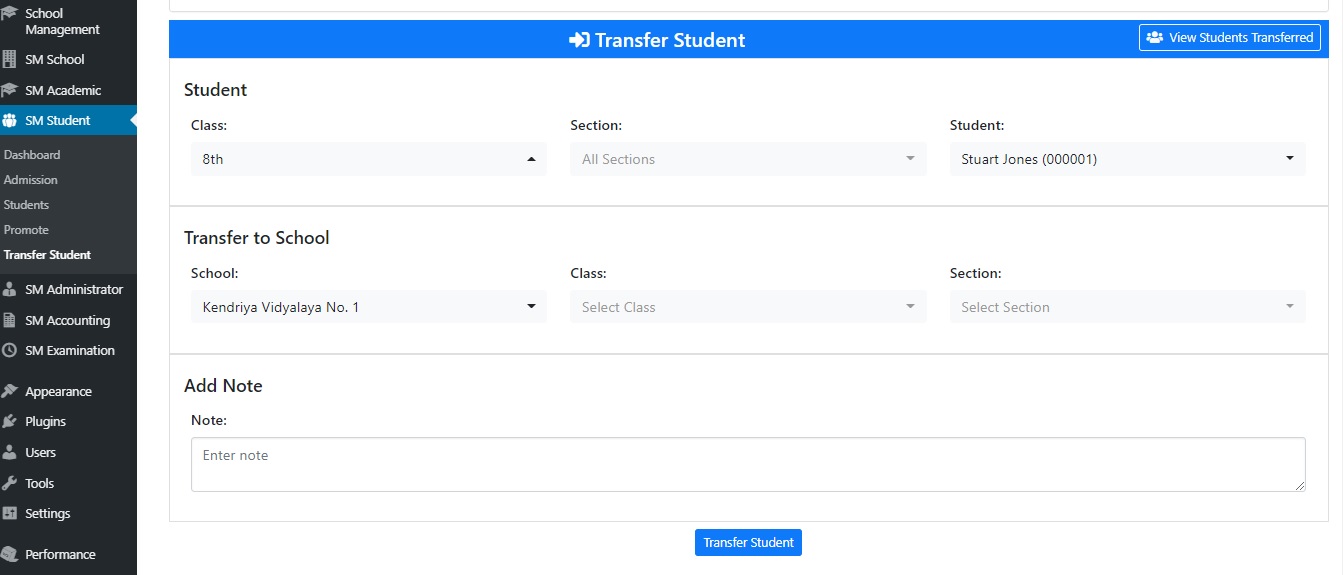
1). Go to "Transfer Student" under "SM Student".
2). Here, you can find students transferred to other schools and students transferred to this school.
3). To tranfer student to other school. Click on "Transfer Student", select next school, class and confirm the transfer.

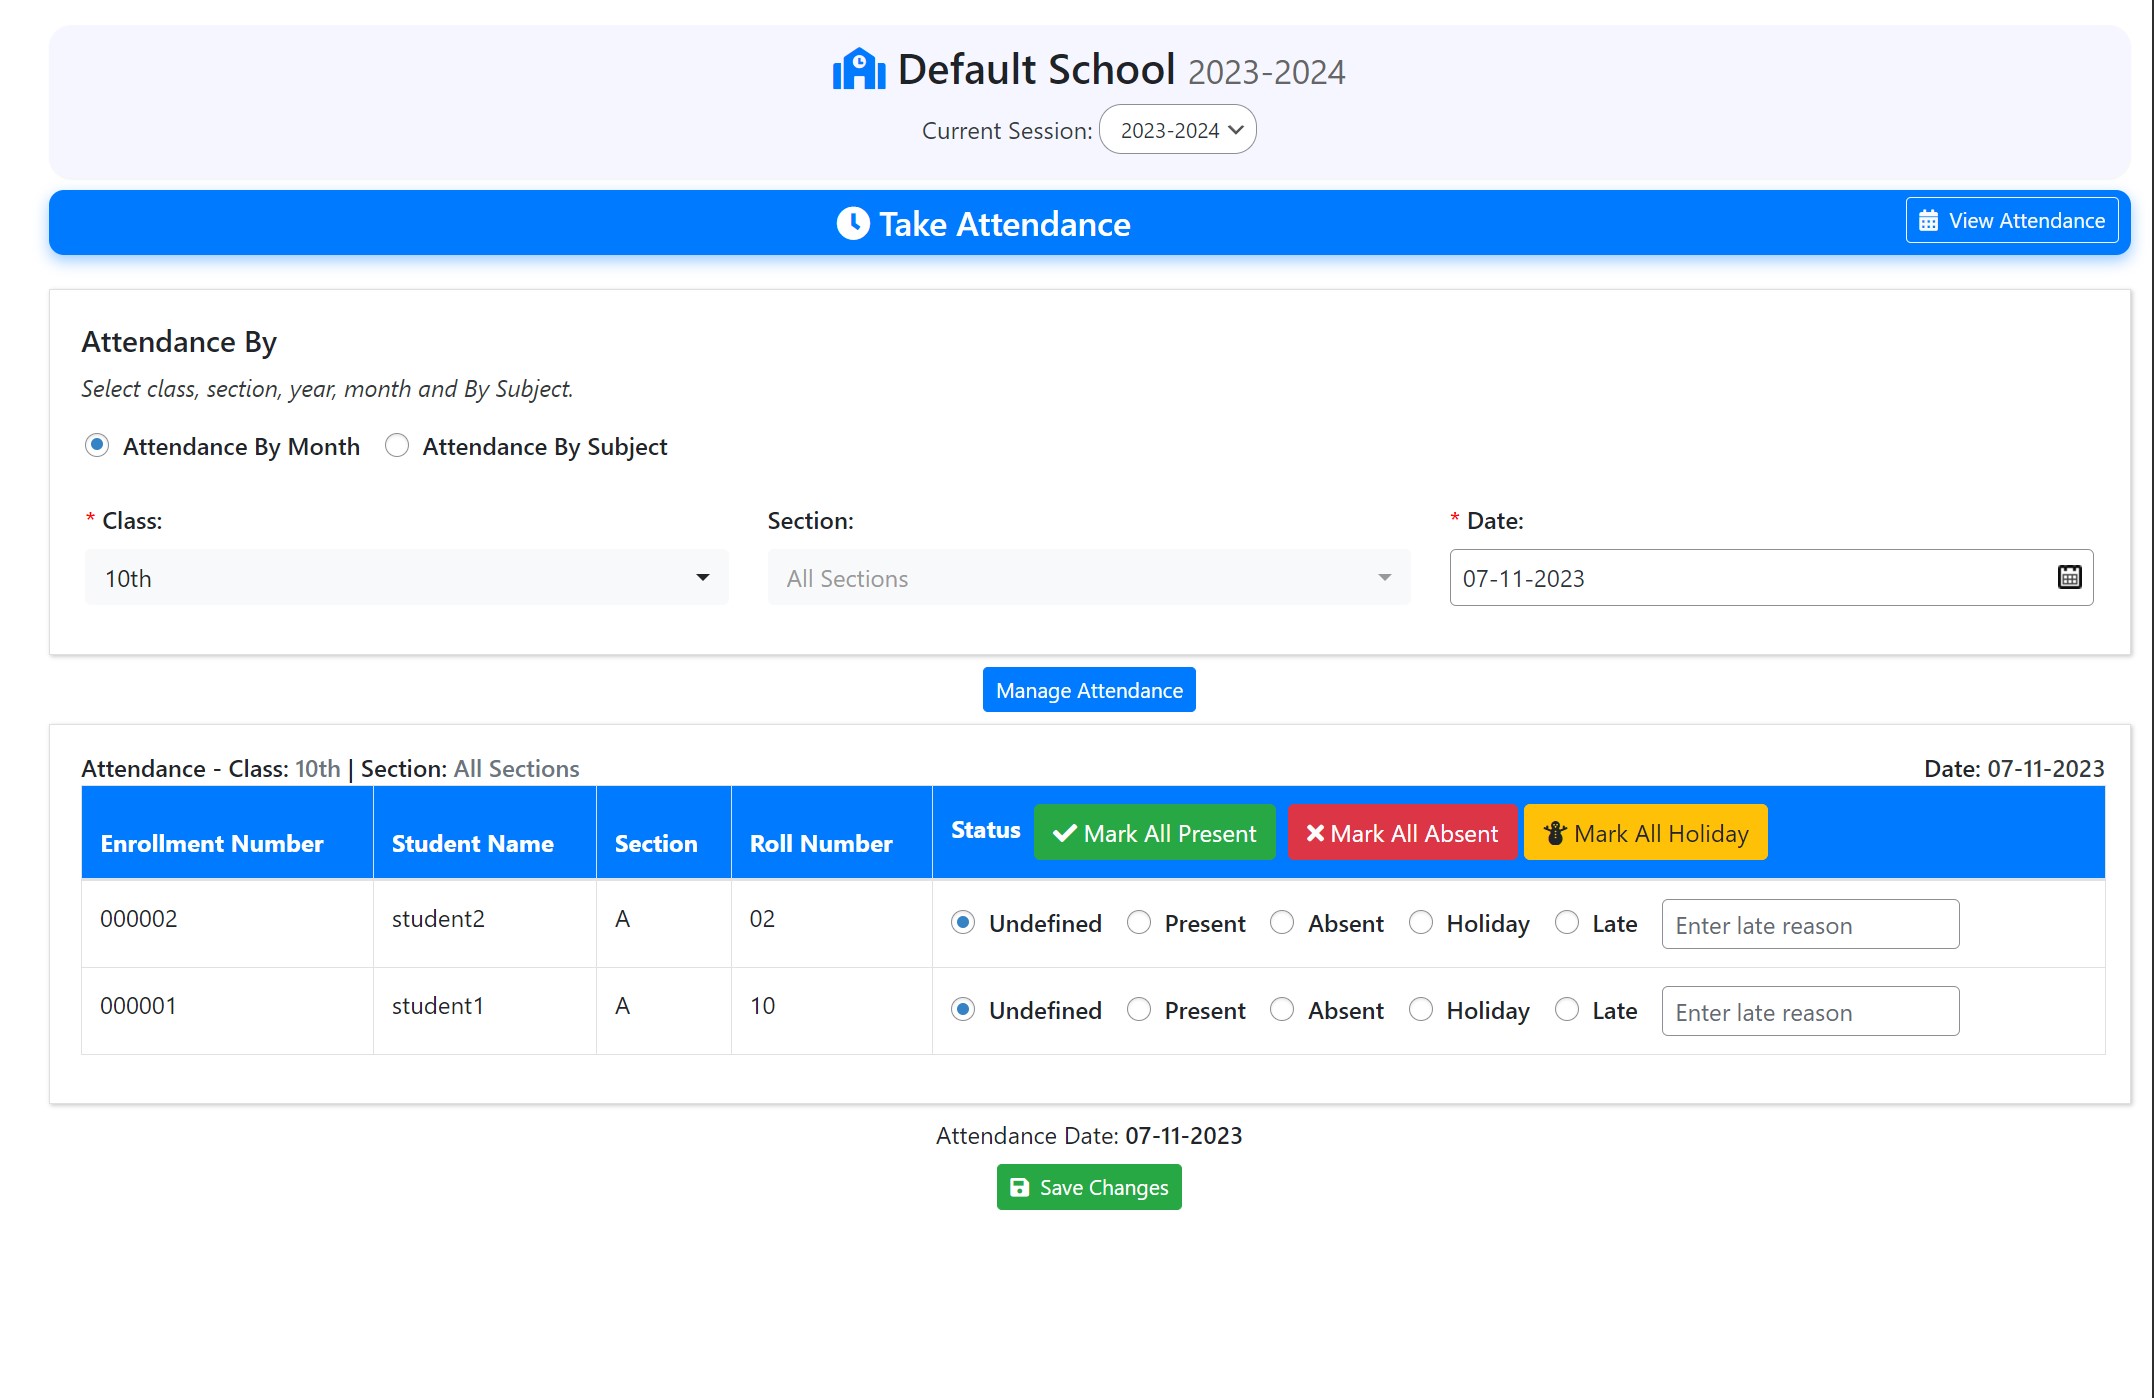
1). Go to "Attendance" under "SM Academic".
2). Here, you can take daily attendance of a class.
3). Also, you can generate a printable attendance sheet for the class.
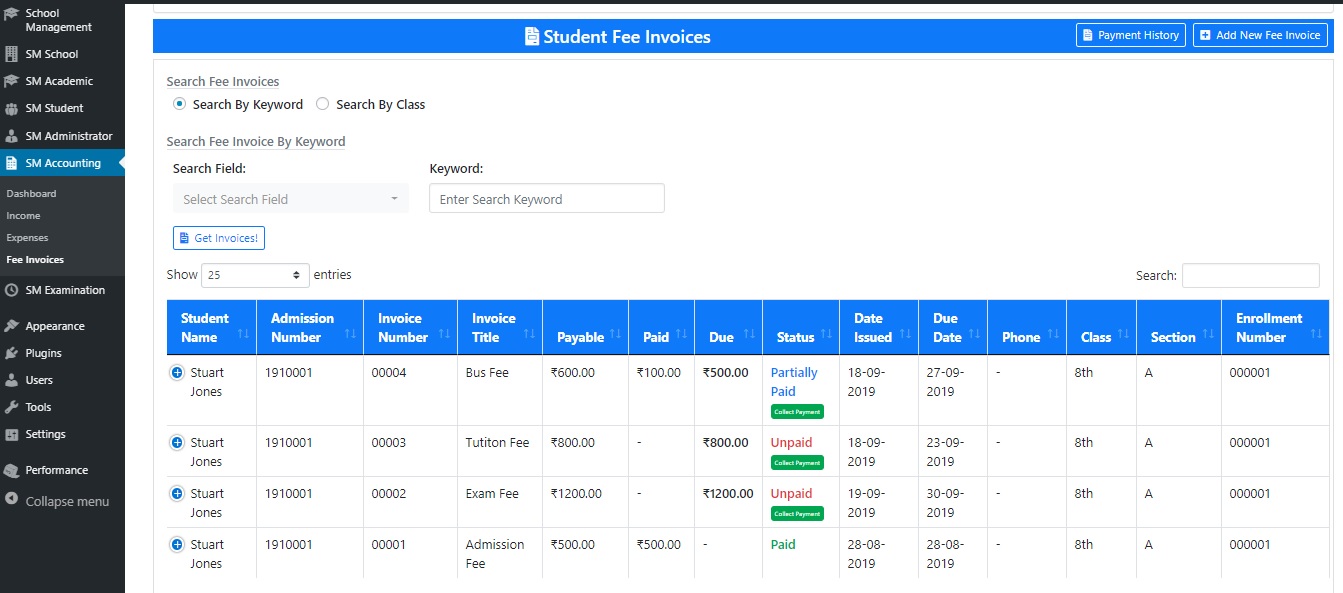
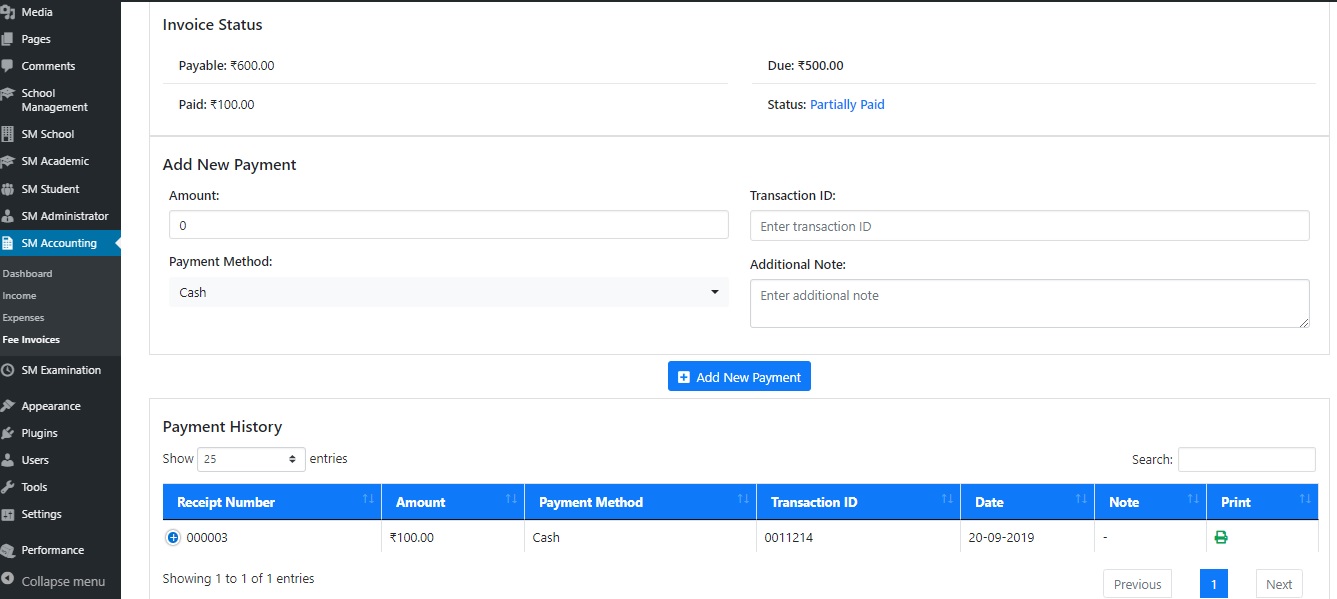
1). Go to "Fee Invoices" under "SM Accounting".
2). Here, you can either generate a single invoice or bulk invoices. Also, you can specify if you want to allow partial payments for the invoice.
3). If you are generating a single invoice, you can collect payment for that invoice at the same step.
4). After generating the invoice, staff can print the invoice. Also, students can view their pending invoices in student dashboard and pay their fees.
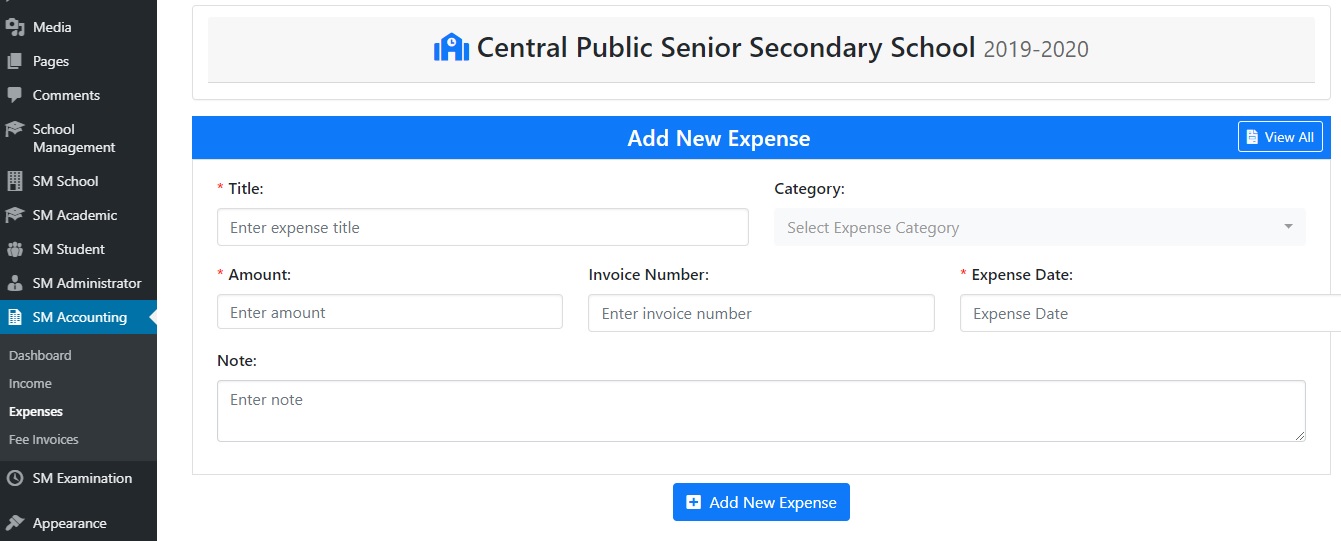
1). Go to "Expenses" under "SM Accounting".
2). Here, you can add expense and manage expenses.
3). Also, you can group the expenses by category. For this, you need to create expense categories.
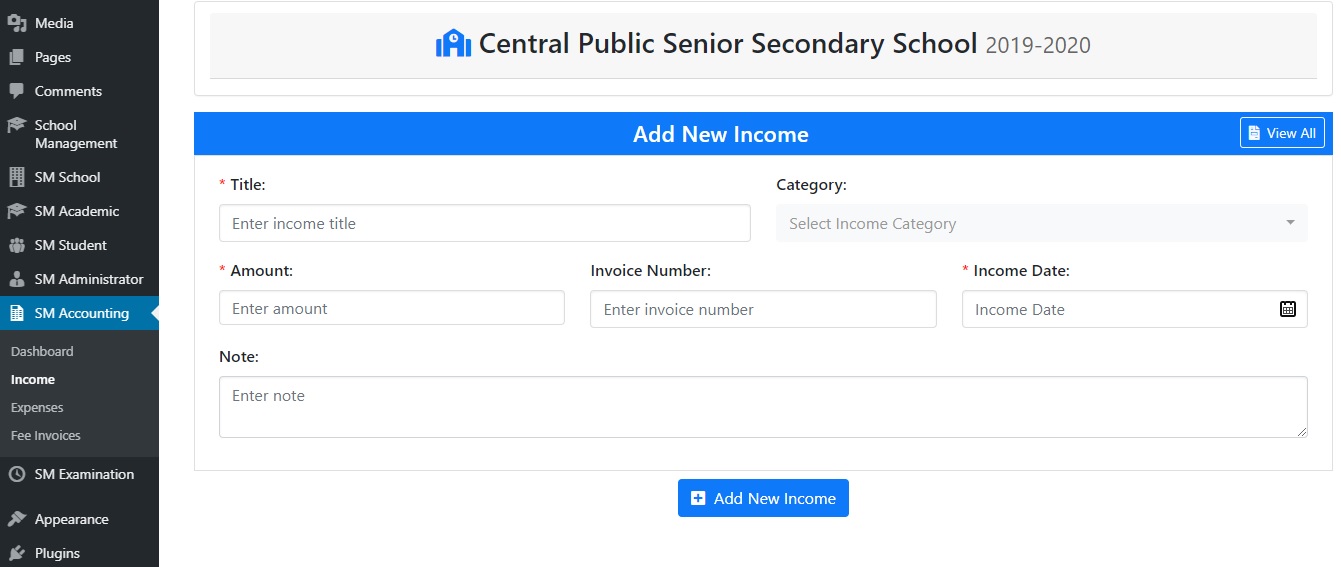
1). Go to "Income" under "SM Accounting".
2). Here, you can add income and manage income.
3). Similiar to expense, you can group the income by category. For this, you need to create income categories.
1). When you genreate invoice, you can later collect payments for this invoice.
2). You can specify payment method used and provide transaction ID for adding offline payment.
3). Students can also pay their fees by using online payment like Stripe, Razorpay, PayPal etc.
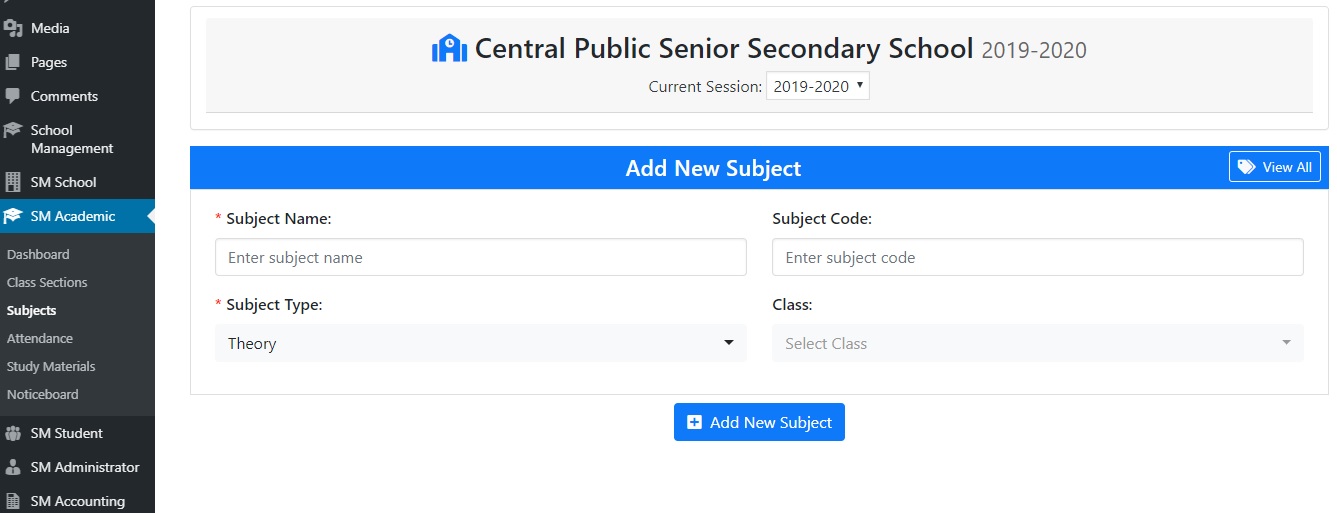
1). Go to "Subjects" under "SM Academic".
2). Here, you can add class subjects, their subject code etc.
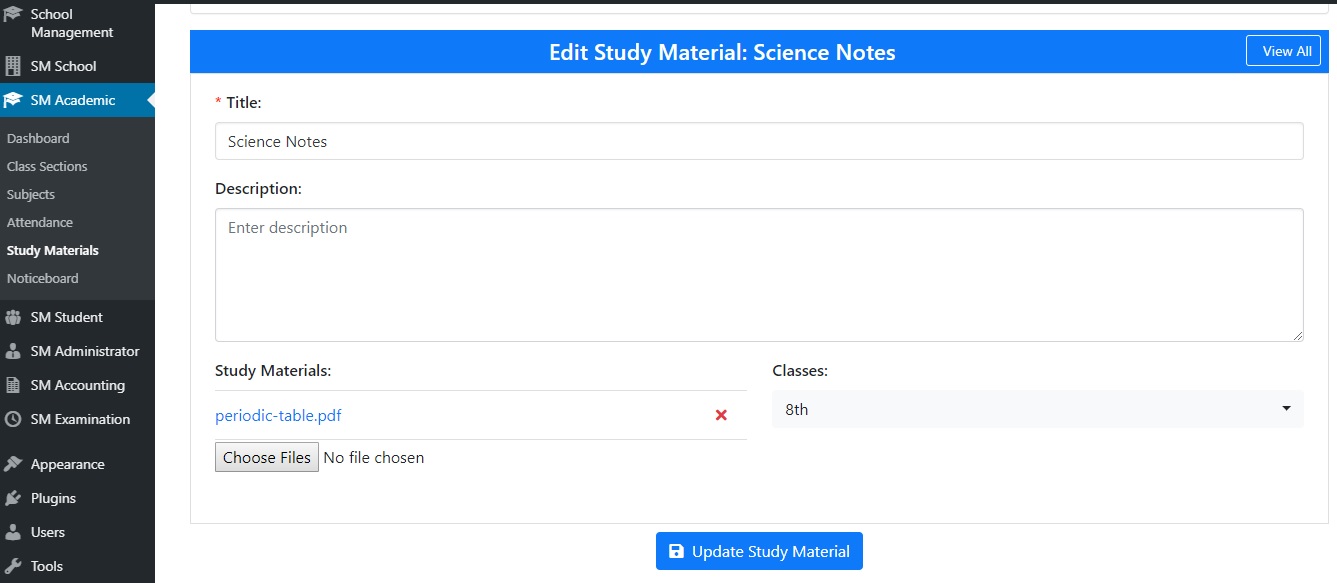
1). Go to "Study Materials" under "SM Academic".
2). Here, you can add study materials and class notes.
3). Also, you need to select the classes for which these study materials need to be available.
4). Students belong to these classes will be able to view and download these study materials from dashboard.
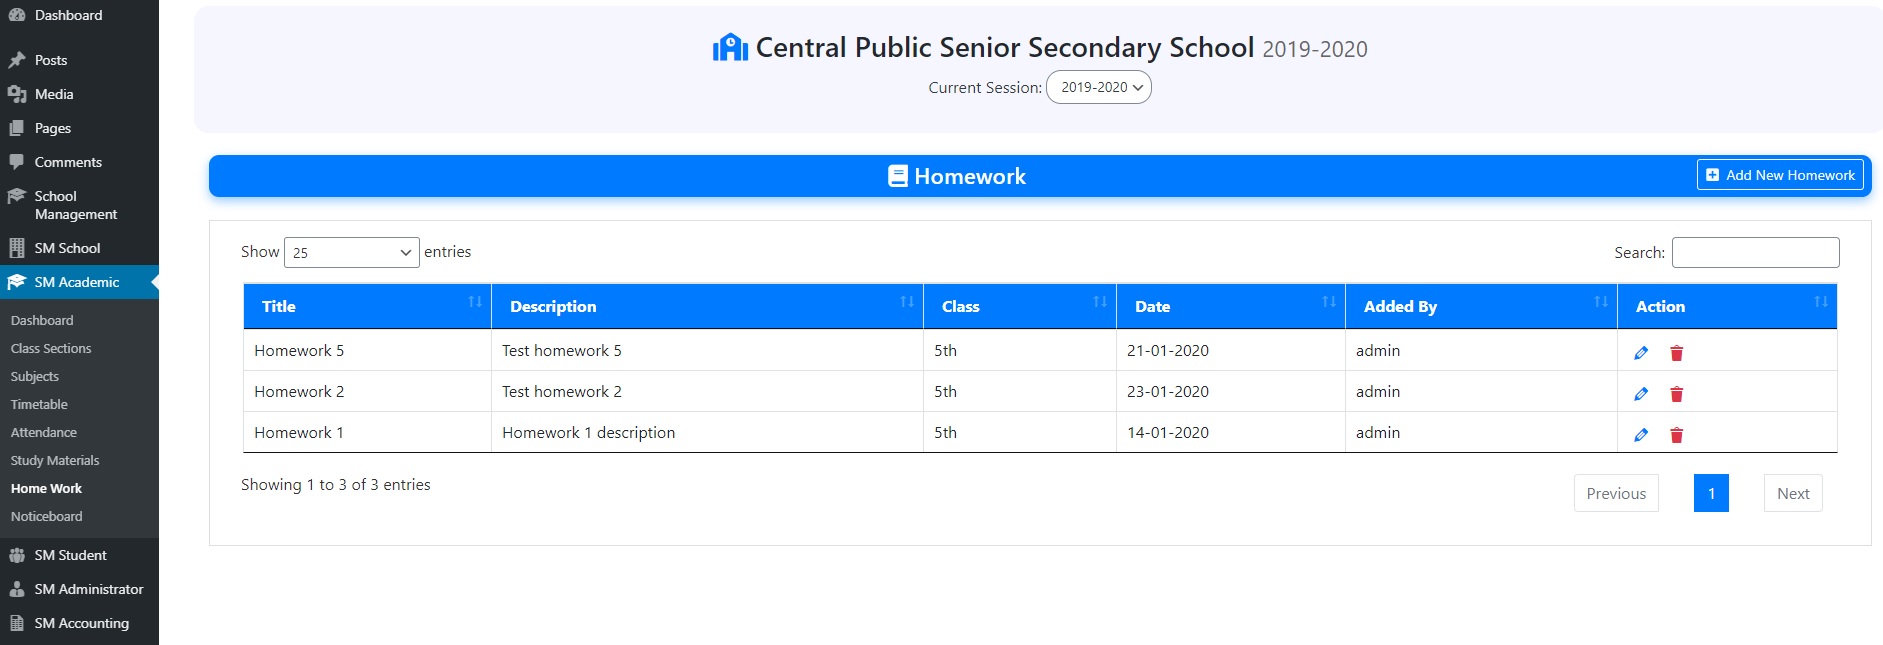
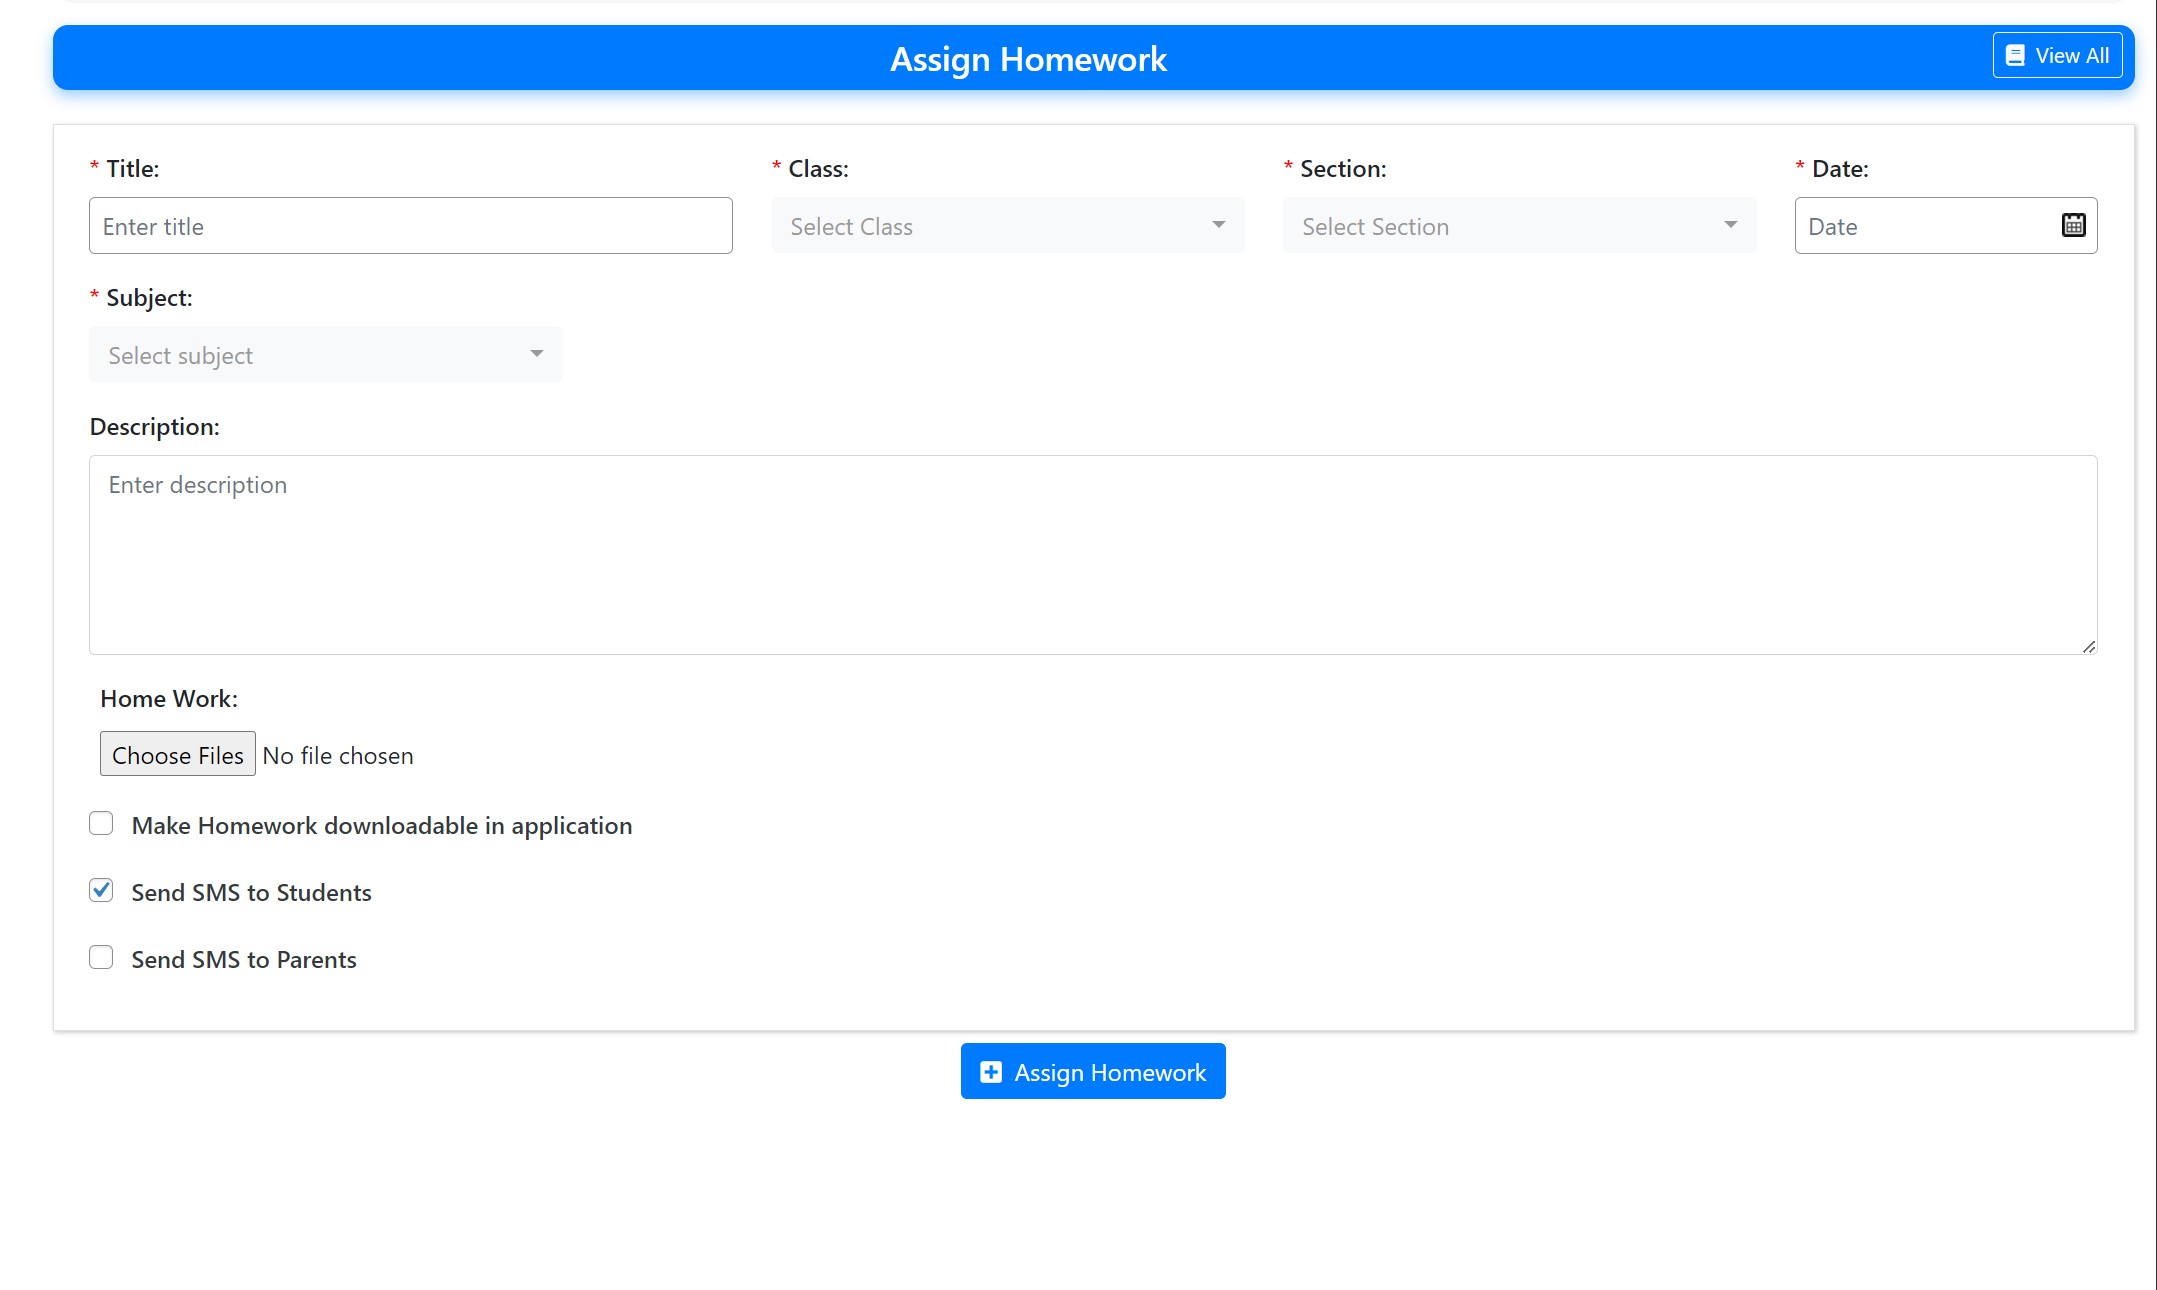
1). Go to "Home Work" under "SM Academic".
2). Here, you can assign home work to students of class in sections.
3). Also, you can send SMS to student or parent at the same time.
4). This homework will also be visible in student dashboard.
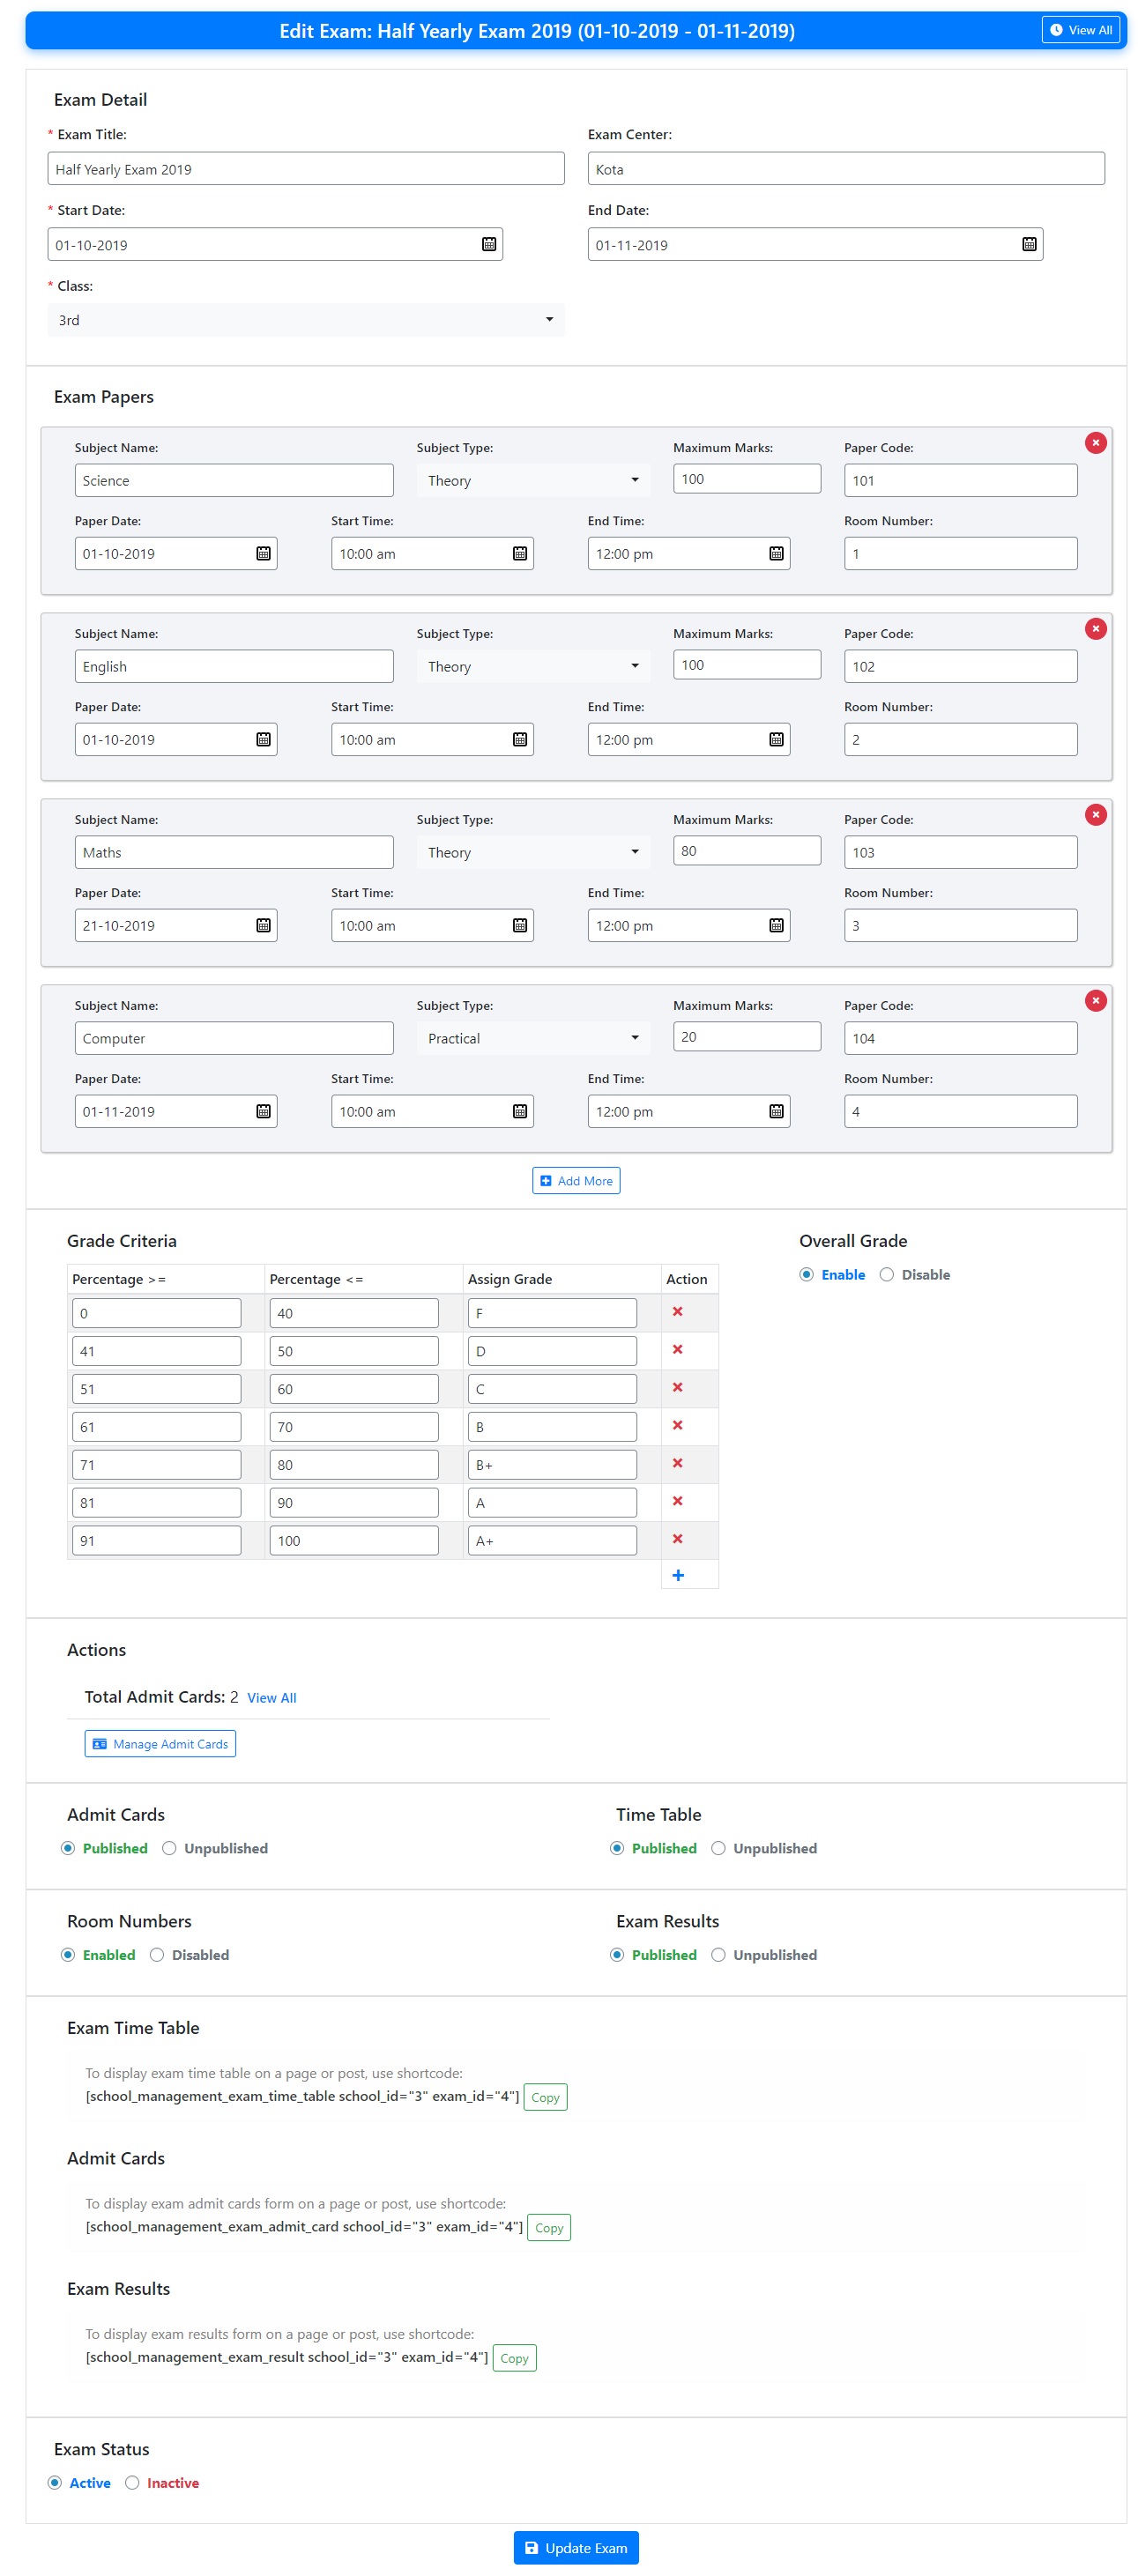
1). Go to "Exams" under "SM Examination".
2). Here, you can add exam, exam center, exam papers and timings, grade criteria, exam date and room numbers.
3). Using these information, the exam time table is generated which you can publish.
4). You can also generate and publish admit cards for students. When generating admit cards, you need to create series of roll numbers for exam. You can also specify roll number prefix.
5). Students can download their admit cards from dashboard.
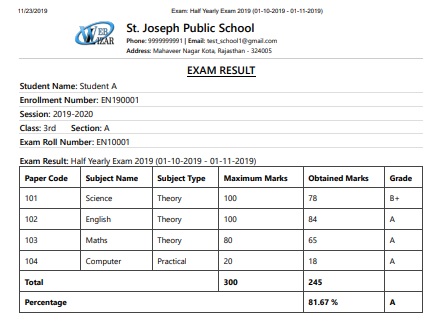
1). Go to "Exam Results" under "SM Examination".
2). Here, you can add and view exam results.
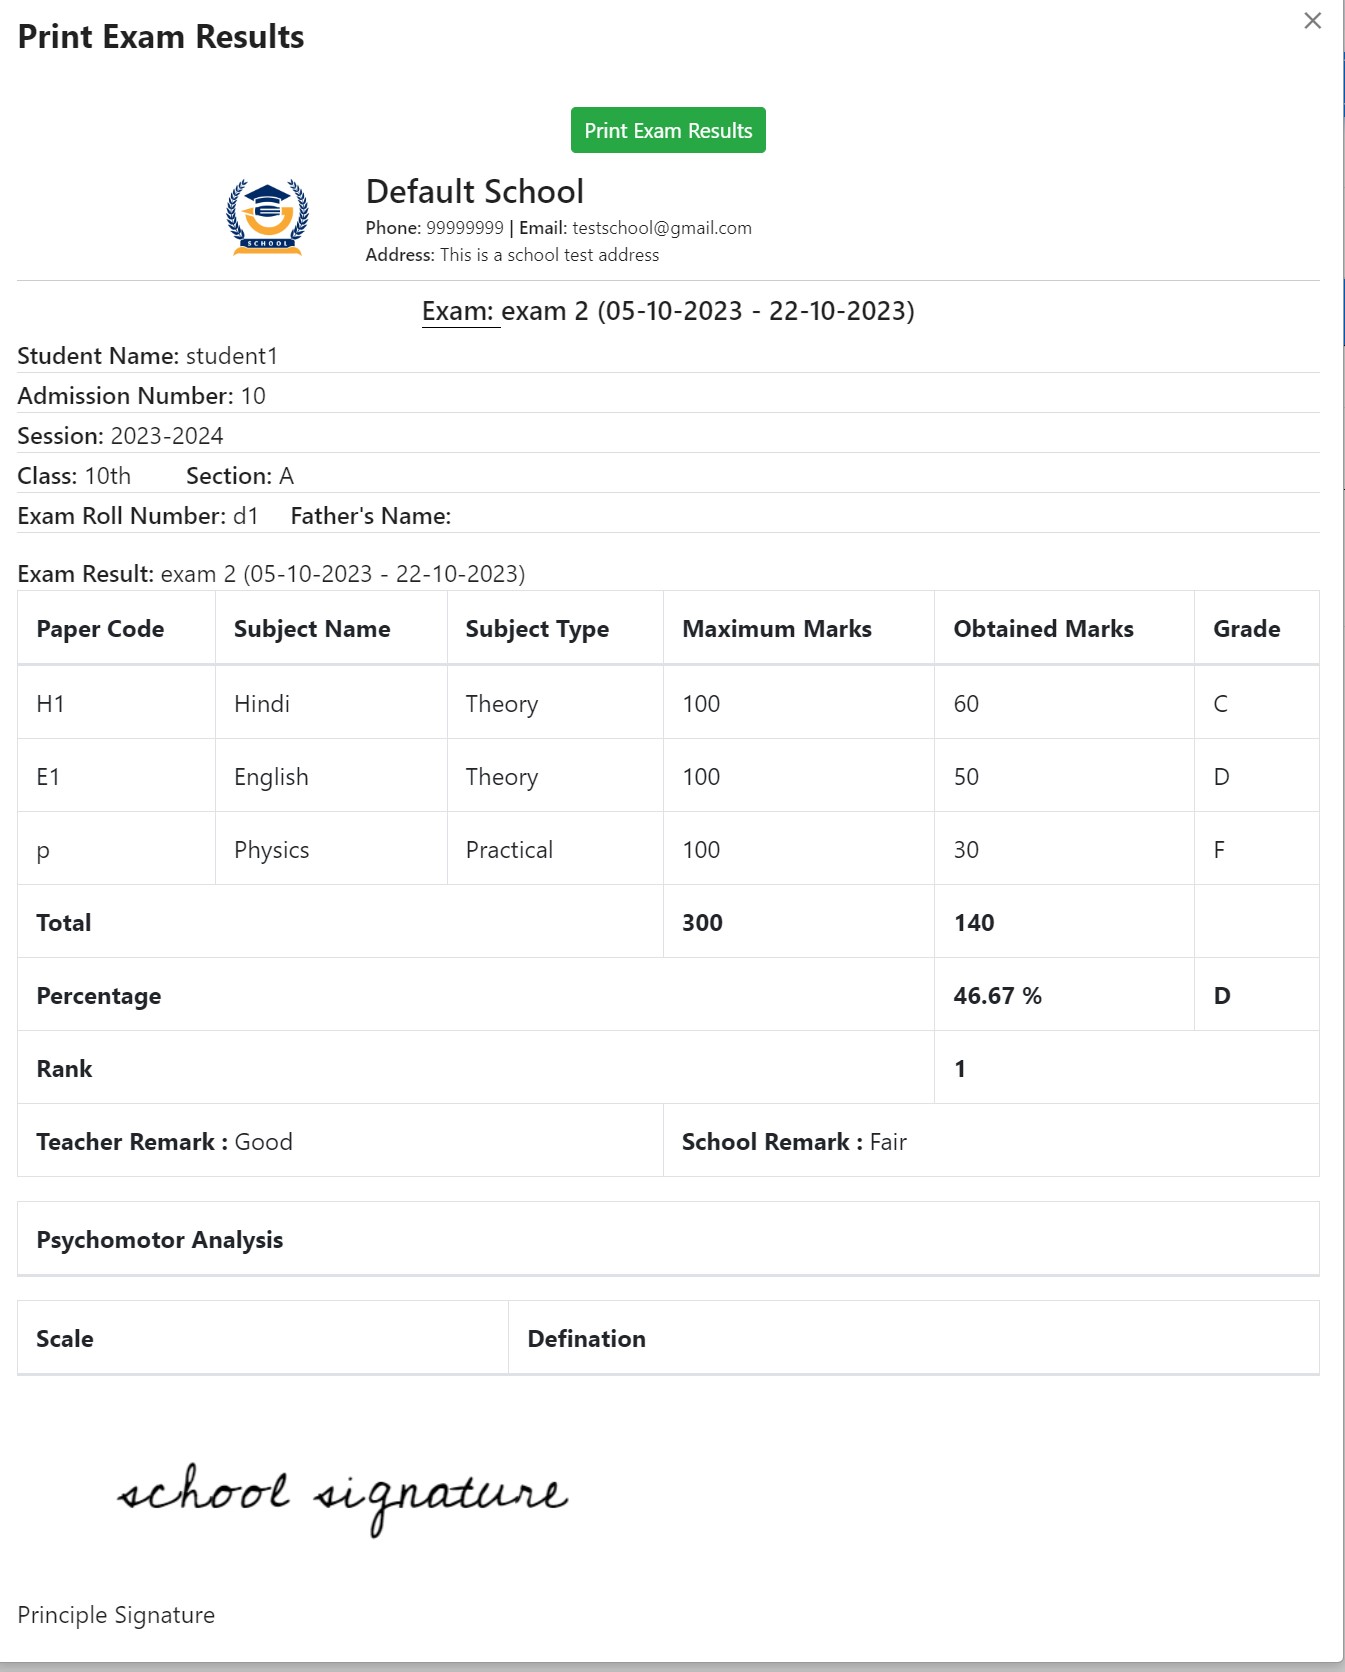

3). Select student, fill obtained marks for each subject and click "Add Exam Results".
4). Students can view exam results once the exam results have been published.
1). Go to "Results Assessment" under "SM Examination".
2). Here, you can view overall results assessment of a student.
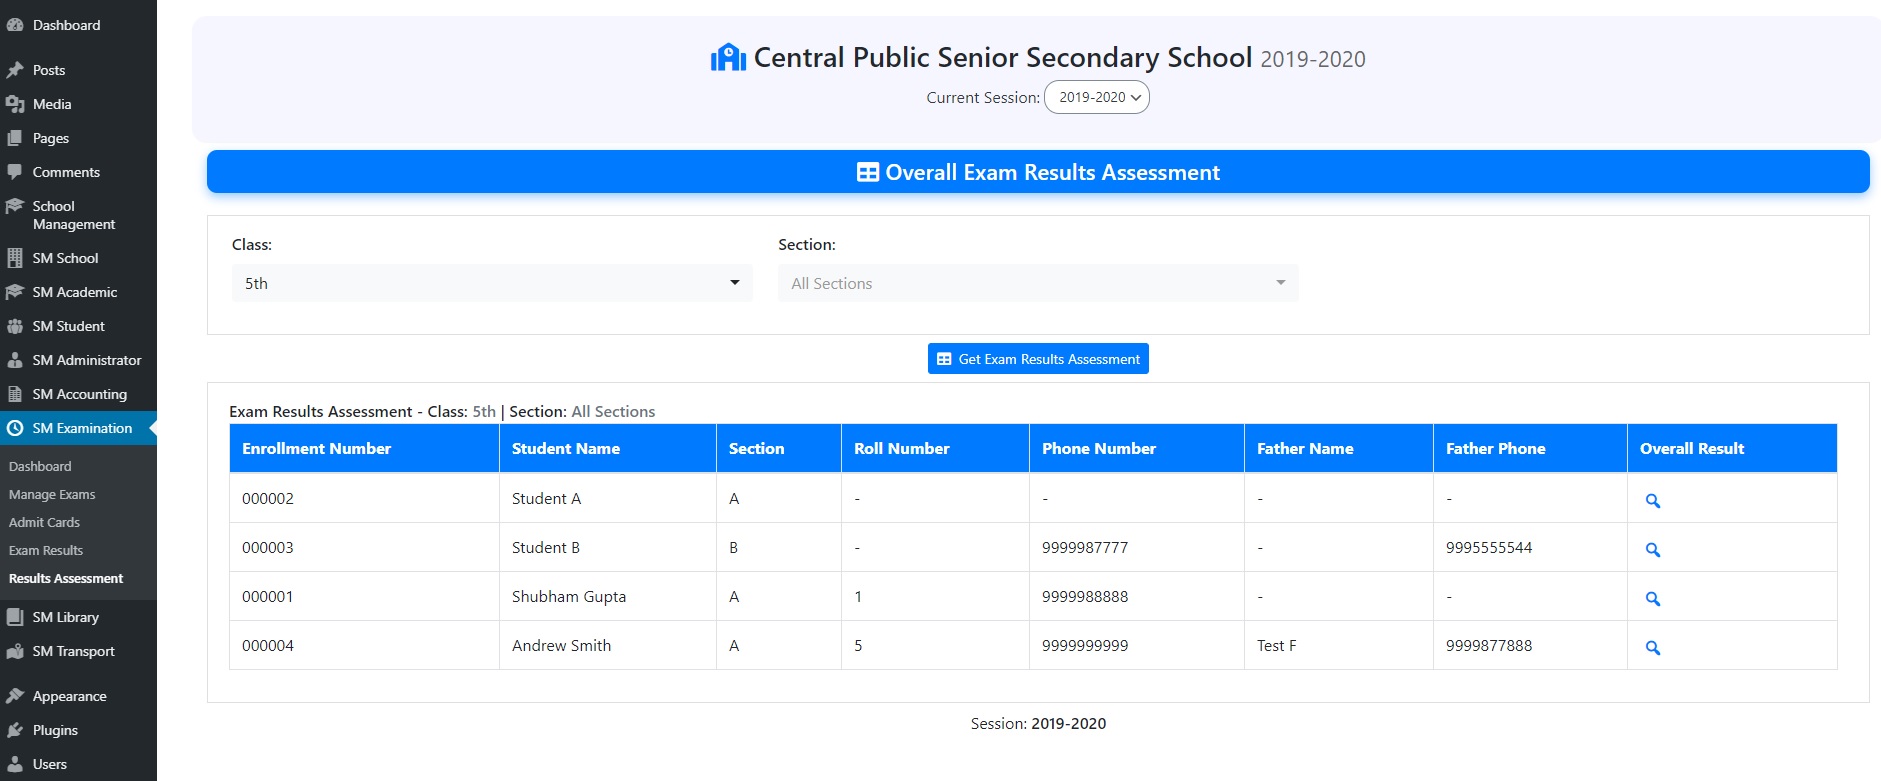
3). Select class, section, then click "Get Exam Results Assessment".
4). Then, you print out results assessment of a student.
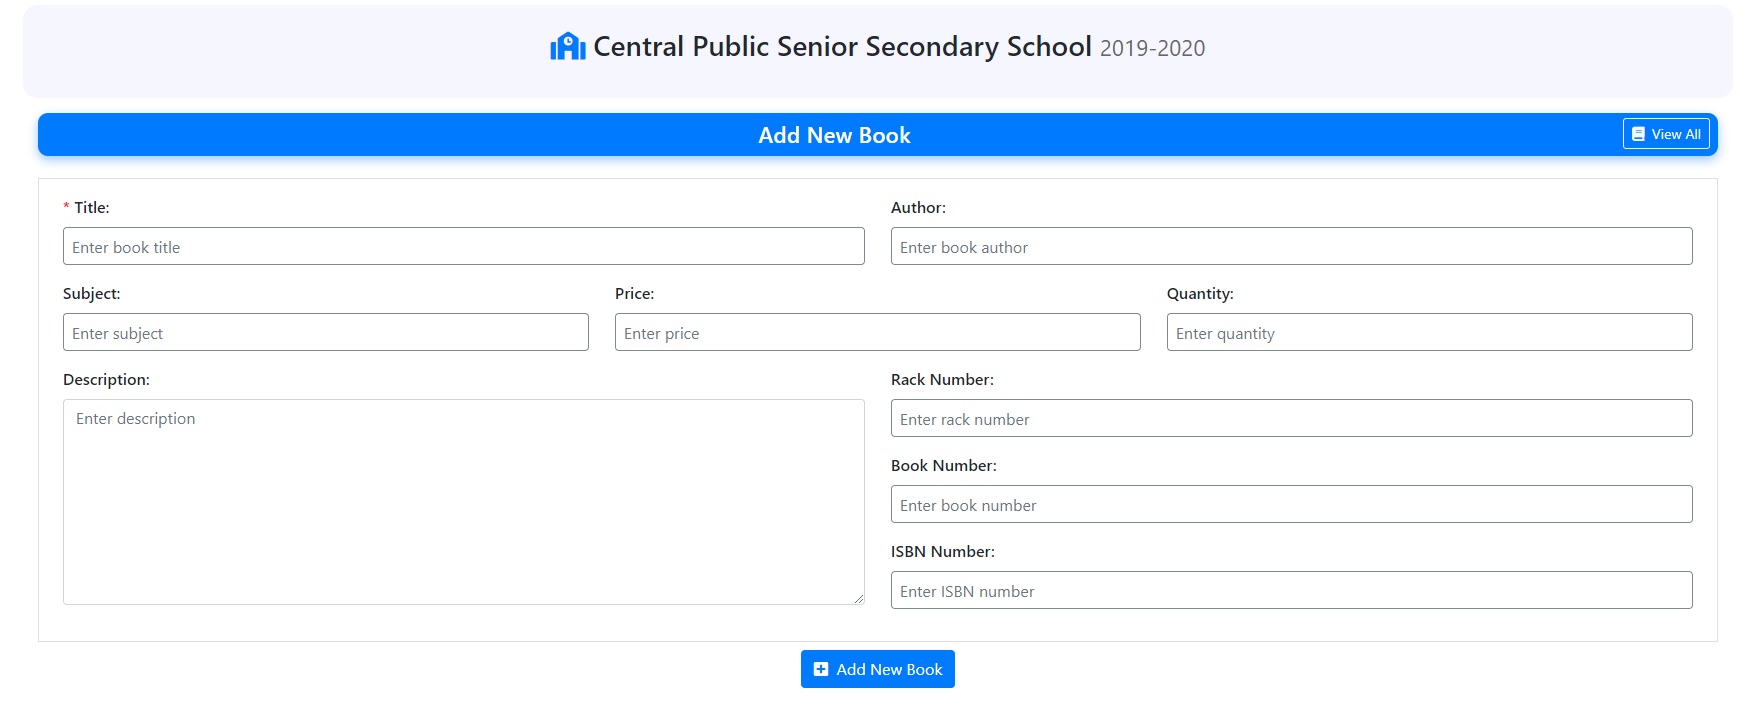
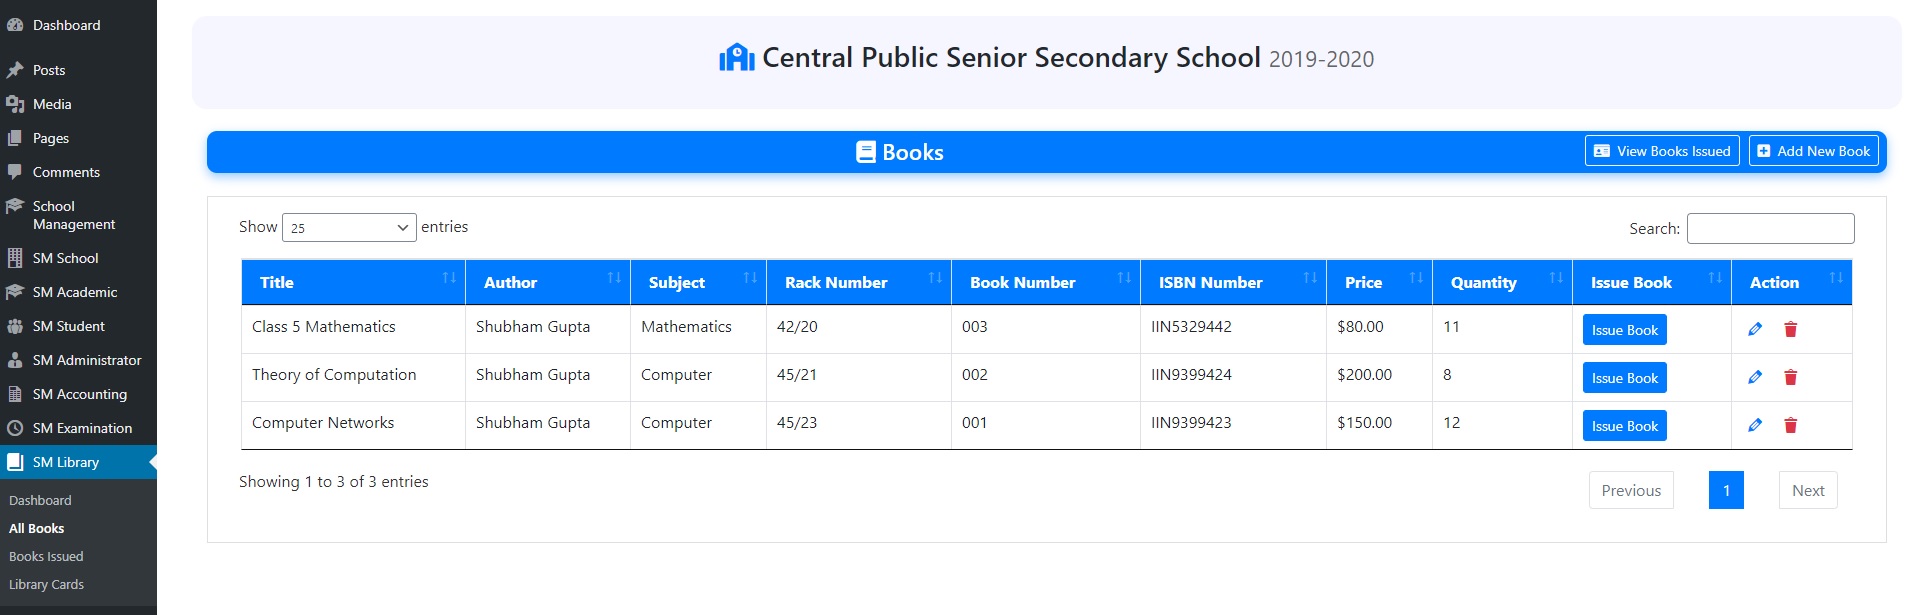
1). Go to "All Books" under "SM Library".
2). Here, you can add and manage library books.
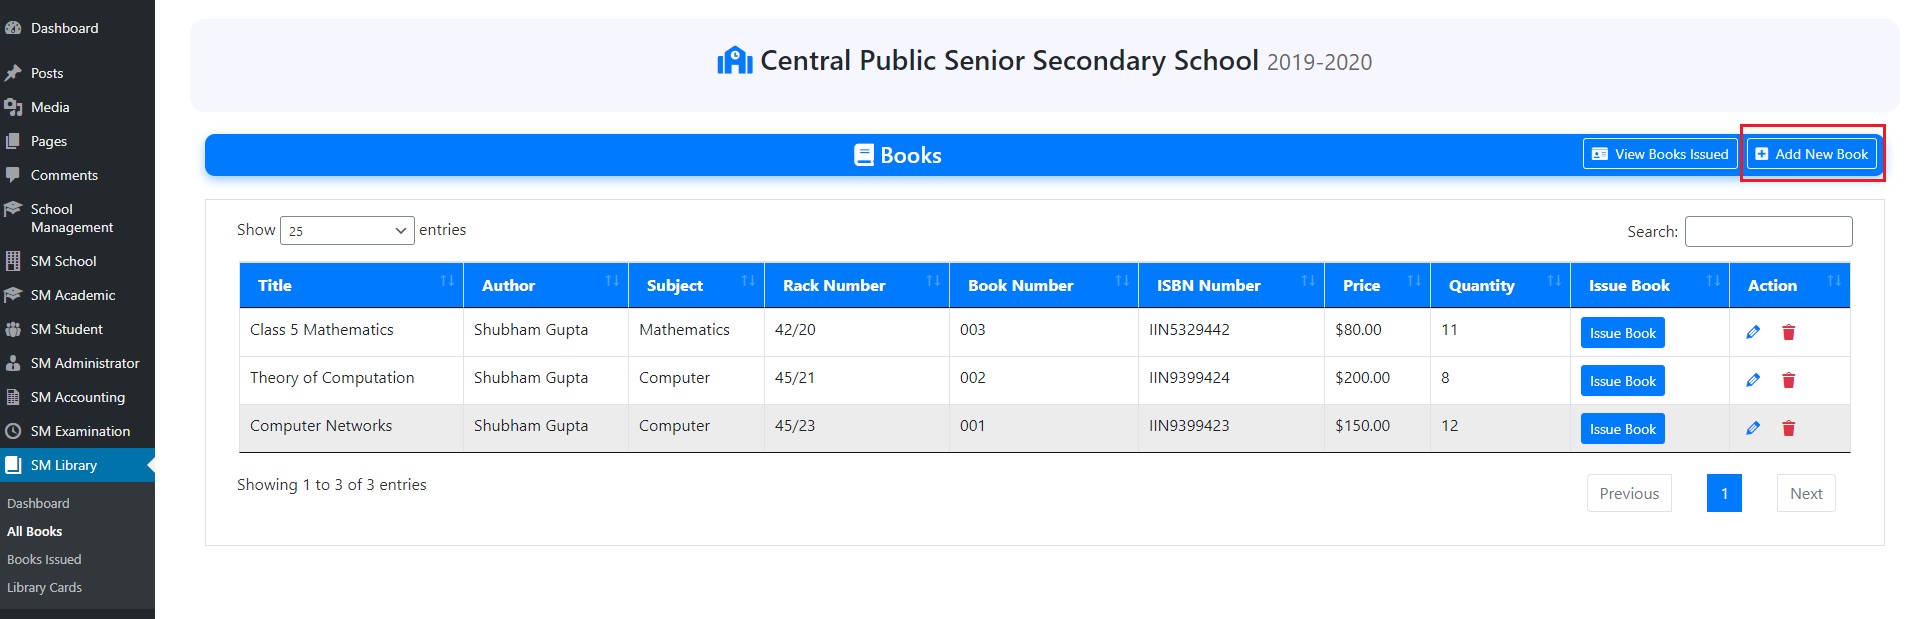
3). To add a new book, click on "Add New Book" and fill the title, author, ISBN etc.
1). Go to "Library Cards" under "SM Library".
2). Here, you can issue library cards.
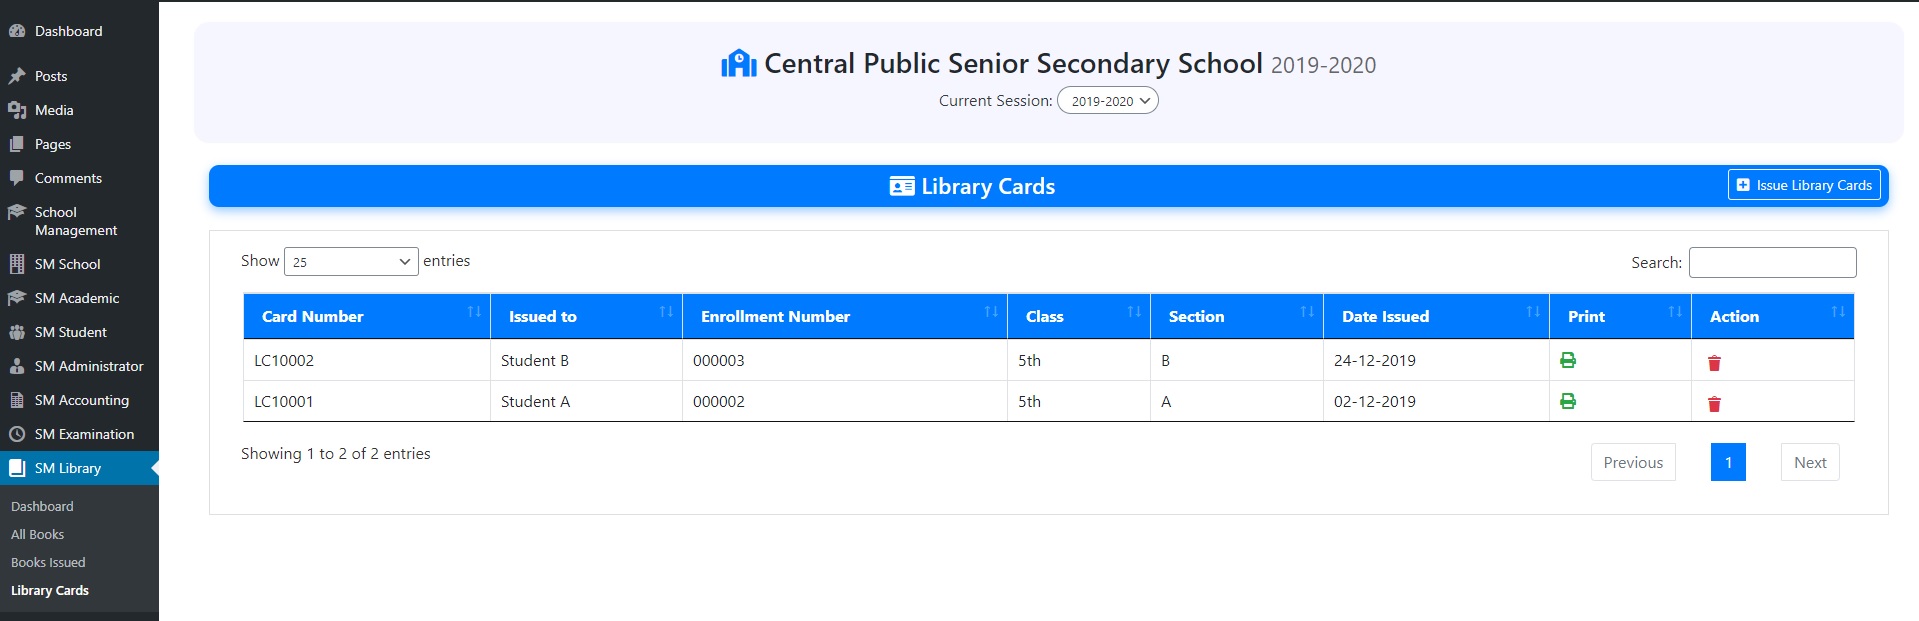

3). To issue library cards, specify card number prefix, enter starting card number, select class, section and issued date, then click "Manage Library Cards". Select students and then click on "Issue Library Cards".
1). Go to "Books Issued" under "SM Library".
2). Here, you can view all the books issued to the students.
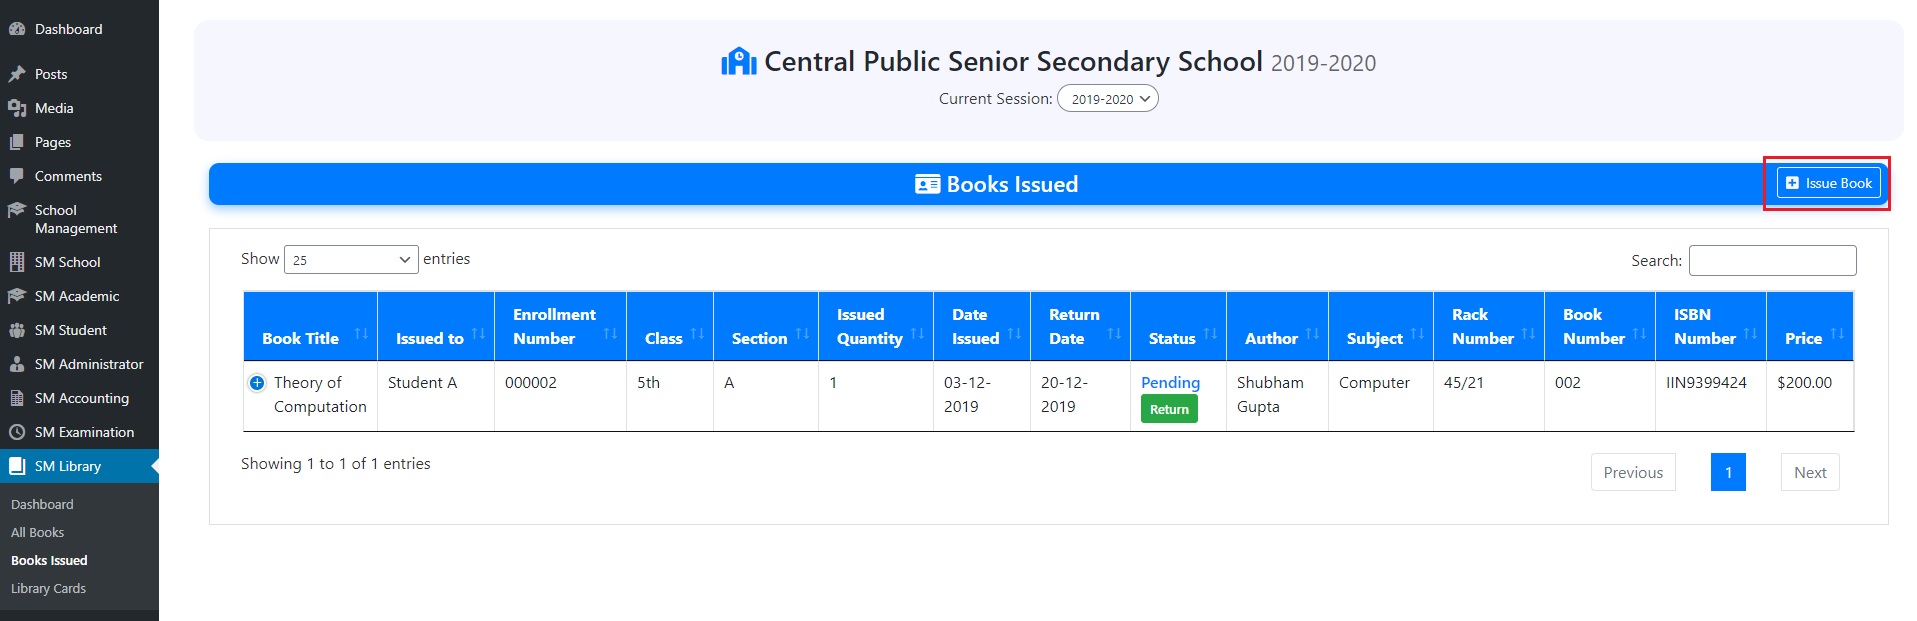
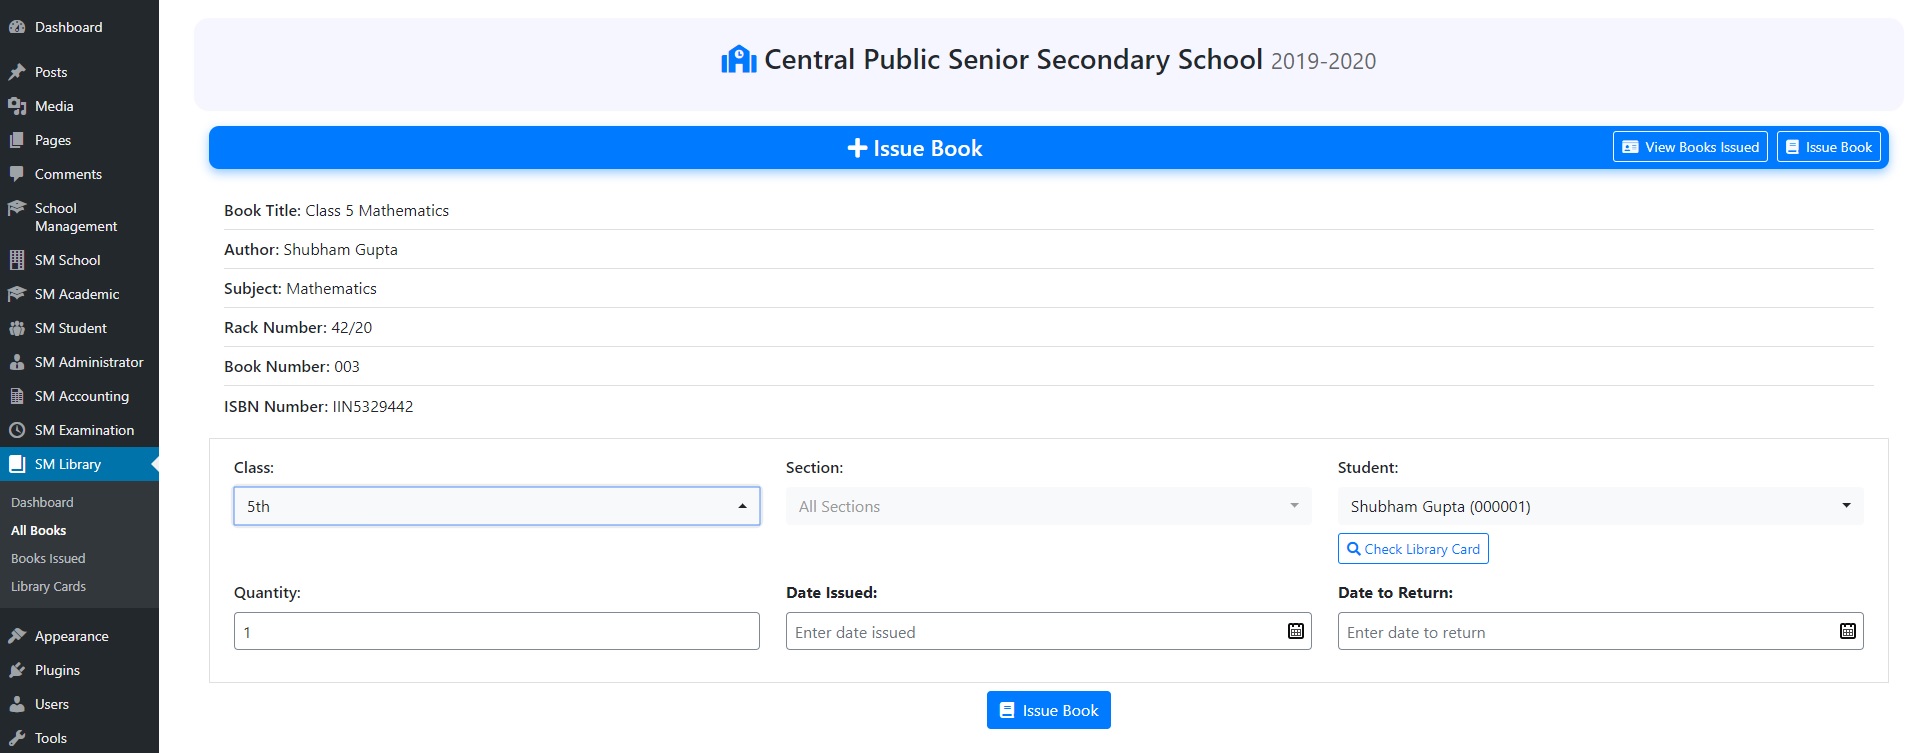
3). To issue a new book, click on "Issue Book", select class, section, student, book quantity, date of issue and return.
4). Here, you can also check for student library card.
1). Go to "Vehicles" under "SM Transport".
2). Here, you can view all the vehicles for transport.

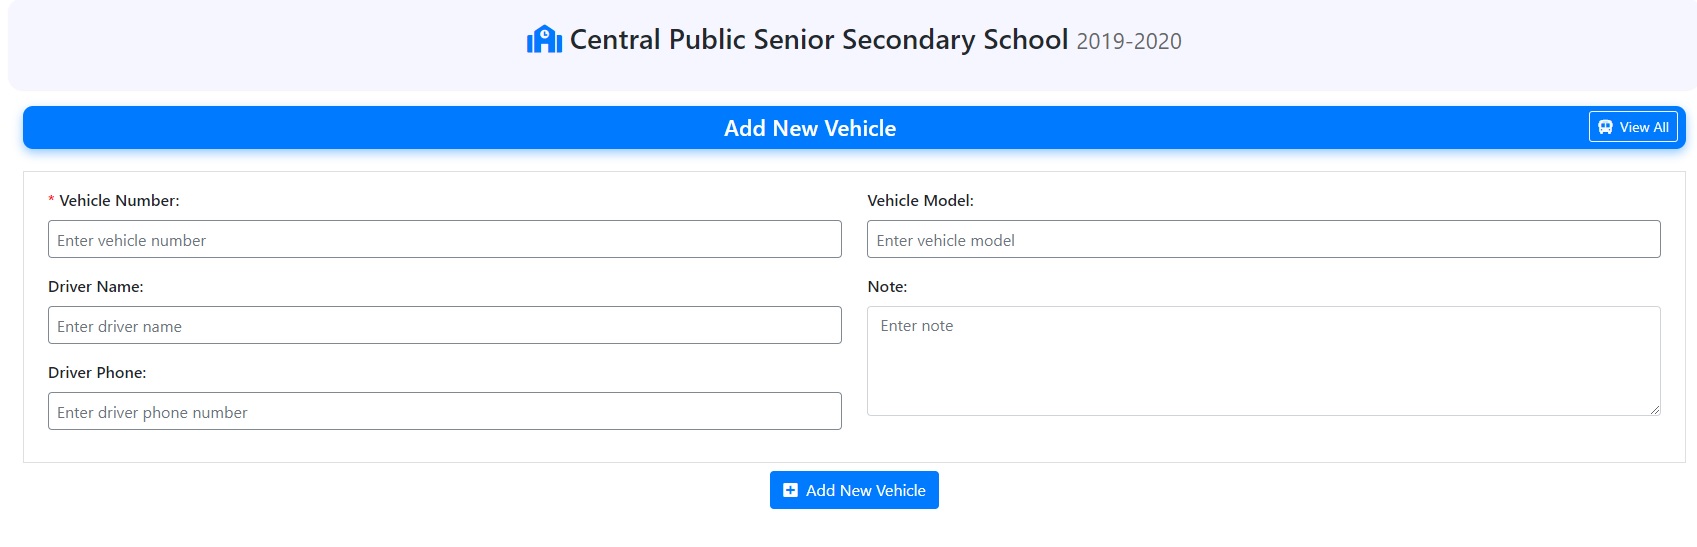
3). To add a new vehicle, click on "Add New Vehicle" and specify vehicle number, model, driver name, driver phone.
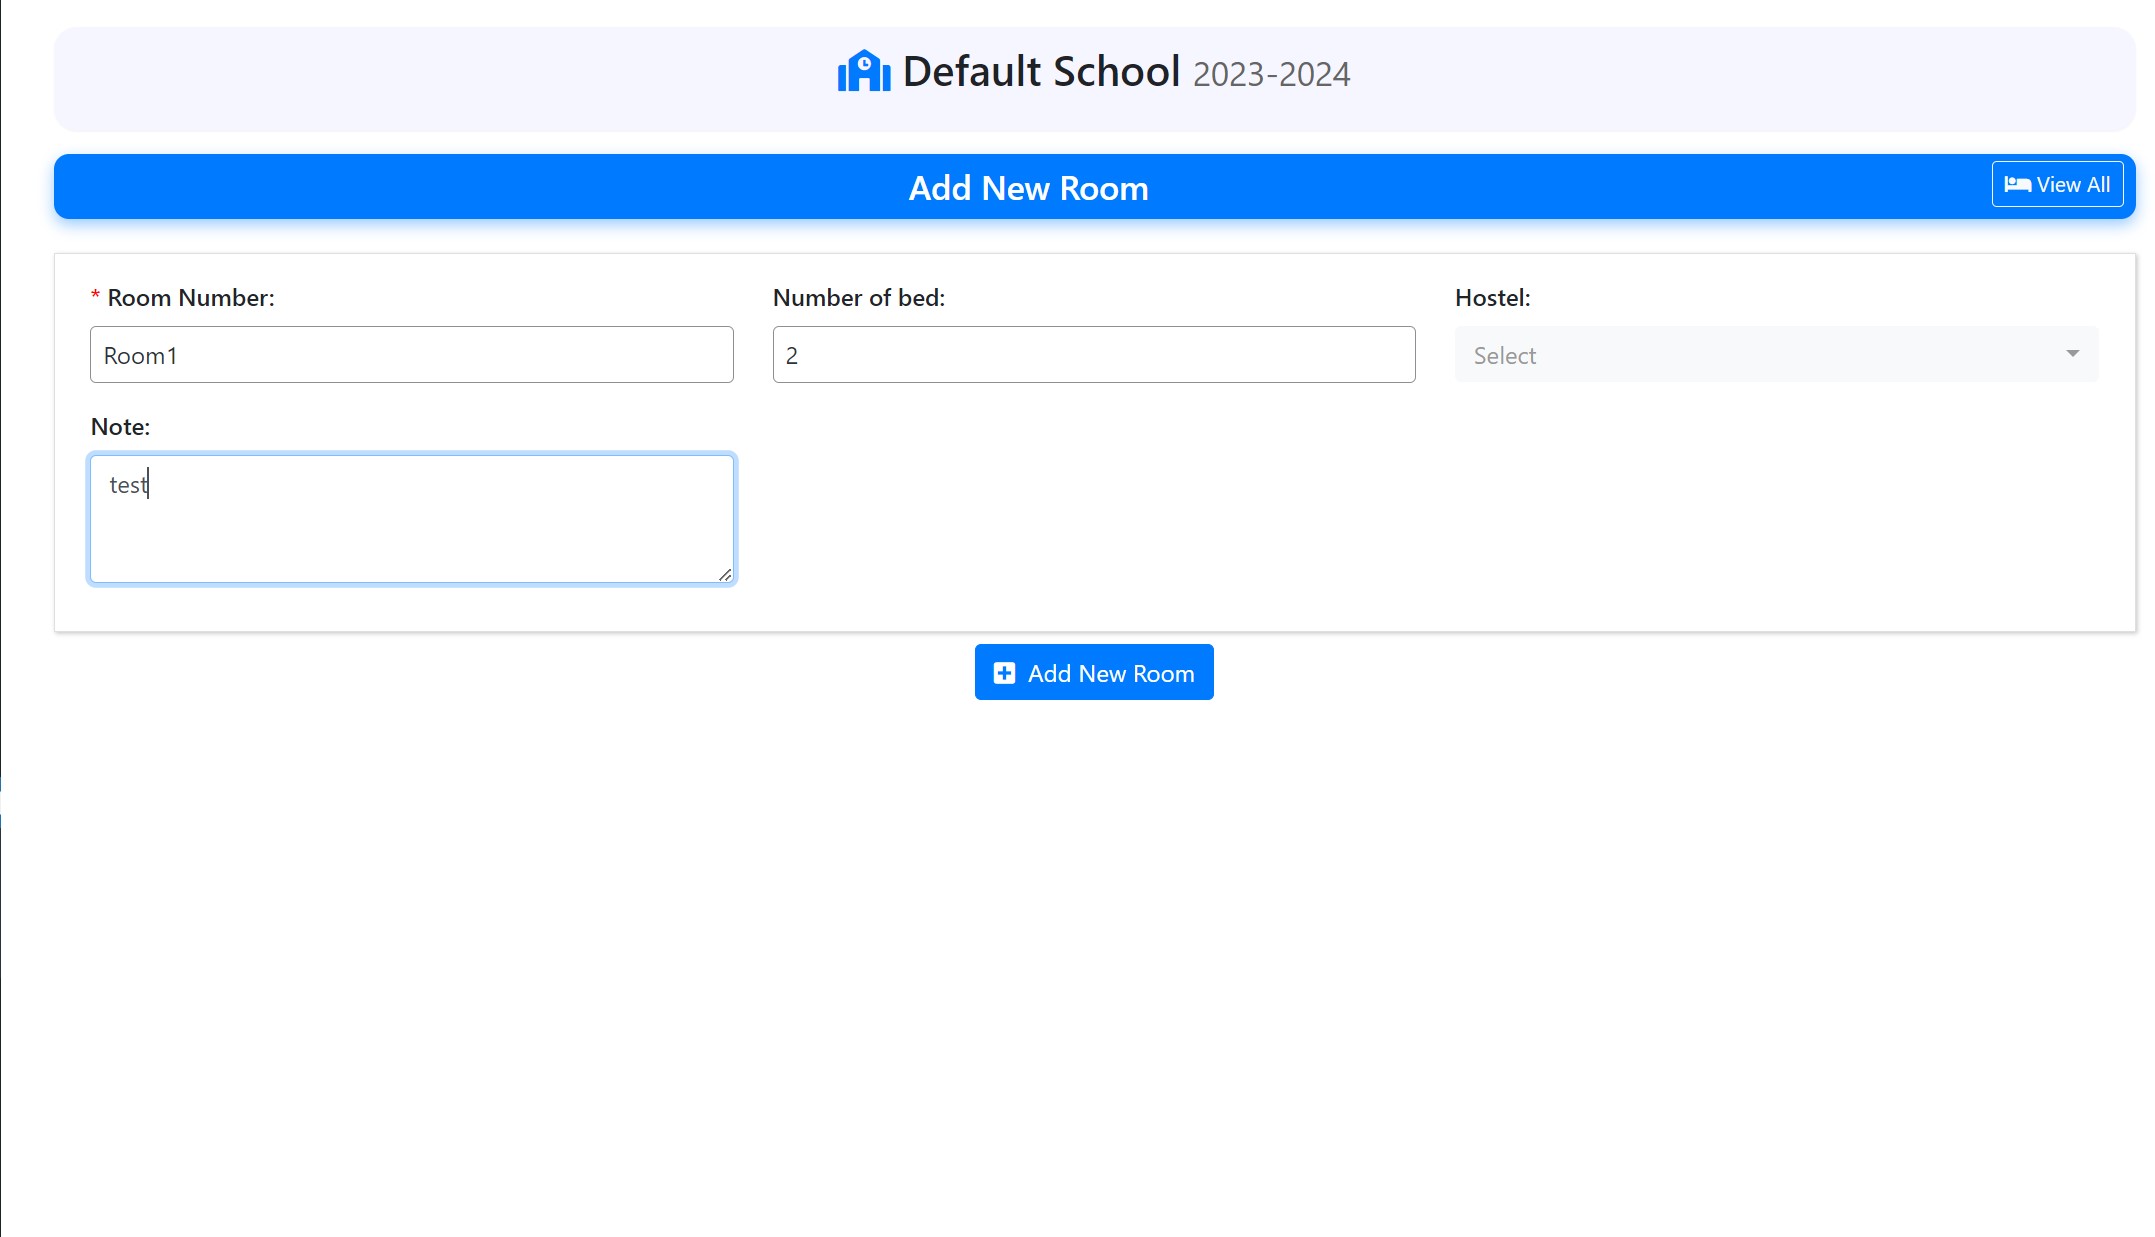
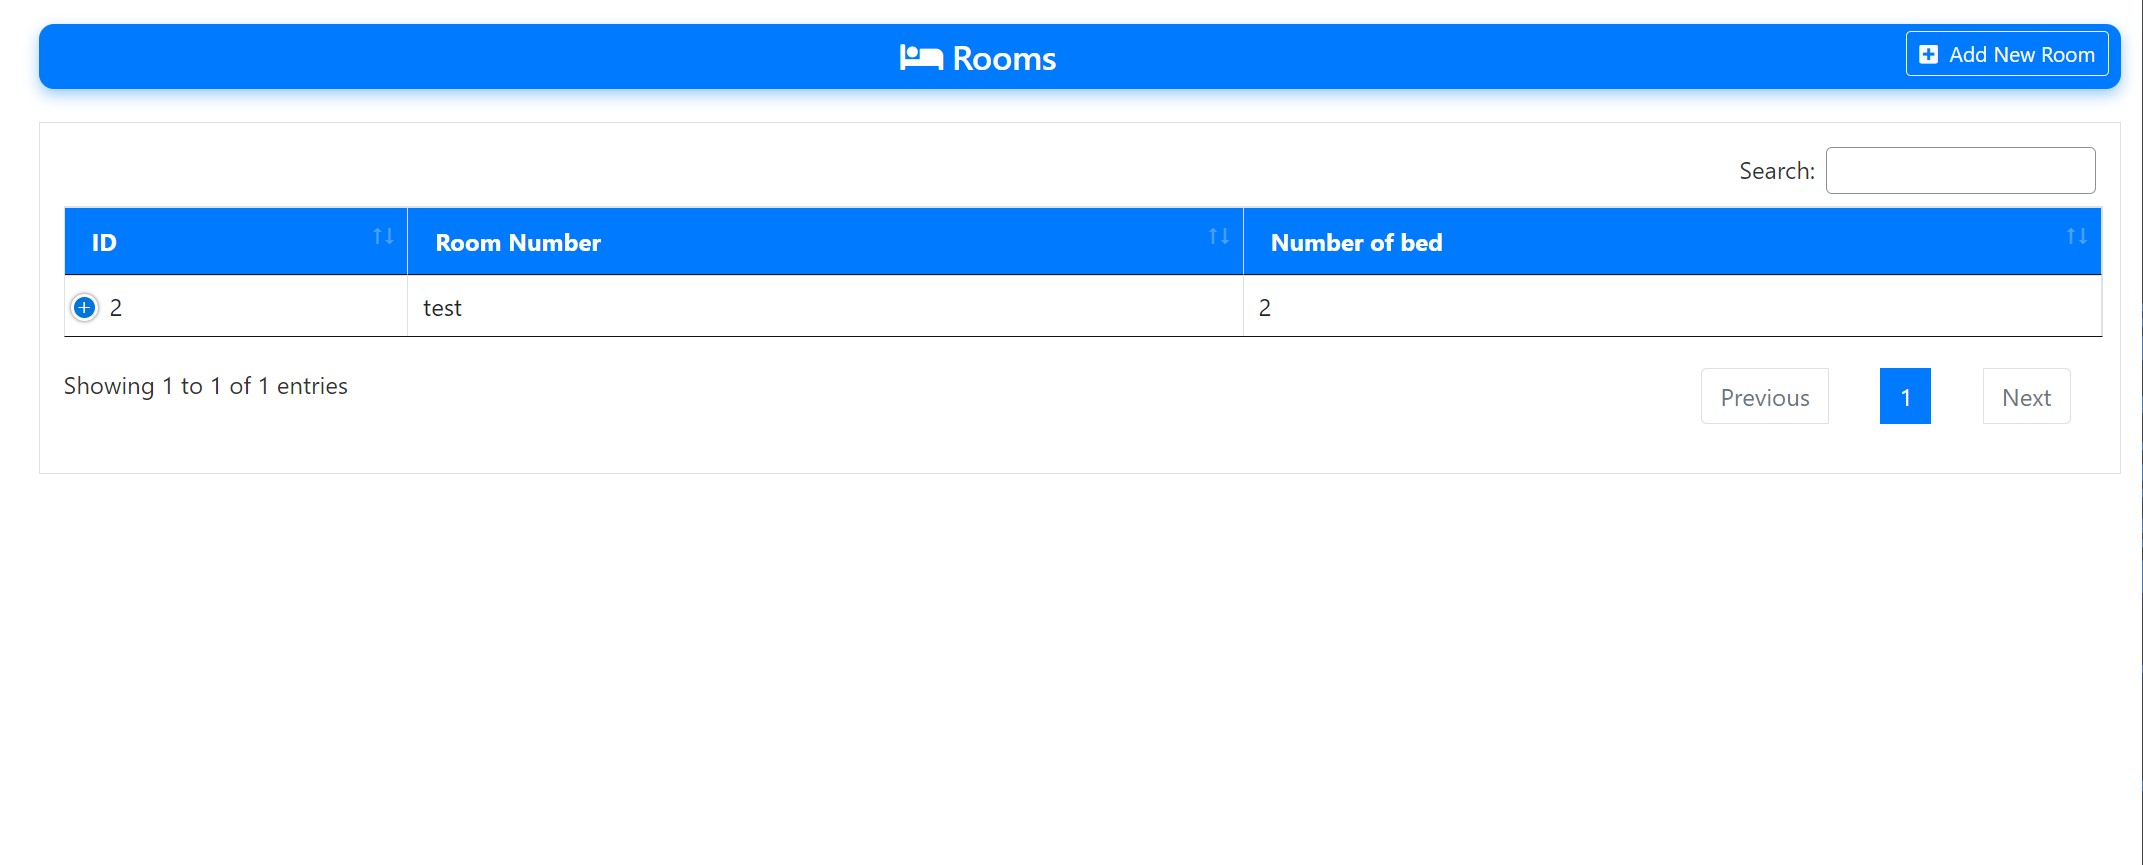
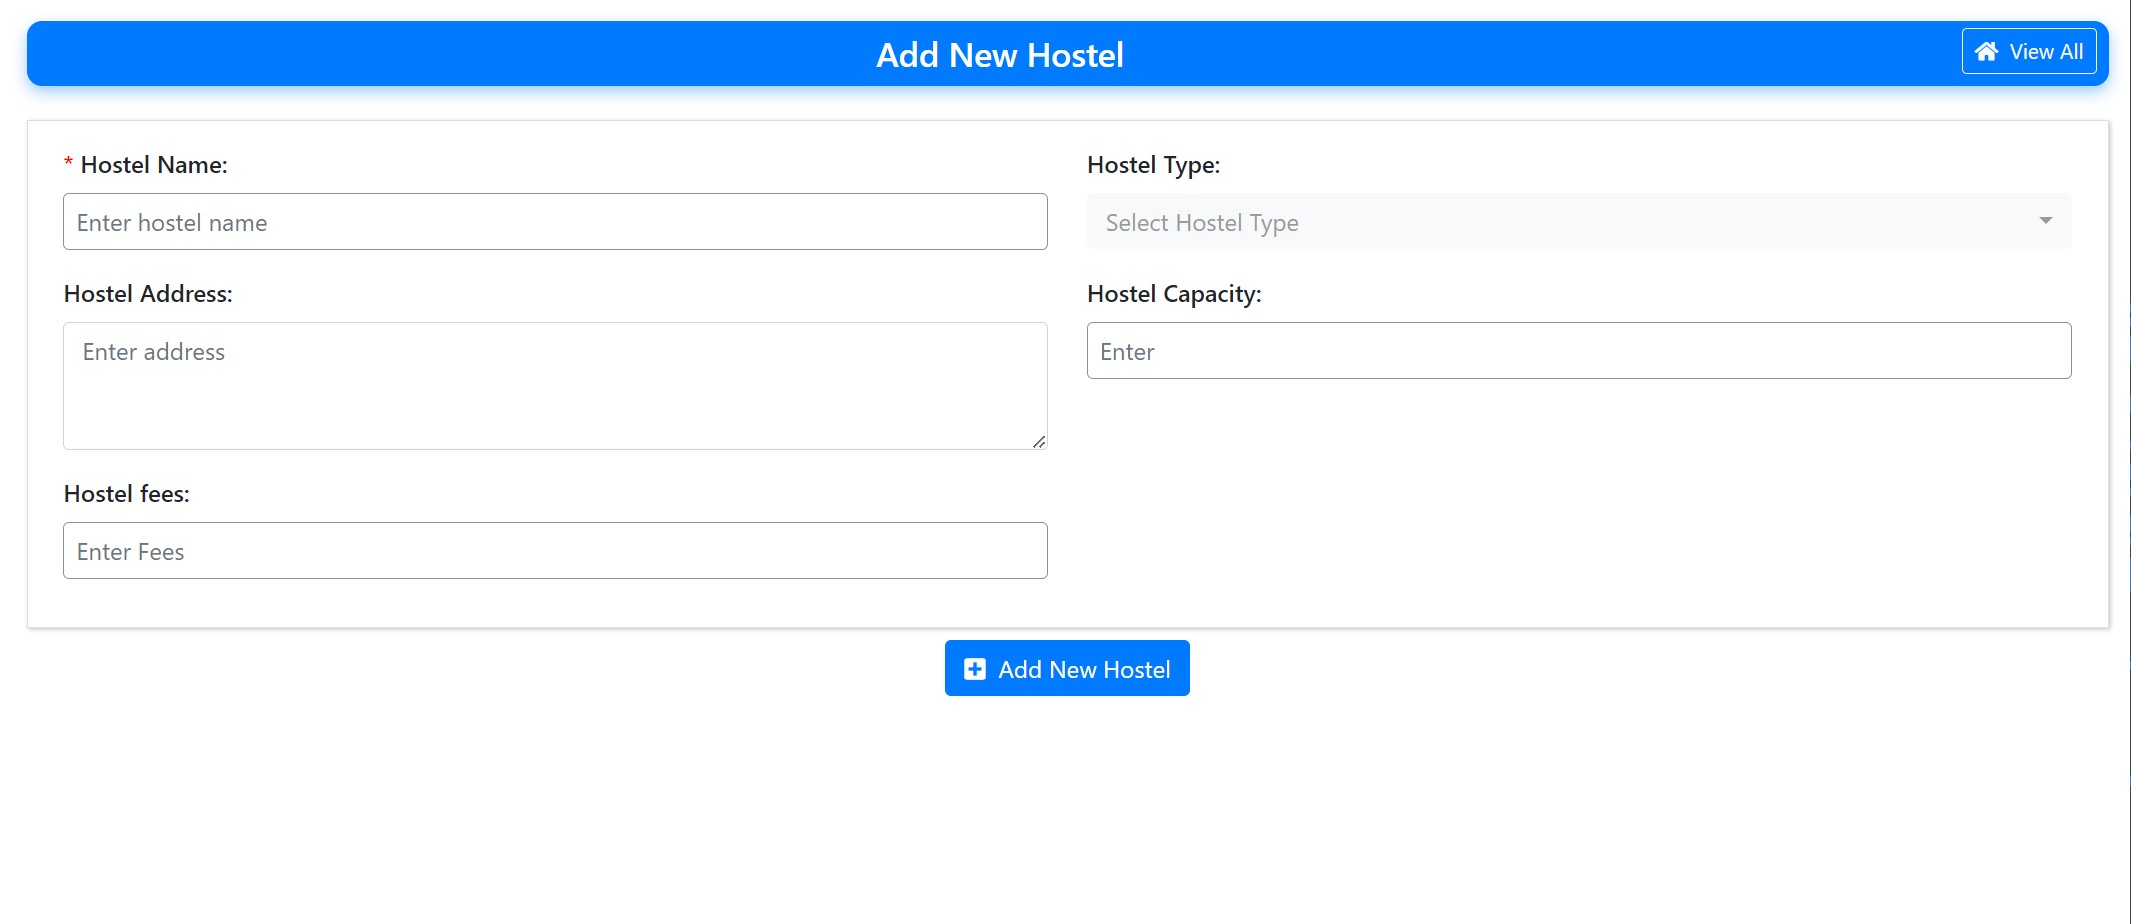
1). Go to "rooms" under "SM hostel".
2). Here, you can view all the rooms for hostel.
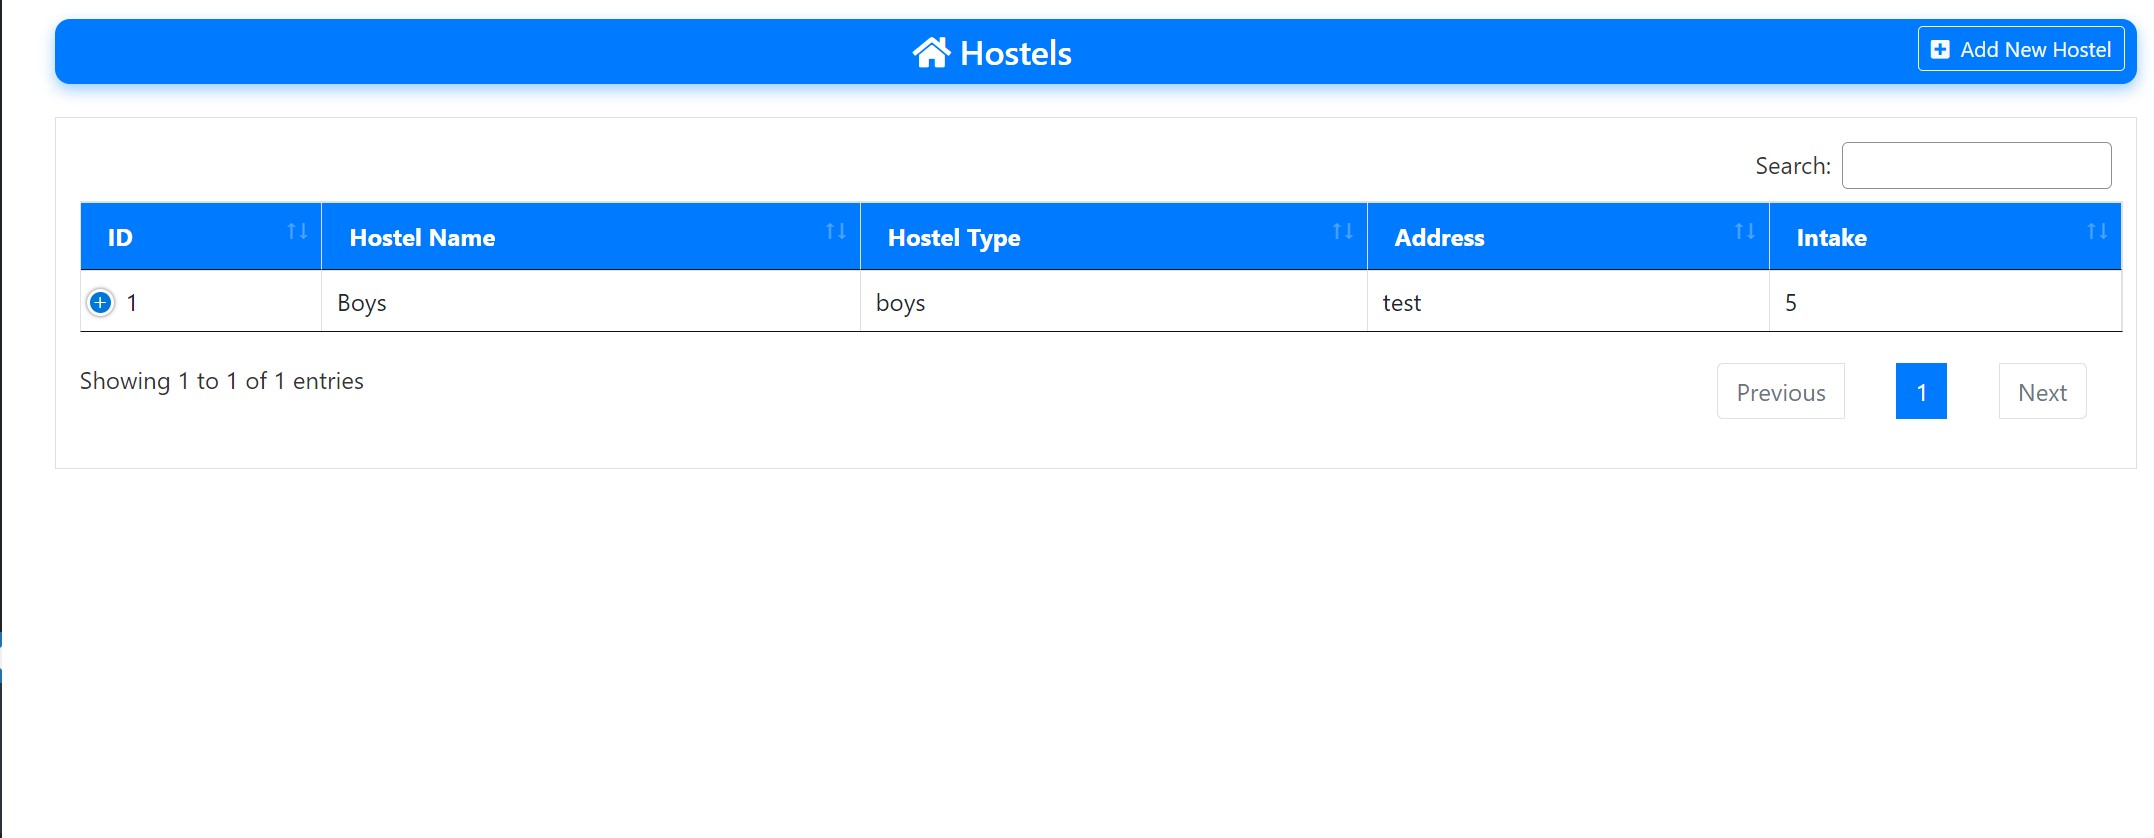
1). Go to "hostel" under "SM hostel".
2). Here, you can view all the sm hostel for hostel.
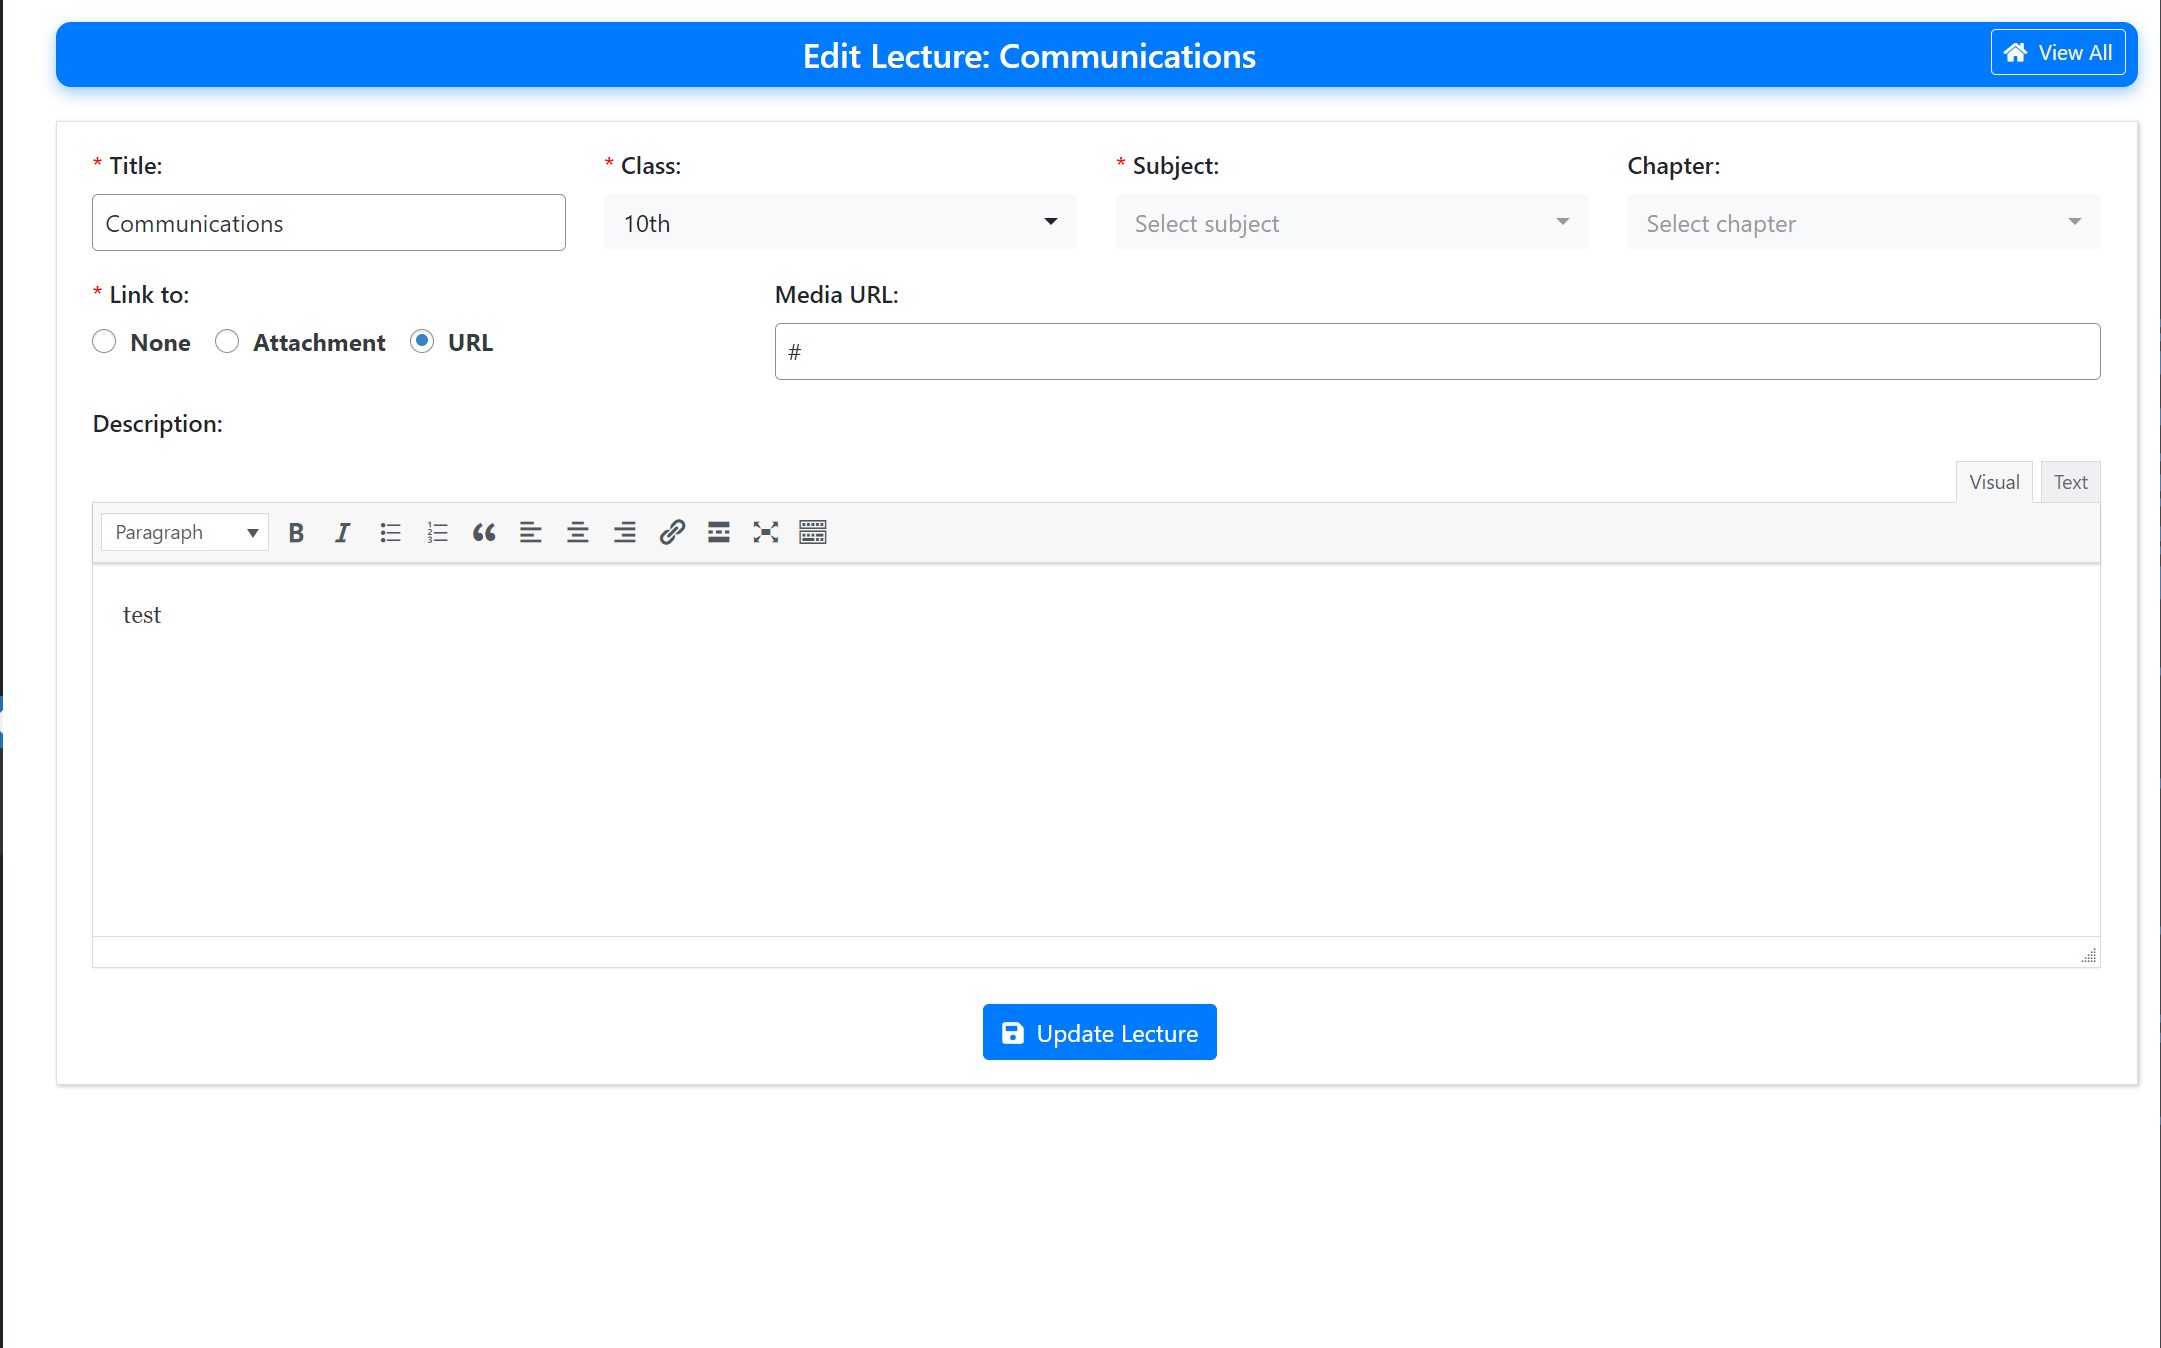
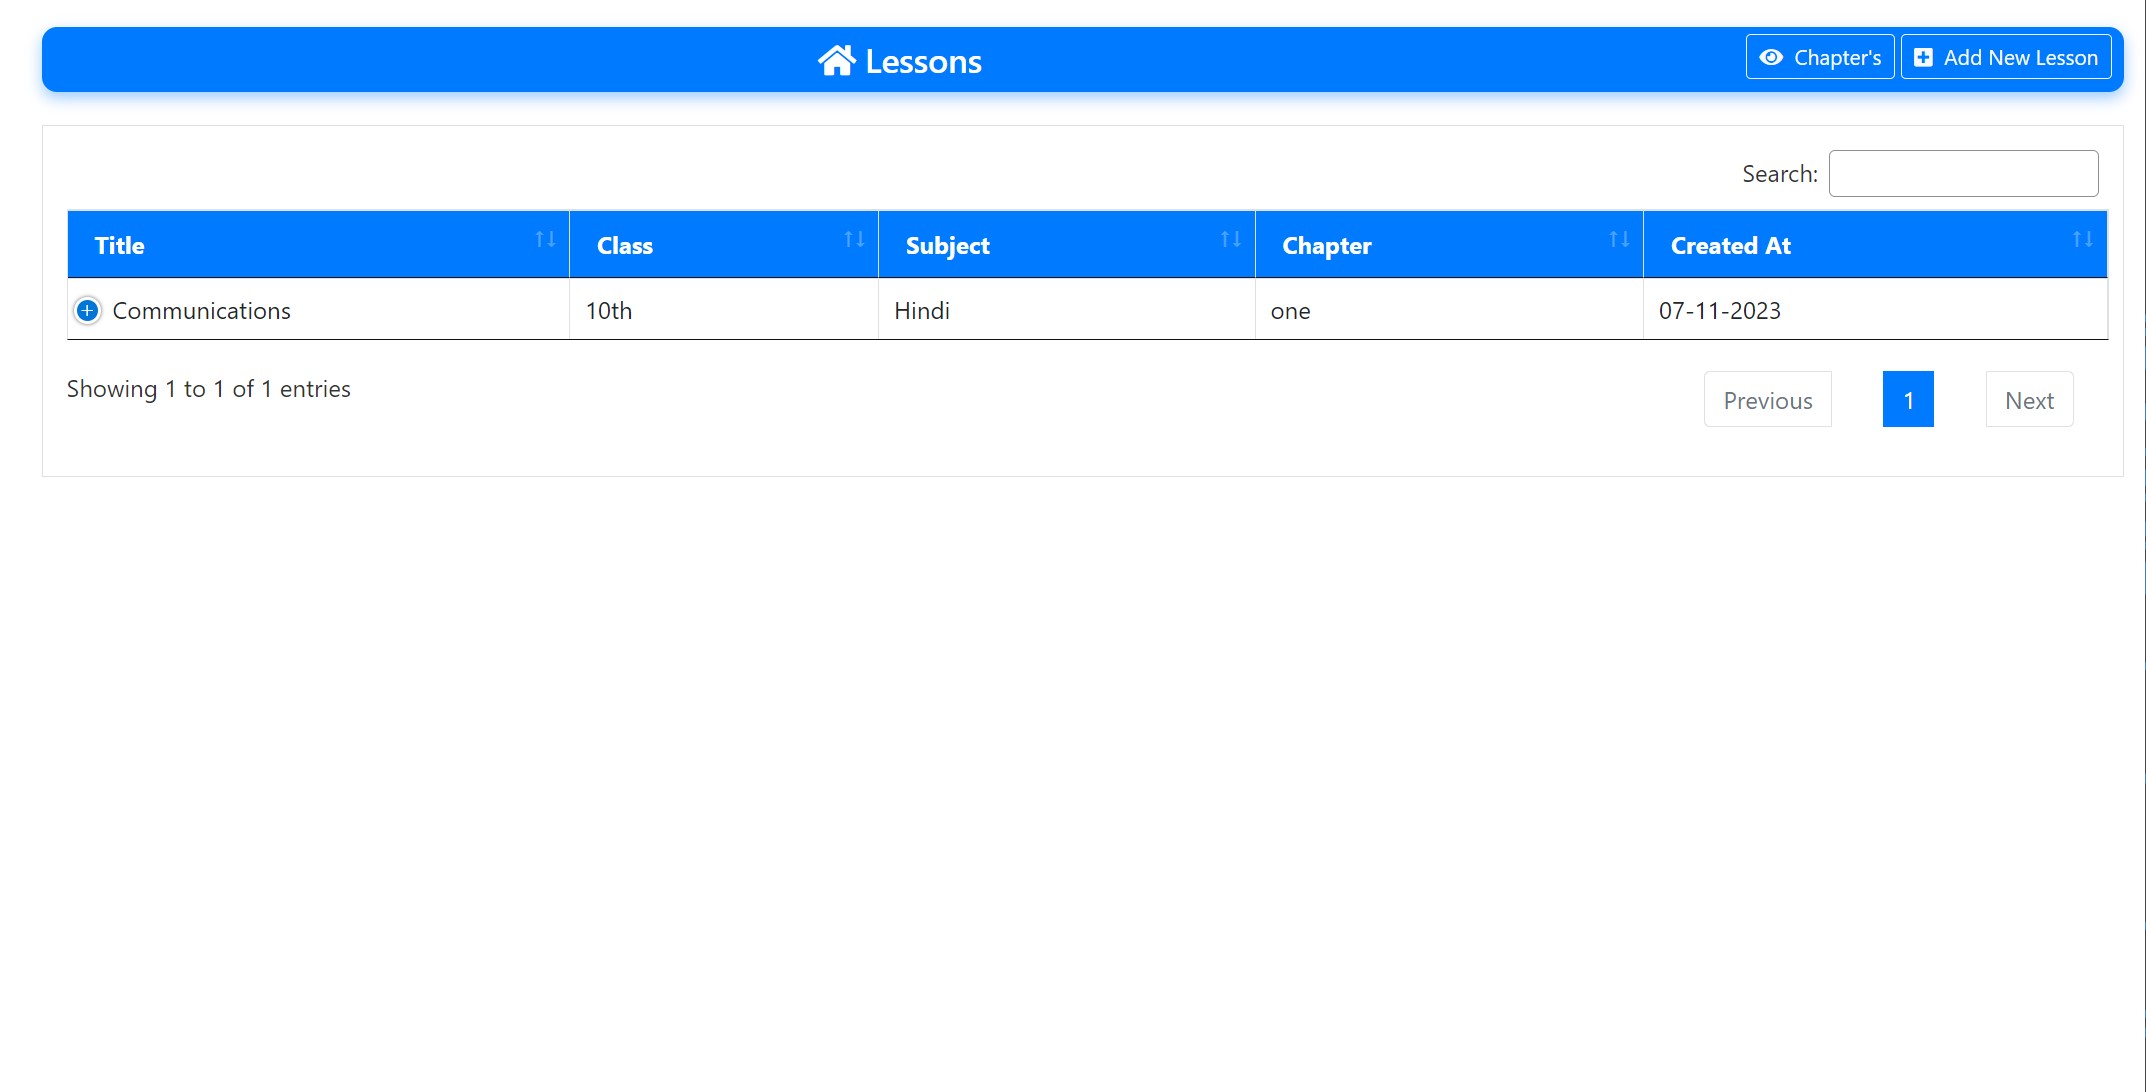
1). Go to "lessons" under "SM lessons".
2). Here, you can view all the sm lessons for lessons.
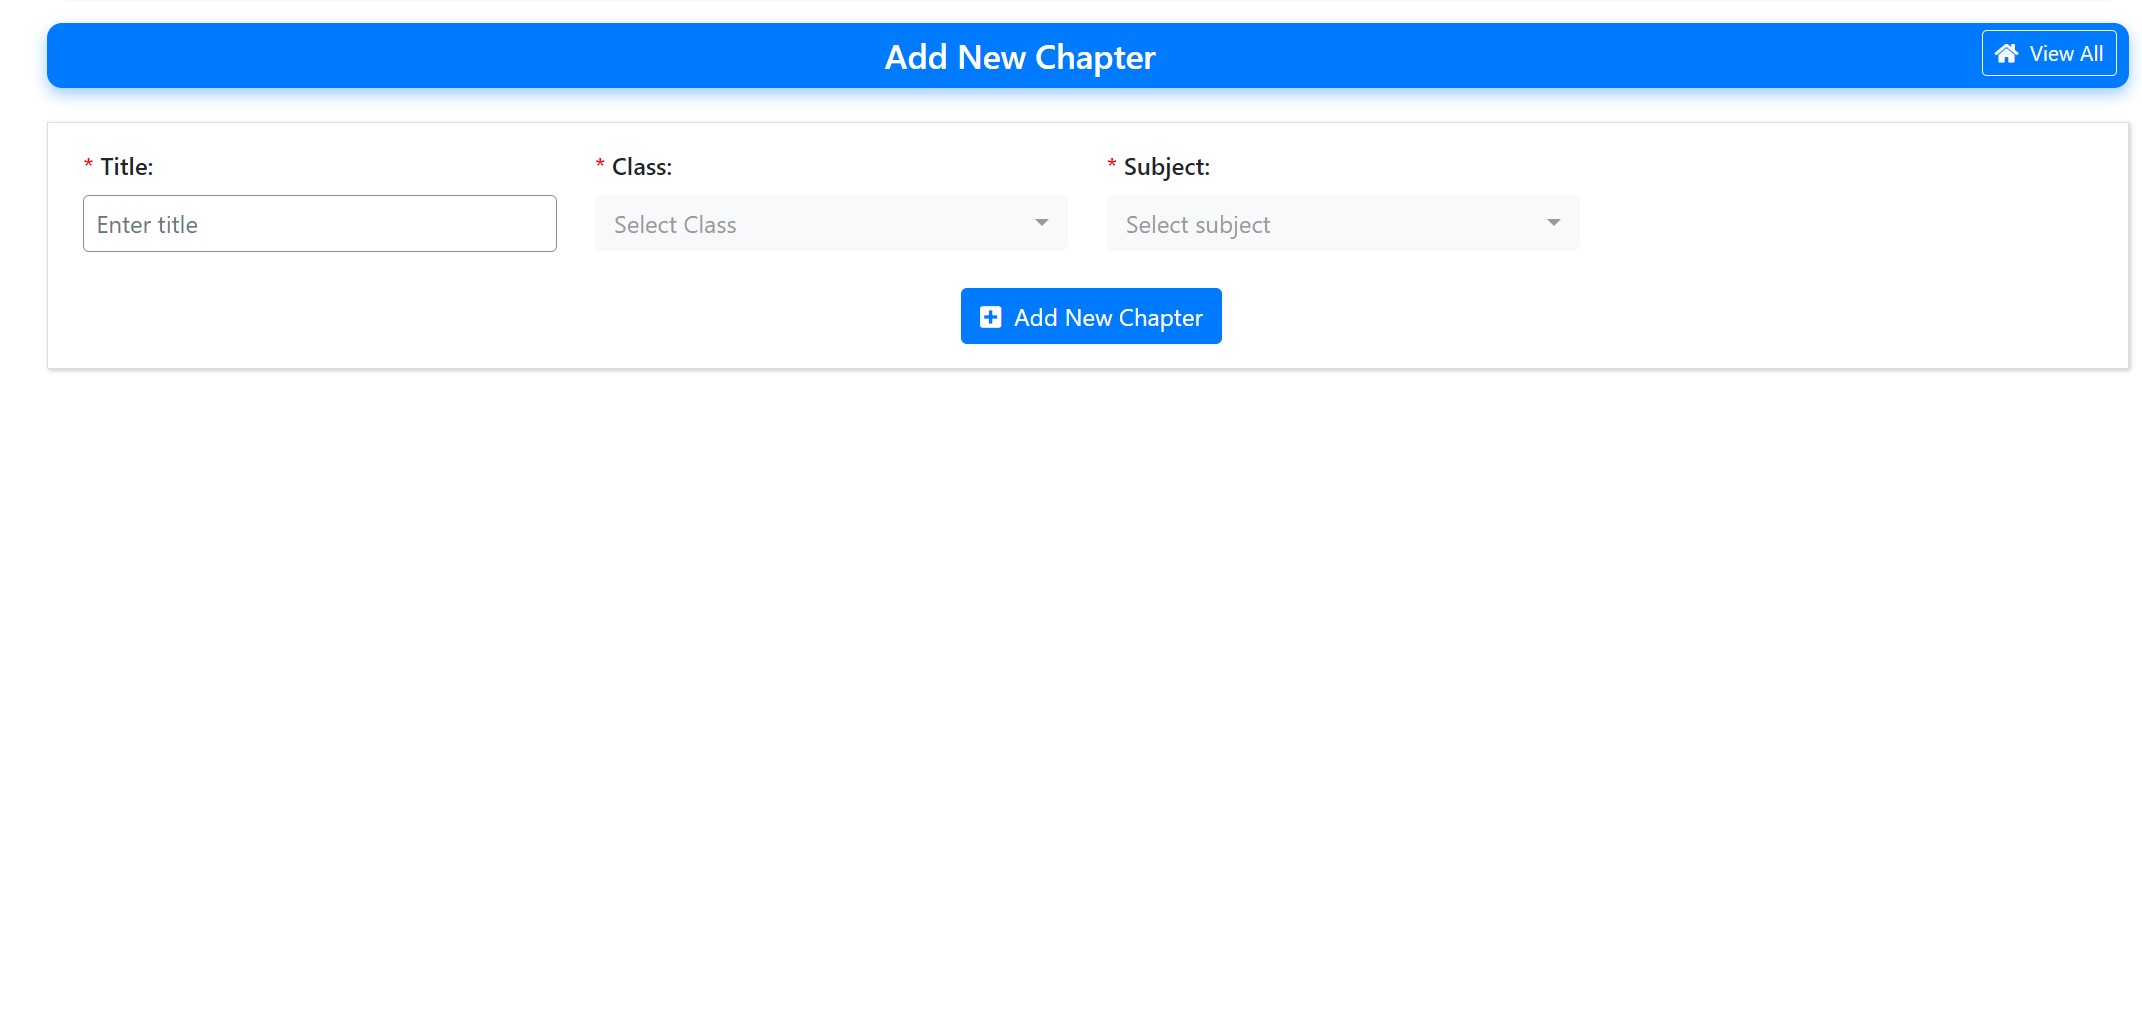
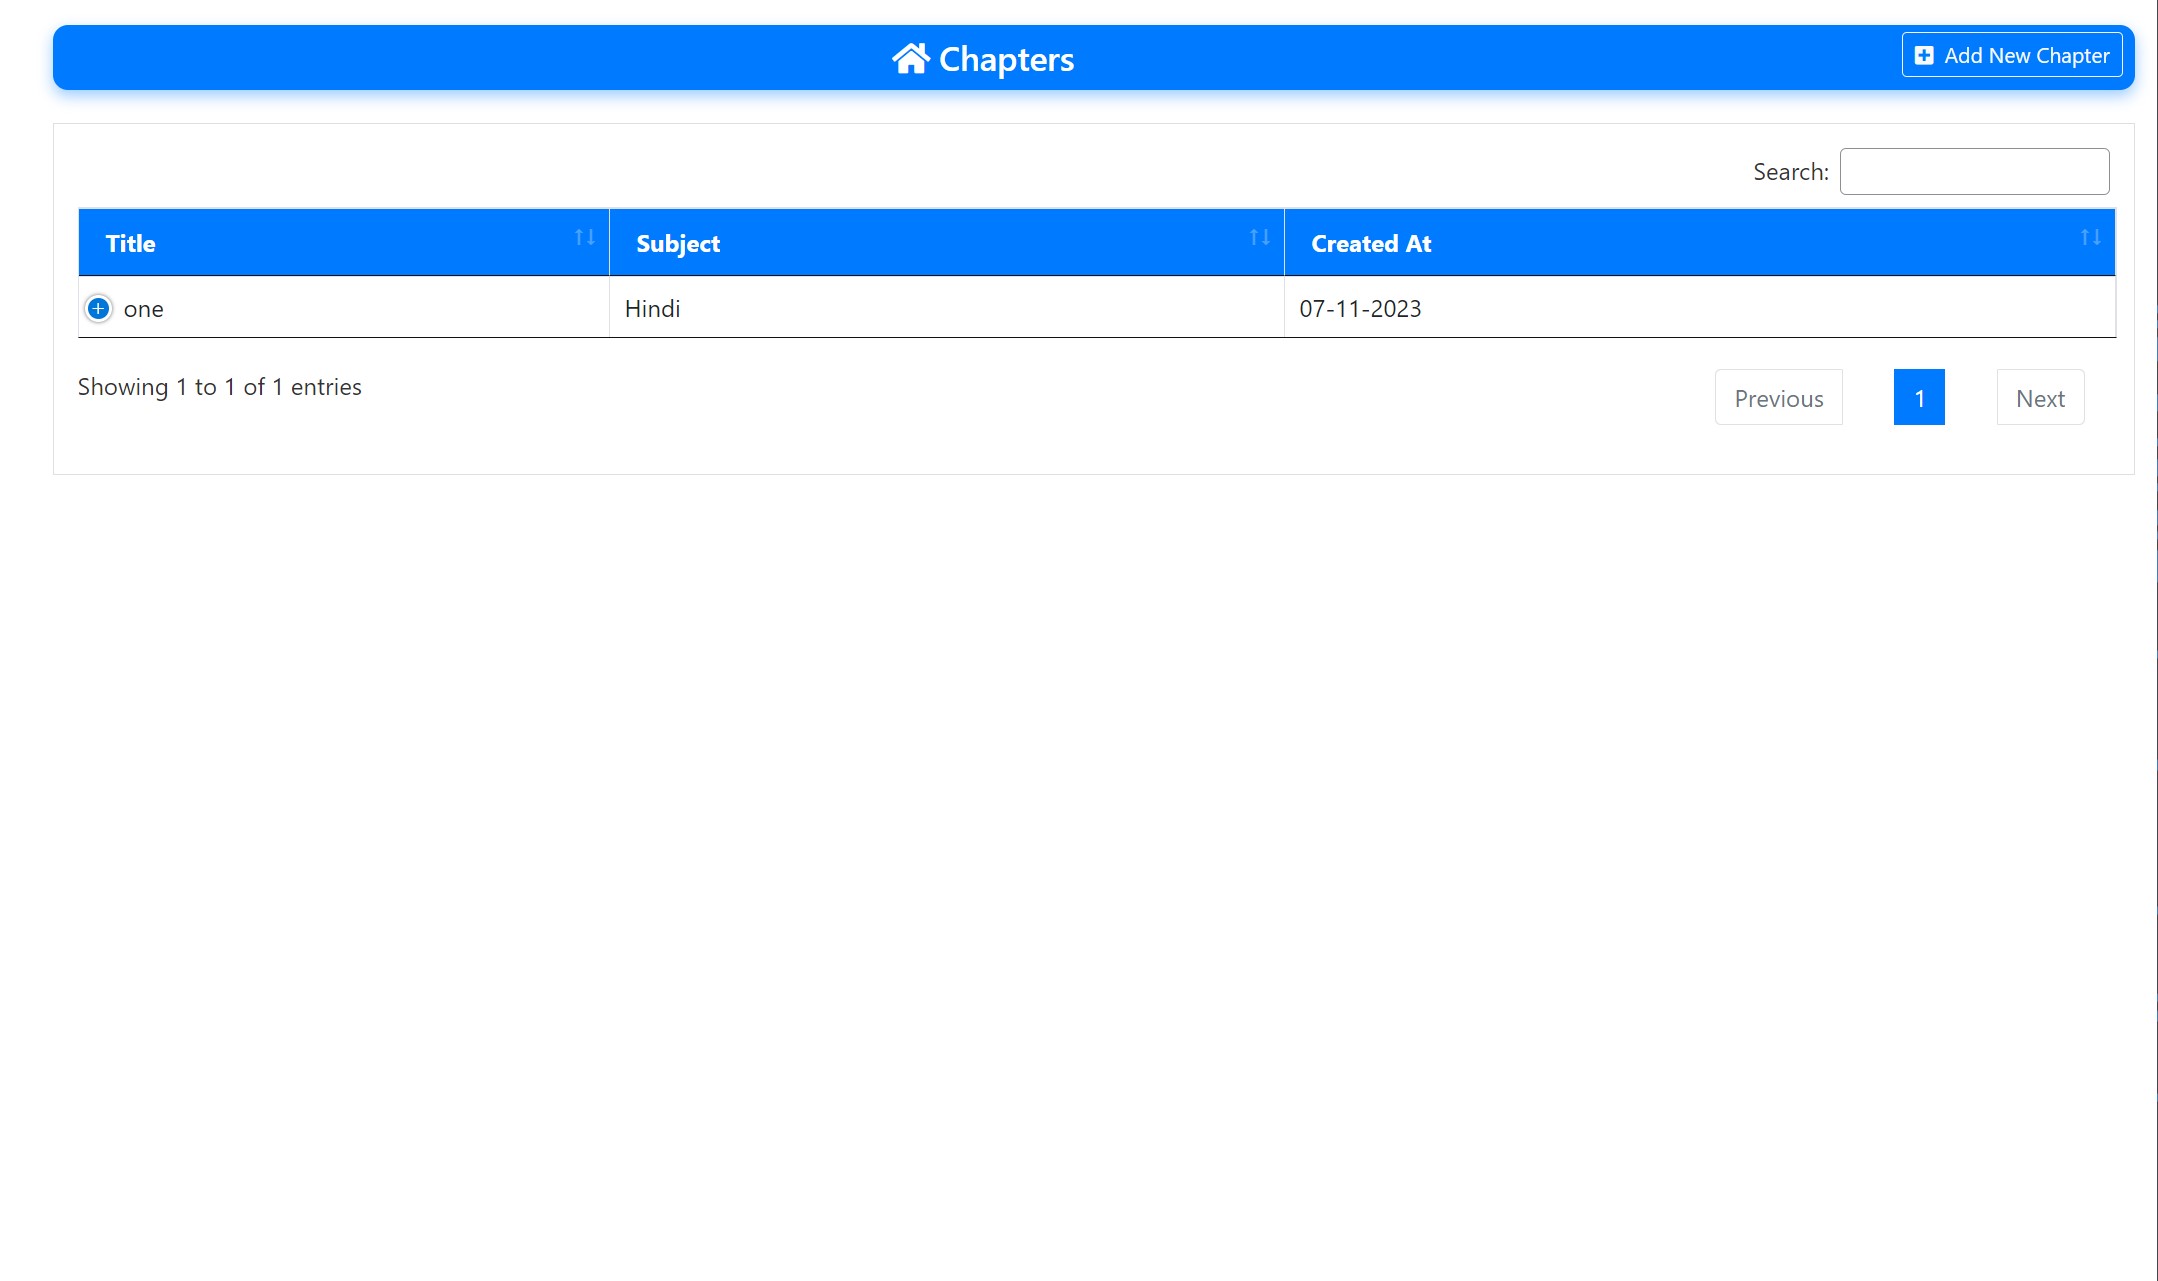
1). Go to "chapter" under "SM chapter".
2). Here, you can view all the sm chapter for chapter.
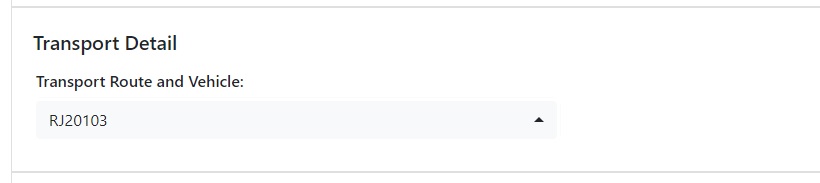
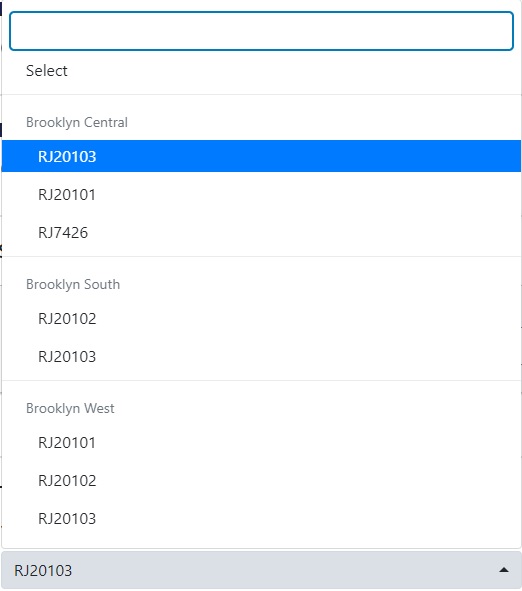
1). Go to "Routes" under "SM Transport".
2). Here, you can view all the transport routes.
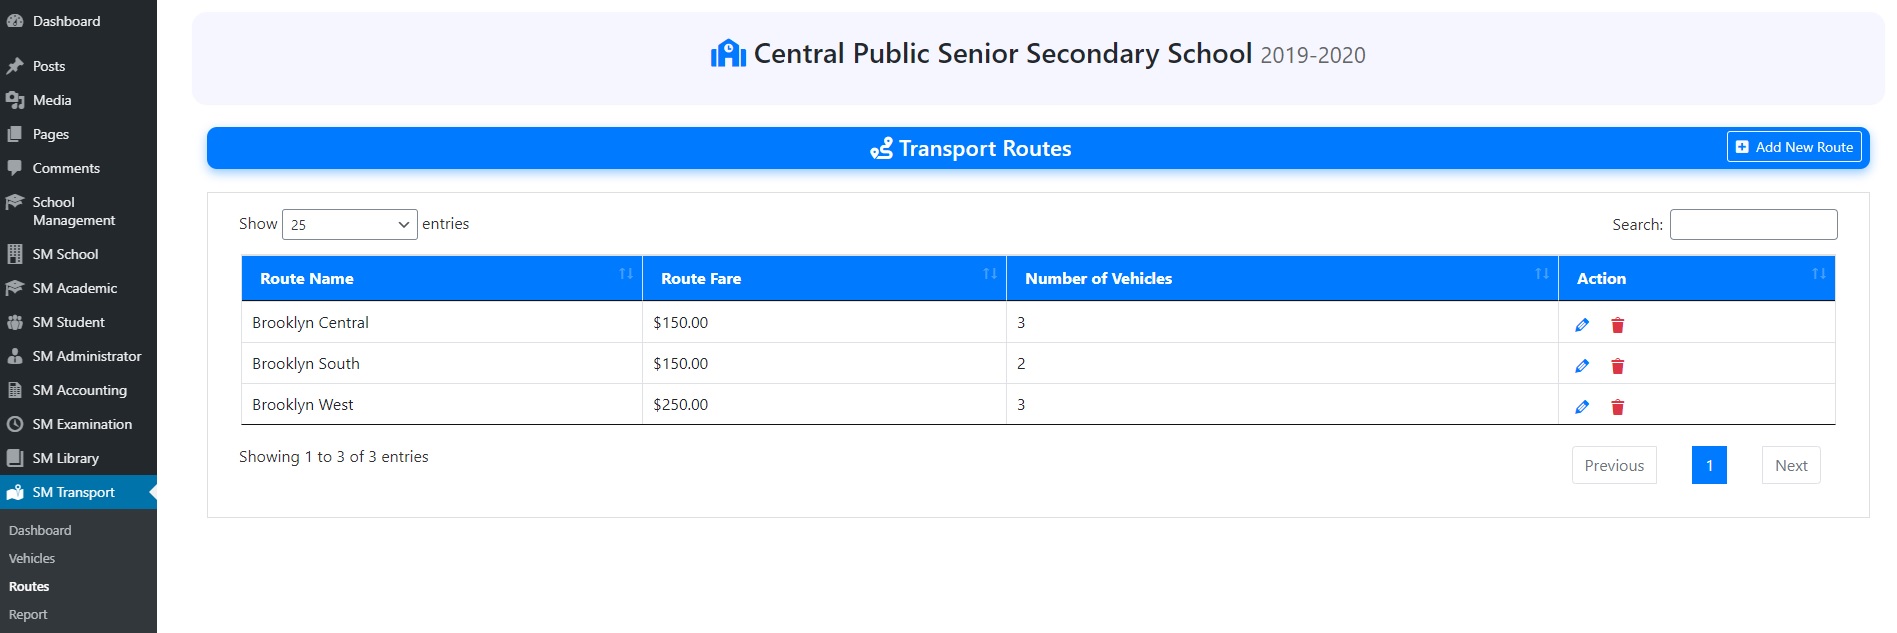
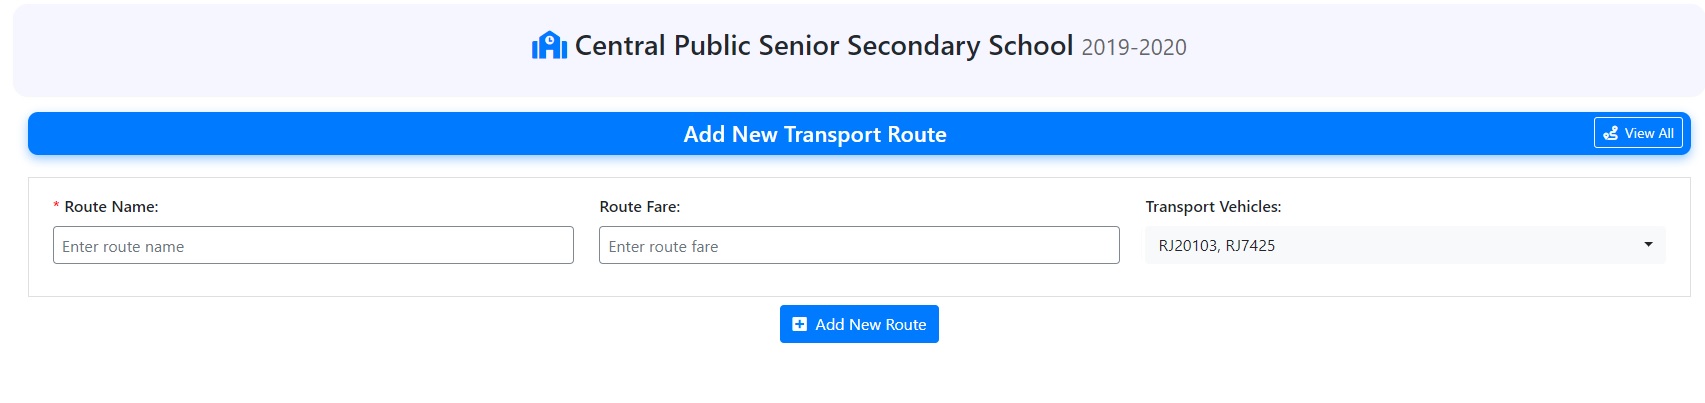
3). To add a new routes, click on "Add New Routes" and specify route name, route fare and select vehicles available in this route.
4). You can assign transport vehicle and route to students at the time of admission or by editing the student record.
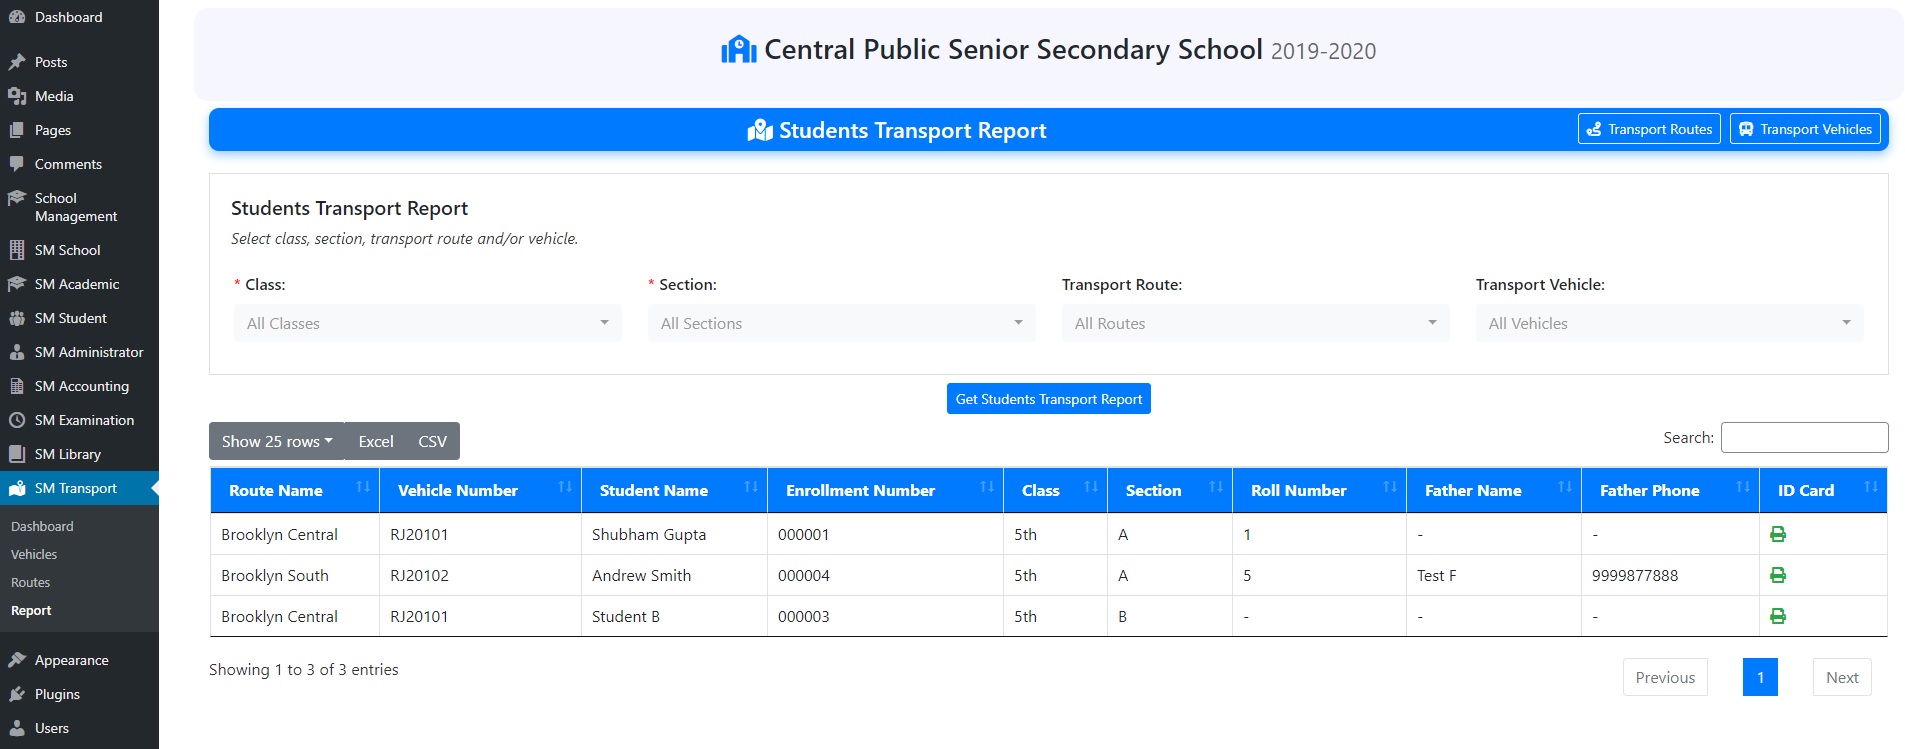
Select class, section, transport route and/or vehicle to get the students transport report.
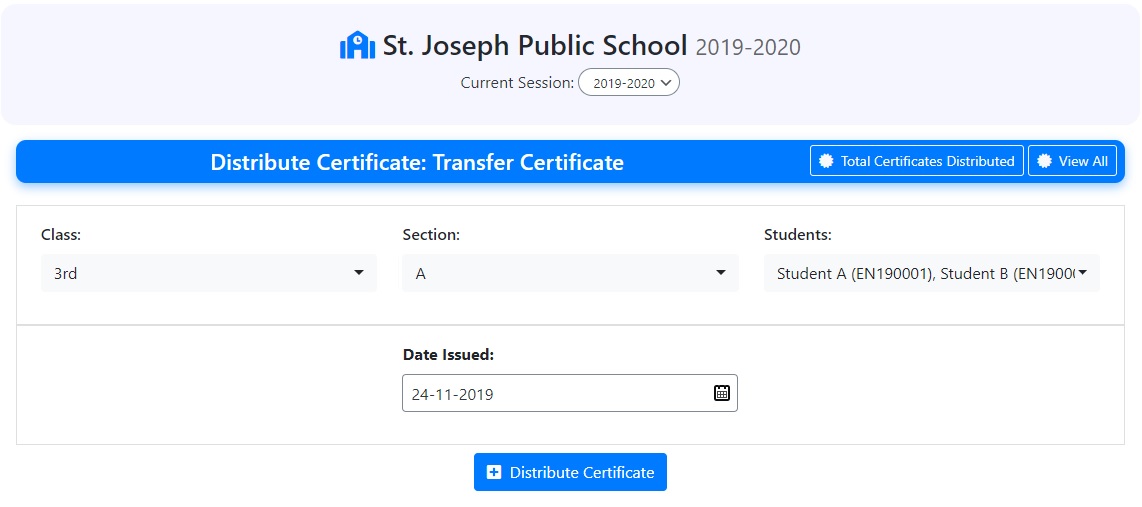
1). Go to "Certificates" under "SM Student".
2). Here, you can design and distribute certificates.
3). To add and design a new certificate. Click on "Add New Certificate".
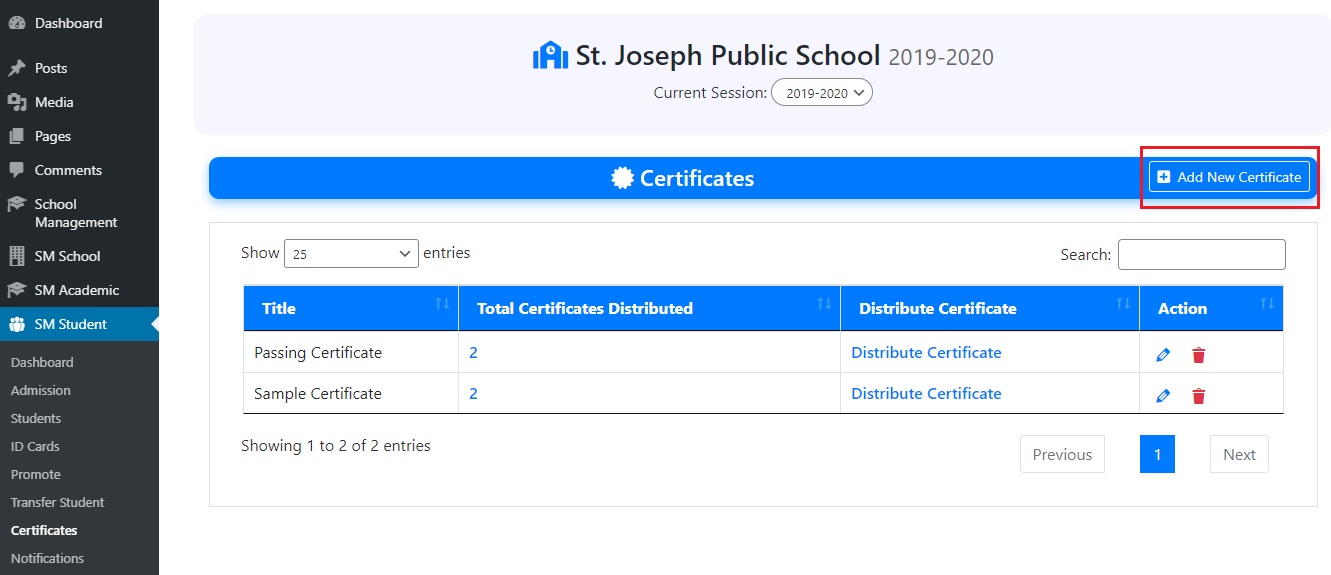
4). You can upload your own certificate background image and set positions for various fields like name, session, class, section, roll number, enrollment number, session start date, session end date etc.
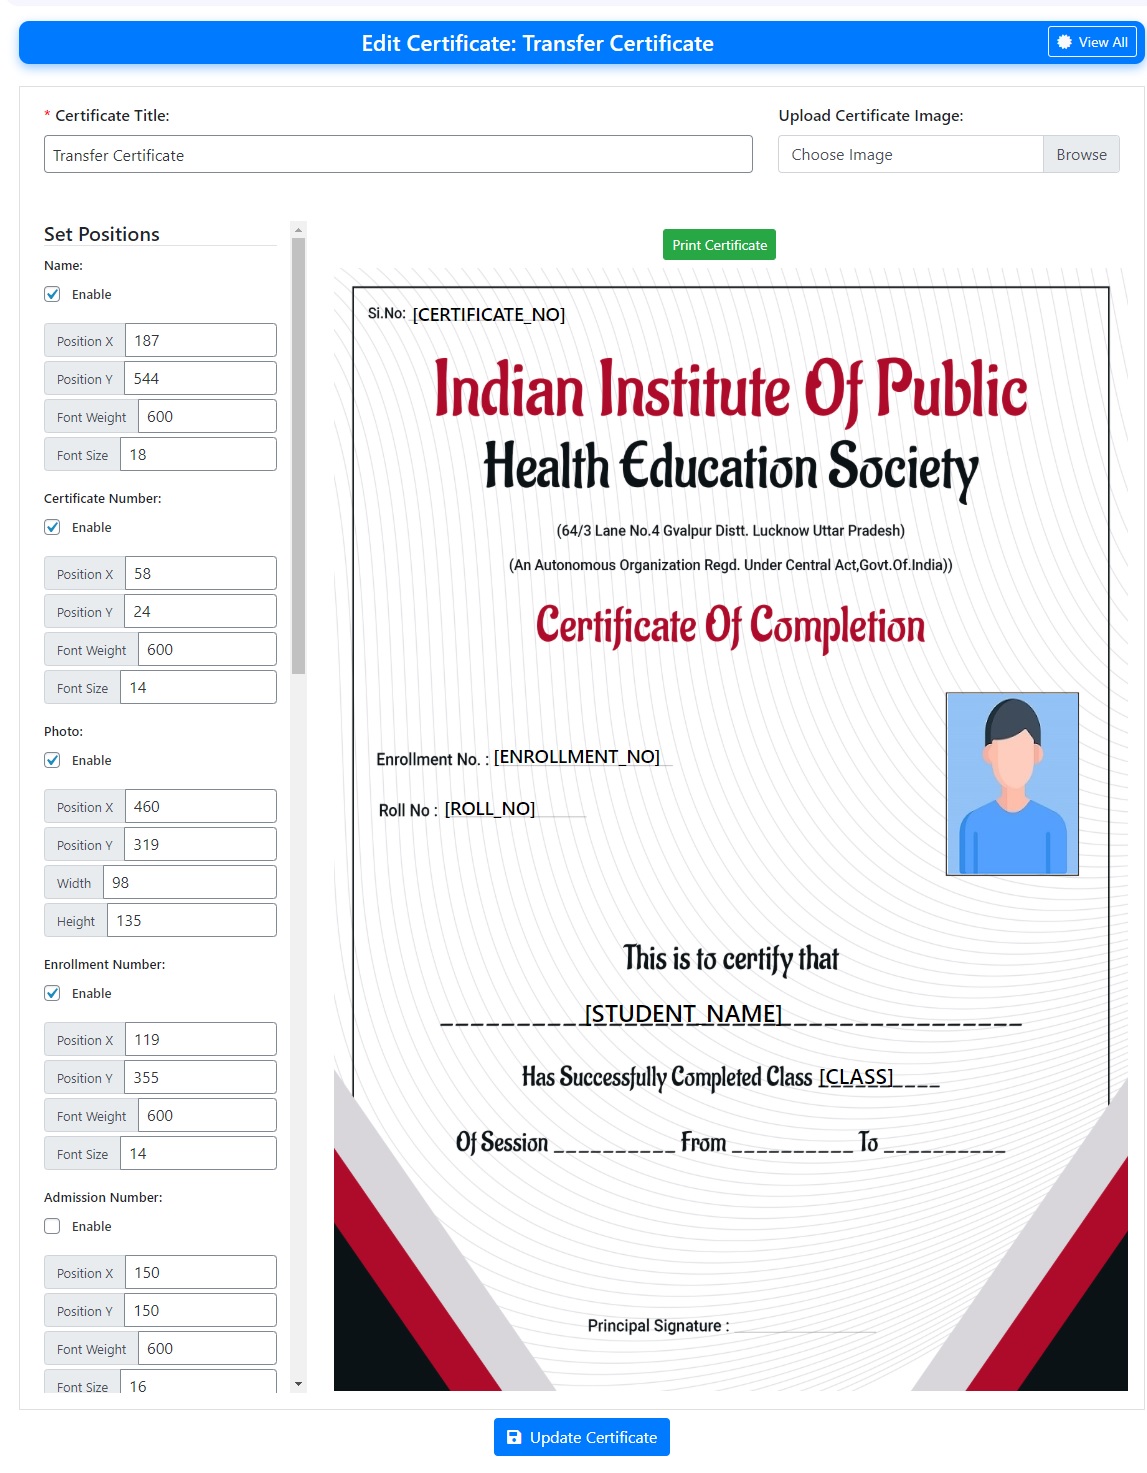
5). After you design the certificate, you can distribute it to the students. For this, click on "Distribute Certificate" and select class, students and date issued.

1). Go to "Widgets" under "Appearance".
2). Using "Student Login" widget, you can display login form on your website.
3). Also, here you can set the URLs where you want the student to redirect after login and logout.
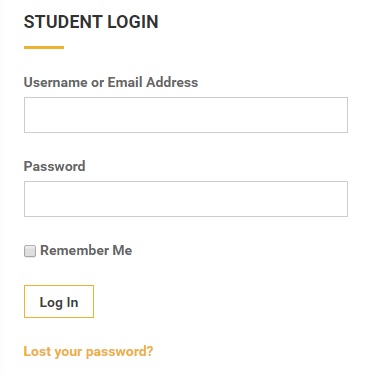
1). To display login form and student dashboard on a page or post, use shortcode: [school_management_account]
1). Student can login from the page where the shortcode [school_management_account] is used. Here, student can find the dashboard.
2). In this dashboard, student can view recent notices, print ID card, view attendance, view exam time table, admit card and study material. Also, students can pay their fees using a suitable payment method.


1). Go to "Exams" under "SM Examination".
2). Edit the exam and you will see a shortcode for time table which you can use in a page or post to display the time table for this exam.
1). To display admission inquiry form on a page or post, use shortcode: [school_management_inquiry]
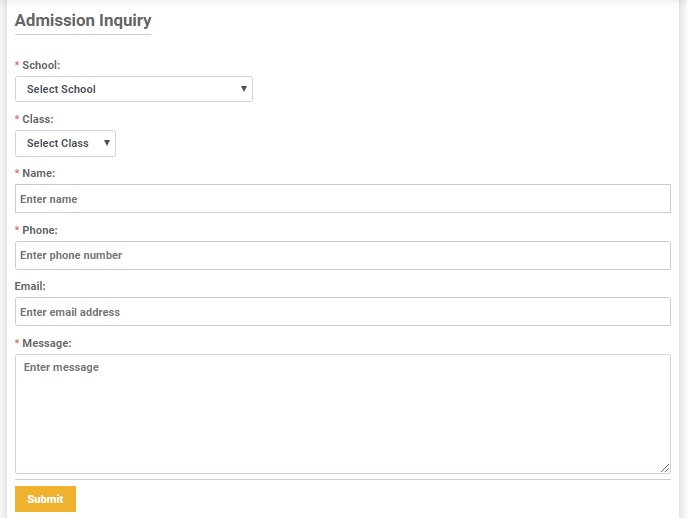
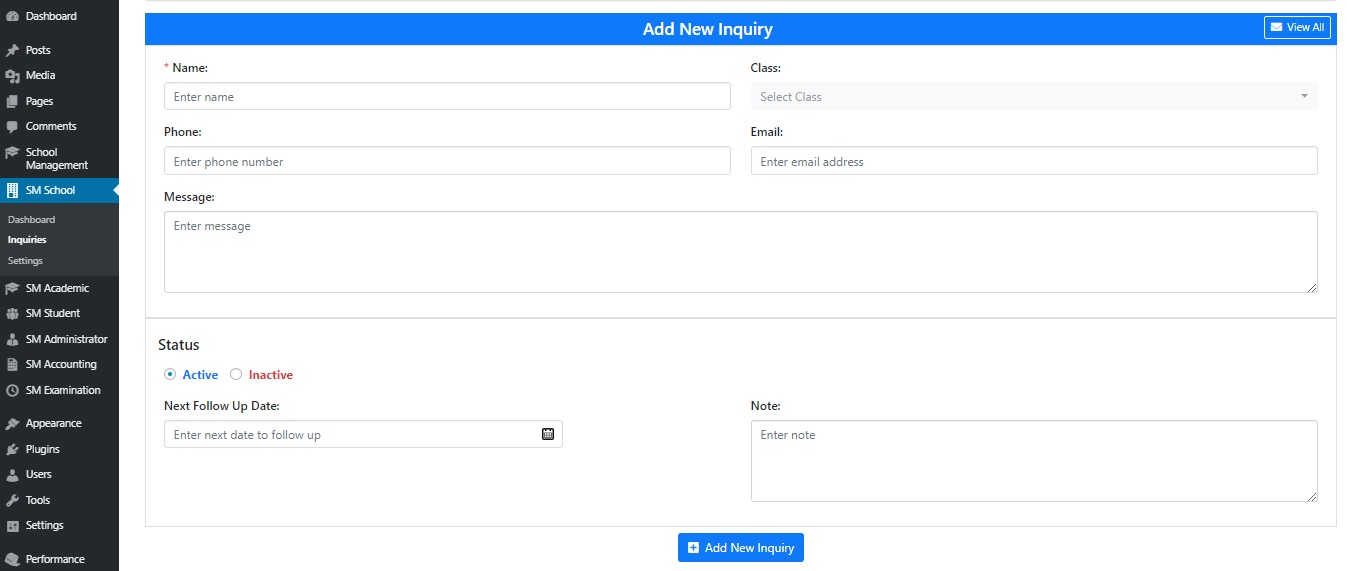
1). Go to "Inquiries" under "SM School".
2). Here, you can find the school related inquiries received from inquiry form.
3). You can also add a follow up date for each inquires and notes.

Zoom Live Classes can be created from here.
Live classes list can be seen here. teacher.

If you face any trouble OR required any assistance to set up and configure the plugin, please post your query on Support Forum. We will try our best to resolve our query on the forum.
And your suggestions for more features and improvements for our plugin is really appreciated.
Thanks for reading this documentation.