


In the current world, instructional video tutorials have become common. Creating a professional tutorial video using a specialized screen recorder is easier than most think. Nothing feels better than when someone watches a well-structured and detailed tutorial video about something that appeared so technical.
It is an easier way to learn and improve our skills. With the use of specialized software like Wondershare DemoCreator, you can create tutorial videos on any subject. Whether you want to teach your friends how to use Skype, check the email, or anything else you are experienced, you can create a video tutorial using such software.
How to do something practical
The main reason why someone may want to create a video tutorial is to show your friends or potential clients how to do something practical. The good thing about these videos is that someone can refer to them whenever they tend to forget what you intended to teach them. With the current development in online learning and tutoring, you can sell your tutorials to those who want to learn specific skills.
How to create a tutorial is simple as long as you have decided the software to use. With the required skills, you can make the best videos with the software you want to use. Software like Wonder share DemoCreator that has an easy-to-use platform, even beginners can create amazing videos.
It’s advisable to practice what you want to share to avoid skipping or forgetting the necessary steps. You should only screen record a perfect video to avoid misleading or confusing the viewers.
Screen Recording Process on DemoCreator.
You can create tutorial videos using Wonder share DemoCreator screen recorder. This software is free to download and only requires basic skills to create a tutorial video.
The best way to record a tutorial video on a PC is Wondershare DemoCreator screen recording software. As we said earlier, DemoCreator is easy to use. This easiness applies to both screen recording and video editing.
Screen recording during a tutorial presentation is quite easy. The following steps will help you to come up with a tutorial video effectively: The first step is to clean up your computer screen and closing other applications that could be running on screen.

Turning off popup notification
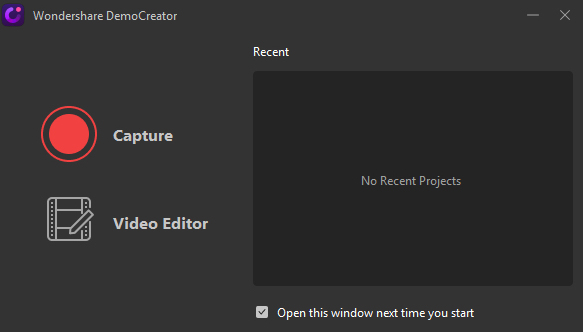
Turning off screen notifications that may pop up during screen recording. Launch the software to get a window where you are supposed to click the ‘Capture’ button. On clicking the ‘Capture’ button, a small window appears. It is on this window where you can adjust the size of the region you want to capture.
You are free to take any of the options among the three that are available, depending on your preference. On the other hand, you can manually select the recording area by keying in the values of its length and width. You will also have an opportunity to select the devices that you intend to use in your tutorial recording.
You may need to use the microphone, system microphone, and webcam, you can choose your record device directly from the DemoCreator.
Use Functional keys To Pause or play Recordings
The webcam is useful for shooting live videos from the PC’s inbuilt camera or any mounted webcam. To record your audio, you can use the system’s mic or an external microphone. You are free to enable or the three at will.
Once you select the recording area, you can move on to record your screen. During recording, the F10 functional key is used to stop recording. The F9 key is used to pause or resume the recording process. Make the record avoiding mistakes as much as possible. If you mess up, pause the recording before starting slightly before the error. The error can be corrected when editing the video.
Remove Unnecessary Part With Tool Help
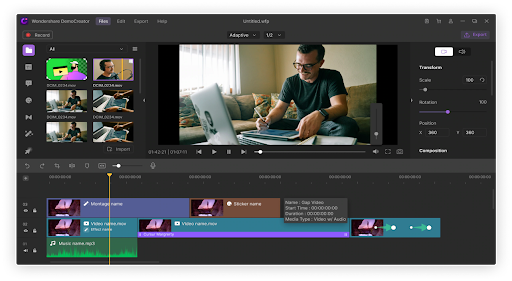
Immediately you stop recording, DemoCreator will automatically open the editor window. It’s on this window where you crop, add text, title or subtitle, annotations, etc. to add value to your video.
Other than the editor’s above features, you can add more effects to the videos or remove any part that you feel is not necessary. It’s also possible to import files and incorporate them into the video you just recorded.
It is advisable to open DemoCreator and practice before recording to upload or share. This will give a high-quality output of the video and minimize editing. Don’t forget to add a webcam recording to your screen casts because it increases viewers’ engagement.
Edit Your Tutorial after Recording.
Wondershare DemoCreator is the most innovative free screen recorder that lets you capture the activities on your screen. Its in-built editor has a wide range of functions that are useful in making the videos attractive.
You can use the editing features that can be used to join several video clips or add effects to a video.Although someone may think it’s free and therefore, may not be the best, the developer of this software did not compromise its output quality.
Anyone can use it because it doesn’t need professional skills.Once you finish recording the video tutorials, you can edit them to remove unnecessary sections and add value. You can use the various effects available to make your tutorial more appealing.

Influence your video
Having read through this article, I believe you are in a position to create an influencing video for your business page on Facebook or YouTube channel and get you more views and likes. There is no need to spend money on paid screen recorders that will not offer you the value for your money.
This free to download software will do miracles to your video tutorial creation. Download the Wonder share DemoCreator version 4.0 and experience the new features for screen recording and video editing. I promise you can never regret using this software both for your video editing and screen recording.