Tag Archives: how to setup google amp
How To Setup Google AMP On Your Website
-
Danish Ansari
5 Comments
- Digital Updates , SEO
- accelerated mobile pages, amp, google amp pros and cons, how to setup google amp, mobile-first indexing, what is google amp, why to use google amp
Are you looking to setup Google AMP on your WordPress website? Accelerated Mobile Pages or AMP is a process to make your website load faster on mobile devices. Loading speed is an important factor in SEO and can divert heavy traffic to your website if done properly.
Now, let’s first learn what Google AMP is and how can it help our website ranking up and then how to setup Google AMP on your website.
What is Google AMP?
Google AMP stands for Accelerated Mobile Pages. It is an open source initiative backed by giants like Google and Twitter. The main aim of AMP’s to make web pages load faster on mobile devices to make the user experience better.
For many mobile users, reading on the web is a tedious job as for most of the web pages, loading time is too high. Most content rich pages take several seconds to load despite all efforts taken by site owners to speed up their website.
Accelerated Mobile Pages or AMP very limited HTML and Javascript. This allows the web page to be saved on Google AMP cache. Google can then serve this cached version to users instantly when they click on your link in the search results which helps your site to load faster and thus rank higher in search engines.
Accelerated Mobile Pages are platform-agnostic and can be used by any app, browser, or web viewer. Currently, it is used by Google, Twitter, LinkedIn, Reddit, and others.
Advantages and Disadvantages of Google AMP (Accelerated Mobile Pages)
According to yo SEO experts, AMP’s help you rank higher since you are improving one of the most priority factors of SEO, that is your site loading speed. It also helps to stabilize your user experience for the people who are accessing your website through slow internet connections.
AMP uses the limited set of HTML, JavaScript, and CSS, which means you cannot add certain plugins and features to our AMP version. This limits your ability to add subscriber forms, facebook like boxes, and other dynamic scripts.
While Google AMP supports Google Analytics, it does not support many other analytics platforms. Same goes for advertising options which are limited to select few advertising platforms.
Despite all the limitations caused, Google is still approaching AMP pages by giving them a boost in mobile search.
If significant chunk of your traffic comes from mobile searches, then you may benefit from adding AMP support to improve and maintain your SEO.
How To Setup Google AMP On Your Website
Now you are all set to make your web pages AMP compatible. Firstly, you have to install a plugin AMP by Automattic Inc. and activate it.
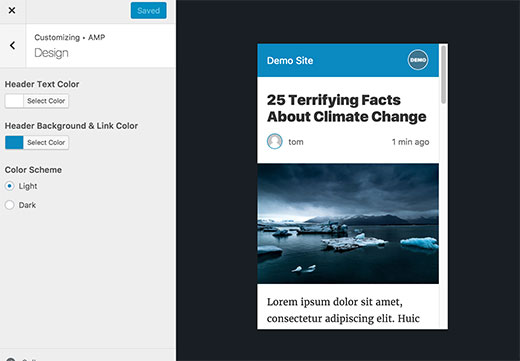
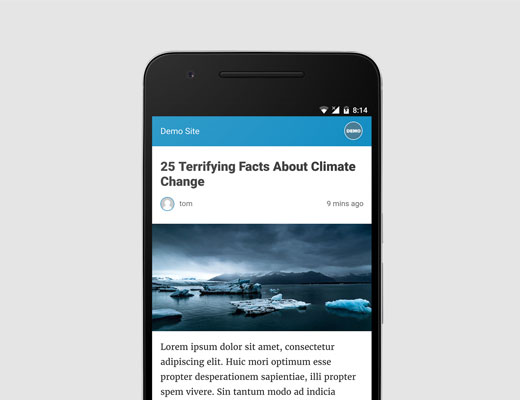
After activation, you can move to Appearance » AMP page to see how your site looks on mobile devices using AMP.
You can now customize the header background and text color on this page. The header background color you choose will remain same for the links.
The plugin will also use your site’s icon or logo if your theme supports it.
Just save all the changes you have made to see the effect taking place.
You can now visit any single post on your website and add /amp/ at the end of the URL. Like this:
https://example.com/2017/01/new-blog-post/amp/
This will show you an AMP version of the url.
Now, when you’ll check the source code of your original page, you can see this syntax in your HTML:
<link rel="amphtml" href="http://example.com/2016/10/my-blog-post/amp/" />
This line tells search engines and other AMP consuming apps/services where to visit for the AMP version of the page.
Troubleshooting:
Fewer times, we have seen a 404 on AMP version of the web page, so if face the same problem, here’s what you have to do:
You need to visit Settings » Permalinks page in your WP admin panel and look out for “Save Changes” button and click on it. Be cautious and don’t click anywhere else apart from save changes button as this will refresh all your permalinks structure so that your web page become accessible again.
More Customization for Your Accelerated Mobile Pages
TheWordPresspress plugin that we used has very less customization options, so if you are one among them who loves to play with customization of website, you have to take help of some more plugins which will provide you the freedom to try and test your AMP web pages.
If you are already using Yoast SEO, then you need to install and activate the Glue for Yoast SEO & AMP.
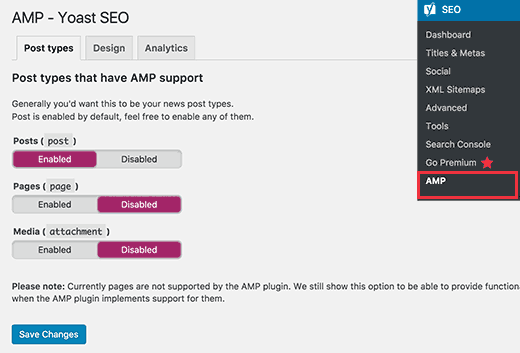
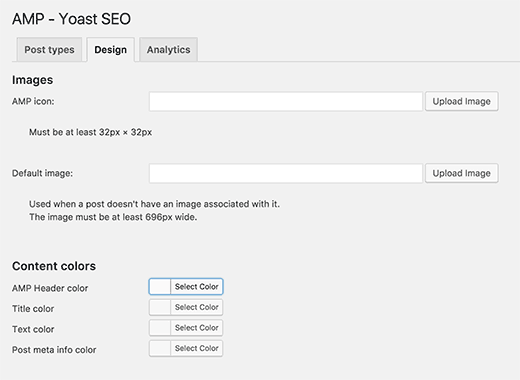
It is an add-on plugin for Yoast SEO and AMP plugins. Upon activation, you need to visit SEO » AMP page to configure plugin settings.
This plugin permits you to enable or disable AMP support for all other post types or pages.
On the design tab, you can customize with all available designs and colors. You can also upload a logo and a default header image which will be used when a post does not have its own featured image.
Onto the Analytics tab, you can add your Google Analytics code to enable your AMP page tracking.
Always press save once you are done with your changes.
You can find so many other plugins which can help you add related posts, footer widgets, and even social media icons to your AMP pages, it’s just you have to dedicate some time to find those plugins.
However, you need to make sure to validate your AMP pages after you install any add-on plugins.
We hope this article, helped you learn how to set up google amp on your website.
You can also check tips to improve your SEO in 2017 or how to increase conversion on your website.
Like us on Facebook, Follow us on Twitter and Instagram and Google+.
Follow our channel on YouTube to find out exciting video’s which help you with your WordPress mission.
