Tag Archives: magento 2
How To Edit And Delete Order In Magento 2
-
weblizar
0 Comment
- Magento 2
- admin panel magento, edit and delete in magento 2, magento 2, magento 2 admin panel, magento ecommerce
Working with Magento 2 is pretty exciting, with so many functionalities to explore and leverage. In terms of order management, Magento 2 offers a very simplified and effective workflow that helps businessmen manage their orders’ lifecycle without trouble. And to minimize the troubles even more, let’s learn how to edit and delete order in Magento 2.

As a part of your business routine, you will encounter several orders where you will need to make a lot of changes and even cancel them. In some case, you will have sales orders that would be better off deleted from the system. In this guide, we will explain how you can handle these requirements in Magento 2.
Editing A Sales Order in Magento 2
Did the customer change his mind? Ran out of stock for a product? Has there been a sudden price change? There could be dozens of reasons for you to edit sales order details. However, default Magento 2 options only offer you the flexibility of changing the Address details in the orders. Apart from this, you can mark sales orders as Cancelled. This is useful but doesn’t let you make as many edits as you might need to, considering the complicated realities of real business.
To edit order information, go to the Admin Panel of Magento 2, and go to the Sales Order tab. This gives you an overview of the orders. Click on View for the order in which you want to make a change. Once in the order, you’ll observe that there’s a button called ‘edit’ next to the billing information and shipping information. Click on Edit to change the shipping address; note that you’ll need to specify the shipping method again once you do this. Also, if the customer’s payment method is ‘credit card’, you’ll need to enter the entire information again.
It’s clear; Magento 2’s basic order editing features are limited, and not exactly convenient. Also, we talked about how you might need to delete sales orders in some cases. Well, you can easily delete order in Magento 2, in case you don’t want to proceed with them. These could be orders created for quick testing, abandoned orders, or orders discontinued because of any reasons. However, there’s no built in option to let you delete sales orders. What’s the solution then? The answer – special extensions for editing and deleting sales orders or a fully functional Magento e-commerce theme to support your cause.
Editing and Deleting Orders in Magento 2 Using Extensions
The great thing about Magento 2 is that you have extensions for pretty much everything you want, and order editing/deletion is no different. There are dozens of free and premium extensions that you can install to add the functionality of order editing (extensive) and order deletion to Magento 2.
These extensions generally work by providing you a button, or a dashboard option to select the orders you wish to edit. For instance, you can expect an order editing extension to:
- Enable you to edit all kind of details in sales orders without canceling them.
- Ensure smooth order management and processing.
- Help you in changing the materials entered in the sales orders.
- Enable intricate changes in information such as tax details and billing details.
- Give you options to manipulate discounts and coupon code usage in orders, to adjust the final pricing.
- Help you add comments on orders, to specify more information about the changes you made.
A pretty useful extension you might want to check out is “Magento 2 Order Management extension v2.3.1 or Magento 2 Edit Order by FMEextensions.
Similarly, you can use one of the many extensions for Magento 2, made to help you delete unwanted orders from the database. The common functionalities include:
- Bulk deletion of problem sales orders from the backend, saving you time and cleaning your reporting.
- Enabling order delete option from the order view page.
- Customizable buttons for order deletion.
- Automatic deletion of the subsequent documents for the order to be deleted (such as delivery, shipment, and invoice documents).
One useful option you could consider is MageComp’s Magento 2 Delete Orders extension, which incorporates all the above-mentioned features, along with other nifty options that help you quickly delete unwanted orders.
Now, note that you can also create custom codes to add functionality for order editing and order deletion. However, that will consume a lot of time (assuming you know how to code) and would need a lot of documentation from your side (so that future users and admins know the code). Extensions, on the other hand, are quicker, more effective, and convenient.
Magento 2’s order management functionalities are pretty robust. However, two of the biggest gaps that will be evident when you start working on the platform are the limitations of order editing and the non-availability of order deletion option. However, you can install extensions to enable these two functions and manage sales order workflow in Magento 2 without any hassles. Look for an extension from a reliable developer, so that you’re sure it will be supported in the future too.
Also, How To Upgrade From Magento 2.0.0 to Magento 2.0.1 and How to submit a Magento 2 extension to the marketplace?

How To Upgrade From Magento 2.0.0 to Magento 2.0.1
-
weblizar
0 Comment
- Magento 2
- how to update magento, magento 2, magento 2.0.0 to magento 2.0.1, magento 2.0.1, magento latest version, update magento
Magento is a pioneering the eCommerce industry worldwide by delivering an incredible solution to businesses for creating an enticing web presence. Magento has successfully retained the quality and ease of managing an online store with timely software updates. The updates are released to make sure the websites are well equipped to foil malicious attacks and serve the users with a technology equipped shopping experience. These kind of CMS are bound to be updated regularly. So, lets see how to upgrade from Magento 2.0.0 to Magento 2.0.1
Magento 2.0 brought magnanimous changes to the performance improvement of online stores that were powered by Magento application. The previous version was also well tailored to meet the varying business requirements of merchants across the globe, whereas the launch of a newer version was a need of the day.
It came up with lots of built in features with more security, better user interface, appealing design, and impressive performance. Though it was a major release, merchants were required to make lots of changes like carrying on the entire customization and reinstalling all the extensions with a compatibility of the latest version. For example, the online stores that have configured Magento Facebook Login extension for allowing users to easily register and sign-in to their accounts on the older version acquired a fresh copy of the plugin and installed it on Magento 2.0.
Now, that most of the merchants have moved or planned to move, Magento keeps on updating them with the latest version to let them carry online businesses with a complete peace of mind. Please follow through this article to find different methods to update your core eCommerce application.
How to Upgrade From Magento 2.0.0 to Magento 2.0.1?
Having the latest version of Magento means you are all set to take off your flight towards the limitless business opportunities online. Improving business productivity and making your online store more engaging is possible with all the security updates.
Magento is continuing improving its core application to let you avail every single opportunity of maximizing your business and converting visitors into customers. Update your business website to the latest version and you are all set to compete your rivals and reach a targeted community. Following are two different ways to upgrade Magento from 2.0.0 to 2.0.1 version. Select any method, follow the steps, you will end up with a successful update.
Updating with a composer
If you wish to update the latest version of Magento, make sure you have access to the command line as this method is not for ordinary users. It requires prior experience of using the command line just like the way programmers need to access and modify it. Here is a step by step process of updating Magento 2.0.0 to Magento 2.0.1 version with the composer.
Step 1: Sign in to your Magento 2 application with Secure Shell (SSH)
ssh your-username@$your-server-ip
Step 2: Move to the installation directory of Magento that is
/home/cloudpanel/htdocs/magento2.mgtcommerce.com/
Step 3: Edit the file named as Composer.json to change the Magento version to the latest one. For example, replace the version 2.0.0 to 2.0.1
Repeat the same modification under the ‘require’ command as
“require”: { “magento/product-community-edition”:”2.0.1”,
Step 4: Execute Compose command
composer update
Step 5: Now Run Magento CLI command to upgrade the database
php bin/magento setup:upgrade
Step 6: Clean Magento cache
php bin/magento cache:flush
Step 7: Redeploy Static content
php bin/magento setup:static-content:deploy
Step 8: Product DI (Dependcy Injection) content
php bin/magento setup:di:compile
Step 9: Execute indexers
php bin/magento indexer:reindex
Step 10. Validate the latest version update by running Magento 2 CLI.
php bin/magento
Upgrade Magento 2.0.0 to 2.0.2 (via Magento admin)
Upgrading Magento version with the help of admin access is the simplest and recommended method. Store managers who are not fluent in coding or a programming language can easily upgrade Magento version because it does not require access and expertise to modify the code through a command line.
Step 1: Log in to Magento control panel as administrator
Step 2: Navigate to System \ Tools and select Web Setup Wizard
Step 3: Click System Configuration box
Step 4: Type the authentication keys in the fields that are labeled as Public key, and Private key. Following are some of the recommendations while entering the keys.
- Get access to your authentication keys before initiating the upgrade or update process. These are the same keys you have entered while the installation of Magento application.
- The authentication keys you possess can only work for the application you install. The keys of Magento Community Edition (CE) will not work on upgrading or updating to the latest version of Magento Enterprise Edition (EE) and vice versa.
- The authentication keys of another Magento user or shared accounts are also not applicable for updating version on your website.
Step 5: Hit Save Config.
Step 6: Move to Upgrade the system menu
By doing this, Magento instantly starts finding the updates about the core module. If you like to find component updates, you need to click ‘Yes’ on the screen.
Once the search is complete, a list of available updates will appear on the screen.
Step 7: Select Magento version 2.0.1 from the field labeled as Step 1: Select Version
Continue with the configuration by moving to the next step that is readiness. if you get an error, make sure you to run the crone job, or for further assistance, you can refer to the official documentation by Magento.
Step 8: Click ‘Upgrade’ option and wait until the version updates and you are notified with a welcome message.
The error you may face while updating the latest version of Magento
You can encounter an error that doesn’t permit the completion of Magento software update. It may be due to several reasons, whereas the primary one is not entering the authentication keys in the admin panel. It may appear like this
Conclusion
Updating Magento to the latest version is easier than making changes to any other eCommerce application. The well-designed user interface allows you to easily access the control panel, select the latest version, and continue with the simple configuration. We hope the above tutorials will help you quickly update without asking any expert’s advice.
Also, dont forget to read How to submit a Magento 2 extension to the marketplace? and How To Create A Hello World Extension In Magento 2.
Author Bio
Written by Paul Simmons

How To Create A Hello World Extension In Magento 2
-
weblizar
1 Comment
- Docs , eCommerce , Magento 2 , Plugins
- how to build magento extension, learn how to make magento extension, magento, magento 2, magento 2 development, magento 2 extension, magento extension, magento extension tutorial, magento extensions, simple magento extension
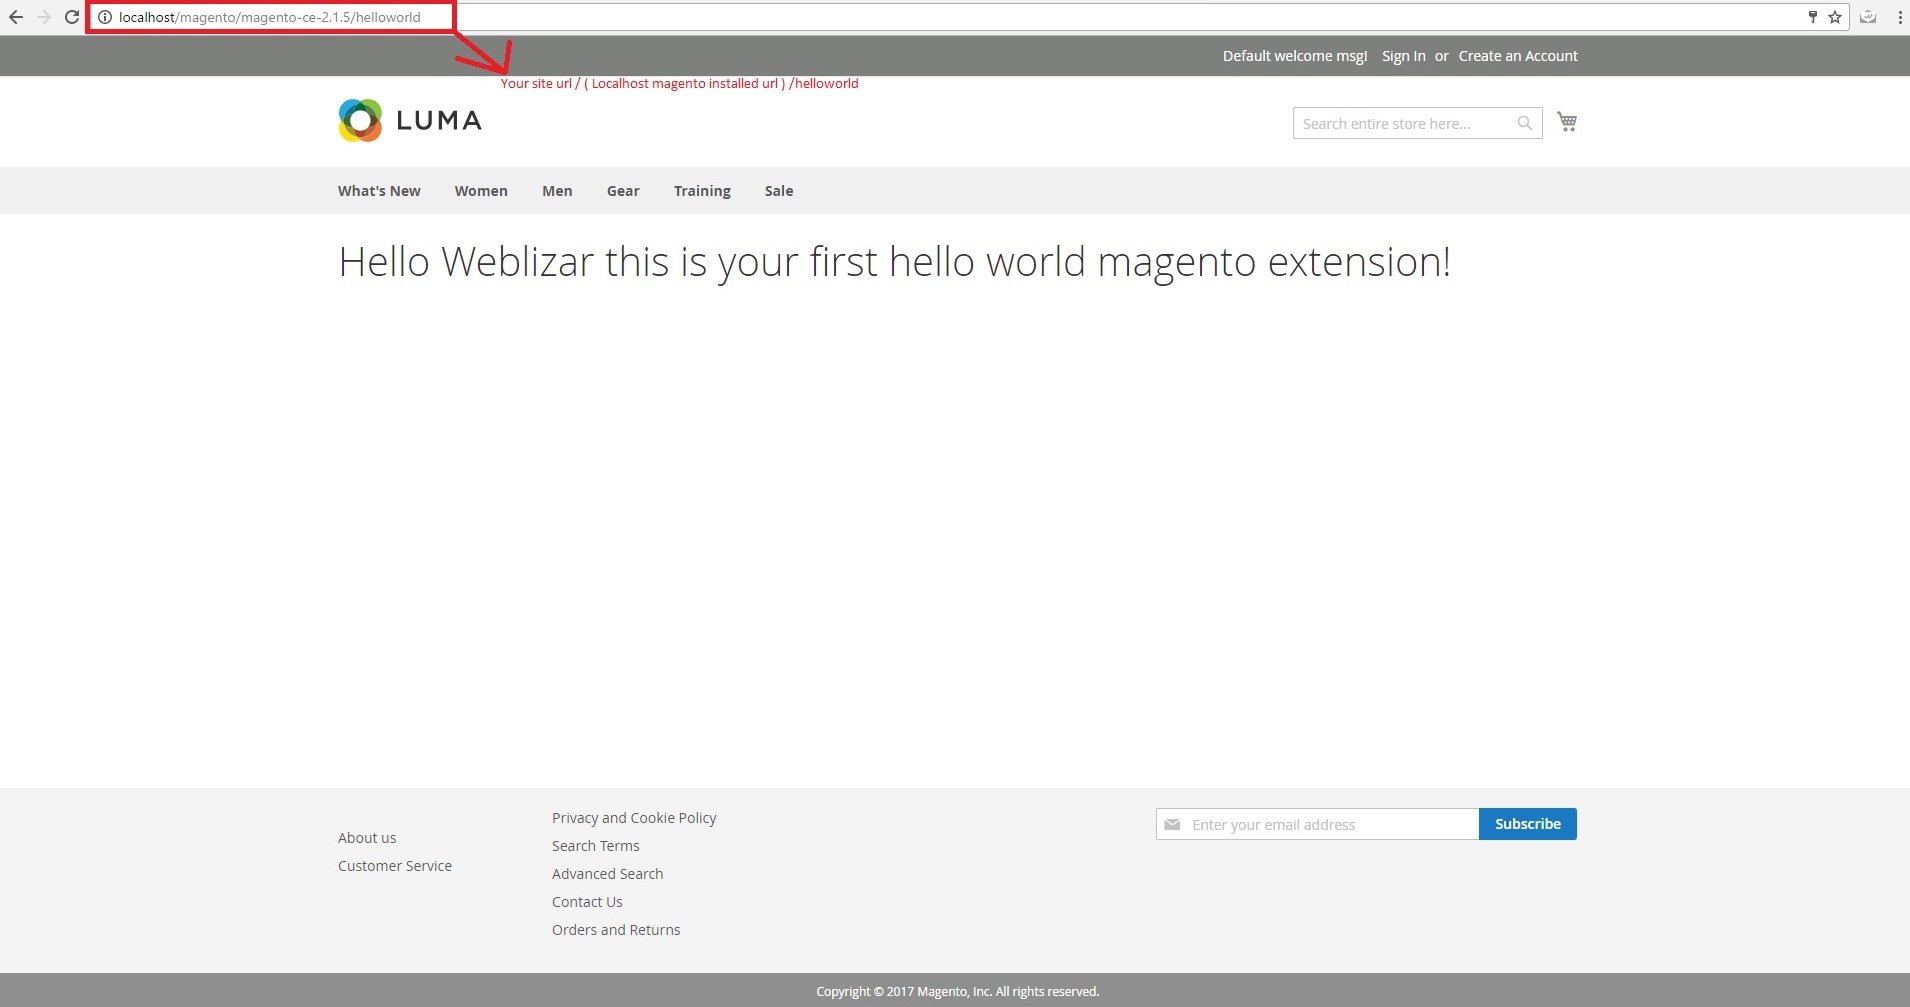
We are going to build a very simple extension in Magento 2. When finished, the extension ‘s output will say ” Hello Weblizar, This is your first hello world Magento Extension! ” in the block content on a custom frontend route. Let us learn how to create an extension in magento 2 with hello world as our output.
Requirement :
At list, you have latest Magento 2 version which is currently 2.1. Is installed on your local system.
Before we start a Magento 2 extension development, there are two things people often forget and we recommend you to do:
1. Disable Magento cache
Disabling Magento cache during development will save you some time because you won’t need to manually flush the cache every time you make changes to your code.
The easiest way to disable cache is to go to Admin => System => Cache Management => select all cache types and disable them.
2. Put Magento into a developer mode
You should put Magento into a developer mode to ensure that you see all the errors Magento is throwing at you.
In order to do this, open your terminal and go to the Magento 2 root. From there you should run the following command:
php bin/magento deploy:mode:set developer
How To Create An Extension In Magento:
Creating the extension files and folders:
Extension Setup
The first step is to create the extension folder and necessary files required to register a Magento extension.
1. Create the following folders:
- app/code/Weblizar
- app/code/Weblizar/Helloworld
The Weblizar folder is the extension namespace, and Helloworld is the extension name.
Note: If you don’t have the code folder in your app directory, create it manually.
2. Now that we have an extension folder, we need to create a module.XML file in the app/code/Weblizar/Helloworld/etc folder with the following code:
<?xml version=”1.0″?>
<config xmlns:xsi=”http://www.w3.org/2001/XMLSchema-instance” xsi:noNamespaceSchemaLocation=”urn:magento:framework:Module/etc/module.xsd”>
<module name=”Weblizar_Helloworld” setup_version=”1.0.0″></module>
</config>
3. To register the module, create a registration.php file in the app/code/Weblizar/Helloworld folder with the following code:
<?php
\Magento\Framework\Component\ComponentRegistrar::register(
\Magento\Framework\Component\ComponentRegistrar::MODULE,
‘Weblizar_Helloworld’,
__DIR__
); ?>
4. Open your terminal and go to the Magento 2 root. Run from there the following command:
php bin/magento setup:upgrade
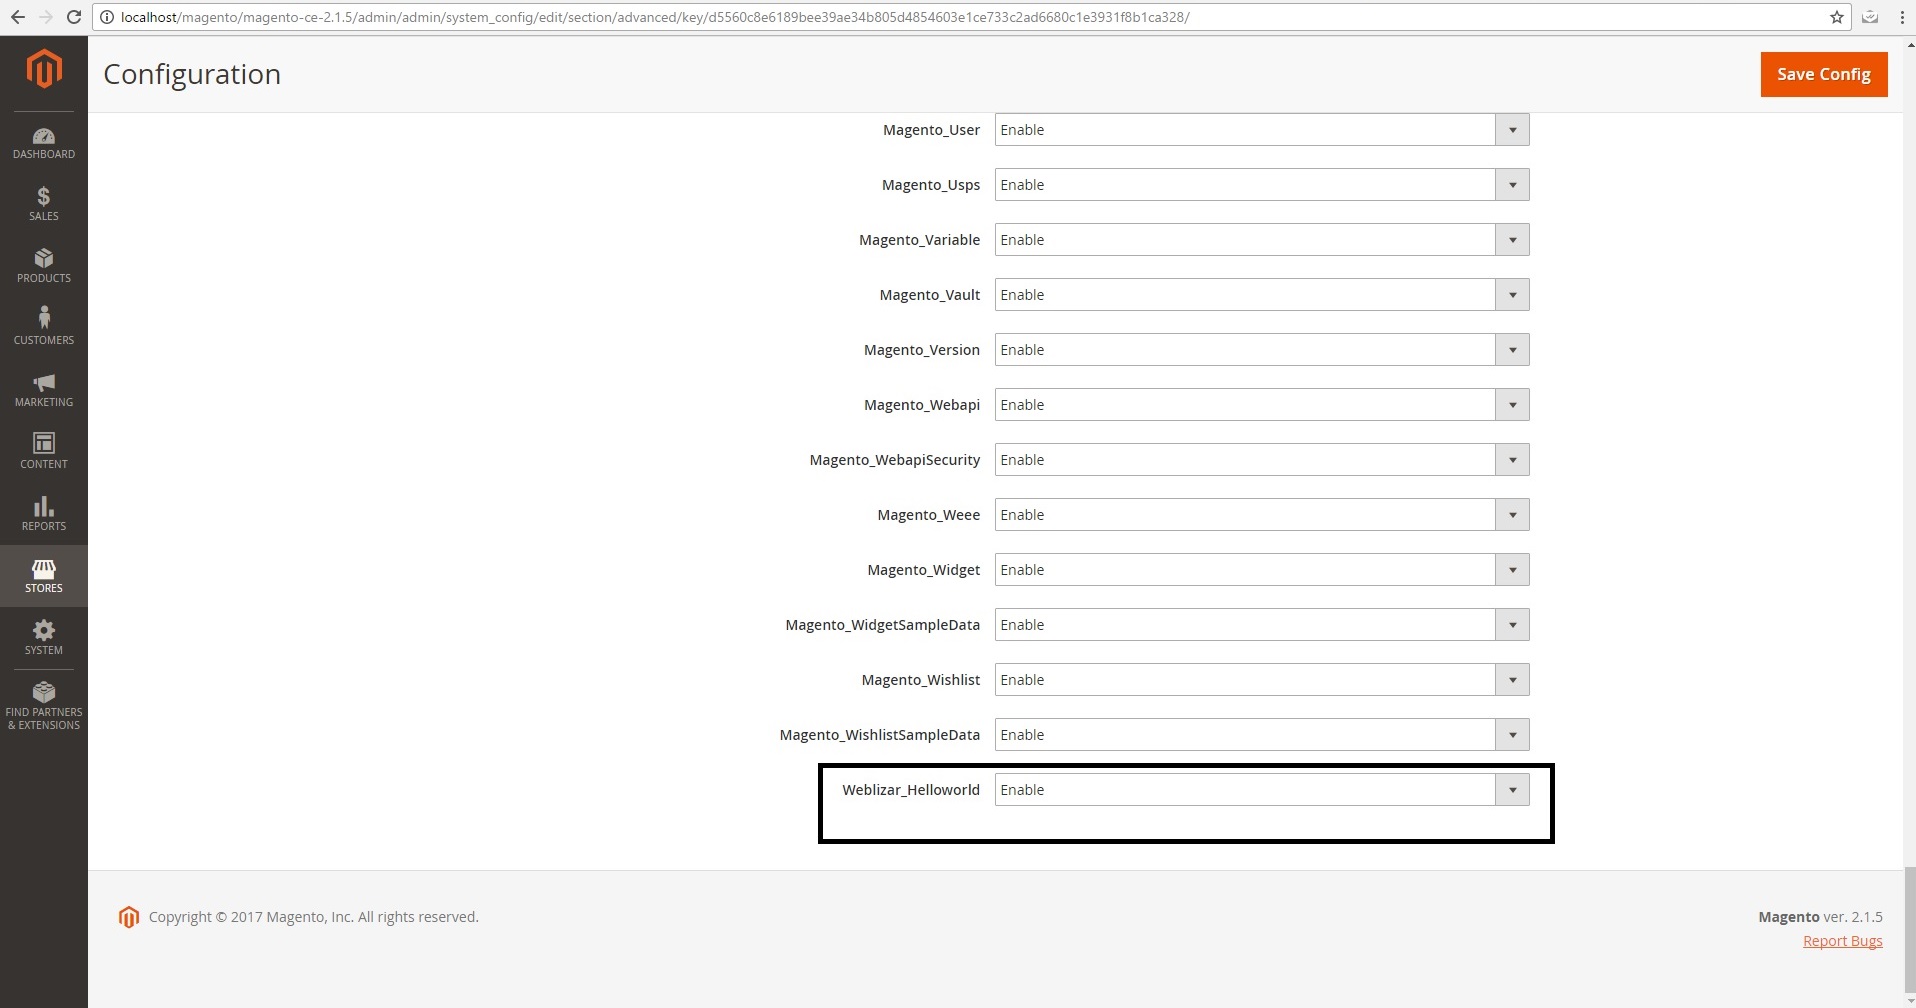
If you want to make sure that the extension is installed, you can go to Admin => Stores => Configuration => Advanced => Advanced and check that the extension is present in the list or you can open app/etc/config.php and check the array for the ‘Weblizar_Helloworld’ key, whose value should be set to 1.
Creating a controller
1. First we need to define the router. To do this, create a routes.XML file in the app/code/Weblizar/Helloworld/etc/frontend folder with the following code:
<?xml version=”1.0″?>
<config xmlns:xsi=”http://www.w3.org/2001/XMLSchema-instance” xsi:noNamespaceSchemaLocation=”urn:magento:framework:App/etc/routes.xsd”>
<router id=”standard”>
<route id=”helloworld” frontName=”helloworld”>
<module name=”Weblizar_Helloworld” />
</route>
</router>
</config>
Here we are defining our frontend router and route with an id ” helloworld “.
The frontName attribute is going to be the first part of our URL.
In Magento 2 URL’s are constructed this way:
<frontName>/<controler_folder_name>/<controller_class_name>
So in our example, the final URL will look like this:
helloworld/index/index
2. Now we create the Index.php controller file in the app/code/Weblizar/Helloworld/Controller/Index folder with the following code:
<?php
namespace Weblizar\Helloworld\Controller\Index;
use Magento\Framework\App\Action\Context;
class Index extends \Magento\Framework\App\Action\Action
{
protected $_resultPageFactory;public function __construct(Context $context, \Magento\Framework\View\Result\PageFactory $resultPageFactory)
{
$this->_resultPageFactory = $resultPageFactory;
parent::__construct($context);
}public function execute()
{
$resultPage = $this->_resultPageFactory->create();
return $resultPage;
}
}
In Magento 2 every action has its own class which implements the execute() method.
Creating a block
We will create a simple block class with the getHelloWorldTxt() method which returns the “Hello world” string.
1. Create a Helloworld.php file in the app/code/Weblizar/Helloworld/Block folder with the following code:
<?php
namespace Weblizar\Helloworld\Block;class Helloworld extends \Magento\Framework\View\Element\Template
{
public function getHelloWorldTxt()
{
return ‘Hello Weblizar, This is your first hello world magento Extension!’;
}
}
Creating a layout and template files
In Magento 2, layout files and templates are placed in the view folder inside your extension. Inside the view folder, we can have three subfolders: adminhtml, base, and frontend.
The adminhtml folder is used for admin, the frontend folder is used for frontend and the base folder is used for both, admin and frontend files.
1. First, we will create a helloworld_index_index.XML file in the app/code/Weblizar/Helloworld/view/frontend/layout folder with the following code:
<page xmlns:xsi=”http://www.w3.org/2001/XMLSchema-instance” xsi:noNamespaceSchemaLocation=”../../../../../../../lib/internal/Magento/Framework/
View/Layout/etc/page_configuration.xsd” layout=”1column”>
<body>
<referenceContainer name=”content”>
<block class=”Weblizar\Helloworld\Block\Helloworld” name=”helloworld” template=”helloworld.phtml” />
</referenceContainer>
</body>
</page>
Every page has a layout hand and for our controller action, the layout handle is helloworld_index_index. You can create a layout configuration file for every layout handle.
In our layout file, we have added a block to the content container and set the template of our block to helloworld.phtml, which we will create in the next step.
2. Create a helloworld.phtml file in the app/code/Weblizar/Helloworld/view/frontend/templates folder with the following code:
<h1><?php echo $this->getHelloWorldTxt(); ?></h1>
$this variable is referencing our block class and we are calling the method getHelloWorldTxt() which is returning the string ‘Hello world!’.
And that’s it. Open the /helloworld/index/index URL in your browser and you should get something like this and