Newsletter Subscription Form is nicely track to your Subscribers and send emails. Allows collecting all visitors to emails Auto and Manually Notify system. This plugin is a responsive subscription form for blogs and page by widget and shortcode. We have added 4 more beautiful templates with pro version. You can manage your subscriber with data table and export as CSV file. You can add unlimited Social Icons with form. Here we are discribe a way to customize the form with shortcode and Widget sidebar section.
Newsletter Form via Shortcode
[ wnlsp_theme1 ] shortcode : Show newsletter form with selected template
[ wnlsp_theme1 id=”511436″ theme_color = “#FF2E34” bg_color = “#555” content_color = “#fff” select_form = “madmimi” ] shortcode : Show Custom newsletter form with 1st template. Easily customized with Theme, background and content color change short code attributes .
Newsletter Form via widget
In widget section, Drag and drop Newsletter Form widget menu at a sidebar where you would like to show.
choose a output template from select list.
Easy Customization with Content and form color
Create Multi newsletter from widget with different from API
Features Of Plugin
1. Easy to use, user friendly interface
2. User friendly Descriptive section design with message tool tips
3. Responsive dashboard, Form Templates design
4. News Letter Subscriber Forms
5. News Letter Subscriptions APIs
6. Easy Integration with Email Marketing Service: Mail Chimp and Mad Mimi email marketing services
7. Subscriber Form show from widget and by short-codes.
8. Multiple form with different mail services( Mail API ) forms and color schemes
9. Auto & Manual Notification To Subscribers
10. Notify All and selected Subscriber
Other Key Points
1. Multi Site Support
2. Multilingual Translate Plugin In Any Language
3. Social Media Profile Links
4. 500+ Google Fonts Family
5. Unlimited Color Scheme
6. Bootstrap Based Responsive Plugin Settings Panel
7. Compatible With Most WordPress Theme
8. Latest Font Awesome Icon
9. Multilingual & Translation Ready
10. Compatible With All Major Browsers
Complete Plugin Documentation
You can find more details about our plugin in our plugin documentation link
IMPORTANT: If you found a bug in Newsletter Subscription Form Pro plugin or have any problem/question concerning the plugin, please post your query into Newsletter Subscription Form Pro Support Forum here in our Forum. If you do not find a solution here, do not hesitate to contact us at lizarweb (at) gmail (dot) com.
Here we are shared Newsletter Subscription Form Plugin Documentation. We are explaining about installation, configuration and publishing the Newsletter Subscription Form Plugin.
Plugin Standard Features
1. Subscriber Form show from widget and shortcodes:
Newsletter Form via Shortcode :
[nls_form] shortcode : Show newsletter form with sletected template
[nls_theme1] shortcode : Show newsletter form with 1st template. this is work with other template like [nls_theme2] for second template
Newsletter Form via widget :
Go to the ‘Widgets’ menu and picked the Newsletter Form widget form the widget menu and placed it a sidebar where you would like to show.
Select a template from list.
and saved.
2. Easy Integrations with Email Marketing Service:
MailChimp and all MadMimi email marketing services
3. Auto & Manual Notification To Subscribers
4. Notify All and selected Subscriber
How to install this plugin:
There are 3 ways to install this plugin
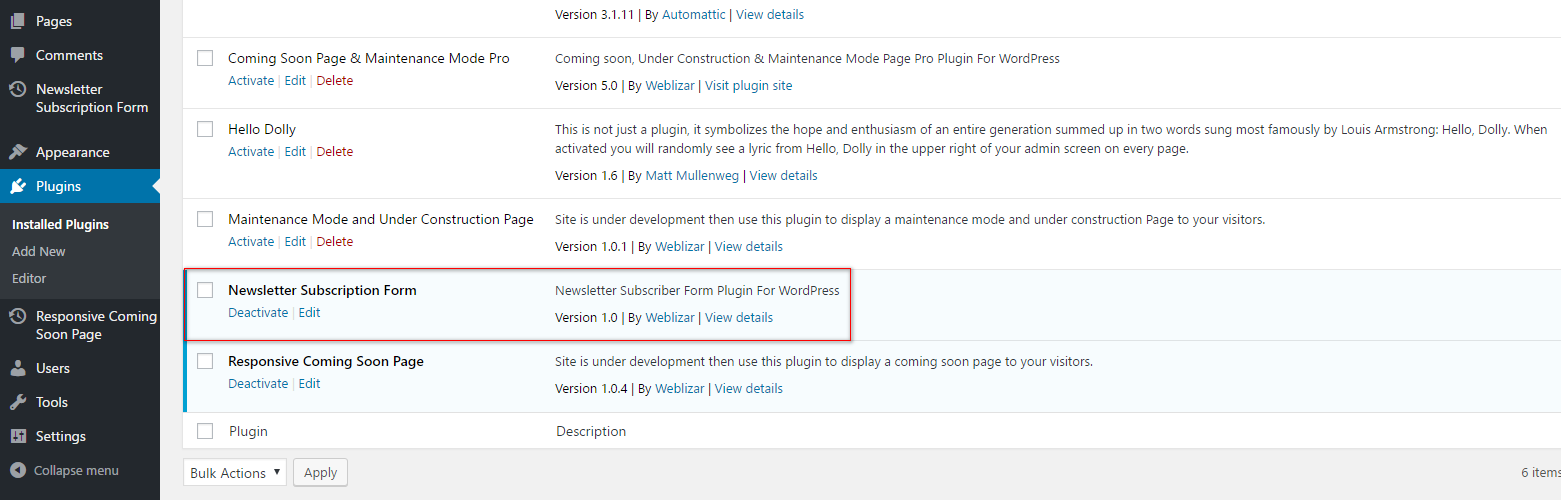
Installation From Plugin Dashboard In your Admin, go to menu Plugins > Add Search for Newsletter Subscription Form Click to install Activate the Newsletter Subscription Form A new menu Newsletter Subscription Form will appear in your Admin
Upload the plugin Download the plugin (.zip file) on the right column of this page In your Admin, go to menu Plugins > Add Select the tab “Upload” Upload the .zip file you just downloaded Activate the plugin A new menu Newsletter Subscription Form will appear in your Admin
The old and reliable way (FTP) Upload newsletter-subscription-form folder to the /wp-content/plugins/ directory Activate the plugin through the ‘Plugins’ menu in WordPress A new menu Newsletter Subscription Form will appear in your Admin
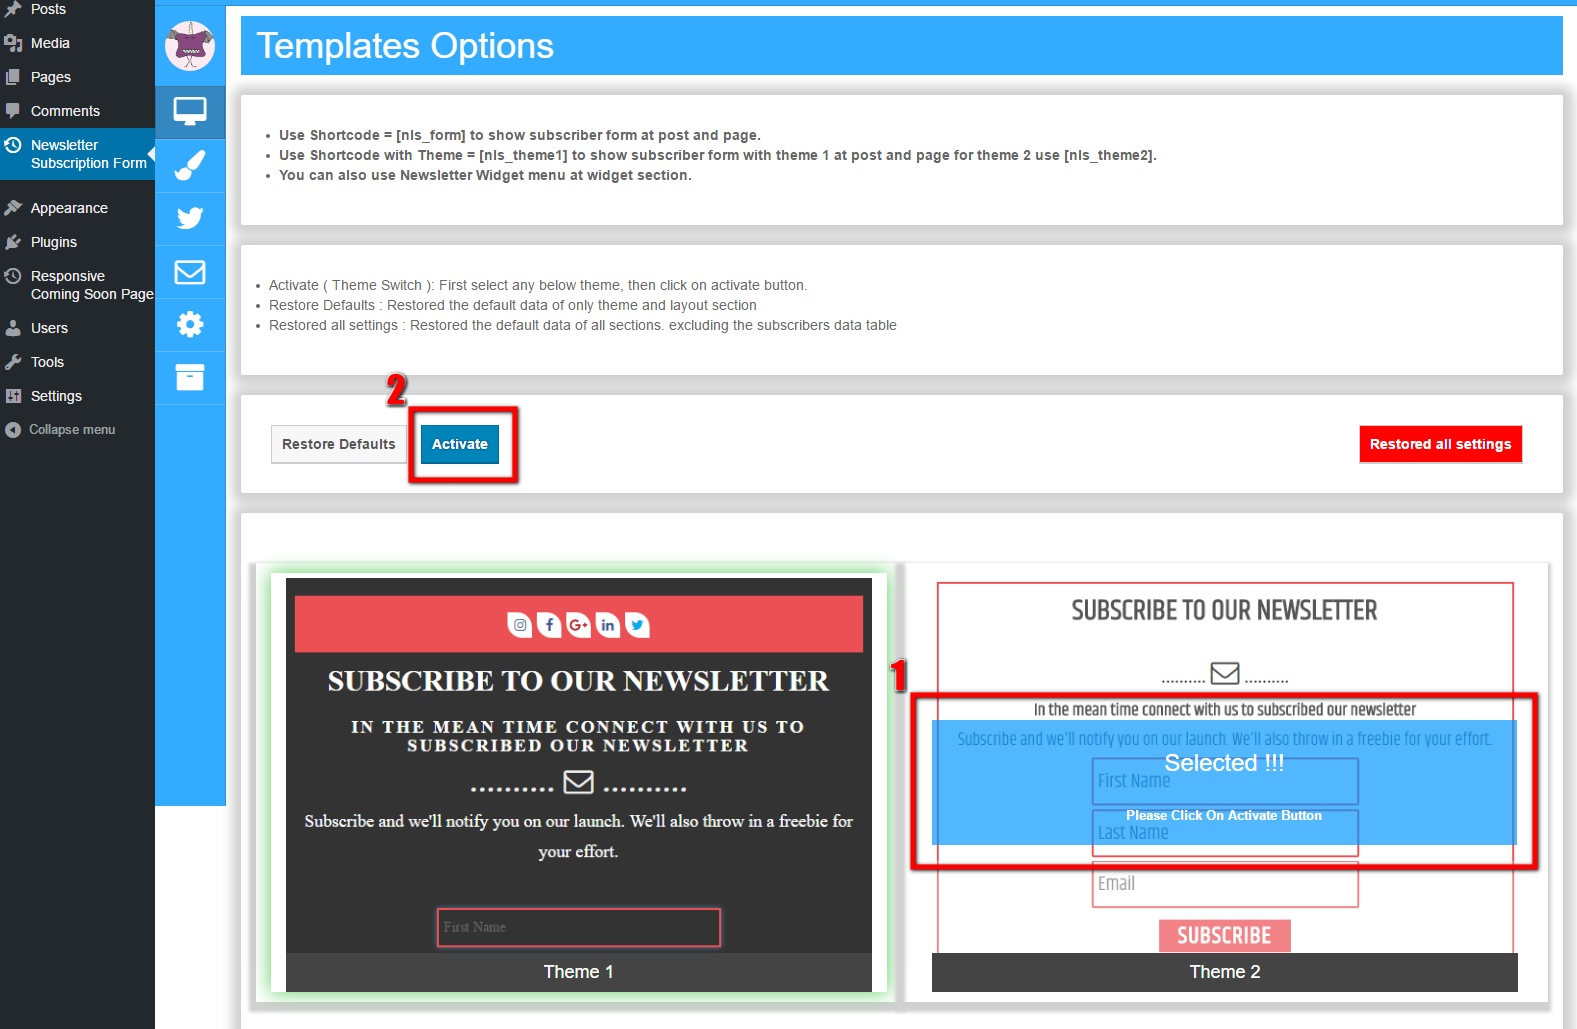
Select Theme
1. Select a theme from list ( See Image : Point 1 )
2. Then click on activate button. ( See Image : Point 2 )
Note : Your selected theme will show by [nls_form] shortcode. Use this shortcode at post and page content area. fore more details go to this link Newsletter Form via Shortcode.
Theme Color Schemes : Change theme color scheme by default and custom color picker option
1. Default color (See below image)
2. Custom color (See below image)
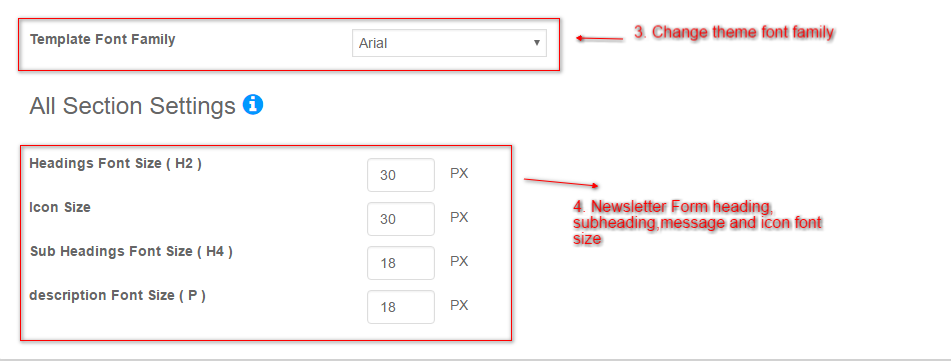
3. Theme Font family : This select drop down box have +500 font family to change font-family of all section coming soon and another page template.
4. Header Content settings : Change font size of logo, header title, Sub title, description
Social Media Options
1. Social Icon On/Off : Show/hide the social icon from the form template. ( See below Image )
2. Open as new tab : social link will open a new tab when you on this setting.
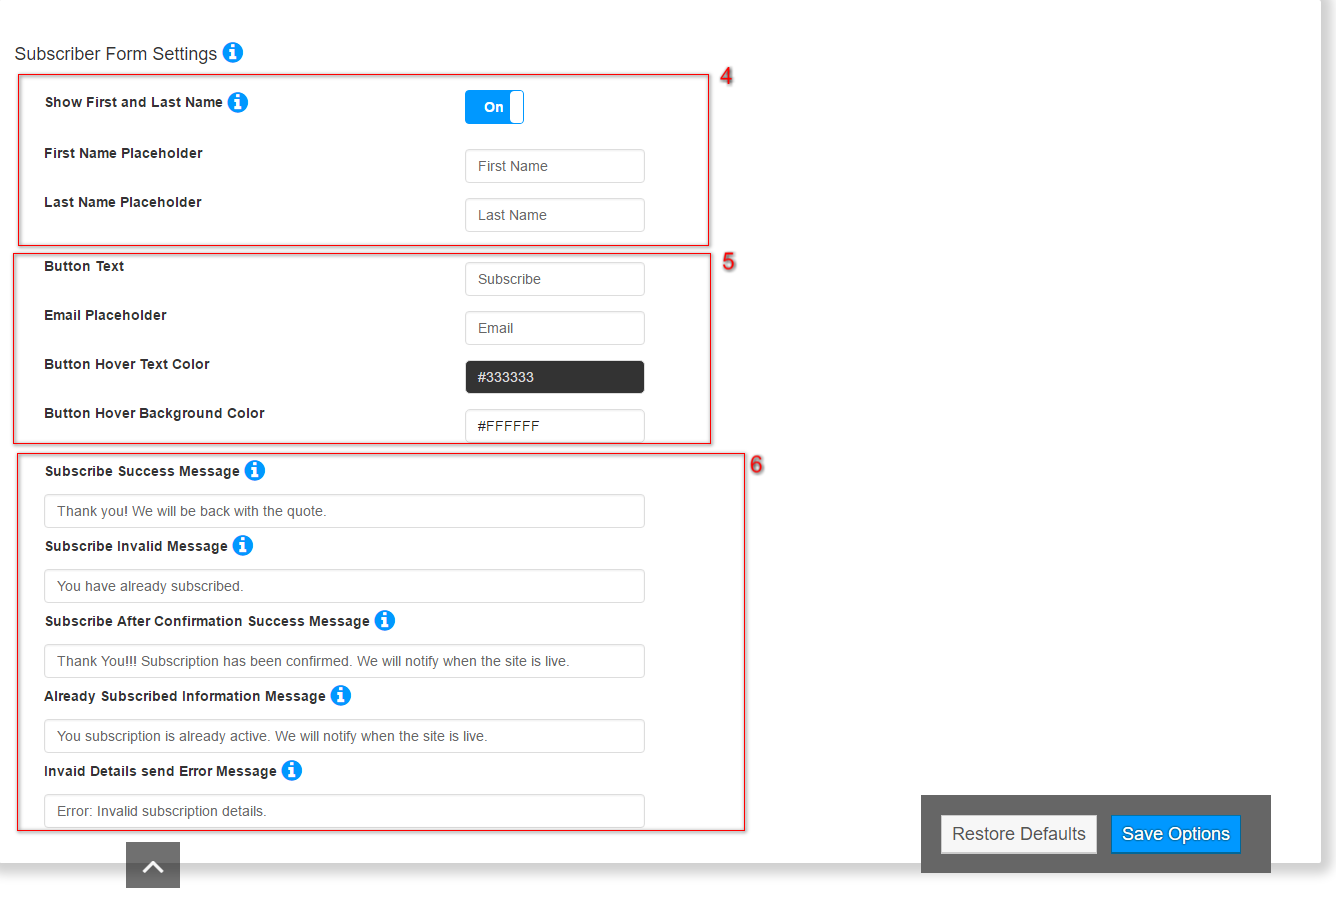
Subscriber Form Settings
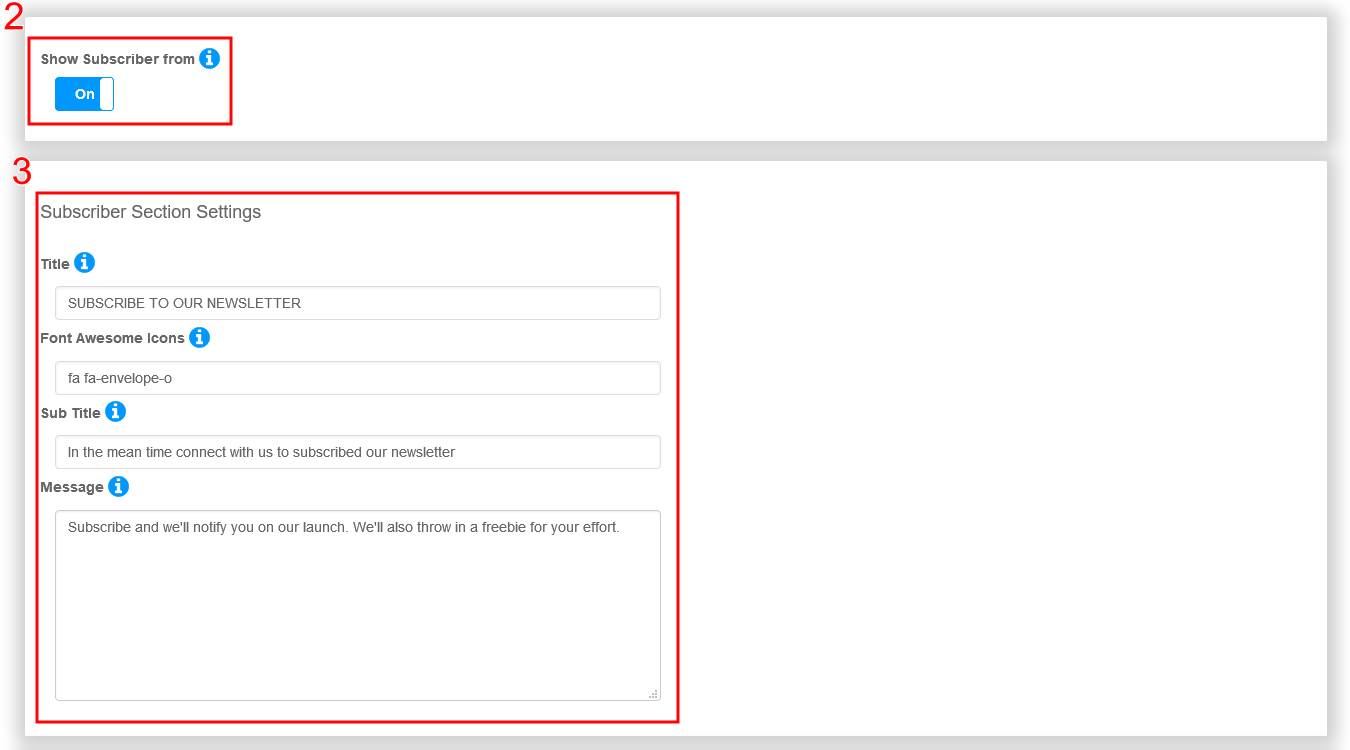
General Settings : Select subscriber settings ( See Image : Point 1)
1. Show Subscriber form : Show/Hide the Subscriber form section from page template. ( See Image : Point 2 )
2. Form general settings : Fill all details like Subscriber form section Heading, Sub-Heading, add relative font awesome Icon and description. ( See Image : Point 3 )
3. Subscriber form settings
1. Add a button text for subscribe button.
2. Add the placeholder of First/last Name, Email box. ( See Image : Point 4 )
3. Add a color for Subscriber Button text Color on hover and Placeholder color. ( See Image : Point 5 )
4. Add some text for subscriber form
1. Subscribe Success Message
2. Subscribe Invalid Message
3.
4. Already Subscribed Information Message
5. Invalid details send error Message. ( See Image : Point 6 )
Subscribers Provider Options
Enable Email Based Subscriber : Enable the option to send a message to Subscriber user to confirm his subscription. ( See Image : Point 2 )
If Email Subscription is Enable: You have “PHP Mail”, “WP Mail” and “SMTP Mail” option to mail the subscribers and confirm its subscription through email.
If email subscription option is disabled: Email confirmation process not required. Users/Visitors will be added to subscriber list as the active subscriber. ( See Image : Point 3 )
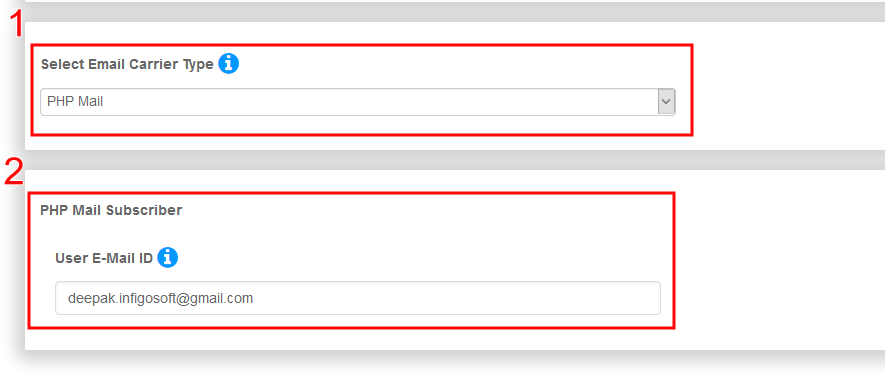
PHP has a built-in function called mail() that allows you to send the email. The advantage of mail() is that it’s very easy to use. we have two option WP-Mail and PHP-Mail
WP-Mail (WordPress mail function) : Select WP-Mail from option list ( See Image : Point 1 )
Add Mail Id: You just add your mail id to use for sending a message from your mail id to user for getting the confirmation for the subscription. (See Image : Point 2 )
PHP Mail Settings : Select PHP mail from option list ( See Image : Point 1 )
You just add your mail id to use for sending a message from your mail id to user for getting the confirmation for the subscription. ( See Image : Point 2 )
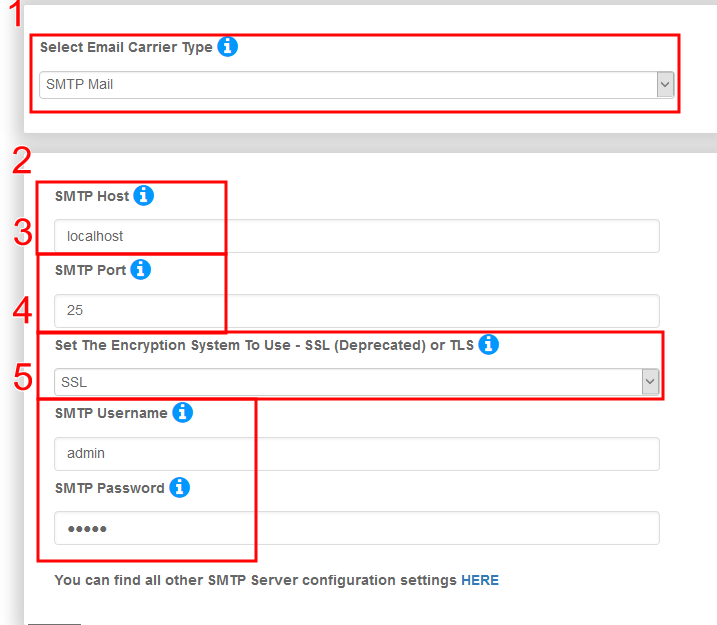
SMTP Mail Settings : Select SMTP mail from option list ( See Image : Point 1 )
SMTP mail needs valid details of SMTP host, port number, Set The Encryption System( SSL / TLS ) username and password. ( See Image: Point 2,3,4,5 )
You can find all other SMTP Server configuration settings HERE
Mail Chimp and Mad Mimi email marketing services : Please check our Mail Chimp and Mad Mimiblog.
Subscribers Options and List
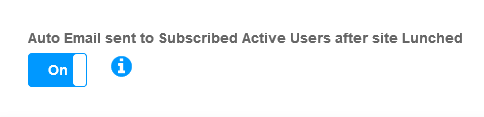
Auto Mail sent : Mail to a user when the site will launch.
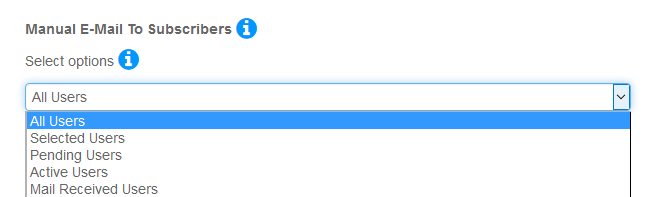
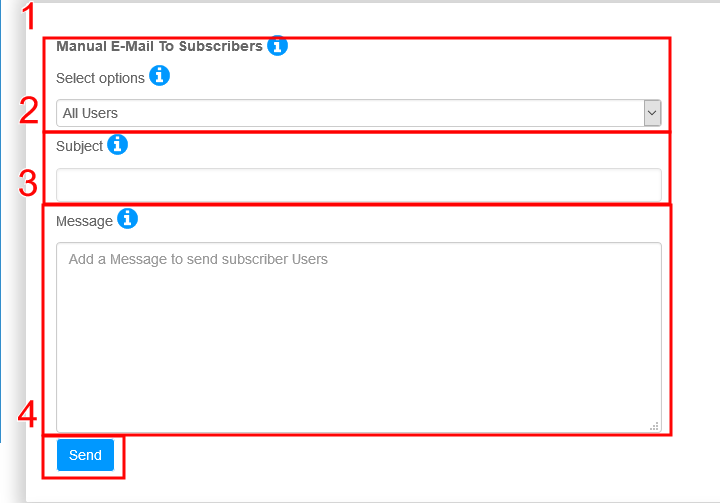
Select Users for manual E-mail :
Manual mail form settings :
1. Select users as All Users/Selected Users/Pending Users/Active Users/Already E-Mail Users. ( See Image : Point 1 )
2. Add a subject of sent mail ( See Image : Point 2 )
3. Add a message body of sent mail ( See Image : Point 3 )
4. Click to send Button for mail sent to selected users ( See Image : Point 4 )
Subscriber Users list table :
All users show in table as first and last name, email, date and subscriber status( pending, active, mail sent )and Arrange the table in ascending/descending order
Note : There is two delete button for deleting the data as selected subscriber and all subscriber. they both button will show when data table has at least one user detail.
Newsletter Subscription Form Plugin for WordPress Users will Show a responsive newsletters form by widget and shortcode, This plugin will automated emails and auto responders. Capture subscribers list with our form subscribed users data table. The plugin allows collecting all visitors subscriptions. Auto and Manually Notify to all your active and pending subscriber user about your site by notification mails.
IMPORTANT: If you found a bug in Coming Soon Page & Maintenance Mode Pro plugin or have any problem/question concerning the plugin, please post your query into Coming Soon Page & Maintenance Mode Pro Support Forum here in our Forum. If you do not find a solution here, do not hesitate to contact us at lizarweb (at) gmail (dot) com.
AWeber is an email marketing service provider with many business clients world wide. AWeber help people keep in touch with the subscribers who have requested to be on their mailing list.
“Coming Soon Pro” plugin will added this service by using Aweber Authorization Code. we are add a application link on Aweber settings. Where you can get your Aweber Authorization Code easily. In Aweber service, You’re also able to track the performance of your emails and receive expert support every day of the week. AWeber is the free 30-day trial, making it easy and risk-free to see the benefits of building an email list.
AWeber helps you keep in touch with your subscribers, You can integrate your aweber account with our “Coming Soon Pro” plugin.
Aweber Newsletter API with Coming Soon Pro Plugin:
The AWeber Authorization Code allows you to sync your subscriber database with AWeber for better list and campaign management. Create client portals, add your new contact by “Coming Soon Pro” plugin subscribe form on templates , link campaign stats to your database, sync email activity with your database, and more.
Auto “sync” your old and new subscriber campaign list once you apply your Authorization Code.
Once your AWeber account “sync”, Our “Coming Soon Pro” plugin template will used this service as subscriber newsletter form.
Subscriber will added on your AWeber account directly, No needed any AWeber form.
Managed your AWeber users at plugin subscriber table list.
Export in CSV file.
Direct contact with your User via Manual mail feature.
After your account is verified, Aweber account will used as subscriber form directly in your plugin template.
How to get Aweber Authorization Code
If you want to set up an integration with your AWeber account, You’ll need to generate an Authorization Code. You can use pre-created weblizar Authorization URL for generate an Authorization Code. please follow below steps
Fill the User name and password field and click on Allow Access button for generate your Authorization Code.
Copy this code for integrate your aweber account with plugin
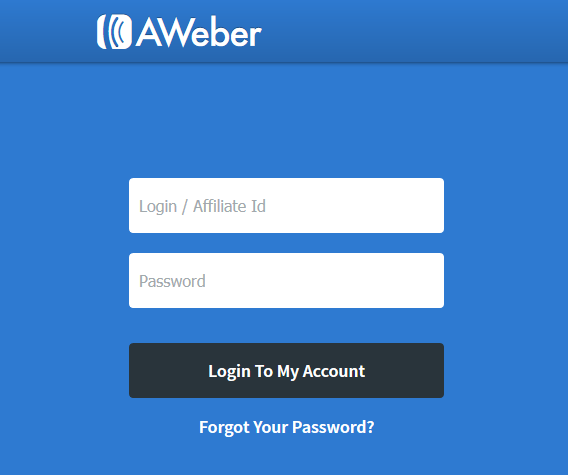
Aweber Login
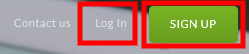
First Click on aweber.com to forward you on AWeber homepage. Once you land on AWeber login screen, click on “Sign-in” button, which is look like below image.
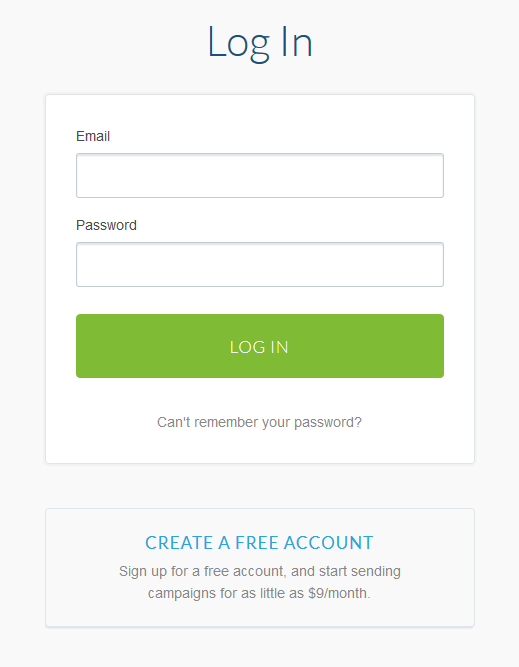
Once you click on login button, you’ll redirect on AWeber login box where you’ll need to enter your username/email and password. After entering, click on “Login”.
AWeber Email Sign Up :
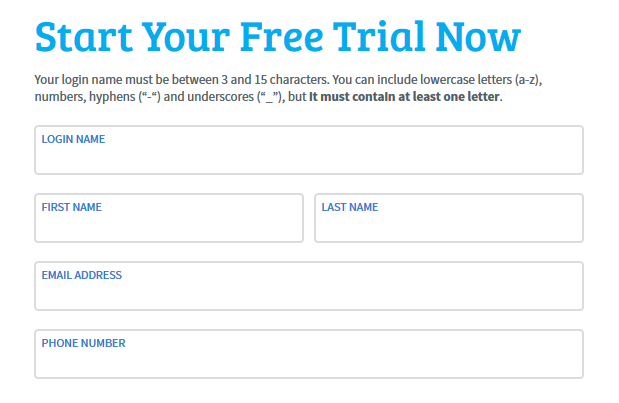
If you already have a AWeber account? Log in here. Other wise Create a free AWeber account for a month by fill some important details.
Click on “Get Started” button and land signup page and fill some information about your self.
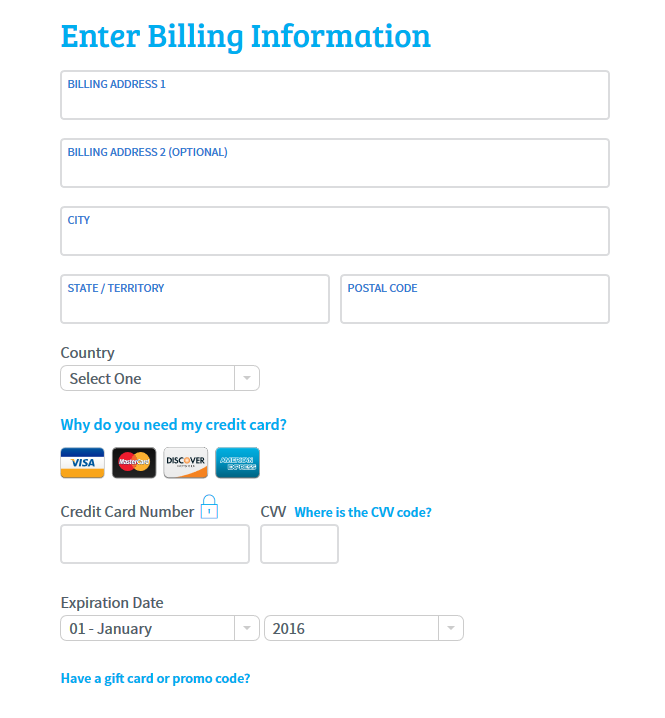
After then you need to fill your billing information with your payment card details.
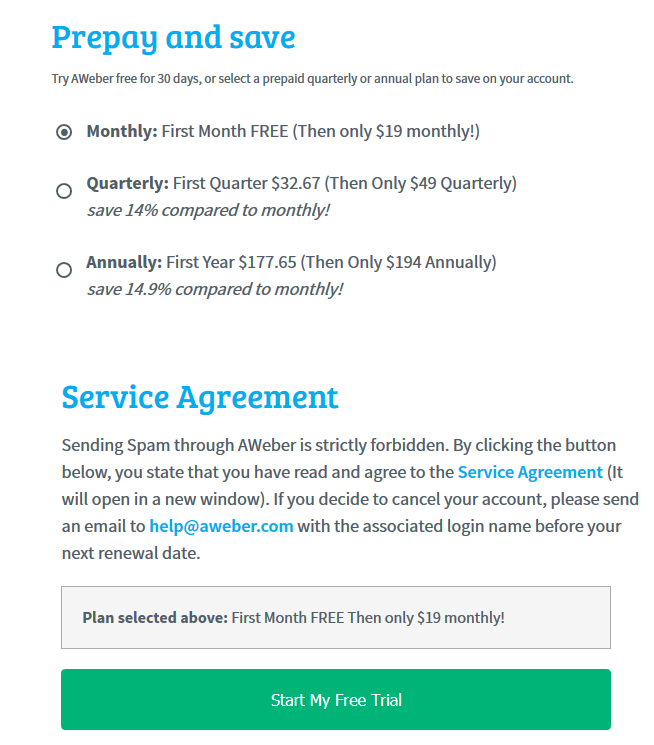
then Select ” Monthly: First Month FREE (Then only $19 monthly!)”. for free signup.
Now you get a mail at your mail id for confirmed your AWeber account.
You have successfully created your AWeber email account with in few minutes. As soon as your account is created, you will find your Authorization Code in below simple steps.
Create an AWeberAPI instance using your consumer key and consumer secret.
Ping AWeber Auth to get your request token key and request token secret.
Visit the Authorization URL using your request token key.
Ping AWeber Auth again to get access keys.
Note : You can also use ” Authorize App ” link to get Authorization Code at plugin AWeber account setting page.
Complete Plugin Documentation
You can find more details about our plugin in our plugin documentation link
IMPORTANT: If you found a bug in Coming Soon Page & Maintenance Mode Pro plugin or have any problem/question concerning the plugin, please post your query into Coming Soon Page & Maintenance Mode Pro Support Forum here in our Forum. If you do not find a solution here, do not hesitate to contact us at lizarweb (at) gmail (dot) com.
The Campaign Monitor API allows your users to interact and “sync” with your Campaign Monitor account via “Coming Soon Pro” plugin.
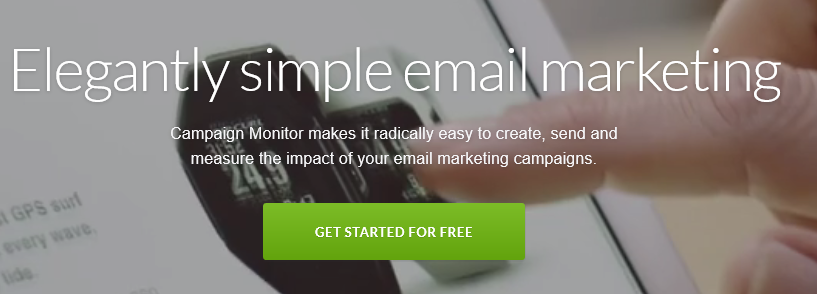
Emails are most powerful when they’re personalized. Campaign Monitor easy-to-use tools, yet powerful tools allow you to send hyper-targeted campaigns and deliver relevant content to the right person at the right time.
Campaign Monitor REPORTING AND ANALYTICS : (Test, track, optimize, and repeat)
In Campaign Monitor you can see, How your emails are performing in real time with interactive analytics on campaign activity. See how your audience is engaging with your emails, sharing your content and which calls to action are most effective.
In our “Coming Soon Pro” plugin, API include: *Automatically sync subscribers list between Campaign Monitor and Plugin. *Create and send custom email campaigns to segments of subscribers built on the fly. *Once you integrate between plugin and Campaign Monitor account, You can saved new subscriber in selected list *Automatically create a client account, set billing and load it with ready-to-send templates. The API uses RESTful protocol and responses are formatted in XML or JSON.
How it is work with coming soon pro, Please check ” Campaign Monitor API with “Coming Soon Page & Maintenance Mode Pro ” plugin (blog under development ) ”
After your account is verified, Campaign Monitor account will used as subscriber form directly in your plugin theme.
Easy steps on Campaign Monitor Login
First Click on campaignmonitor.com to forward you on Campaign Monitor homepage. Once you land on Campaign Monitor login screen, click on “Login” button, which is look like below image.
Once you click on it, you’ll redirect on login box where you’ll need to enter your username/email and password. After entering, click on “Login”.
Campaign Monitor Sign Up
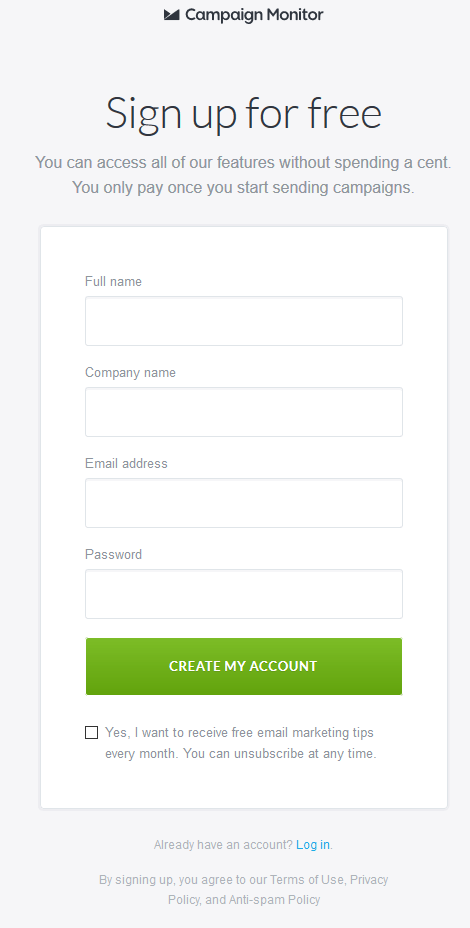
It’s for free and is easy to create a Campaign Monitor account, just follow these simple steps to quickly create an account.
Easy steps :
First go to campaignmonitor.com. Once you will on Campaign Monitor homepage. Simply click on “SIGN UP” button.
Once you click on it, you’ll redirect on Sign Up box where you’ll need to enter your and company name, email ID and password. After entering, click on “CREATE MY ACCOUNT”.
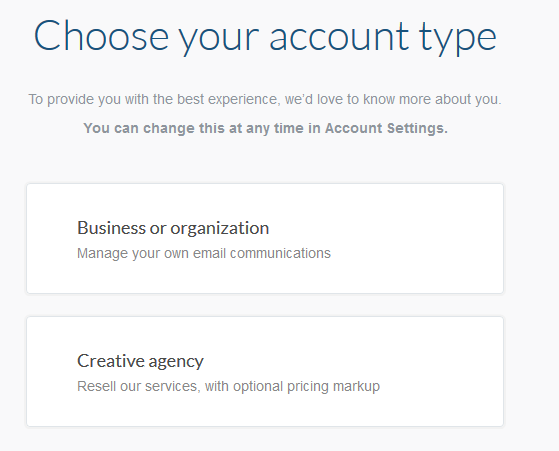
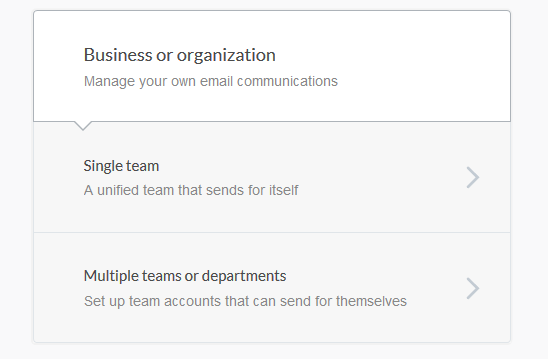
After Sign Up, You will redirect on Account welcome page. Where you can choose one of two Campaign Monitor Account email communication edition.
Where You Can Find API Key?
Campaign Monitor have two edition for user direct edition”Single client” and “Multi-client ” Edition. So you can find your API key in one of two places, depending on which edition of Campaign Monitor you’re using. You’ll know you’re using the multi-client edition if the menu option “Clients” is in the navigation:
First, You have verified your account to access your API key. For verified your account, You can done by clicking the verification link in the email Which is sent you after your Campaign Monitor account was created. If you can’t find the verification email, please contact support.
If you don’t see “Account Settings,” You need to click Clients first to go in a client view.
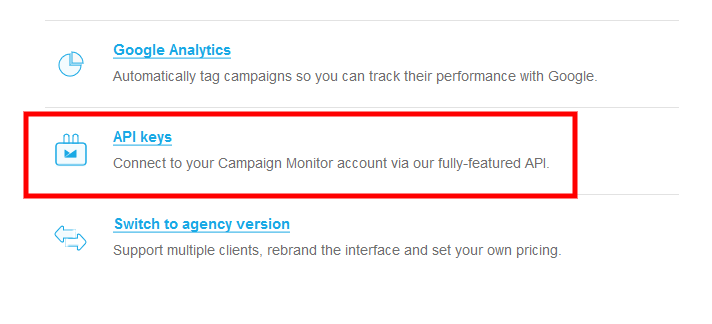
Now to access your API key, click Account Settings in the top navigation bar.
On the next page, below your company name and other details, click Show API Key as pictured here:
Before verify your account you can’t see API key as below link.
After verify your account you can see API key as below link with above image.
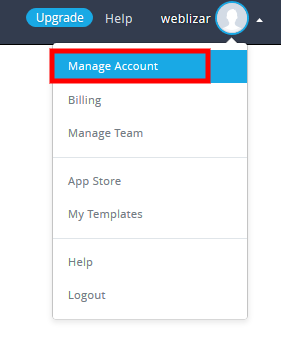
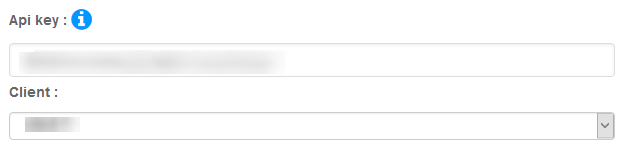
You can only access your API key after you have verified your account. This is done by clicking the verification link in the email we sent you after your Campaign Monitor account was created. If you can’t find the verification email, please contact support.To access your API key, click your profile image at the top right and select Manage Account. On the next page, click API keys, then click Show API Key as pictured here: Tip: You can authenticate with OAuth instead of an API key.
Subscriber list API details
For information on developing your own applications to integrate with Campaign Monitor, view our API documentation. It will help you work your way through every stage of the setup process, including instructions for finding things like list ID information.
Important: Your API key grants access to your account and all of its data, so only use it with trusted third-party websites and applications.
Integrate with Plugin
In last steps, You was got your Campaign Monitor API key. Now you can get integrate your Campaign Monitor account with coming soon pro plugin in some simple steps
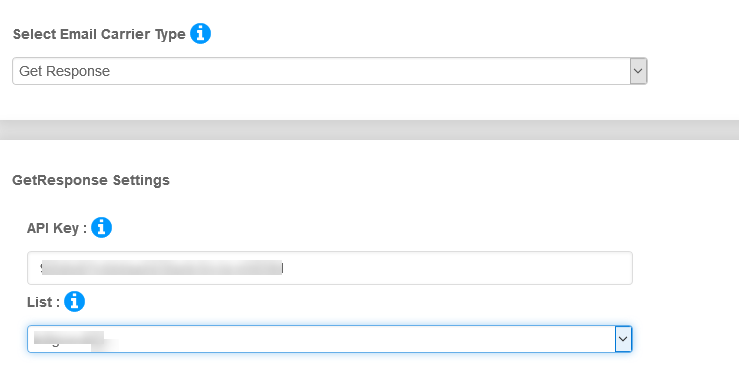
GetResponse is the easiest Email Marketing service. It enables you to create a valuable subscriber list , so you can develop relationships with them.
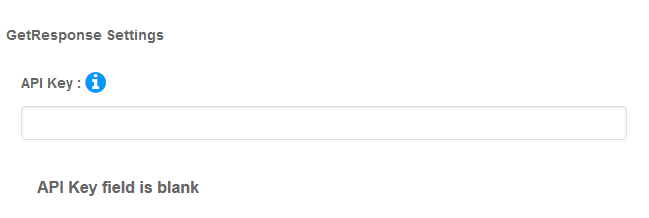
In “Coming Soon Pro” plugin You can use this service in one click. You just need to add your GetResponse API key and saved the settings. Our plugin will synchronize the campaigns list and provide a way to add your subscriber user in your GetResponse account.
GetResponse includes all the capabilities you need for creating effective email campaigns:
Provide List-management tools to help you manage to your contacts
Unlimited autoresponder that enables you to follow up automatically communication with your subscriber contact users.
Deliverability rate of 99.5%, to make sure your campaign messages reach destination inboxes
Analytics and segmentation tools to enable you to create targeted offers to improve conversion rates.
A coordinated set of individual email marketing messages delivered at intervals and with an overall objective in mind. A campaign allows each new message to build on previous success.
An email campaign is a coordinated set of email marketing messages delivered at intervals and designed to escalate a persuasive argument to purchase, subscribe, download, etc. The content and design should be crafted so that each message builds on the previous, offering relevant new content, media, and links, without losing focus on the “call to action”. While email campaigns require careful planning, the ROI is often greater because they deliver the multiple contacts needed to make a sale.
How to use GetResponse with Coming soon Plugin ( Installation )
After your account is verified, GetResponse account will used as subscriber form directly in your plugin theme.
How to get GetResponse User Name and API Key
GetResponse is a free website which is helpful for you with email marketing, also you can create, send, share and track your email newsletter and reports easily. If you are looking for boosting or promoting your business than you are in the right hands, as GetResponse is the best in this job.
But before you use this service, you first need to create GetResponse account. But if you’ve created an account, then it’s easy to login. Here are some steps on GetResponse login through different ways.
Easy steps on GetResponse Login
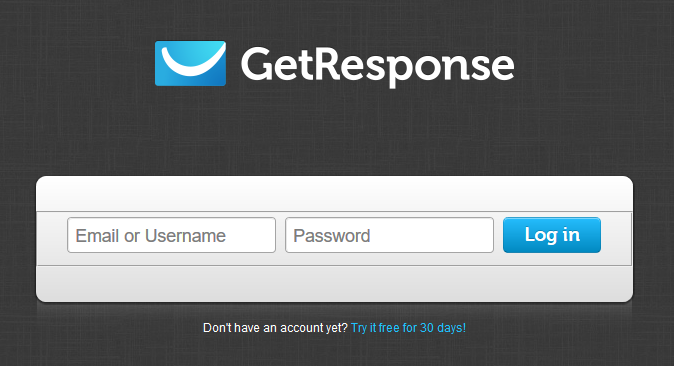
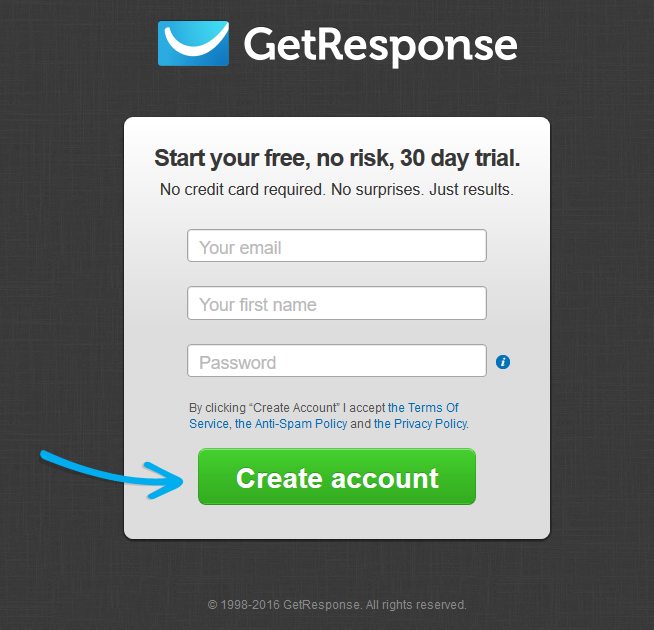
First Click on getresponse.com to forward you on GetResponse homepage. Once you land on GetResponse login screen, click on “Login” button, which is look like below image.
Once you click on it, you’ll redirect on login box where you’ll need to enter your username/email and password. After entering, click on “Login”.
GetResponse Sign Up
The GetResponse affiliate program is a huge opportunity for all affiliate marketers to easily increase their online revenue! The email marketing industry is sky-rocketing and with lucrative payouts such as with GetResponse you can count on great ROI. Their affiliate management provides one of the best support of online marketing.
GetResponse is a free website which is helpful for you with email marketing service. It’s for free and is easy to create a GetResponse account, just follow these simple steps to quickly create an account.
Easy steps :
First go togetresponse.com. Once you will on GetResponse homepage. Simply click on “Create account” button.
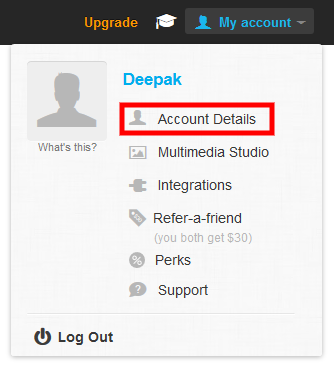
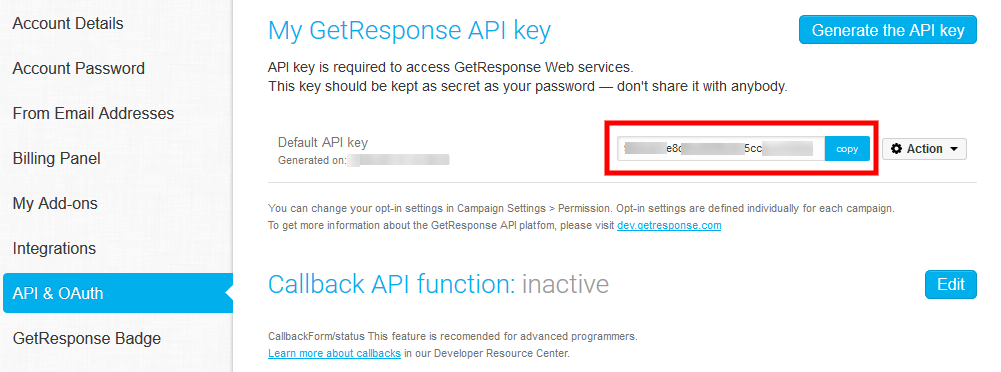
Where You Can Find API Key?
It is assumed that you have created an account on GetResponse.
Once the account is created, you will get a GetResponse API key, same as the below image.
This API key is used to identify your account so you need to keep it securely. Now, enter this API key in the below code.
Integrate with Plugin
In last steps, You was got your GetResponse API key. Now you can get integrate your getresponse account with coming soon pro plugin in some simple steps
MailChimp is a newsletter service that allows you to send out email campaigns to a list of email subscribers. MailChimp is free for lists up to 2000 subscribers, which is why it is the newsletter service of choice for thousands of businesses. Yet many of those people are still not clear about how to integrate with MailChimp account.
More than 12 million people and businesses around the world use MailChimp. Our features and integration allow you to send marketing emails, automated messages and targeted campaigns. And our detailed reports help you keep improving over time.
MailChimp has been around since 2001. The company started as a side project funded by various web-development jobs. Now we’re the world’s leading email marketing platform, and we send more than a billion emails a day. We democratize technology for small businesses, creating innovative products that empower our customers to grow.
MailChimp API helps you add more subscribers to your MailChimp lists using subscriber from. You can integrate your mail chimp account with “Coming Soon Pro” plugin in an easy way.
Our “Coming Soon Pro” MailChimp newsletter service features:
The MailChimp API allows you to sync your subscriber database with MailChimp for the better list and campaign management. Create client portals, add your new contact by “Coming Soon Pro” plugin subscribe form on templates, link campaign stats to your database, sync email activity with your database, and more.
Auto “sync” your old and new subscriber campaign list once you add your API key.
Once your MailChimp account “sync”, Our “Coming Soon Pro” plugin template will use this service as subscriber newsletter form.
Subscriber will be added on your MailChimp account directly, No needed any MailChimp form.
Managed your mail chimp users at plugin subscriber table list.
Export in CSV file.
Direct contact with your User via Manual mail feature.
After your account is verified, MailChimp account will be used as subscriber form directly in your plugin template.
How to get MailChimp API Key
If you want to set up an integration with your MailChimp account, chances are high that you’ll need to generate an API key. Users with Manager permissions can generate and view their own Cafergot. Users with Admin permissions can also see API keys for other account users. Below, you’ll learn how to grab an existing API key or generate a new one.
MailChimp Login
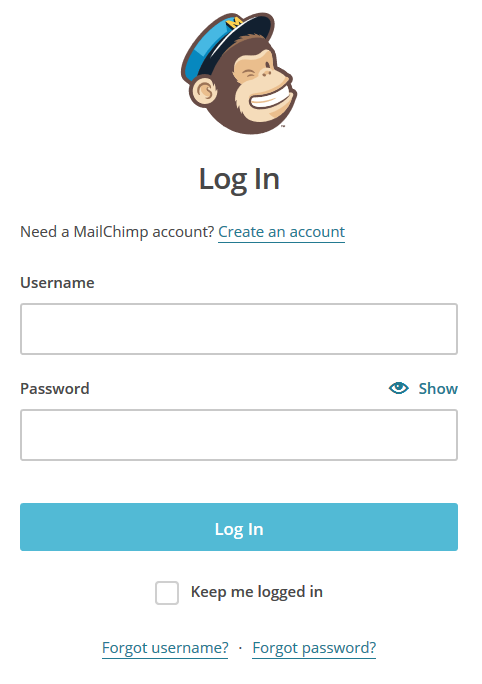
First Click on mailchimp.com to forward you on MailChimp homepage. Once you land on MailChimp login screen, click on “Login” button, which is look like below image.
Once you click on login button, you’ll redirect on MailChimp login box where you’ll need to enter your username/email and password. After entering, click on “Login”.
MailChimp Email Sign Up:
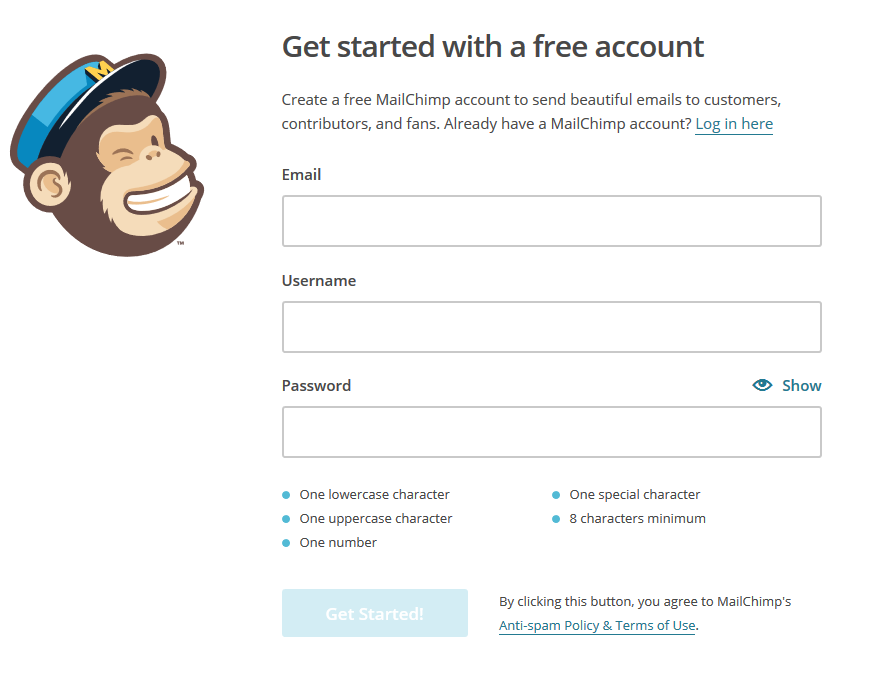
If you already have a MailChimp account? Log in here. Otherwise Create a free MailChimp account to send beautiful emails to customers, contributors, and fans.
Add your email address, after entering your valid email address then add a user name. Then you’ll be entering a strong 8 digit password. Once you have created the password, click on “Get Started” button.
Now you get a mail at your mail id for confirmed your MailChimp account.
You have successfully created your MailChimp email account within few minutes. As soon as your account is created, you will find your API key in below simple steps.
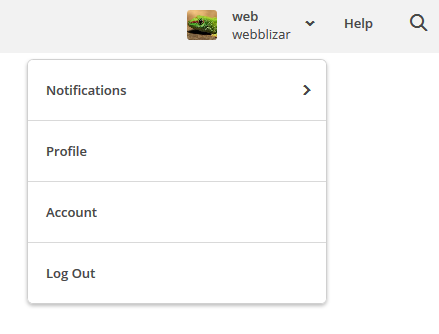
1. Click your profile name to expand the Account Panel, and choose Account.
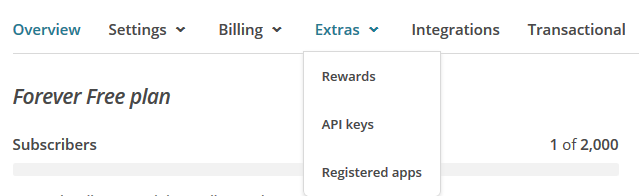
2. Click the Extras drop-down menu and choose API keys.
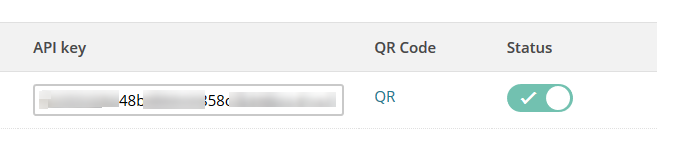
3. Copy an existing API key or click the Create A Key button.
Note: You can also use ” Get your API key ” link to get API key at plugin MailChimp account setting page.
Hope this blog post helped you learn how to integrate with mailchimp account.
Mad Mimi is the easiest way to create, send, share and track email newsletters online. Mad Mimi is for people who want email marketing to be simple. Every day, over 40 million emails are sent, shared and tracked using our delightful and powerful service.
The Mad Mimi Subscriber Form makes it easy to grow your subscribers! we are integrate mad Mimi newsletter service into our “Coming Soon Pro” WordPress plugin. To learn more about Mad Mimi, grab a FREE forever account and explore.
Once the plugin is activated, you can select and used any of your Mad Mimi list into your site by using our coming soon templates. Setup is easy; in Settings, simply enter your account email address and API key (found in your Mad Mimi account area), and you’re all set.
Our “Coming Soon Pro” Mad Mimi news letter service features:
Automatically “sync” and add Mad Mimi email list for subscribe users to subscribe into an email list of your choice
Subscribe unlimited users into an email list of your choice
Also see all subscribed user in database table. with Export CSV file button
After your account is verified, Mad Mimi account will used as subscriber form directly in your plugin theme.
How to get Mad Mimi User Name and API Key
Mad Mimi is a free website which is helpful for you with email marketing, also you can create, send, share and track your email newsletter and reports easily. If you are looking for boosting or promoting your business than you are in the right hands, as Mad Mimi is the best in this job.
But before you use this service, you first need to create Mad Mimi account. But if you’ve created an account, then it’s easy to login. Here are some steps on Mad Mimi login through different ways.
Easy steps on Mad Mimi Login
First Click on madmimi.com to forward you on Mad Mimi homepage.
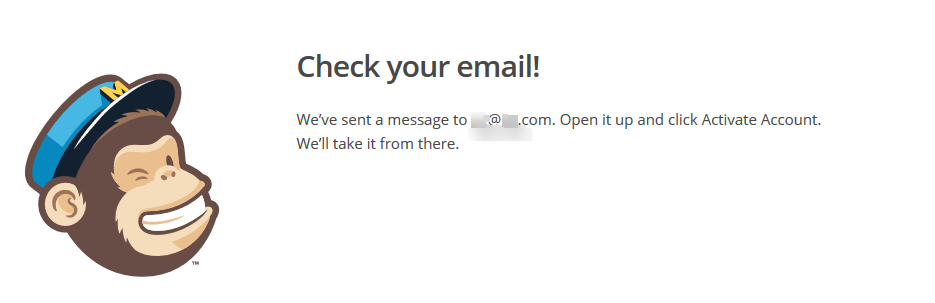
Once you land on Mad Mimi login screen, click on “Login” button, which is look like below image.
Once you click on it, you’ll see a drop down Mad Mimi login box where you’ll need to enter your username/email and password. After entering, click on “Login”.
Note : You can also login from Facebook and Twitter
Mad Mimi Email Sign Up
Mad Mimi is simple and beautiful email marketing service, you’ll first need to sign up for Mad Mimi. Here we’ll talk about Mad Mimi email sign up process in few easy steps. Creating an email with Mad Mimi is really simple and awesome.
It’s for free and is easy to create a Mad Mimi account, just follow these simple steps to quickly create an account.
Easy steps :
First go to madmimi.com . Once you will on Mad Mimi homepage. Simply click on “Create my account” button.
MadMimi sign up
Then it’ll ask your email address, after entering your valid email address press “Next” button.
Then you’ll be enter a strong 8 digit password. Once you have created the password, click on “Sign Up” button.
After clicking on sign up, you’ll need to give few more information or details like your first and last name and your company or group name.
You have successfully created your Mad Mimi email account with in few minutes. As soon as your account is created, you will see this page as shown in the image below.
Click on “Compose” to get started. Then it will ask you to upload a image. You can simply drag the image from your desktop or browse. Add the image and you’re all ready to use Mad Mimi email account.
Features provided by Mad Mimi
Your email and information are safe and secure during transactions.
You can also add add-on to Mad Mimi.
The free plan let’s you store only 100 contacts but you can send out unlimited emails.
You can also choose which plan is suitable for you and your company.
The API key is the long string of letters and numbers under Secret API key.
Copy and paste when needed to integrate with a plugin, but remember–it’s secret like your password! If you’ve accidentally shared your key, click Regenerate to receive a new one.
Complete Plugin Documentation
You can find more details about our plugin in our plugin documentation link
IMPORTANT: If you found a bug in Coming Soon Page & Maintenance Mode Pro plugin or have any problem/question concerning the plugin, please post your query into Coming Soon Page & Maintenance Mode Pro Support Forum here in our Forum. If you do not find a solution here, do not hesitate to contact us at lizarweb (at) gmail (dot) com.
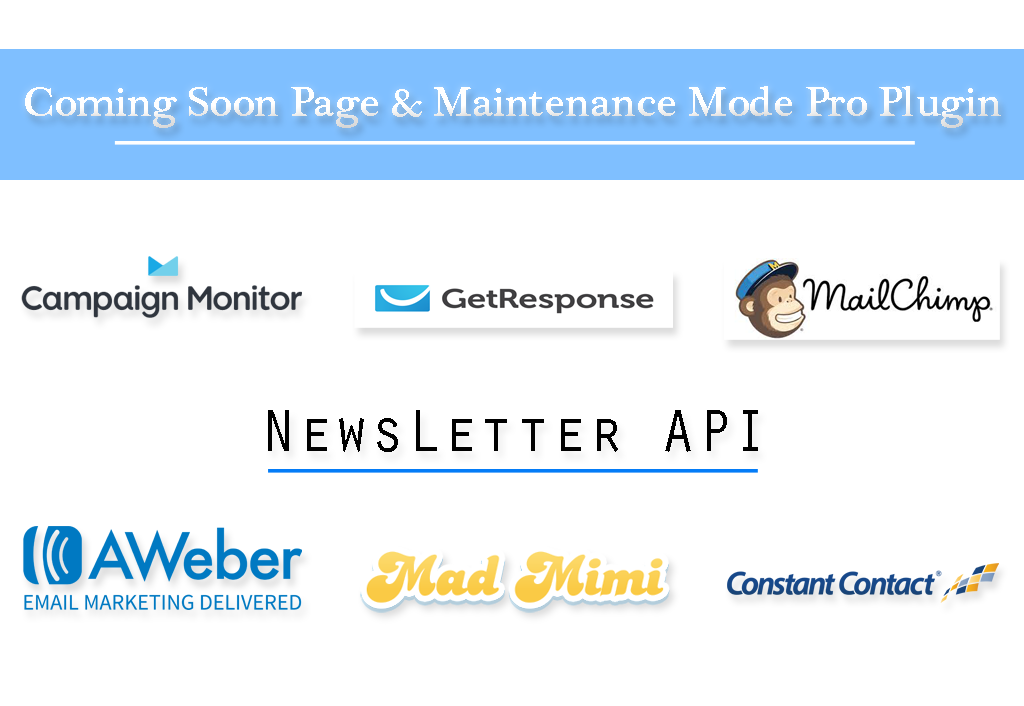
Now we are shared some information about “Newsletter API”.
In our “Coming Soon Pro” plugin , You can see a list of multiple API in Subscriber option panel.
What is Newsletter API
Newsletter Marketing Email API that allows users to access data and interact with the Marketing Email functionality of your website.
The API allows notifications to be sent in real time, meaning that you can speak to your customers at exactly the right time with exactly the right message.
The Newsletter API provides ability to manage marketing emails, lists, identities, and schedule delivery events. This can be very useful in allowing development teams to propagate data in and out of the web based Marketing Email App that can be easily used by members of the company with little or no programming expertise.
Here are the some API listed in below. Which is used in our “Coming Soon Pro” plugin
1. Mad Mimi :
Mad Mimi is the easiest way to create, send, share and track email newsletters online. Mad Mimi is for people who want email marketing to be simple. Every day, over 40 million emails are sent, shared and tracked using our delightful and powerful service.
The Official Mad Mimi Signup Form plugin makes it easy to grow your subscribers! we are integrate mad Mimi newsletter service into our “Coming Soon Pro” WordPress plugin. To learn more about Mad Mimi, grab a FREE forever account and explore.
More than 12 million people and businesses around the world use MailChimp. Our features and integration allow you to send marketing emails, automated messages, and targeted campaigns. And our detailed reports help you keep improving over time.
MailChimp has been around since 2001. The company started as a side project funded by various web-development jobs. Now we’re the world’s leading email marketing platform, and we send more than a billion emails a day. We democratize technology for small businesses, creating innovative products that empower our customers to grow.
MailChimp API helps you add more subscribers to your MailChimp lists using subscriber from . You can integrate your mail chimp account with “Coming Soon Pro” plugin in easy way.
AWeber is an email marketing service provider with many business clients world wide. AWeber help people keep in touch with the subscribers who have requested to be on their mailing list.
“Coming Soon Pro” plugin will added this service by using Aweber Authorization Code. You can get this code by fill the simple form. we are also provided the a application link on Aweber settings. Where you can get your Aweber Authorization Code easily. In Aweber service, You’re also able to track the performance of your emails and receive expert support every day of the week. AWeber is the free 30-day trial, making it easy and risk-free to see the benefits of building an email list.
AWeber helps you keep in touch with your subscribers, You can integrate your aweber account with our “Coming Soon Pro” plugin.
For more details about this service, Please read ” How to use Aweber API (blog under development ) ”
4. GetResponse :
GetResponse is the easiest Email Marketing service. It enables you to create a valuable subscriber list , so you can develop relationships with them.
In “Coming Soon Pro” plugin You can use this service in one click. You just need to add your GetResponse API key and saved the settings. Our plugin will synchronize the campaigns list and provide a way to add your subscriber user in your GetResponse account.
GetResponse includes all the capabilities you need for creating effective email campaigns:
Provide List-management tools to help you manage to your contacts
Unlimited autoresponder that enables you to follow up automatically communication with your subscriber contact users.
Deliverability rate of 99.5%, to make sure your campaign messages reach destination inboxes
Analytics and segmentation tools to enable you to create targeted offers to improve conversion rates.
The Campaign Monitor API allows your users to interact and “sync” with your Campaign Monitor account via “Coming Soon Pro” plugin.
Emails are most powerful when they’re personalized. Campaign Monitor easy-to-use tools, yet powerful tools allow you to send hyper-targeted campaigns and deliver relevant content to the right person at the right time.
Campaign Monitor REPORTING AND ANALYTICS : (Test, track, optimize, and repeat)
In Campaign Monitor you can see, How your emails are performing in real time with interactive analytics on campaign activity. See how your audience is engaging with your emails, sharing your content and which calls to action are most effective.
In our “Coming Soon Pro” plugin, API include: *Automatically sync subscribers list between Campaign Monitor and Plugin. *Create and send custom email campaigns to segments of subscribers built on the fly. *Once you integrate between plugin and Campaign Monitor account, You can saved new subscriber in selected list *Automatically create a client account, set billing and load it with ready-to-send templates. The API uses RESTful protocol and responses are formatted in XML or JSON.
With over 15 years of experience and more than 650,000 customers, Constant Contact is the trusted leader in small business marketing. Our experts collaborate closely to understand your business and your goals—delivering email and digital marketing best practices to drive real results.
Constant Contact Automatically send the right message at the right time. Constant Contact is Personalized emails build connections, and it’s auto responder service makes it simple. Create a personalized email once, and set it to send automatically for triggers like birthdays or a customer milestone.
Constant Contact have “Set it and forget it” functionality for your email. When you add new contacts to your automated list, they’ll start receiving a scheduled series of emails. Your audience stays engaged, and ready to take action.
IMPORTANT: If you found a bug in Coming Soon Page & Maintenance Mode Pro plugin or have any problem/question concerning the plugin, please post your query into Coming Soon Page & Maintenance Mode Pro Support Forum here in our Forum. If you do not find a solution here, do not hesitate to contact us at lizarweb (at) gmail (dot) com.