Customize Through Inspect Element – For DIY Users

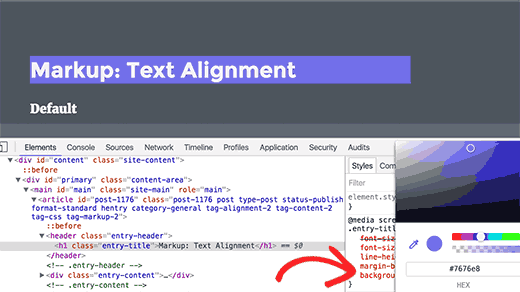
Did you ever gave a thought to temporarily customize any webpage to check how it will look like with specific set of colors, fonts, and styling that you always wanted to see on your webpage. It’s possible with a tool that already exists in your browser called Inspect Element and you can customize through inspect element easily. This is a dream come true for all DIY(Do-It-Yourself) users when they find out about it. In this article, we will show you the basics of inspect element and how to use it with your WordPress site.

Inspect Element, Heard it for the first time?

Modern web browsers like Google Chrome and Mozilla Firefox has built-in tools which allow web developers to debug errors. These tools show the HTML, CSS, and JavaScript code for a page and how the browser executes the code.

Using Inspect Element tool, you can edit HTML, CSS, or JavaSCript code for any webpage and see your changes live (only on your computer).

For a DIY website owner, these tools can help you preview how a site design would look without actually making the changes for everyone.

For writers, these tools are awesome because you can easily change personal identifying information when taking your screenshots eliminating the need to blur out items altogether.

For support agents, it’s a great way to identify the error that could be causing your galleries to not load or your sliders to not work properly.

We’re just scratching the surface of use-cases. Inspect element is really powerful.

In this article, we will be focusing on Inspect Element in Google Chrome because that’s our browser of choice. Firefox has its own developer tools which can also be invoked by selecting inspect element from browser menu.

Ready? Let’s get started.

How To Launch Inspect Element?

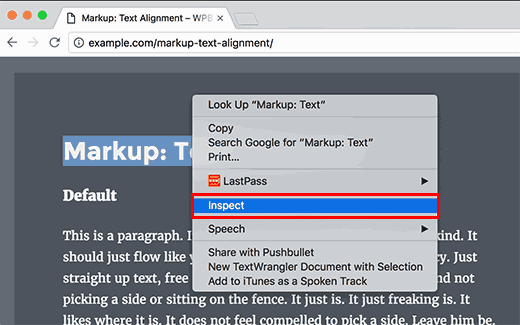
You can launch inspect element tool by pressing CTRL + Shift + I keys on your keyboard. Alternately you can click anywhere on a web page and select inspect element from browser menu.

how to customize through inspect element inspect element menu

Your browser window will split into two, and the lower window will show the web page’s source code.

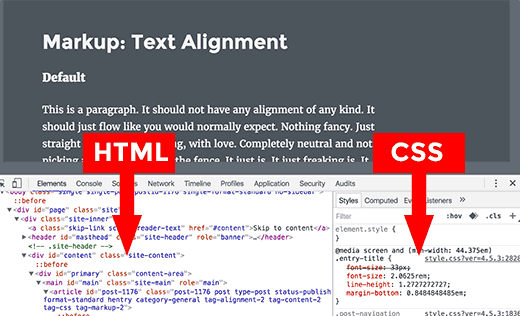
The developer tool window is further divided into two windows. On your left, you will see the HTML code for the page. On the right-hand pane, you will see the CSS rules.

how to customize through inspect element inspect html css panes

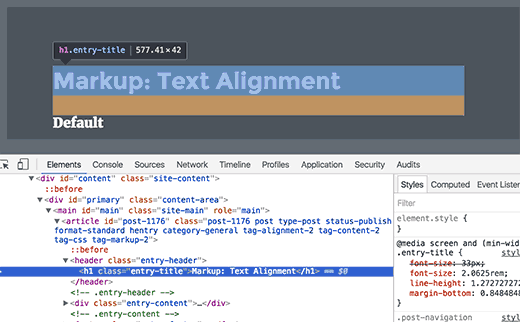
As you move your mouse over the HTML source you will see the affected area highlighted on the web page. You will also notice CSS rules change to show the CSS for the element you are viewing.

how to customize through inspect element inspect element editing any particular item

You can also take the mouse pointer to an element on the web page, right click and select inspect element. The element you pointed at will be highlighted in the source code.

How To Edit Code In Inspect Element Window?

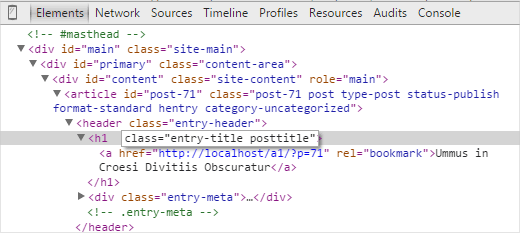
Both the HTML and CSS in the inspect element window are editable. You can double click anywhere in the HTML source code and edit the code as you like.

how to customize through inspect element inspect editing html

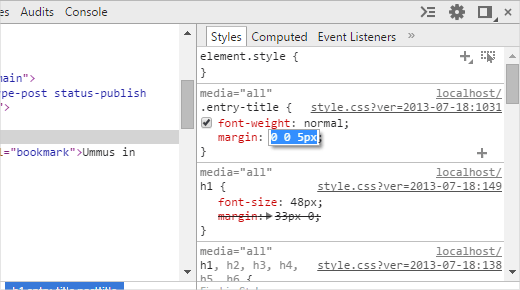
You can also double click and edit any attributes and styles in the CSS pane. To add a custom style rule click on the + icon at the top of CSS pane.

how to customize through inspect element inspect edit css

As you make changes to the CSS or HTML those changes will be reflected in the browser instantly.

how to customize through inspect element inspect element changes preview

Note, that any changes you make here are not saved anywhere. Inspect element is a debugging tool, and it does not write your changes back to the files on your server. This means that if you refresh the page, all your changes will be gone.

To actually make the changes, you will have to edit your WordPress theme’s stylesheet or relevant template to add the changes you want to save.

Before you start editing your existing WordPress theme using Inspect Element tool, make sure you that you save all your changes by creating a child theme.

Debug Errors On Your Website

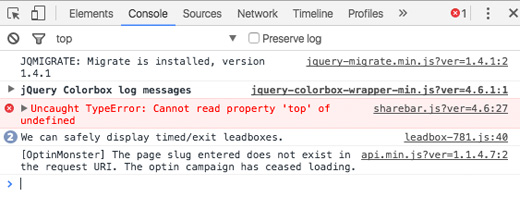
Inspect element has an area called Console which shows all the errors that exist on your website. When trying to debug an error or requesting support from plugin authors, it’s always helpful to look here to see what the errors are.

how to customize through inspect element errors in console tab

We hope this article helped you learn the basics of inspect element and how to use it with your WordPress site.

If you liked this article, then please subscribe to our YouTube Channel for WordPress video tutorials. You can also find us on Twitter and Google+.

Also you can read Top Ways To Make Website More Secured and how to get a Free SSL Certificate For Your Website.

How You Can Boost Your Video Rankings on Search Engines

Online videos have emerged as one of the most powerful marketing mediums we have today. From increasing user understanding of products and services to driving increased organic traffic to websites, videos have been proven to bring marketers solid returns of their investments.

However, it is safe to say that the popularity of videos also poses a challenge for businesses that are new to enter this space. With hundreds of thousands of videos already out there in the virtual world and hundreds more being added with every passing second, beginners can find it difficult to make sure that their video stands out from all the competition.

Provide exceptional value

People love to share great videos with their friends or on social media, but they are not going to like, share or link to any video they find on the web. They need content that provides exceptional value, inspires them, or touches an emotional chord.

So basically, the first things you need for video marketing success are unique content that your audience can’t find elsewhere and attracts and holds their attention and, of course, a carefully planned and executed marketing strategy. When your video is endorsed by more people or gets more shares, likes, and tweets, it pushes search engines to boost your site’s ranking in their results, leading to more views.

Don’t forget video SEO

However, don’t forget that you also need to optimize your video for search engines like you would do a normal web page if you want your videos to rank higher in search engine results.

To start with, video SEO is different from normal SEO because the search engines are not going to be able to “watch”, search, or index the actual video.  They can only index the text content on your page, which is why you need to use descriptive text and keywords while coming up with titles, tags, file names, and so on for your videos. With proper utilization of these video SEO components, you will be able to give your videos the advantage it requires to edge out the competition in the virtual world.

For example, closed captions, which are indexed by search engines like Google, have been proven to increase YouTube views by 13.48% in just a couple of weeks. In addition, captions make your video understandable to millions of viewers who have hearing disabilities. A lot of people who don’t have any trouble hearing also used closed captions when they want to enjoy videos in unfavorable surroundings like a quiet doctor’s office or when they are at home with a sleeping baby.

Search engines also use transcripts for indexing multimedia content, which means that you can increase search traffic to your website by adding transcripts to your videos. In addition, transcripts provide a useful reference for people who want to use the video for reference or as a guide, not to mention the millions of people out there with hearing disabilities.

Considering that more than half of YouTube views come from non-English speaking countries, you may also want to consider adding subtitles to your videos. In addition to improving SEO, subtitles in multiple languages also increase your video’s reach and accessibility and give people the freedom to watch your videos from any part of the world at any time. Subtitles have also been shown to increase engagement time by more than 40%and increase the number of people who watch a video till the end by 80%.

For more in-depth information about how you can make your videos popular and search engine friendly and some useful marketing stats and data, check this new infographic from Taking 1 Transcription!

Thanks

This blog contributed by Jessica Morgan.

Enable Cross-Origin Resource Sharing

What is Cross-Origin Resource Sharing (CORS) –

Cross-origin resource sharing is fundamental that can make visible the resources which are hidden. Cross-Origin Resource Sharing (CORS) is a specification that enables truly open access across domain boundaries. CORS allows web scripts to interact more openly with content outside of the original domain, leading to better integration between web services. Cross-origin resource sharing allows blocked resources just like – fonts, on a web page to be requested from another domain outside the domain from which the resource originated.

CORS defines a way in which a browser and server can interact to determine whether or not it is safe to allow the cross-origin request. It allows for more freedom and functionality than purely same-origin requests but is more secure than simply allowing all cross-origin requests.


Why is CORS important?

JavaScript and the web programming has grown by leaps and bounds over the years, but the same-origin policy still remains. This prevents JavaScript from making requests across domain boundaries and has spawned various hacks for making cross-domain requests.

CORS introduces a standard mechanism that can be used by all browsers for implementing cross-domain requests. The spec defines a set of headers that allow the browser and server to communicate about which requests are (and are not) allowed. CORS continues the spirit of the open web by bringing API access to all.

Enable Cross-Origin Resource Sharing –

1. CORS on Apache

To add the CORS authorization to the header using Apache, simply add the following line inside either the <Directory>,<Location> <Files> or <VirtualHost> sections of your server config (usually located in a *.conf files, such as httpd.conf or apache.conf), or within a .htaccess file:

 Header set Access-Control-Allow-Origin "*"

To ensure that your changes are correct, it is strongly recommended that you use

apachectl -t

to check your configuration changes for errors. After this passes, you may need to reload Apache to make sure your changes are applied by running the command

sudo service apache2 reload

or

apachectl -k graceful

Altering headers requires the use of mod_headers. Mod_headers is enabled by default in Apache, however, you may want to ensure it’s enabled by run

a2enmod headers

Note: you can also use add rather than set, but be aware that add can add the header multiple times, so it’s likely safer to use set.


2. CORS on App Engine

For Python-based applications in Google App Engine, the self.response.headers.add_header() method can be used, such as:

class CORSEnabledHandler(webapp.RequestHandler):
  def get(self):
    self.response.headers.add_header("Access-Control-Allow-Origin", "*")
    self.response.headers['Content-Type'] = 'text/csv'
    self.response.out.write(self.dump_csv())

For Java-based applications, use resp.addHeader():

public void doGet(HttpServletRequest req, HttpServletResponse resp) {
  resp.addHeader("Access-Control-Allow-Origin", "*");
  resp.addHeader("Content-Type", "text/csv");
  resp.getWriter().append(csvString);
}

And for Go-based applications, use w.Header().Add():

func doGet(w http.ResponseWriter, r *http.Request) {
  w.Header().Add("Access-Control-Allow-Origin", "*")
  w.Header().Add("Content-Type", "text/csv")
  fmt.Fprintf(w, csvData)
}

3. CORS on ASP.NET

If you don’t have access to configure IIS, you can still add the header through ASP.NET by adding the following line to your source pages:

Response.AppendHeader("Access-Control-Allow-Origin", "*");

ASP.NET Web API

ASP.NET Web API 2 supports CORS.

To enable CORS support, add the Microsoft.AspNet.WebApi.Cors NuGet packages to your project.

Add this code to your configuration:

public static void Register(HttpConfiguration config)
{
    // New code
    config.EnableCors();
}

To enable cross-origin requests, add the [EnableCors] attribute to your Web API controller or controller method:

[EnableCors(origins: "http://example.com", headers: "*", methods: "*")]
public class TestController : ApiController
{
    // Controller methods not shown...
}

Enabling Globally

The method described above can also be used to enable CORS across the API without annotating each controller:

public static void Register(HttpConfiguration config)
{
    var corsAttr = new EnableCorsAttribute("http://example.com", "*", "*");
    config.EnableCors(corsAttr);
}

4. CORS on AWS API Gateway

Amazon API Gateway adds support for CORS enabling through a simple button in the API Gateway console. Unfortunately, that button has a partial behavior, thus setting CORS correctly only for 200 answers (so not other HTTP status codes) and ignoring Jquery header support. The best solution considered so far is about avoiding to use the CORS button and set configurations manually.

This can be achieved in a couple of steps:

1. Log into API Gateway console

2. Create all the REST resources that need to be exposed with their methods before setting up CORS (if new resources/methods are created after enabling CORS, these steps must be repeated)

3. Select a resource

4. Add OPTIONS method, choose as integration type “mock”

5. For each Method of a resource

6. Go to Response Method

7. Add all the response method that should be supported (i.e. 200, 500, etc.)

8. For each response code set Response Headers to
X-Requested-With
Access-Control-Allow-Headers
Access-Control-Allow-Origin
Access-Control-Allow-Methods

9. Go to Integration Response, select one of the created response codes, then Header Mappings

10. Insert default values for headers
example:
X-Requested-With: ‘*’
Access-Control-Allow-Headers: ‘Content-Type,X-Amz-Date,Authorization,X-API-Key,x-requested-with’
Access-Control-Allow-Origin: ‘*’
Access-Control-Allow-Methods: ‘POST,GET,OPTIONS’
This operation has to be repeated for each method, including the newly created OPTIONS

11. Deploy the API to a stage

12. Check using http://client.cors-api.appspot.com/client that CORS requests have been successfully enabled


5. CORS on Caddyserver

To add the CORS authorization to the header using Caddy, simply add the following line inside your caddyfile:

cors

This will allow all resources to be accessed from every domain.

You can also be more specific, i.e. allow specific resources to specific domains:

cors /foo http://mysite.com http://anothertrustedsite.com

There are many more options you can use, here is a full example, as shown in the caddyserver docs:

cors / {
  origin            http://allowedSite.com
  origin            http://anotherSite.org https://anotherSite.org
  methods           POST,PUT
  allow_credentials false
  max_age           3600
  allowed_headers   X-Custom-Header,X-Foobar
  exposed_headers   X-Something-Special,SomethingElse
}

6. CORS in CGI Scripts

Just output the line:

Access-Control-Allow-Origin: *

.. as part of your CGI script’s headers, for example, in Perl (using CGI.pm):

print header(
  -type => 'text/turtle',
  -content_location => 'mydata.ttl',
  -access_control_allow_origin => '*',
);

7. CORS in Perl PSGI scripts

The module Plack::Middleware::CrossOrigin provides a complete CORS server side implementation. To allow any request from any location, just add this to your builder:

enable 'CrossOrigin', origins => '*';

8. CORS in Python

print "Content-Type: text/turtle"
print "Content-Location: mydata.ttl"
print "Access-Control-Allow-Origin: *"

9. CORS on ExpressJS

In your ExpressJS app on node.js, do the following with your routes:

app.use(function(req, res, next) {
  res.header("Access-Control-Allow-Origin", "*");
  res.header("Access-Control-Allow-Headers", "Origin, X-Requested-With, Content-Type, Accept");
  next();
});

app.get('/', function(req, res, next) {
  // Handle the get for this route
});

app.post('/', function(req, res, next) {
 // Handle the post for this route
});

10. CORS on IIS6

To CORS-enable Microsoft IIS6, perform the following steps:

  1. Open Internet Information Service (IIS) Manager
  2. Right-click the site you want to enable CORS for and go to Properties
  3. Change to the HTTP Headers tab
  4. In the Custom HTTP headers section, click Add
  5. Enter Access-Control-Allow-Origin as the header name
  6. Enter * as the header value
  7. Click Ok twice

11. CORS on IIS7

For Microsoft IIS7, merge this into the web.config file at the root of your application or site:

<?xml version="1.0" encoding="utf-8"?>
<configuration>
 <system.webServer>
   <httpProtocol>
     <customHeaders>
       <add name="Access-Control-Allow-Origin" value="*" />
     </customHeaders>
   </httpProtocol>
 </system.webServer>
</configuration>

If you don’t have a web.config file already, or don’t know what one is, just create a new file called web.config containing the snippet above.

12. CORS on Meteor

To add CORS authorization to a Meteor application, use the webapp package’s WebApp.connectHandlers to customize HTTP headers.

// Listen to incoming HTTP requests, can only be used on the server
WebApp.rawConnectHandlers.use(function(req, res, next) {
  res.setHeader("Access-Control-Allow-Origin", "*");
  return next();
});

Use the optional path argument to only call the handler for paths that match a specified string.

// Listen to incoming HTTP requests, can only be used on the server
WebApp.rawConnectHandlers.use("/public", function(req, res, next) {
  res.setHeader("Access-Control-Allow-Origin", "*");
  return next();
});

13. CORS on Nginx

The following Nginx configuration enables CORS, with support for preflight requests.

#
# Wide-open CORS config for nginx
#
location / {
     if ($request_method = 'OPTIONS') {
        add_header 'Access-Control-Allow-Origin' '*';
        add_header 'Access-Control-Allow-Methods' 'GET, POST, OPTIONS';
        #
        # Custom headers and headers various browsers *should* be OK with but aren't
        #
        add_header 'Access-Control-Allow-Headers' 'DNT,X-CustomHeader,Keep-Alive,User-Agent,X-Requested-With,If-Modified-Since,Cache-Control,Content-Type';
        #
        # Tell client that this pre-flight info is valid for 20 days
        #
        add_header 'Access-Control-Max-Age' 1728000;
        add_header 'Content-Type' 'text/plain charset=UTF-8';
        add_header 'Content-Length' 0;
        return 204;
     }
     if ($request_method = 'POST') {
        add_header 'Access-Control-Allow-Origin' '*';
        add_header 'Access-Control-Allow-Methods' 'GET, POST, OPTIONS';
        add_header 'Access-Control-Allow-Headers' 'DNT,X-CustomHeader,Keep-Alive,User-Agent,X-Requested-With,If-Modified-Since,Cache-Control,Content-Type';
     }
     if ($request_method = 'GET') {
        add_header 'Access-Control-Allow-Origin' '*';
        add_header 'Access-Control-Allow-Methods' 'GET, POST, OPTIONS';
        add_header 'Access-Control-Allow-Headers' 'DNT,X-CustomHeader,Keep-Alive,User-Agent,X-Requested-With,If-Modified-Since,Cache-Control,Content-Type';
     }
}

14. CORS in Perl PSGI scripts

The module Plack::Middleware::CrossOrigin provides a complete CORS server side implementation. To allow any request from any location, just add this to your builder:

enable 'CrossOrigin', origins => '*';

This module is also available in Debian and Ubuntu as libplack-middleware-crossorigin-perl.

15. CORS on PHP

If you don’t have access to configure Apache, you can still send the header from a PHP script. It’s a case of adding the following to your PHP scripts:

<?php
 header("Access-Control-Allow-Origin: *");

Note: as with all uses of the PHP header function, this must be before any output has been sent from the server.


16. CORS on ColdFusion

If you don’t have access to configure you web server, you can still send the header from a Coldfusion script. It’s a case of adding the following to your Coldfusion scripts:

Tag Based File

<cfheader name="Access-Control-Allow-Origin" value="*">

Script Based File

var response = getPageContext().getResponse();
response.setHeader("Access-Control-Allow-Origin","*");

Note: This needs to be set before any output has been sent from the server.

17. CORS on Tomcat

Apache Tomcat includes support for CORS (Starting from Tomcat version 7.0.41).

Here is an example from those docs that demonstrates a minimal CORS configuration:

<filter>
  <filter-name>CorsFilter</filter-name>
  <filter-class>org.apache.catalina.filters.CorsFilter</filter-class>
</filter>
<filter-mapping>
  <filter-name>CorsFilter</filter-name>
  <url-pattern>/*</url-pattern>
</filter-mapping>

18. CORS on Virtuoso

These instance/server-level settings require OpenLink Virtuoso Open Source (VOS) 6.1.3 or later, or Virtuoso Commercial Edition 06.02.3129

  1. In the Virtuoso Conductor, go to Web Application ServerVirtual Domains & Directories.
  2. Expand the default Interface store.
  3. Click New Directory.
  4. Specify the desired Virtual Directory Type, or choose an existing virtual directory to use as a template.
  5. Click Next.
  6. Specify the Directory Path value.
  7. Set the CORS options.
    • Cross-Origin Resource Sharing – contains a single wildcard asterisk, i.e., * or an origin, such as http://example.com:8080 or http://foo.example.com. Scripts are authorized to retrieve a resource if that resource either uses the wildcard or lists the origin of the script. For this example, enter the following single URI: http://demo.openlinksw.com
    • Reject Unintended CORS check-box – when ticked and the application does not overwrite headers, unmatched Origins will be rejected by sending an empty response.
  8. Click Save changes.

For older versions of Virtuoso, any of the Web Application-level instructions below may be used. Any Virtuoso-based application can implement CORS checking through well-known HTTP functions http_request_header() and http_header(), for example:

<?vsp
IF (http_request_header (lines, 'Origin', NULL) = 'http://host.org')
{
  http_header ('Access-Control-Allow-Origin: http://host.org\r\n');
}
ELSE
{
  RETURN;
}
-- Additional code here ---
?>

19. CORS on WCF

For WCF service you have to develop new behavior and include it in the endpoint configuration:

Create Message Inspector
 public class CustomHeaderMessageInspector : IDispatchMessageInspector
            {
                Dictionary<string, string> requiredHeaders;
                public CustomHeaderMessageInspector (Dictionary<string, string> headers)
                {
                    requiredHeaders = headers ?? new Dictionary<string, string>();
                }

                public object AfterReceiveRequest(ref System.ServiceModel.Channels.Message request, System.ServiceModel.IClientChannel channel, System.ServiceModel.InstanceContext instanceContext)
                {
                    return null;
                }

                public void BeforeSendReply(ref System.ServiceModel.Channels.Message reply, object correlationState)
                {
                    var httpHeader = reply.Properties["httpResponse"] as HttpResponseMessageProperty;
                    foreach (var item in requiredHeaders)
                    {
                        httpHeader.Headers.Add(item.Key, item.Value);
                    }           
                }
            }

Create Endpoint Behavior and use Message Inspector to add headers

  public class EnableCrossOriginResourceSharingBehavior : BehaviorExtensionElement, IEndpointBehavior
            {
                public void AddBindingParameters(ServiceEndpoint endpoint, System.ServiceModel.Channels.BindingParameterCollection bindingParameters)
                {
           
                }

                public void ApplyClientBehavior(ServiceEndpoint endpoint, System.ServiceModel.Dispatcher.ClientRuntime clientRuntime)
                {
            
                }

                public void ApplyDispatchBehavior(ServiceEndpoint endpoint, System.ServiceModel.Dispatcher.EndpointDispatcher endpointDispatcher)
                {
                    var requiredHeaders = new Dictionary<string, string>();

                    requiredHeaders.Add("Access-Control-Allow-Origin", "*");
                    requiredHeaders.Add("Access-Control-Request-Method", "POST,GET,PUT,DELETE,OPTIONS");
                    requiredHeaders.Add("Access-Control-Allow-Headers", "X-Requested-With,Content-Type");

                    endpointDispatcher.DispatchRuntime.MessageInspectors.Add(new CustomHeaderMessageInspector(requiredHeaders));
                }

                public void Validate(ServiceEndpoint endpoint)
                {
            
                }

                public override Type BehaviorType
                {
                    get { return typeof(EnableCrossOriginResourceSharingBehavior); }
                }

                protected override object CreateBehavior()
                {
                    return new EnableCrossOriginResourceSharingBehavior();
                }
            }

Register new behavior in web.config

<extensions>
              <behaviorExtensions>        
                <add name="crossOriginResourceSharingBehavior" type="Services.Behaviours.EnableCrossOriginResourceSharingBehavior, Services, Version=1.0.0.0, Culture=neutral" />        
              </behaviorExtensions>      
            </extensions>

Add new behavior to endpoint behavior configuration

 <endpointBehaviors>      
            <behavior name="jsonBehavior">
                <webHttp />
                <crossOriginResourceSharingBehavior />
            </behavior>
            </endpointBehaviors>

Configure endpoint

 <endpoint address="api" binding="webHttpBinding" behaviorConfiguration="jsonBehavior" contract="Service.IServiceContract" />

APIs that support CORS


Libraries for implementing CORS


Thanks for reading this  post. Hoping this tutorial will help you to Enable Cross-Origin Resource Sharing.

Please give your comments and remark below.


Guide to add video WordPress theme

Hello Guys :

In your WordPress theme, you have lots of the options for customization of slider, testimonial, header, menu, service etc much more. In some themes, the slider is of two types one is image slider and another one is video slider. It’s easy to customize an image slider with compression to a video slider because in video slider sometimes you are confused while changing the video URL.

So don’t be confused we have some easy step to sort out your problem. just read this post Guide to add video WordPress theme.

Step1 –

Get YouTube Link

Just go to the video site (YouTube) or any another. Search the video which you want to add in your slider. Then follow the steps :

Click the Share button under the video itself. This will give you a shortened link to the video.

After clicking the share button click on Embed button to get your embed code.

You were required to use the embed code from the video site. So copy the embed code which in box area only.

video url


Step2 –

Go to your theme Admin Dashboard -> Add New Slider -> Youtube video URL box and paste the embed code into the content area. All you need to make sure is that the Code is on its own line and not clickable (hyperlinked).

Follow the below image –


youtube video url add


After that save the changes.

Hoping that you will get your video by this post. Thanks for reading Guide to add video WordPress theme post.

Please give your comments and remark below.

Wishing You A very Happy And Prosperous Diwali

Weblizar wishes to all our valuable customers A Very Happy Diwali  And Prosperous Diwali 2016.

Another year will be over, another year will come. We hope and pray that the lights of Diwali illuminate the new chapter of your life. Happy Diwali!

Celebrate this Diwail with Weblizar.

Use coupon code : DIWALI and avial 25% discount on all our Products.

Kind Regards

Weblizar Team

Guide For Install and Setup WordPress Multisite Network

Hello Everyone …! Hope you doing well 🙂

Once again i am here to you with a new article Guide For Install and Setup WordPress Multisite Network.  In today’s post, I will provide a full guide to installing, activating and using WordPress multisite. After going through this post, you will have a clear idea about multisite, when and how to use it. Before starting the article I wanna give you some overview about WordPress Multisite so that it’s easy to understandable to you that what is WordPress Multisite? and how’s it’s useful to you?

Note: Before installing WordPress Multisite deactivate your all running plugins.

WordPress Multisite overview –

WordPress Multisite is a very useful feature of WordPress. WordPress Multisite that allows you to create multiple virtual sites that share a single WordPress installation. Which means this very useful WordPress feature lets you create and manage more than one WordPress sites from a single dashboard. This allows users to create their own sites as subdomains of your primary site.

By using the multisite feature, you can easily and quickly create separate WordPress installations for each of them. WordPress multisite is especially useful for business, news or magazine sites with various departments, sections, and categories.

Cautions Before Using WordPress Multisite –

Some cautions which are necessary before something is going wrong after the installation WordPress multisite. You can install multisite in your existing WordPress installation. However, if you have never used multisite before, it would be wise to activate multisite in a test site or your localhost which is a WordPress installation on your computer.

If you are planning to enable multisite in your live WordPress website, make sure that you have a full backup of your website files and database. This will allow you to invert to the last working state if anything goes wrong.

Activating Multisite Within FIve Easy Steps –

Step1 –

Firstly for activating multisite is to add a new line to your wp-config.php file which is in your WordPress folder.

Open the file and search for the line that says: /* That’s all, stop editing! Happy blogging. */

Now add below lines just above it:

/* Multisite */
define( ‘WP_ALLOW_MULTISITE’, true );


wp-config.php file


And save the wp-config.php file.

Step2 –

After step1, get back to your website dashboard. Hover over the ‘Tools’ menu which is on left side, and you will notice a new sub-menu titled ‘Network Setup’.


Network setup


Step3 – Configuring Your Multisite

Go to Tools -> Network Setup. You will be taken to a page similar to the following –


Network Setup


On this page, you will have two options to customize –

  1. Network Title
  2. Network Admin Email.

Provide the network title, network email and click ‘Install’. This will start the actual installation process. After a few seconds, you will be shown to a page like the below image –


network


Here you will show wp-config.php and .htaccessfiles code which you have to add in your wp-config.php and .htaccessfiles.

Get the files. For the wp-config.php file, make sure that you are adding the code before the “/* That’s all, stop editing! Happy blogging. */” line.

Make sure that you are adding the code correctly –

For the .htaccess file, delete the lines between the “# BEGIN WordPress” and “# END WordPress” lines. And paste the lines you are provided with for the file.

After updating the wp-config.php and .htaccess files, reload your website dashboard. You will be asked to log in again.

Once you log in, you will be taken to your regular dashboard, which will have a new top menu titled ‘My Sites‘.


MySite


Step4 – Multisite Settings –

If you hover over the ‘Settings’ menu of your network dashboard, you will find out two new sub-menus – Network Settings and Network Setup.

The Network Setup sub-menu will display the codes you added to the wp-config.php and .htaccess files during activating multisite. This is just a reference page; you will not find any actual option on this page.

All the settings options are located on the Network Settings page. If you go to Settings -> Network Settings from your network dashboard, you will be taken to a page like the following –


Network setting


You can customize Settings here:

  • The title of your network.
  • The network admin’s email address.
  • Registration settings: whether users can register accounts and/or sites, whether site admins can add new users, and email domains and site names which are banned.
  • New site settings: the content of the welcome email for site admins and users and the first page, post, and comment created on new sites.
  • Upload settings: file types permitted and maximum file size.
  • Language settings: the default language.
  • Menu settings: enable or disable the plugins menu item for site admins. If you disable this they won’t be able to activate or deactivate plugins.

After you have made the necessary changes, click ‘Save Changes’.

The Network  Dashboard –

After Multisite Settings your network dashboard will be shown like below image –


Network dashboard


Here you will show two boxes one is search users and another is search sites. You can find the number of users and sites in your network.

In the network setting, you can view a list of the sites, users, themes and plugins of your network by going to the Network Admin menu from the top navigation bar.

Step5 – Adding a New Site

Go to My Sites -> Network Admin -> Sites from the top menu. This will take you to the ‘Sites’ page. From the page, click the ‘Add New’ button. This is the simple step to add a new site in your WordPress.


Add New Site


Fill the site address, title and Admin email in their respective fields. Then, click ‘Add Site’. This will create the site for you.

To view a list of all the sites, go to My Sites -> Network Admin -> Sites.

Or, if you are already in the network dashboard, you can only go to Sites -> All Sites.

For Deactivate Theme –

To activate/deactivate the theme for use on just one site, go to Network Admin > Sites > All Sites.

Hover over the Theme name and Deactivate/Activate. Your Page will look like this –


23

And your WordPress multisite is ready to use to create new sites and try installing and activating new themes, plugins.

Conclusion

At the last hope so this post will a perfect Guide For Install and Setup WordPress Multisite Network. Please give your comments and remark below.
 

How to create more meaningful & engaging content

– How to create more meaningful & engaging content –


Content helps brands to bring exposure, which leads to new leads and customers. Ask any digital marketing expert what is the best method of online marketing, and they’ll swiftly tell you that content marketing is the one to look out for.

Such advice has certainly been in the circulation of digital marketing for many years already, though it seems that it has taken a lengthy amount of time for many to understand the true implications of content marketing, and the kind of value it can hold for business growth, and brand message strengthening.

If we look at content being used in advertising, it’s clear that there’s a huge shift happening in the way that advertisements are going to be presented in the near future — it is estimated that the global use of ad blockers for mobile devices is going to reach more than 430 million active users this year alone, a number that is going to account for billions of dollars in losses.


How to create more meaningful & engaging content


Advertisers are already dreading the low conversion rates for mobile devices as marketers try to innovate new ways of promoting their products, but one thing is clear — content is going to gain more traction as a method of promoting and advertising products using content directly.

Whether that will be done through direct promotion, or through an intelligent approach to crafting engaging content, that will be left up to the marketers themselves.

How to add meaning to your content
Moz did a case study on how adding more meaning to your content can increase traffic by up to 57% — the process of adding more meaning includes updating older content with fresh perspectives, being more mindful of keyword usage, and enhancing the design experience for easier content consumption and digestion. Continue reading to learn more about the ways you can add more meaning to your content.

  • Intentional content — whenever we do something with an intention, we can expect a certain result in return. So the same applies for creating content, if your intention is to help educate others in a particular field, then ensure that you’re sticking to this intention throughout. In content, it helps to stick to what is essential and avoid fluffy information that would otherwise confuse the consumer.


  • Write for one person only — writing for everyone is easy because ideas can be generalized, yet when we’re trying to help a single person only we can be more thorough in our approach of explaining particular aspects of our ideas, and really focus on giving rather than receiving back. Perhaps it is a customer that asked a specific question, or you could just set the intention to write your content as if you’re writing it for a specific person alone. Try it, it works!


  • Make customers a part of it — if part of your strategy involves promoting your product and talking about its capabilities, it might be helpful to integrate existing reviews and testimonials from customers who’ve had previous experience with your product already. This way new customers, and readers, can better understand how your product is being used, and whether it applies to their problems at that time.

Little steps make a big difference, so don’t be afraid to try different techniques and feel out the situation for yourself. Maybe ask yourself, members of your team, how you define the meaning and what it means to you.

Creating engaging content effortlessly –
Engaging is a broad term, and could mean something as simple as having the reader leave a comment after reading a particular piece of content, or it could mean that the reader goes from being a reader to a fully subscribed paying customer.

The essence of an engaging piece of content is that it feels authentic and captivating, to the point where readers want to finish reading it. To give you ideas and examples of how engagement can be added to your own content, follow the ensuing steps.


  • Be generous — apart from blog posts, other forms of digital content include eBooks, case studies, white papers, slideshows, etc, — all of those formats are great for collecting readers details (name, email) and getting them onboard with the message that you’re sharing. These freebies can be weaved into the content to become a part of it, rather than seem like an external resource.


  • Be resourceful — having experience in your own field of work is great, readers can naturally recognize authentic passion and appreciate your original expression of knowledge, though being able to understand the latest research and case studies in your particular topic / niche is another great way to reassure your readers that you’re serious about the work that you do, and inherently such content displays signs of quality and value.


Try to avoid getting caught up in marketing schemes and tricks that promise better results, not to mention being overly concerned with how search engines perceive your content, the number one priority for content should be its authenticity and level of usefulness for that specific topic or category. Meaning and engagement are achieved through expertise which is easily conveyed to others.


Blog Contributed by Alex Ivanovs

Alex Ivanovs is a technology writer who helps to maintain Colorlib — a growing community of WordPress enthusiasts.

Get Twitter Widget ID

What is Twitter widget id?

Twitter widget id is associated with your twitter account. Widget id is used for fetch your twitter tweets from your account. Various plugins, extension, scripts use twitter widget is to get the information from your account. The information fetched using widget id only the public visible, it’s not your private or confidential information. And this is a very secure and authentic way to access information because program usage your own id so information is fetched only from your account only.

Follow the step by step instruction to get your own account Widget ID

Step 1) The first step is log in to your Twitter account. Click on LINK to go on the login screen of twitter. And enter your twitter email or password in the first field and password in the second field.

login-to-twitter


Step 2) Copy username as shown below –

twitter user name


Step 3) Congrats! Finally, you are done. Start using it into your twitter plugin, extension or code.


Thanks for reading our blog about Get Twitter Widget ID.

New iPhone 7 Feature List

Hello Friends 🙂

As all you know Apple has released the next generation iPhone at its annual event in San Francisco – The iPhone 7 and iPhone 7 Plus.
The latest iPhone models comes with a new design. iPhone 7 similar to the iPhone 6s and 6s Plus, has some big differences, including a pressure-sensitive home button, water resisitance, better camera, a faster processor and improved battery life, as well as having no headphone jack.

It also comes in a new range of colours and a starting size of 32GB.

       iPhone 7 Full Features

 CAMERA

camera

Both the iPhone 7 and iPhone 7 Plus have upgraded cameras. iPhone 7 has a 12 megapixel sensor that is claimed to be 60% faster. iPhone 7 also has a quad-LED flash with 50% light output, and can detect for the imperceptible flickering of energy efficient lights. Each camera on iPhone 7 has a different focal length.

PLATFORM

platform

The new iPhone 7 and iPhone7 Plus handsets are powered by the new quad-core Apple A10 Fusion processor with 64-bit four core CPU. The processor has two high performance cores and two high efficiency cores for a longer battery life. It also has a new 6-core GPU which is faster .

DISPLAY

display

iPhone 7 launched with  its 4.7 inches display protected with Ion-strengthened glass, oleophobic coating. Apple claims the Retina HD displays in its iPhone 7 and iPhone 7 Plus are 25% brighter than the screens on last year’s iPhones. They are also supposed to support much wider gamut of colours.

 NETWORK

network

GSM / CDMA / HSPA / EVDO / LTE Network 2G, 3G, 4G supported.


WATER RESISTANCE

water-resistance

Both iPhone 7 and iPhone 7 Plus boasts of IP67 ration, which makes them water and dust-resistant. This means the phones can be immersed in water up to 1m depth.

WIRELESS AIRPAD

airpad

iPhone packages will now come with earphones that fit into the phone’s Lightning port, currently used for charging and data transfer. Yes Apple has ditched 3.5 mm headphone jack. These plug into the phone’s charging port. The company has also bundled an adapter with new iPhones so that older earphones can still be used.

NEW HOME BUTTON

home button

The Apple company has redesigned its Home button. The new home button is now touch sensitive and uses a new Taptic engine for better response.

BIGGER BATTERY

batry

Apple has said that the iPhone 7 comes with the best battery life ever seen in an iPhone. The company claims that the iPhone 7 will last two hours longer than the iPhone 6s.

Other Features:

  1. Internal memory –  32/128/256 GB, GB, 2 GB RAM
  2. Card Slot – No
  3. Sensors – Fingerprint, accelerometer, gyro, proximity, compass, barometer
  4. Sound – LoudSpeaker with stereo speakers
  5. Browser – HTML5 (Safari)
  6. Colors – Jet Black, Black, Silver, Gold, Rose Gold
  7. WLAN – Wi-Fi 802.11 a/b/g/n/ac, dual-band, hotspot
  8. Weight – 138 g (4.87 oz)
  9. SIM – Nano-SIM

Image courtesy:

http://www.apple.com/in/

Thanks for reading our post iPhone 7 Full Features. Let us know in the comments and remark below.

Get Twitter Widget ID

What is Twitter widget id?

Twitter widget id is associated with your twitter account. Widget id is used for fetch your twitter tweets from your account. Various plugins, extension, scripts use twitter widget is to get the information from your account. The information fetched using widget id only the public visible, it’s not your private or confidential information. And this is a very secure and authentic way to access information because program usage your own id so information is fetched only from your account only.

Follow the step by step instruction to get your own account Widget ID

Step 1) The first step is log in to your Twitter account. Click on LINK to go on the login screen of twitter. And enter your twitter email or password in the first field and password in the second field.

login-to-twitter

Step 2) Copy username as shown below –

twitter user name

Step 3) Congrats! Finally, you are done. Start using it into your twitter plugin, extension or code.

Thanks for reading our blog about Getting Twitter Widget ID.