Author Archives: Weblizar Docs
15 Oct,
2016
Explora Premium Documentation
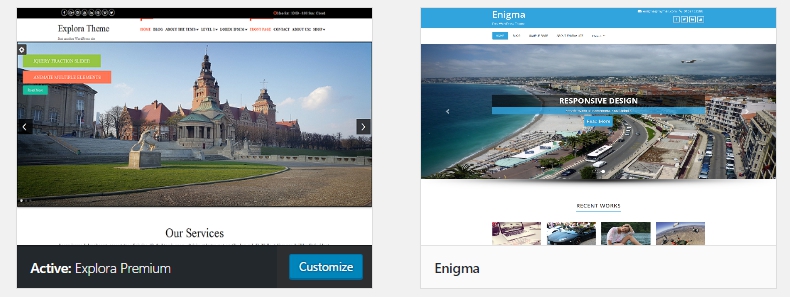
Weblizar Docs 0 CommentExplora is a multi-purpose responsive theme coded & designed with a lot of care and love. You can use it for your business, portfolio, blogging or any type of site. Explora is a flexible Responsive theme and supports all browsers. Explora is Retina ready
Custom menus are used to choose the menu in Primary Location that is in Header area of the site. Explora focusing on the business template, awesome Carousel slider, Fraction Slider, Swiper slider, Powerful but simple Theme Options for full CMS control option to match your logo & website, wide layout, a different type of color skin, translation ready and much more. Explora supports Woo-commerce Ready theme.
Try Explora Premium Theme: DEMO HERE
Key Contents
2.1 General Settings
2.1.1 Enable Front Page
2.1.2 Add Logo
2.1.3 Add Favicon
2.1.4 Google Analytic Code & Custom CSS Editor
5.1 Customize Explora Portfolio
6. Explora Blog
7. Explora Team
8.1 Customizing Explora Client Section
9.1 Customize Explora Testimonial Section
10. Callout Setting
13. Contact Setting
14. Footer Setting
14.1 Widget Area
14.2 Custom Footer Bar
17. Maintenance Mode
29. Short-codes
19.1 Accordion
19.2 Alert
19.3 Button
19.4 Column
19.5 Drop-Caps
19.6 Heading
19.7 Panel
19.8 Popover
19.9 Progress Bar
19.10 Tabs
19.11 Tool Tip
19.12 Pricing Table
Now, we are going through installation, configuration and publish theme. Follow the step by step guide:
1. Theme Installation
First, download your theme package from your Weblizar Amember Account.
Upload Theme package zip folder using theme installer wordPress option Otherwise Any FTP (FillZilla)
We recommend you upload theme zip package using FTP( FillZill/Bitwise), In your host-server-directory\wp-content\themes\
After that Activate theme into WordPress site Admin Dashboard -> Appearance ->themes.
Now the theme is successfully installed on our site, step up to the next step.
2. Setup Home Page
You can access theme options page at Admin Dashboard → Appearance → Theme Options.
all settings are explained one by one.
2.1 General Settings
In this section, you can enable front-page, add a logo , logo size, Site Favicon, add a background image to breadcrumbs, add custom CSS, add google analytic code etc.
Please go to Admin Dashboard → Appearance → Theme Options → General Settings.
Please refer below image for Quick Settings.

2.1.1 Enable Front-page
To Enable front-page go to Admin Dashboard → Appearance → Theme Options → General Settings.
And slide Home-Page or Custom Page to ON.
2.1.2 Add Logo
To add Logo go to Admin Dashboard → Appearance → Theme Options → General Settings.
Now click on Custom Logo Button and upload your logo image or select from Media Library.
Follow image
![]()
You can further customize the logo’s height and width from Logo Height and Logo Width settings.
NOTE : Logo height is Set to 60px for fixed header, if fixed header is enabled and when you scroll the page, Logo will set to 60px height in fixed menu.
2.1.3 Add Favicon
To add Favicon go to Admin Dashboard → Appearance → Theme Options → General Settings.
Now click on Favicon Icon Button and upload your logo image or select from Media Library.
2.1.4 Google Analytic Code & Custom CSS Editor
Google Analytic Code and custom CSS can be added to theme using Theme’s General Settings.
Note : Please add Google Analytic Code without script tag. Please don’t use >, < like symbol in custom CSS editor.
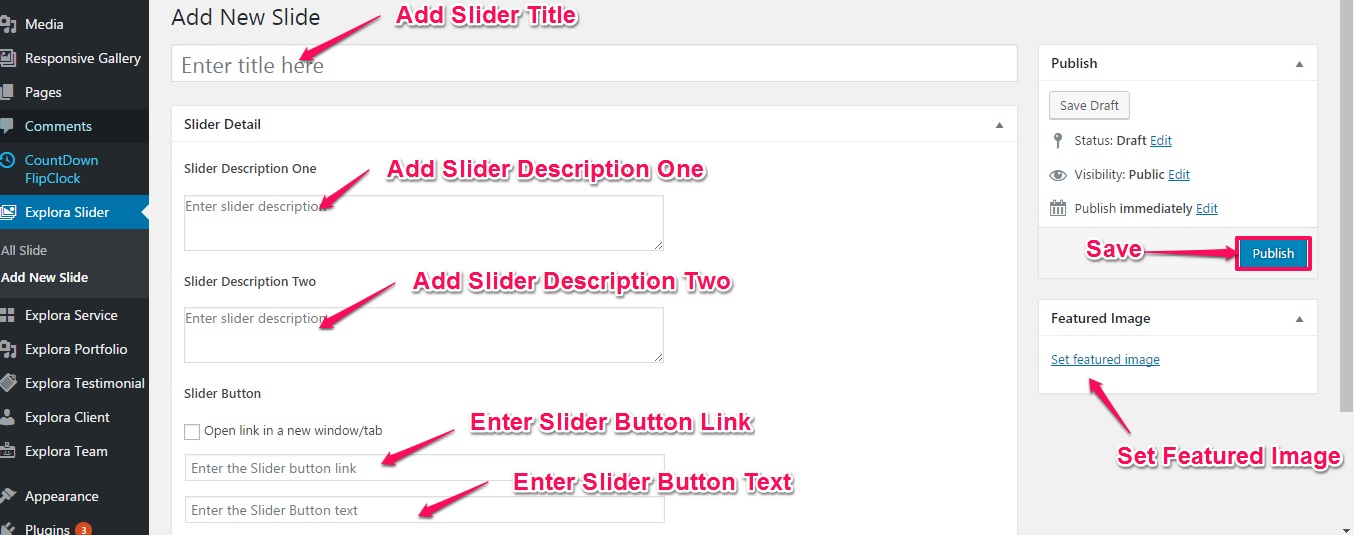
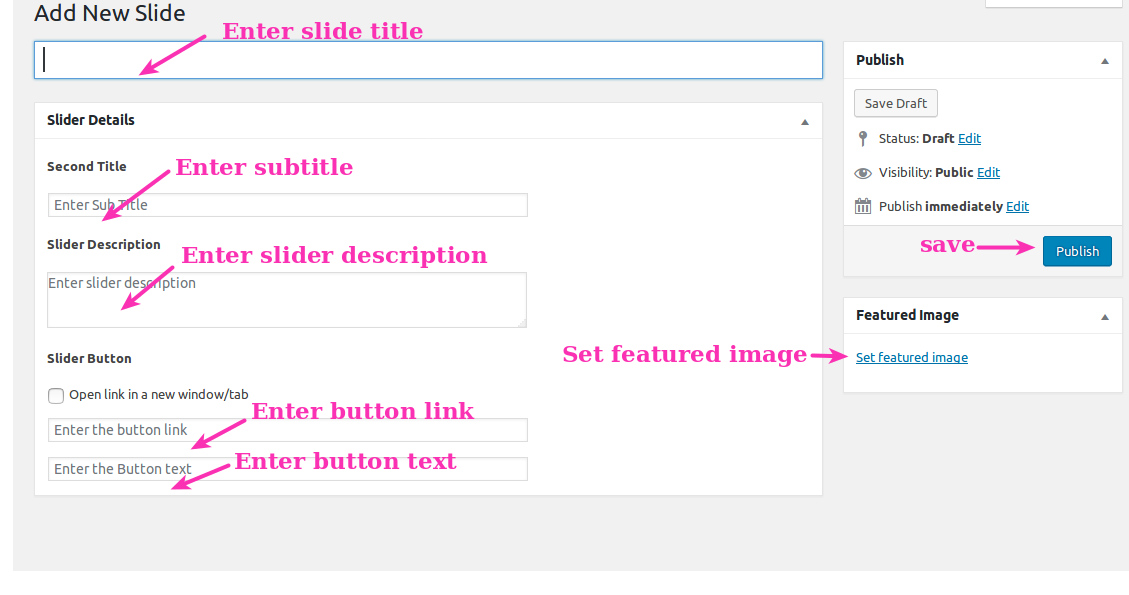
3. Explora Slider
Add a slide to Explora Slider.
Go to Admin Dashboard → Explora Slider → Add New Slide and fill related details.
For a quick view, please follow below image.
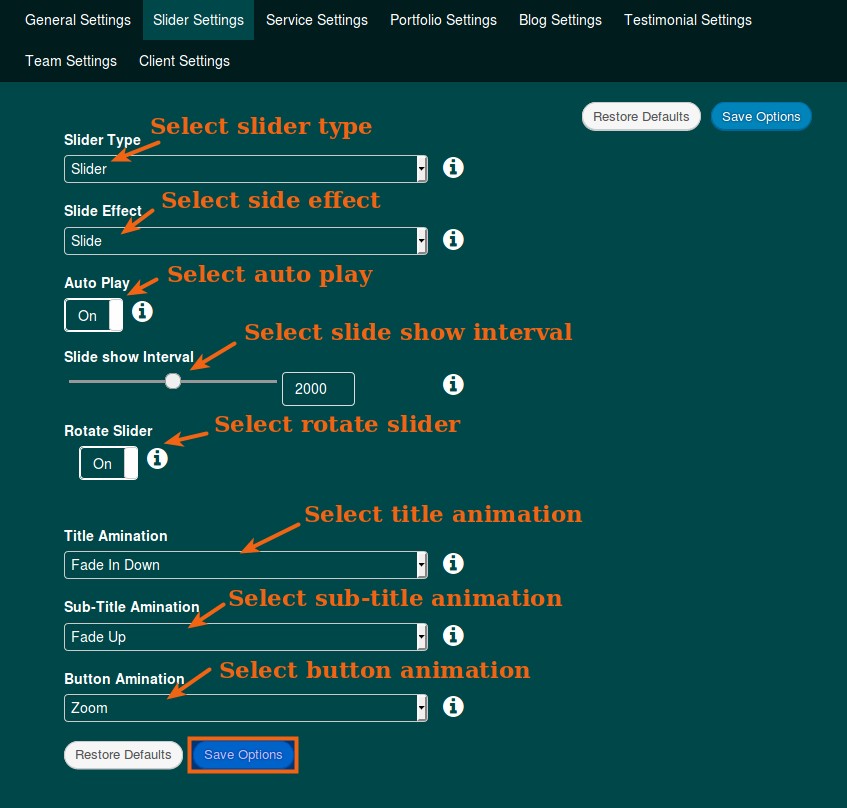
3.1 Customize Explora Slider
Theme have three image slider with the different type of design.
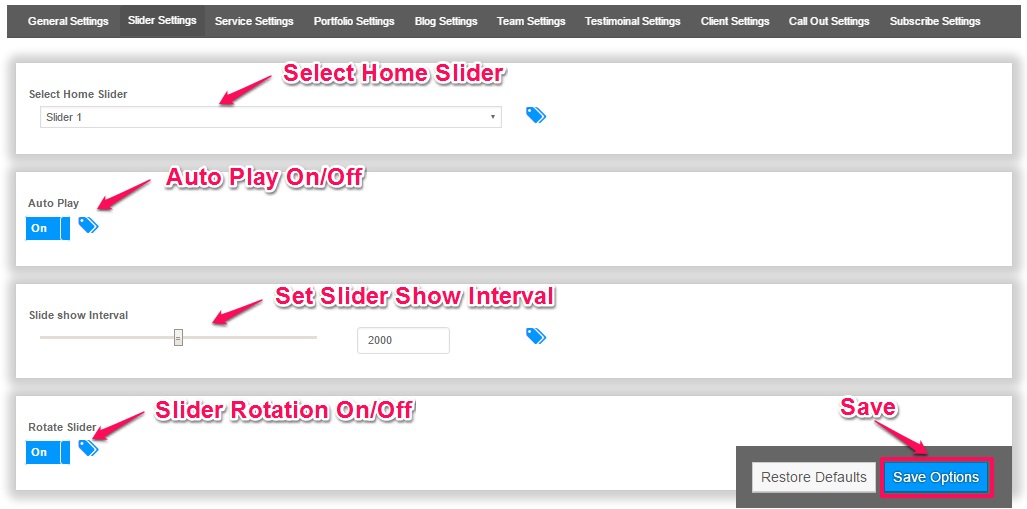
You can customize Explora Slider in Theme Options Settings.
Go to Admin Dashboard → Appearance → Theme Options → Slider Setting.
In Slider Setting, you can set
- Slider Template
- Set AutoPlay
- Slider Title
- Slide Show Interval
- Slider Rotation
Please follow below image for Quick slider Settings.
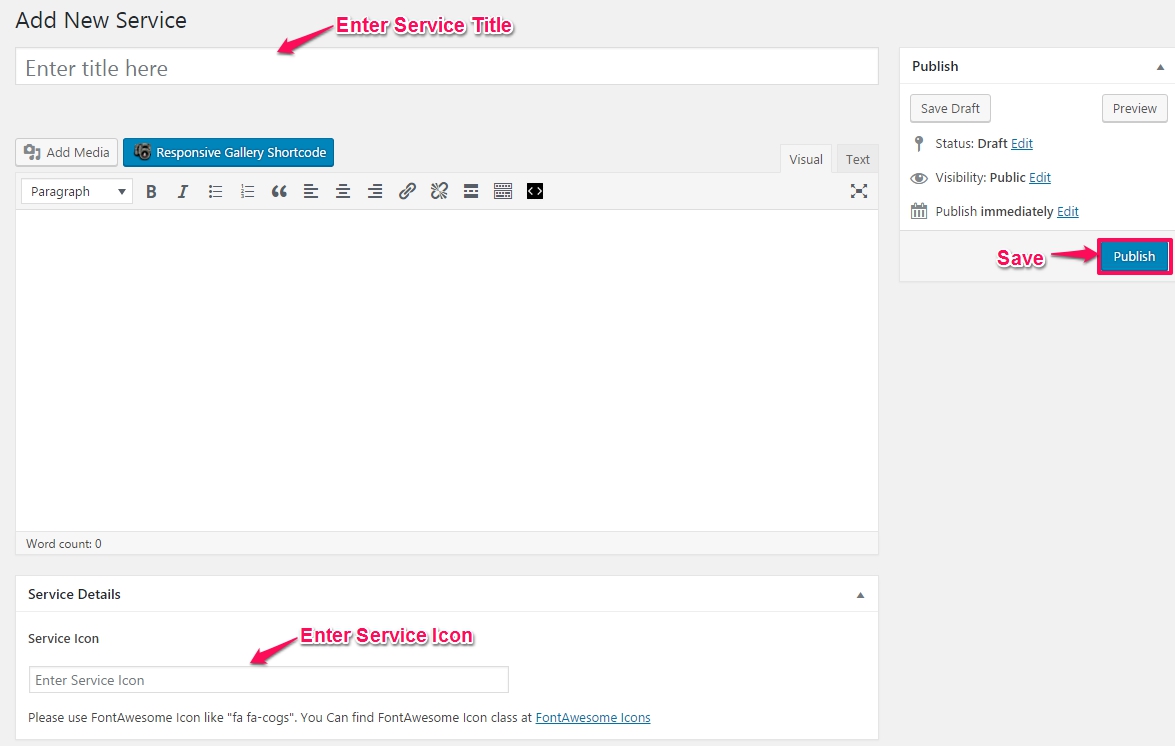
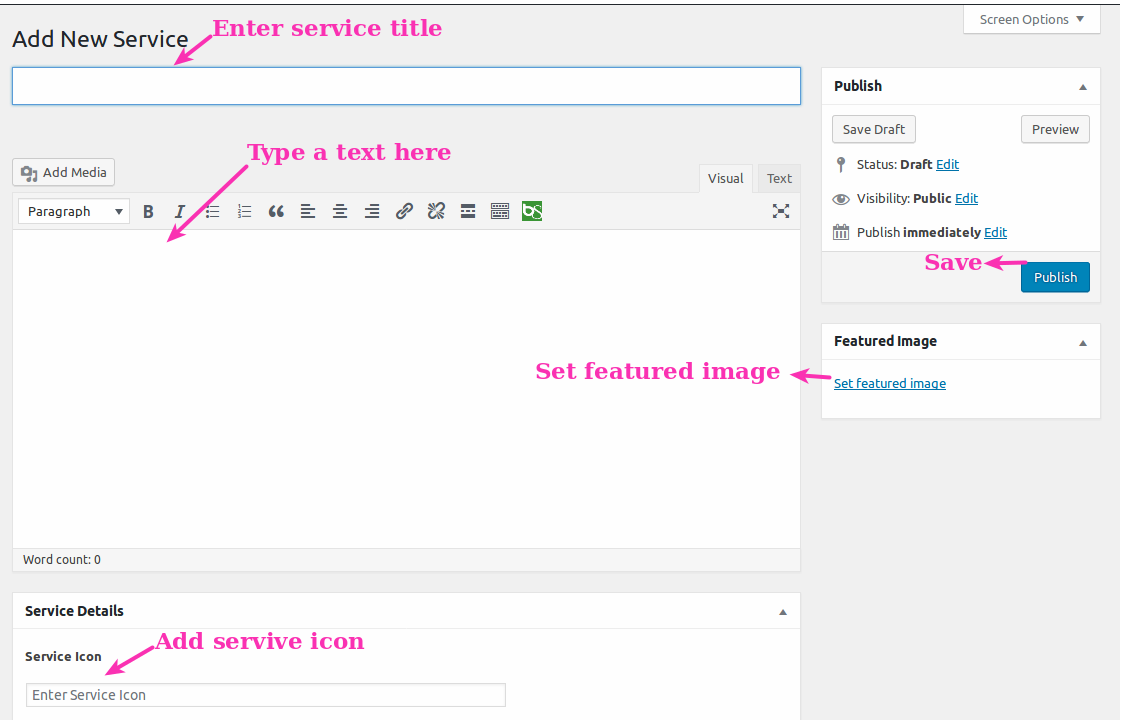
4. Explora Services
Add Service to Explora Services.
Go to Admin Dashboard → Explora Service → Add New Service and fill related details.
For a quick view, please follow below image.

Note: To show services on the homepage you have to add font awesome icon or featured image if you do not add this field, Service will not show on homepage.
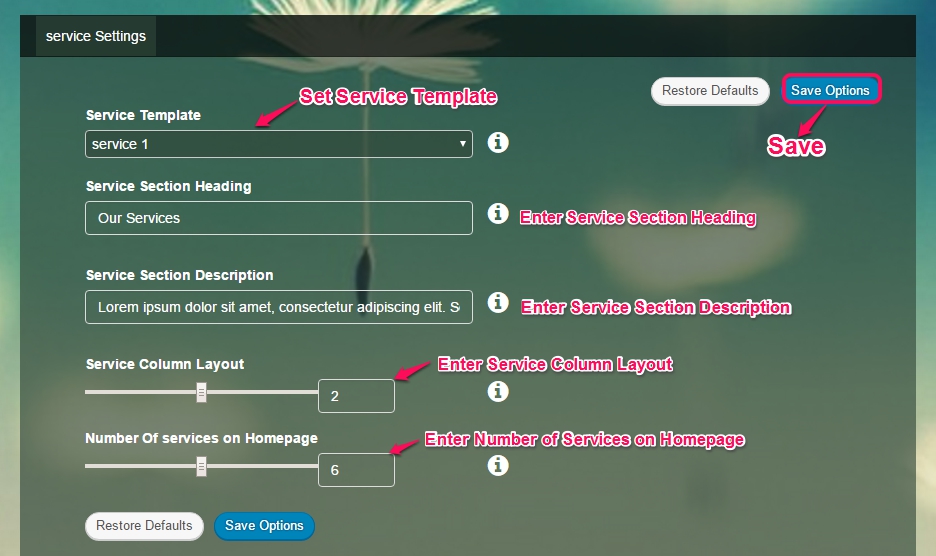
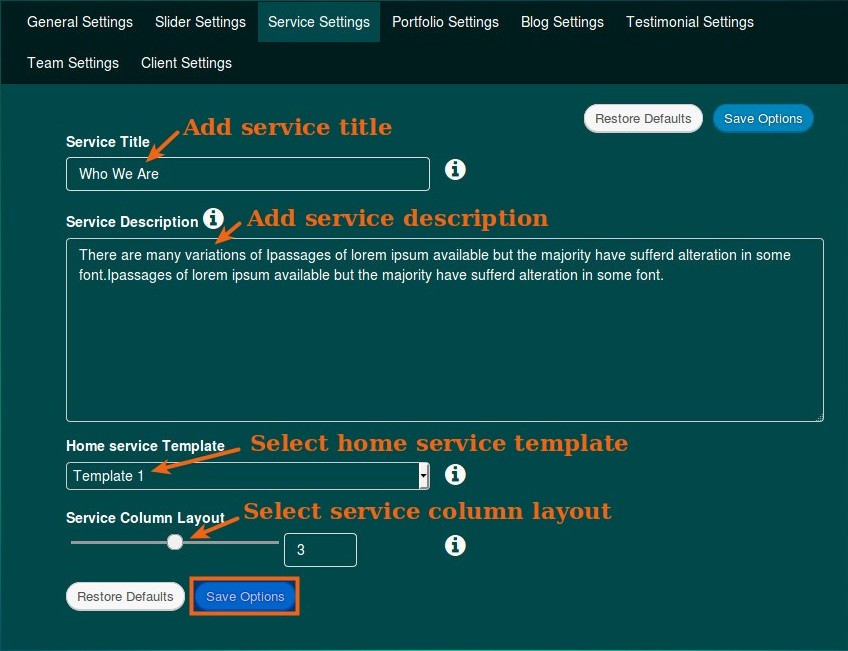
4.1 Customize Explora Services
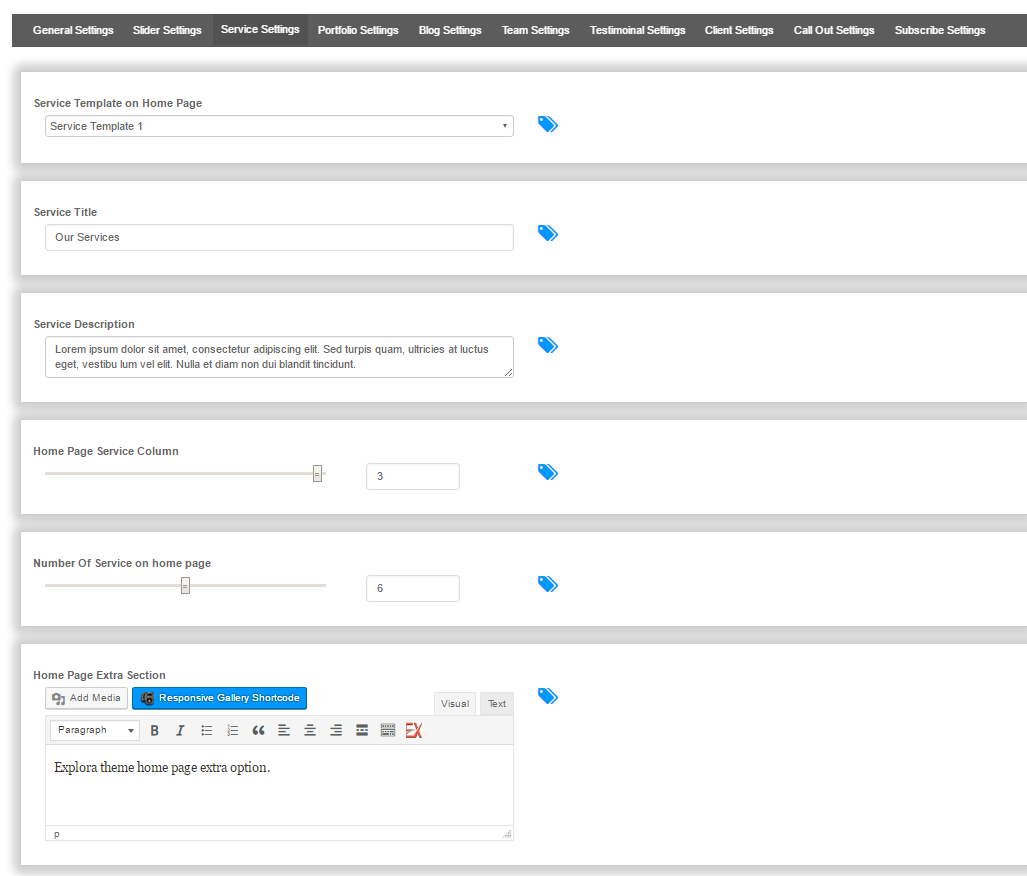
You can customize Explora Services in Theme Options Settings.
Go to Admin Dashboard → Appearance → Theme Options → Service Setting.
In Service Option, you can set
- Service Template
- Service Description
- Service Title
- Service Column Layout
- Service To Be Shown
- Add Extra Section
Please follow below image for Quick Service Settings.
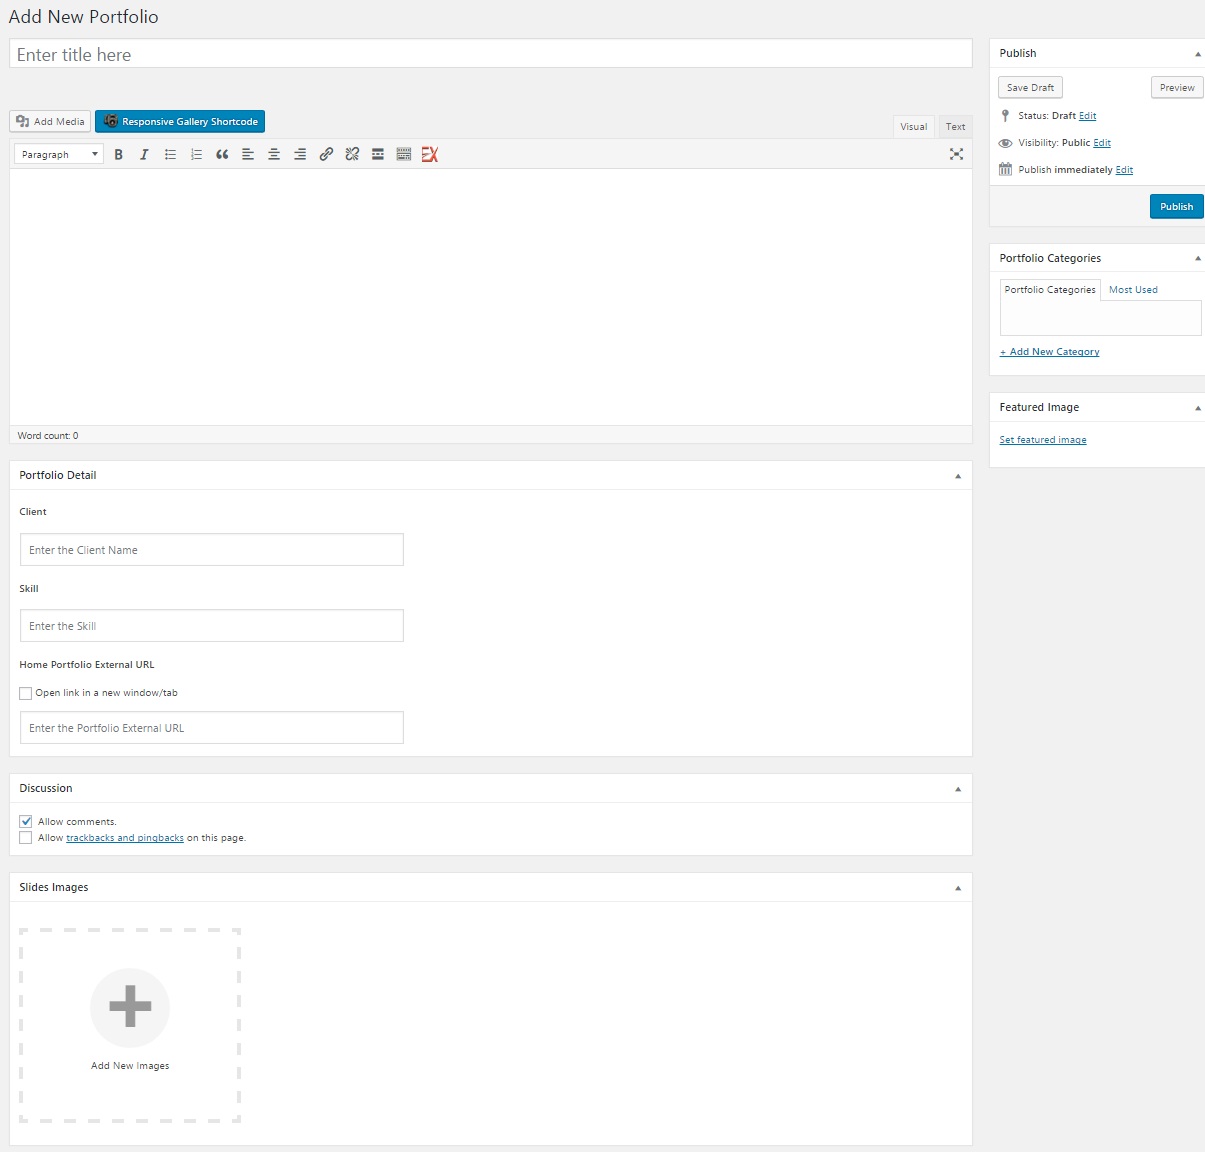
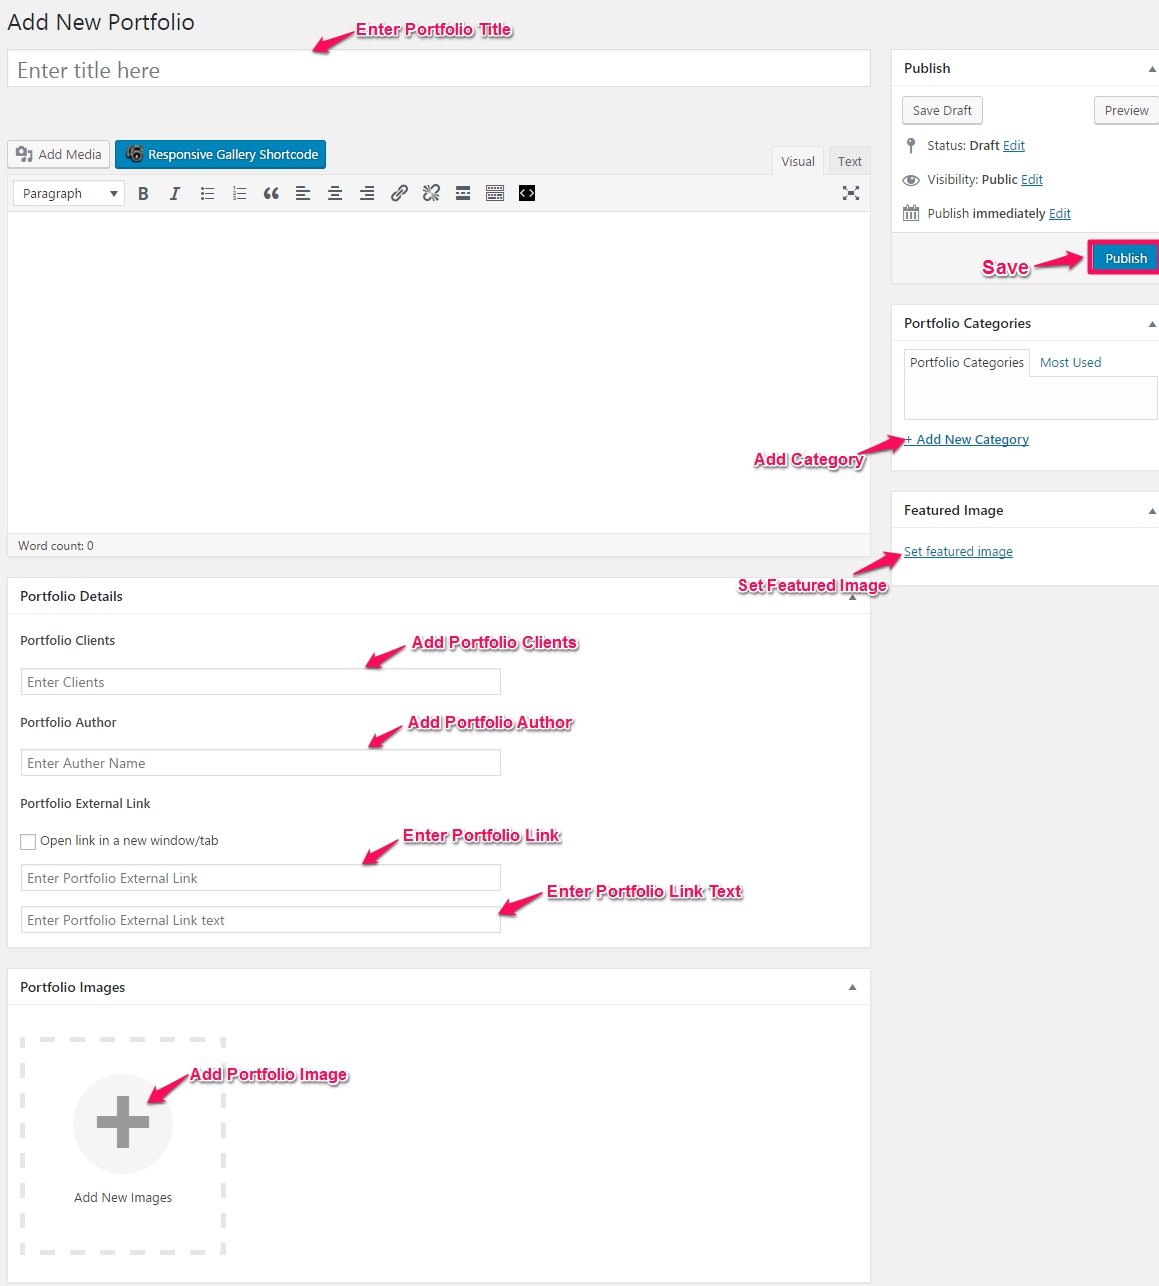
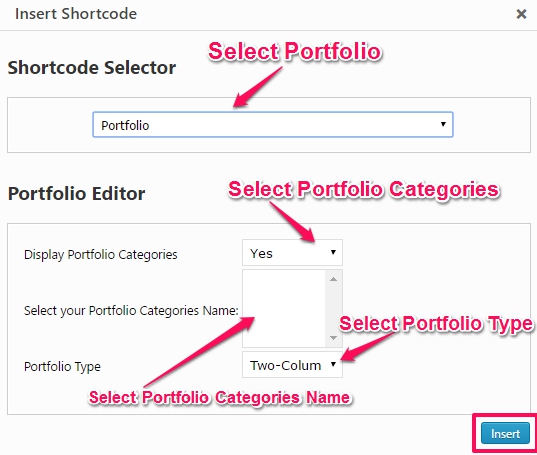
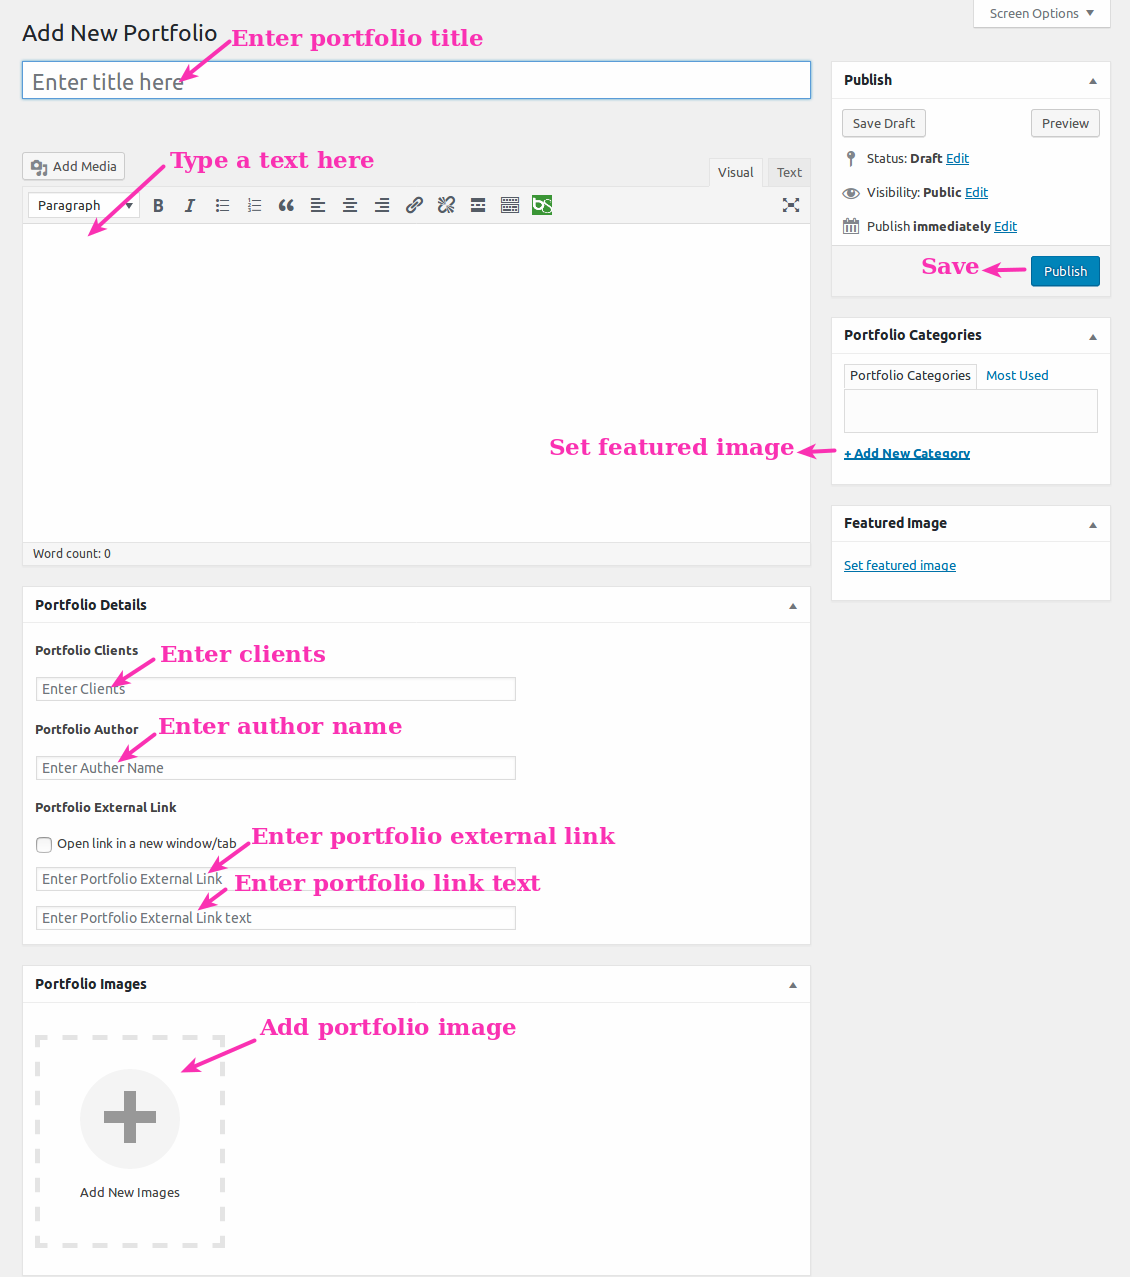
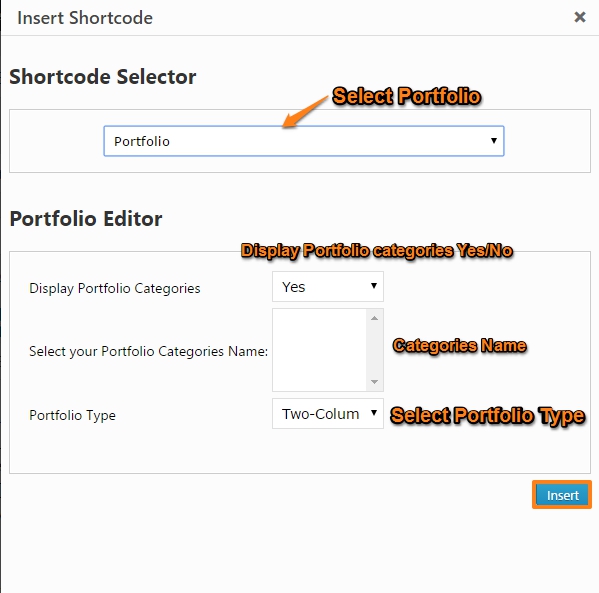
5. Explora Portfolio
Add Portfolio to Explora Portfolios.
Go to Admin Dashboard → Explora Portfolio→ Add New Portfolio and fill related details.
For a quick view, please follow below image.
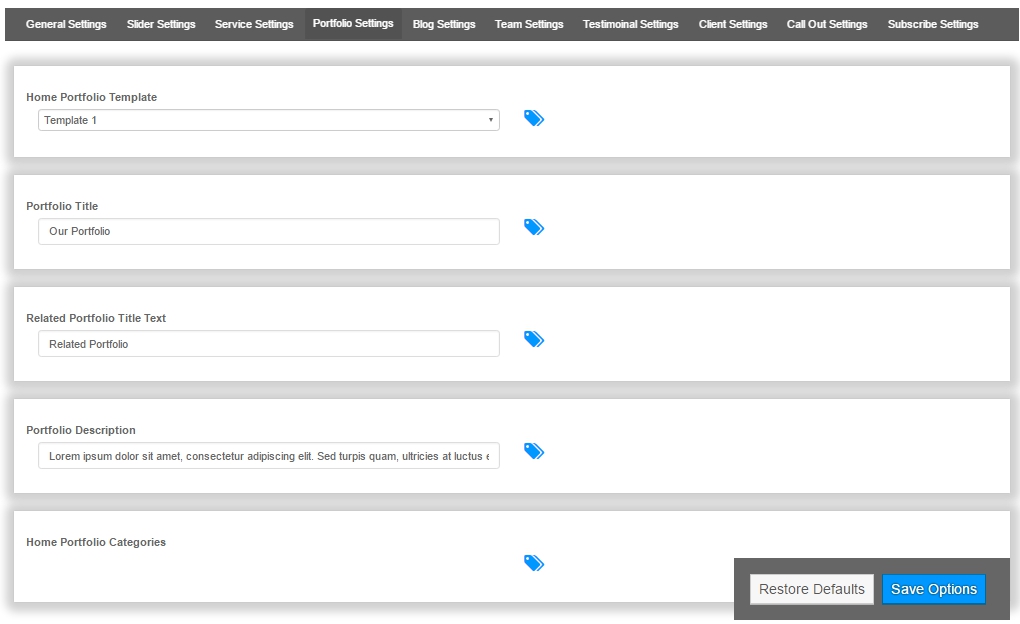
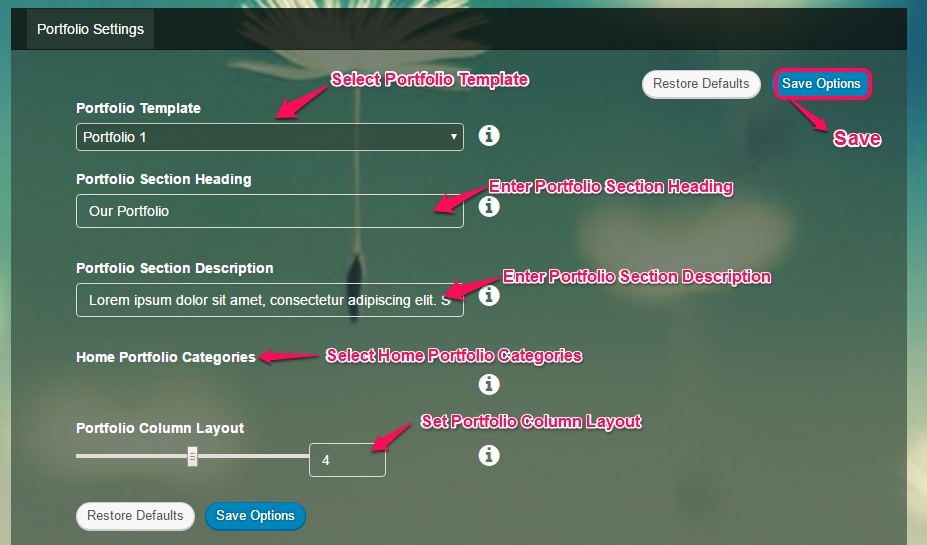
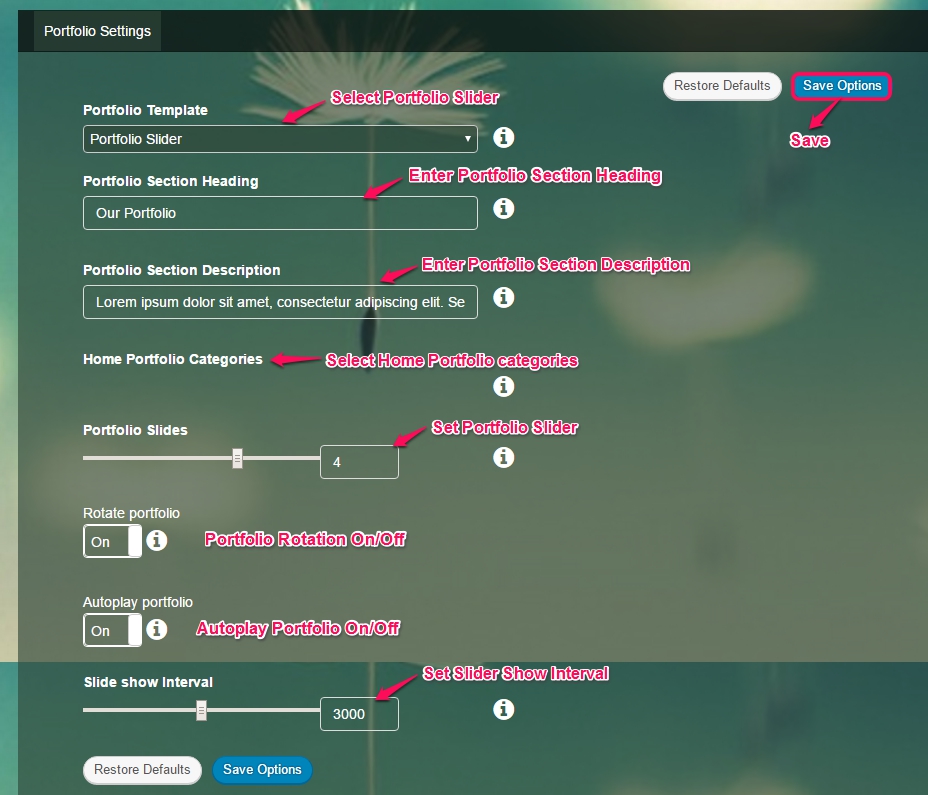
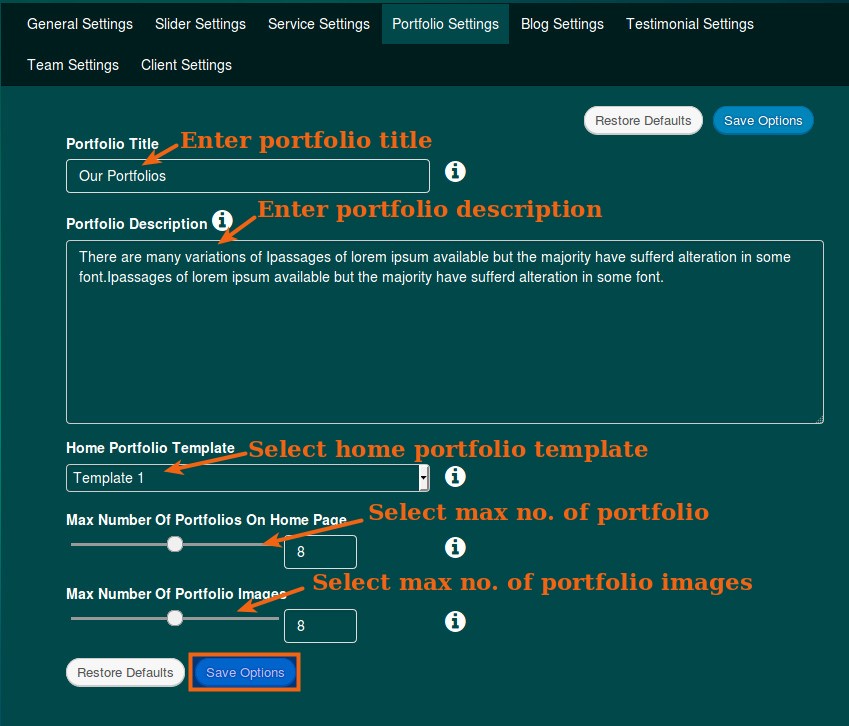
5.1 Customize Explora Portfolio
You can customize Portfolio in Theme Options Settings.
Go to Admin Dashboard → Appearance → Theme Options → Portfolio Setting .
In Portfolio Option, you can set
- Set Portfolio Template
- Portfolio Title
- Related Portfolio Title Text
- Set Portfolio Description
- Home Portfolio Categories
Please follow below image for Quick Portfolio Settings.
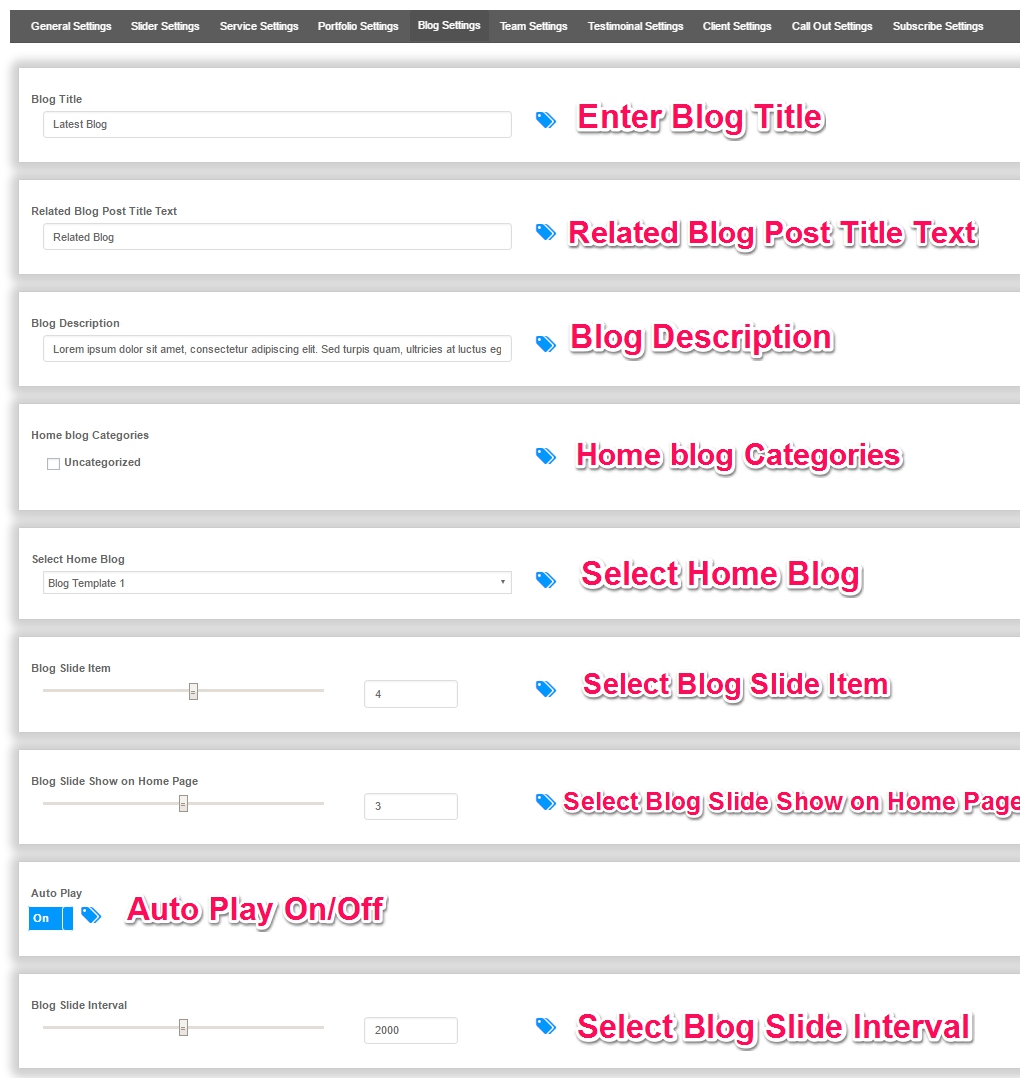
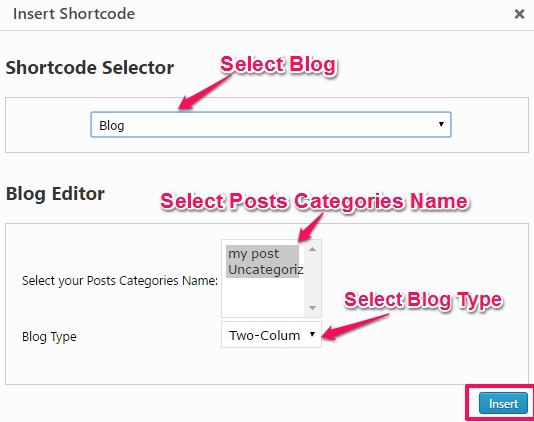
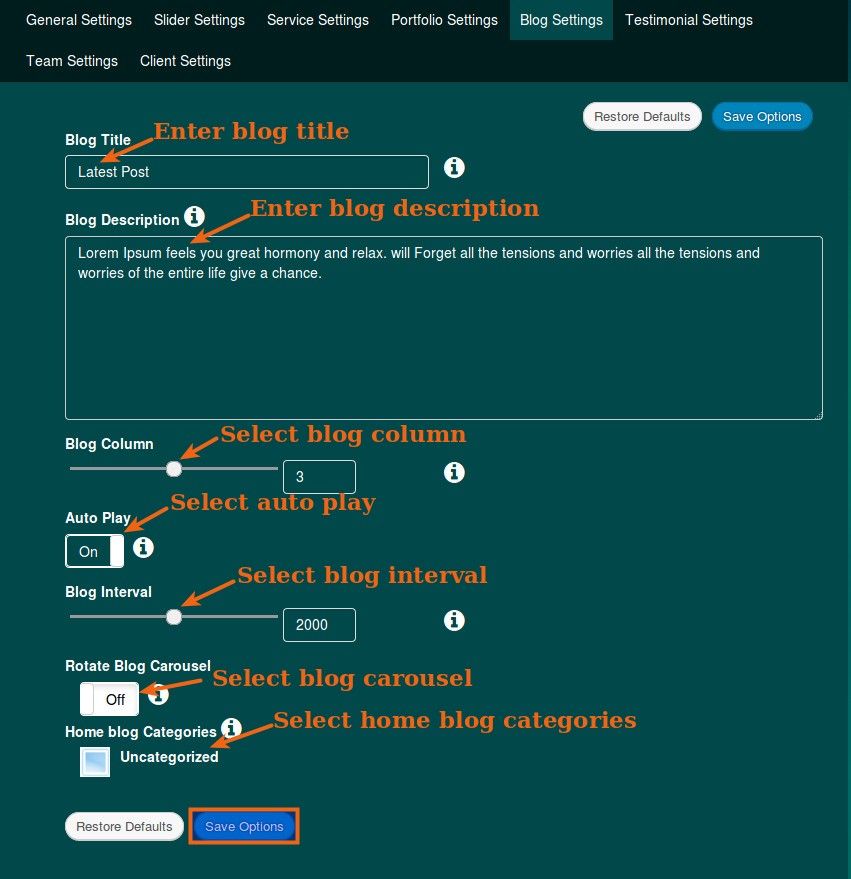
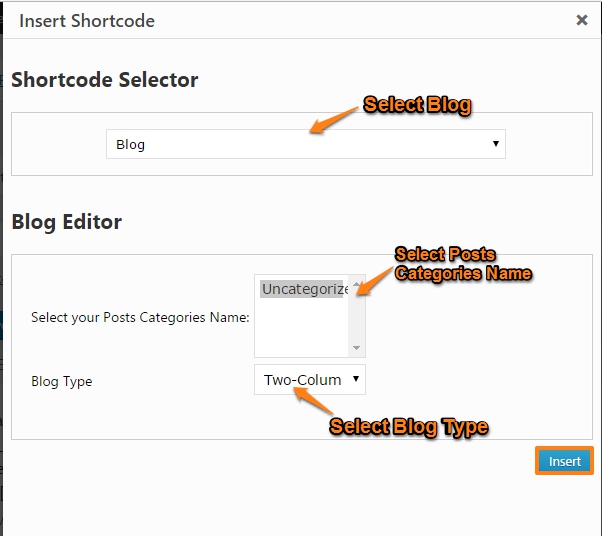
6. Explora Blog
You can customize Blog in Theme Options Settings.
Go to Admin Dashboard → Appearance → Theme Options → Blog Option.
In Blog Option, you can set
- Set Blog Title
- Blog Section Description
- Related Blog Post Title Text
- Home blog Categories
- Select Home Blog
- Blog Slide Item
- Set Blog Slide Show on Home Page
- Set Slider Auto Play
- Blog Slide Interval
Please follow below image for Quick Blog Settings.
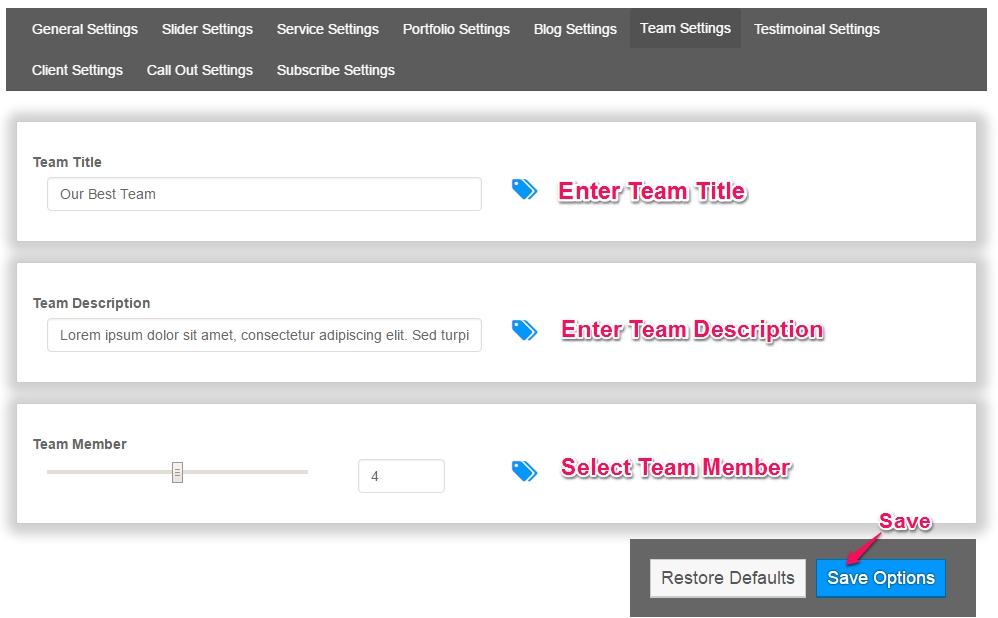
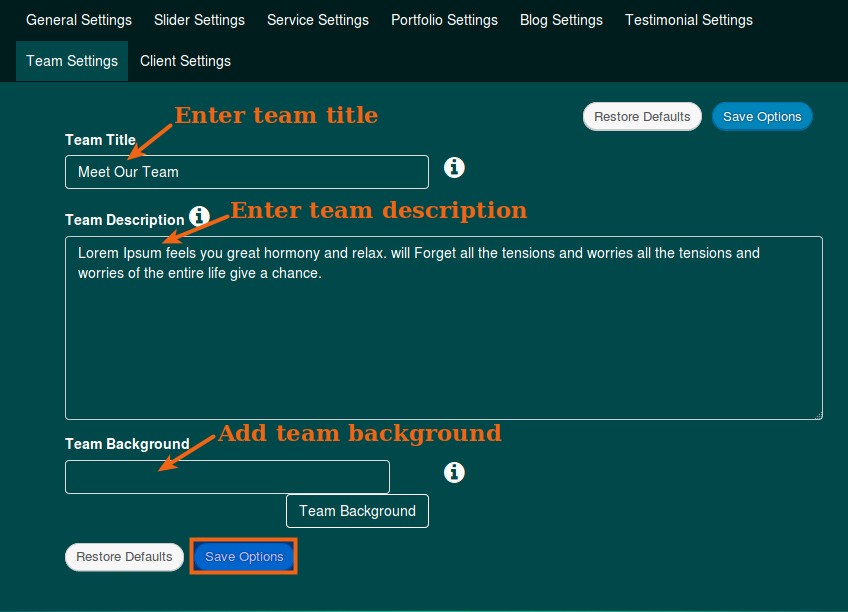
7. Explora Team
Go to Admin Dashboard → Explora Clients → Add New Team and fill related details.
For a quick view, please follow below image.

7.1 Customize Explora Team
You can customize Team in Theme Options Settings.
Go to Admin Dashboard → Appearance → Theme Options → Team Setting.
In Team Option, you can set
- Set Team Title
- Team Member
- Team Section Description
Please follow below image for Quick Team Settings.
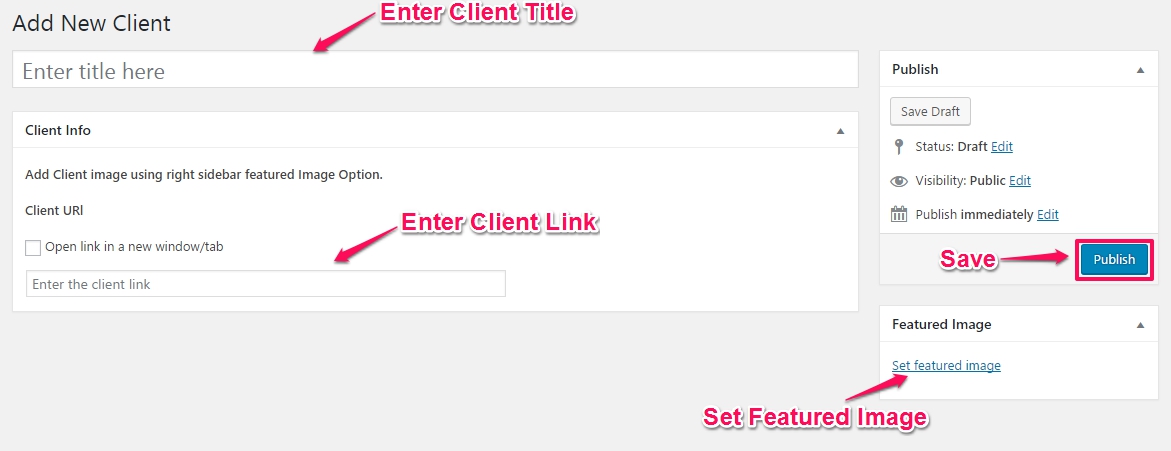
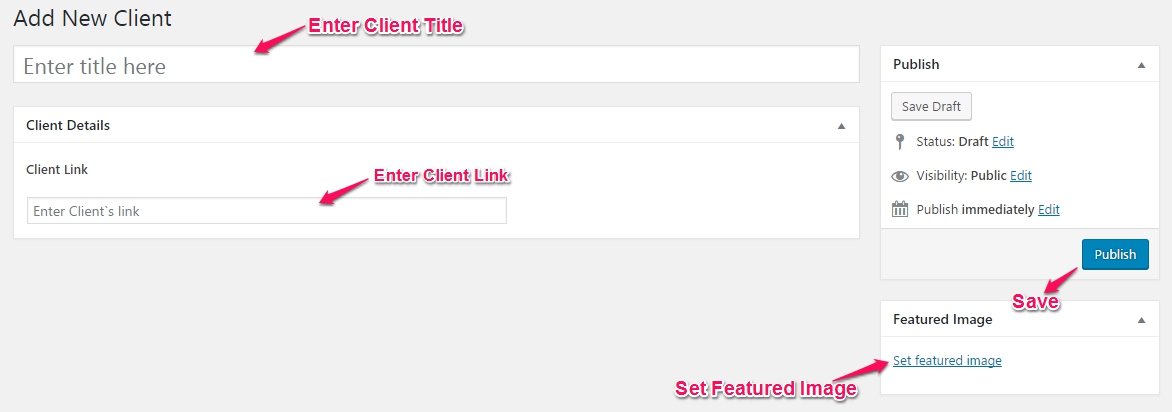
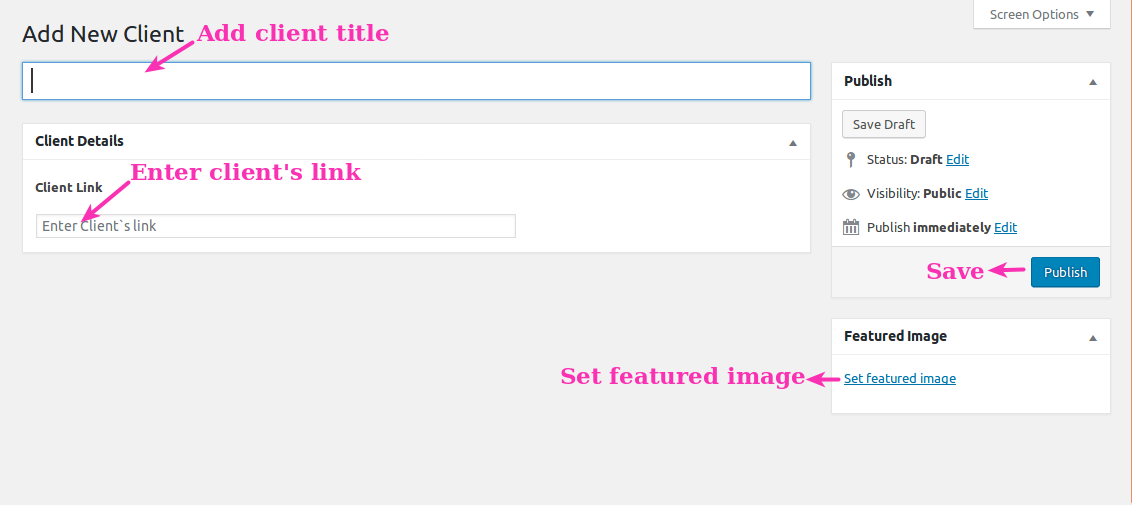
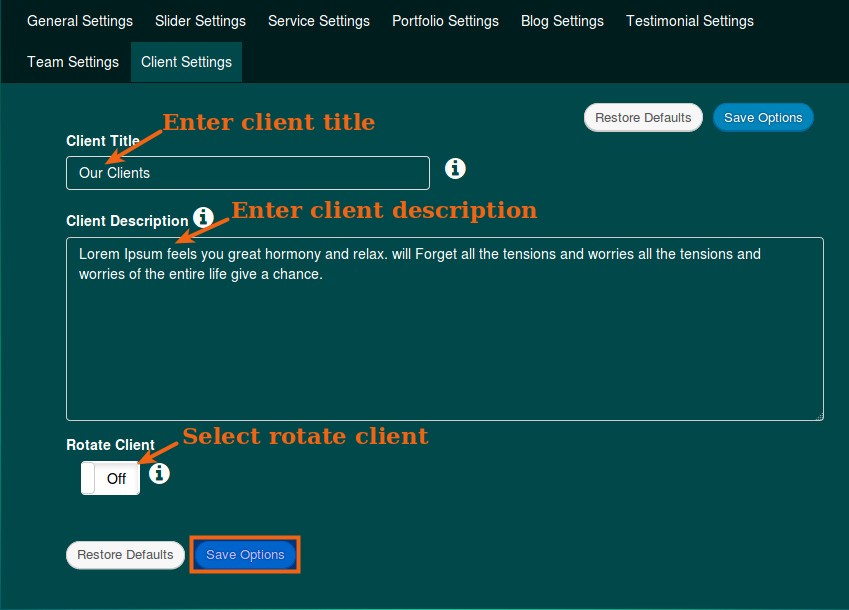
8. Explora Client
Add Member to Explora Client.
Go to Admin Dashboard → Explora Clients → Add New Client and fill related details.
For a quick view, please follow below image.
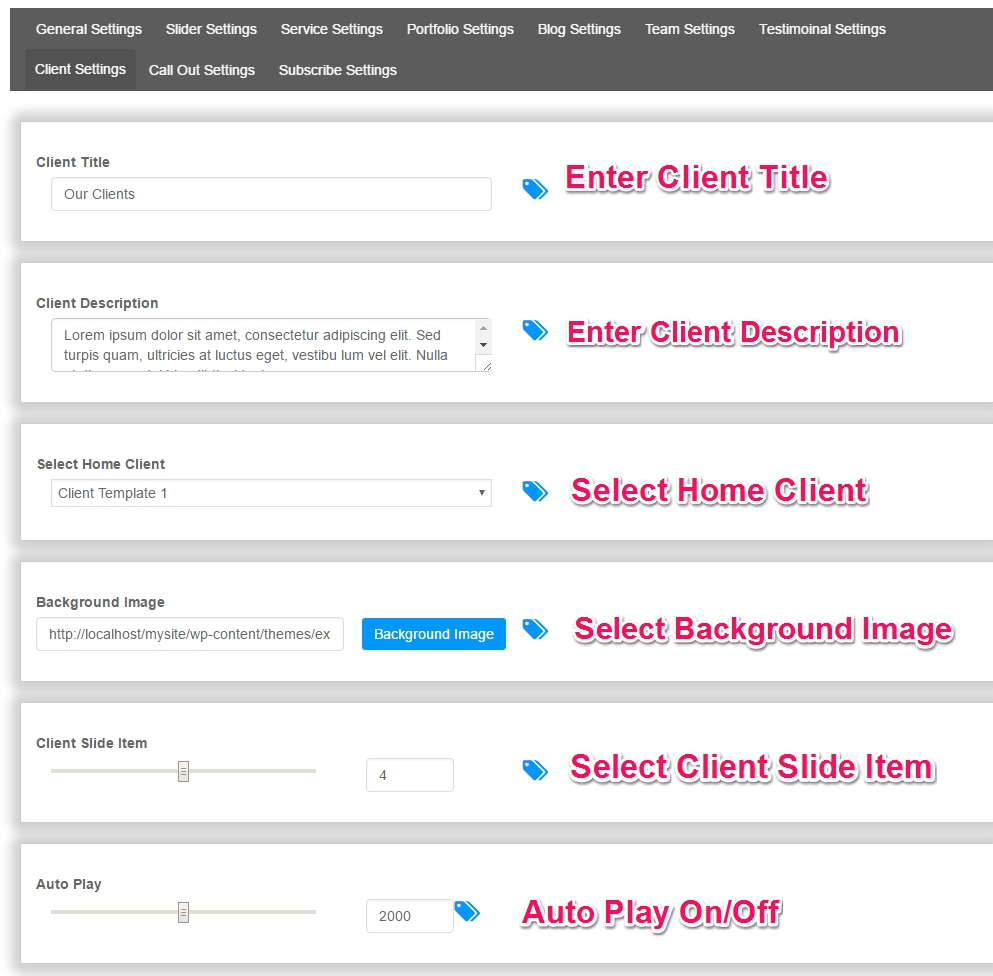
8.1 Customize Explora Client Section
You can customize Explora Client Section in Theme Options Settings.
Go to Admin Dashboard → Appearance → Theme Options → Client Option.
In Client Option, you can set
- Client Title
- Client Description
- Select Home Client
- Background Image
- Client Slide Item
- Set AutoPlay
Please follow below image for Quick Client Settings.
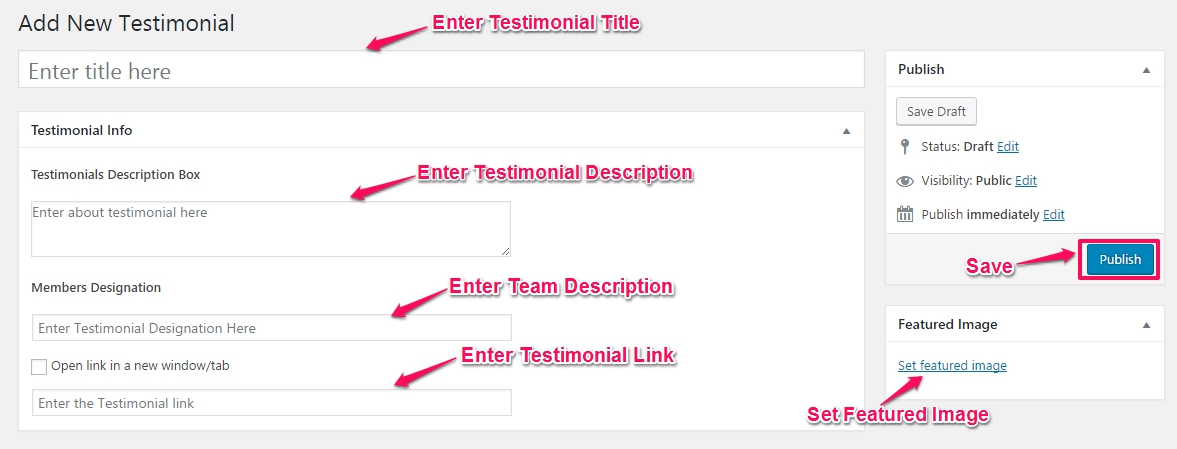
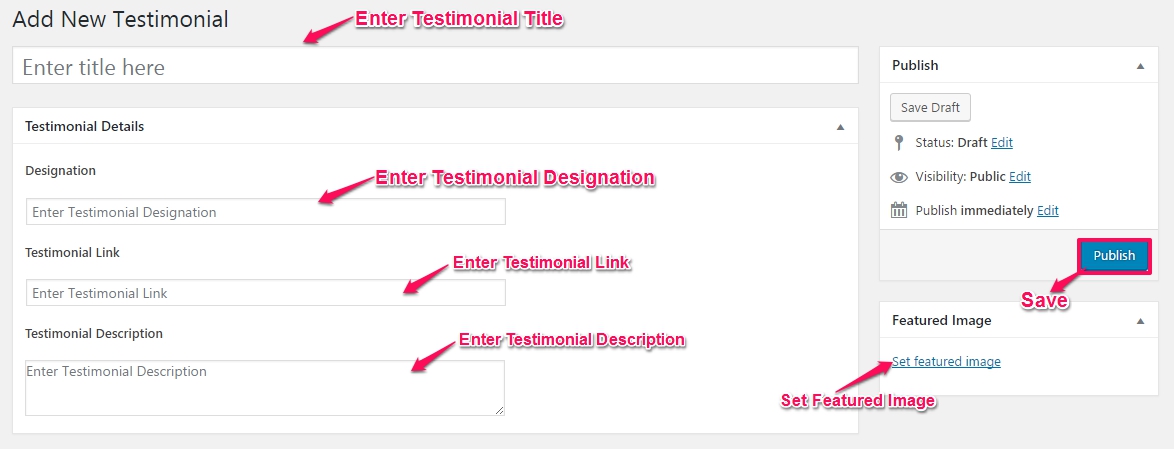
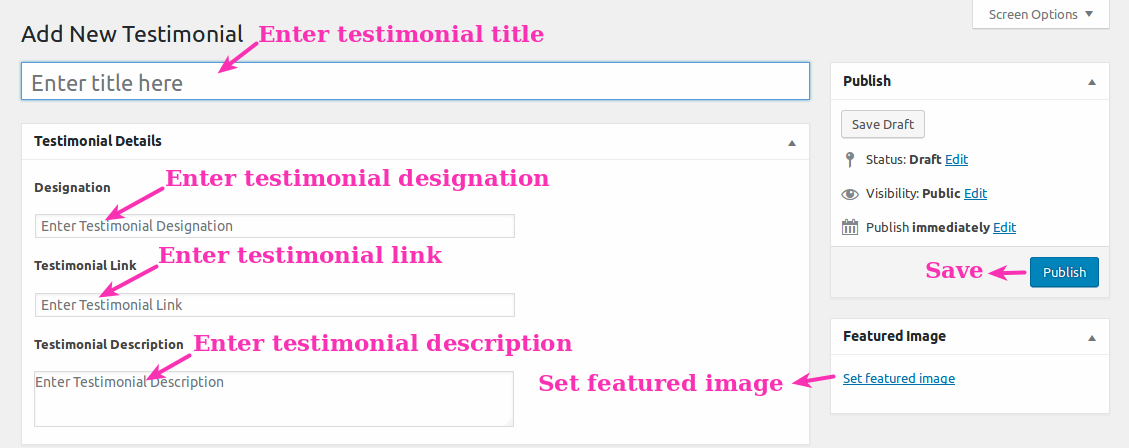
9. Explora Testimonials
Add Testimonial to Explora Testimonials.
Go to Admin Dashboard → Explora Testimonial → Add New Testimonial and fill related details.
For a quick view, please follow below image.
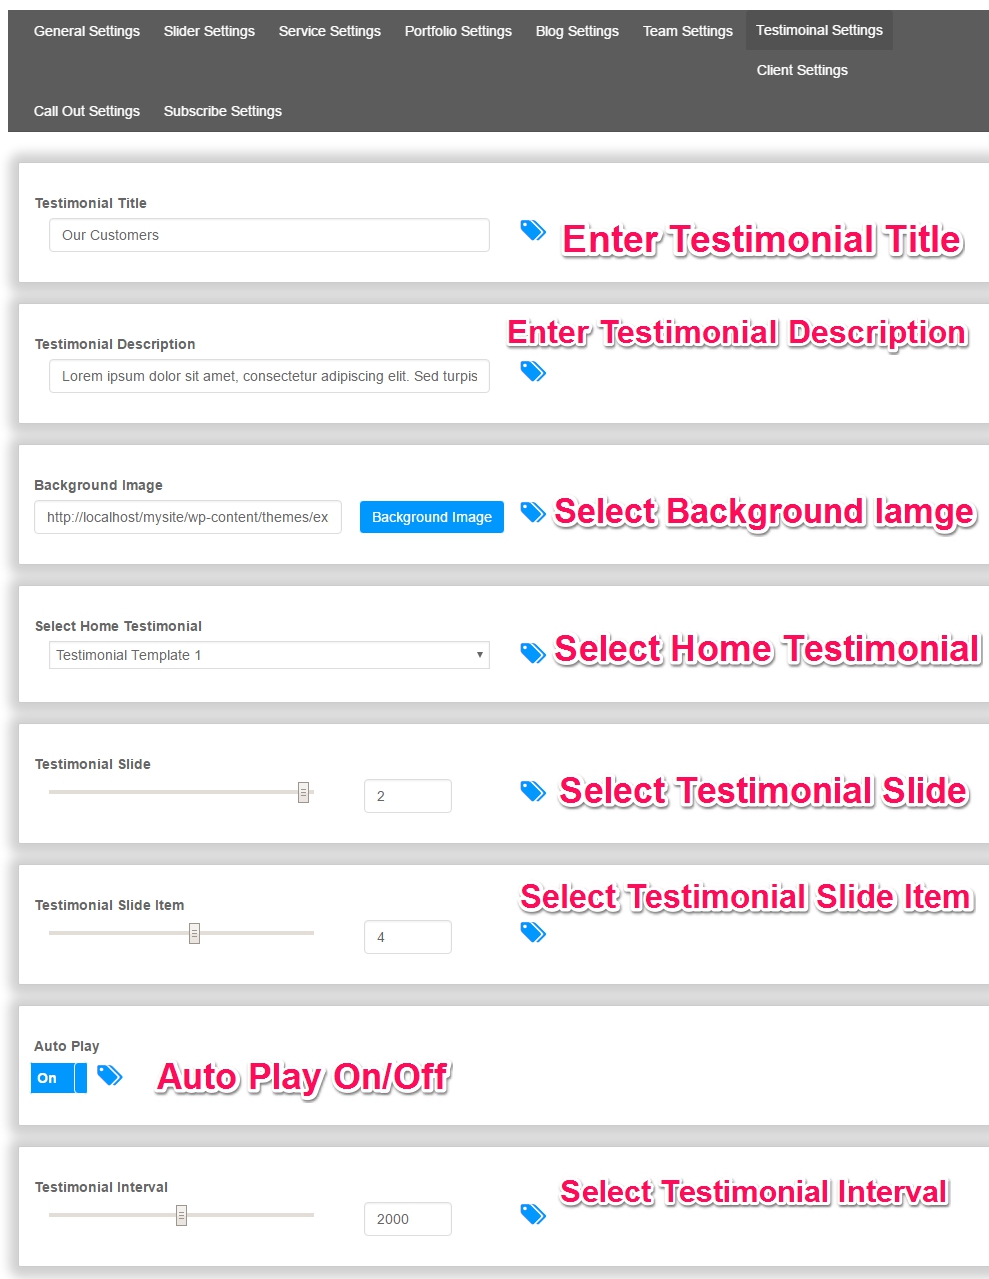
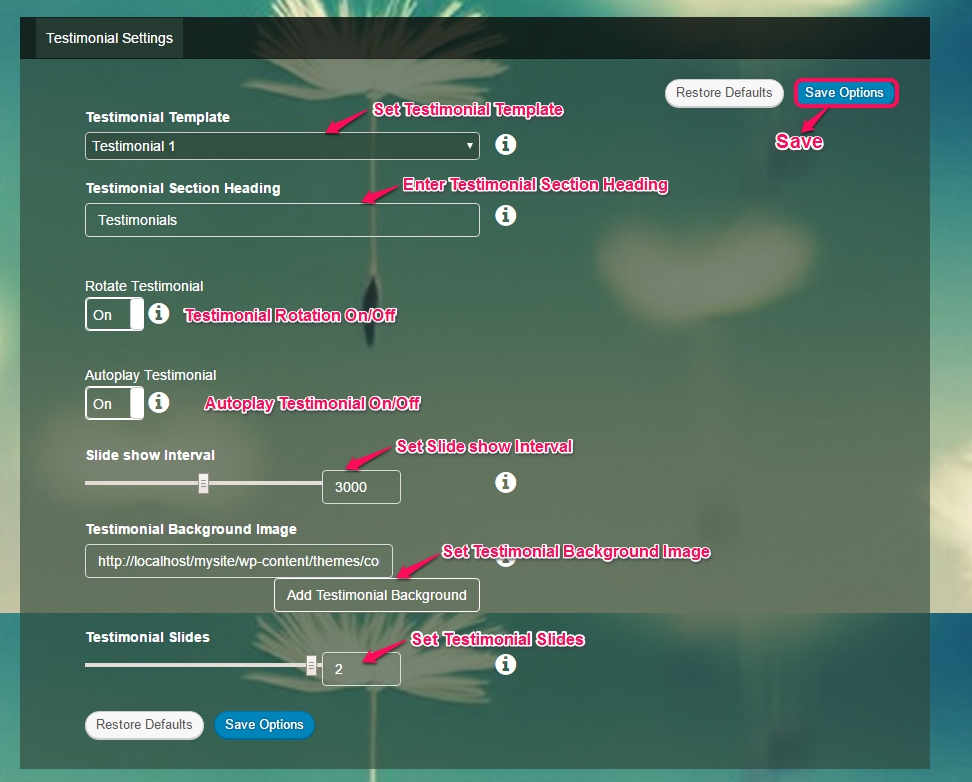
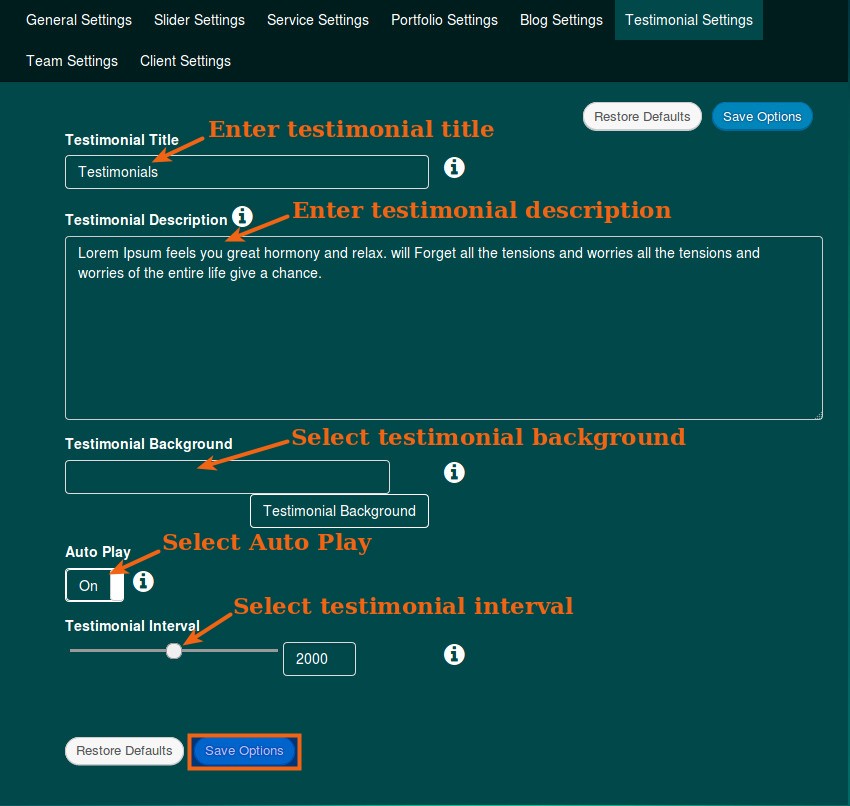
9.1 Customize Explora Testimonial Section
You can customize Explora Testimonial Section in Theme Options Settings.
Go to Admin Dashboard → Appearance → Theme Options → Testimonial Option.
In Testimonial Option, you can set
- Set Testimonial Template
- Testimonial Title
- Testimonial Description
- Set Background Image
- Testimonial Interval
- Set AutoPlay
- Testimonial Slider Show
Please follow below image for Quick Testimonial Settings.
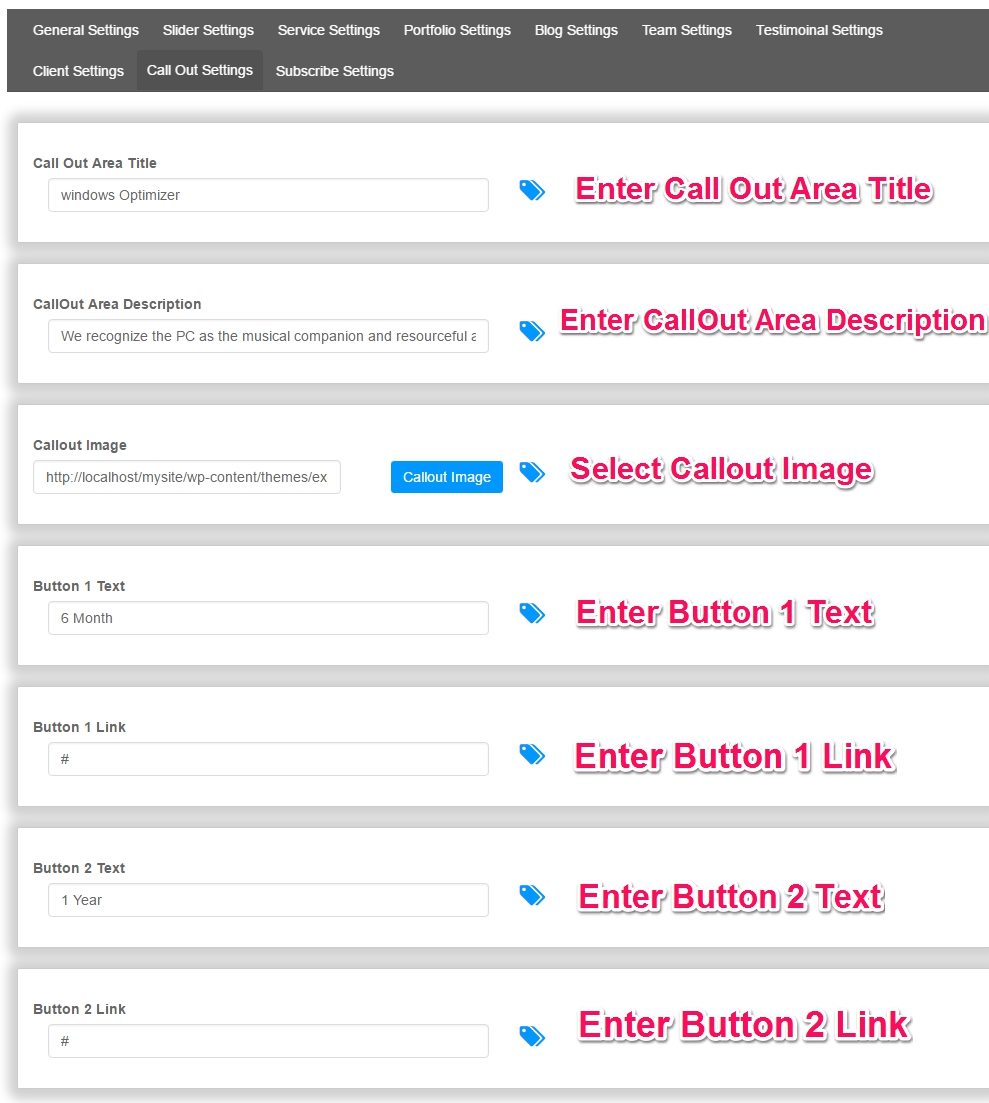
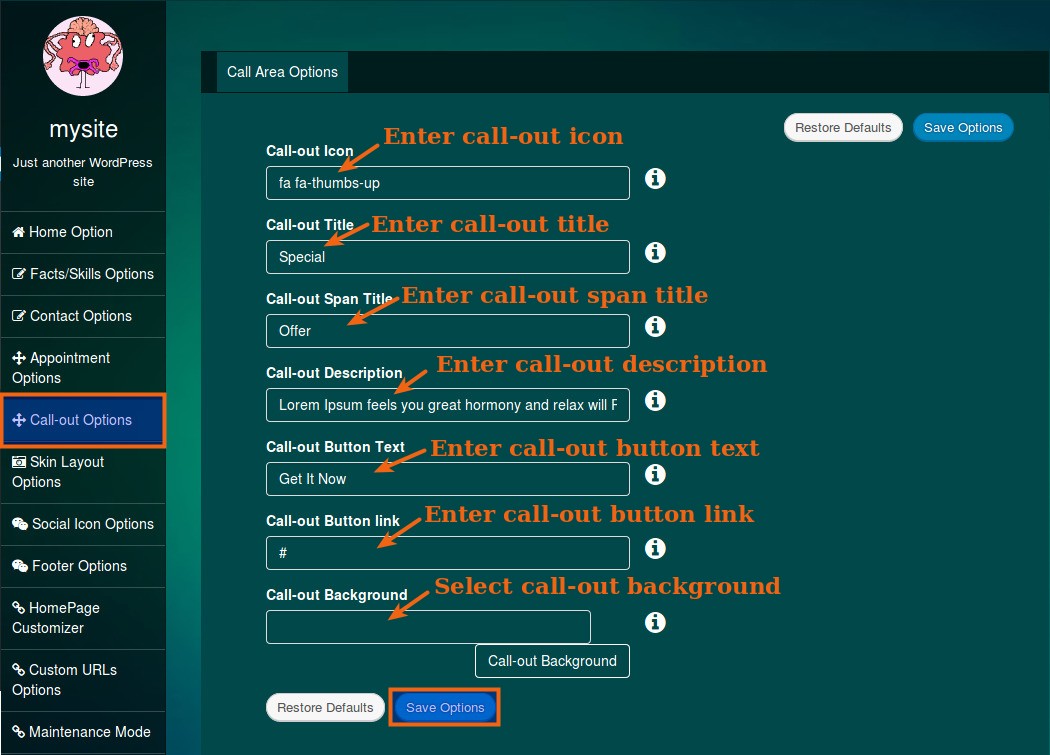
10. Callout Setting
You can customize Callout in Theme Options Settings.
Go to Admin Dashboard → Appearance → Theme Options → Callout Option.
In Callout Settings, you can set
- Set Call Out Area Title
- Set CallOut Area Description
- Set Callout Image
- Set Button 1 Text
- Set Button 1 Link
- Set Button 2 Text
- Button 2 Link
Please follow below image for Quick Callout Settings.
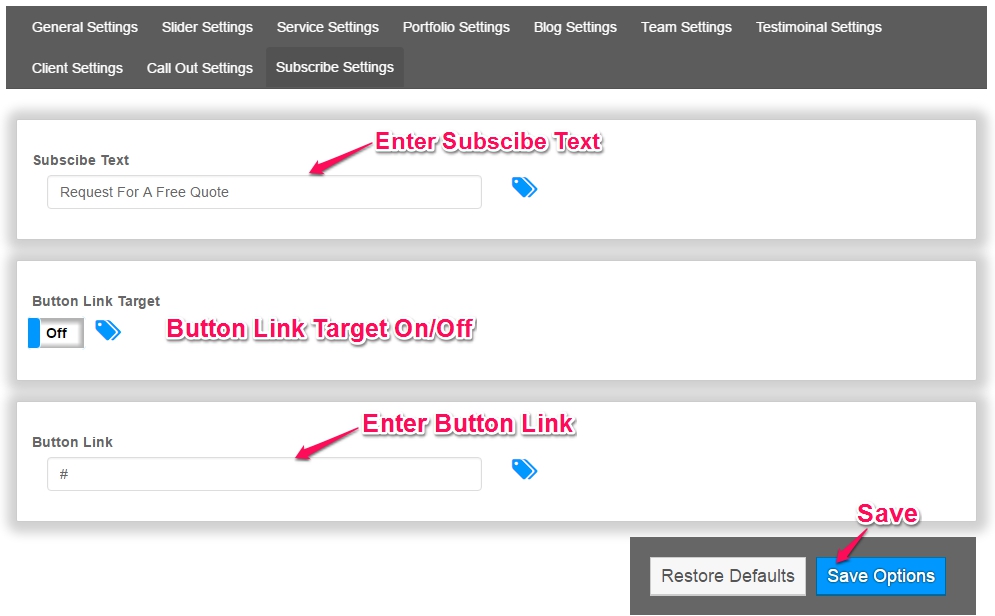
11. Explora Subscriber
You can customize Subscriber in Theme Options Settings.
Go to Admin Dashboard → Appearance → Theme Options → Subscribe Setting.
In Subscriber Option, you can set
- Set Subscribe Text
- Set Button Link Target ON/OFF
- Set Subscribe Button Link
Please follow below image for Quick Subscriber Settings.
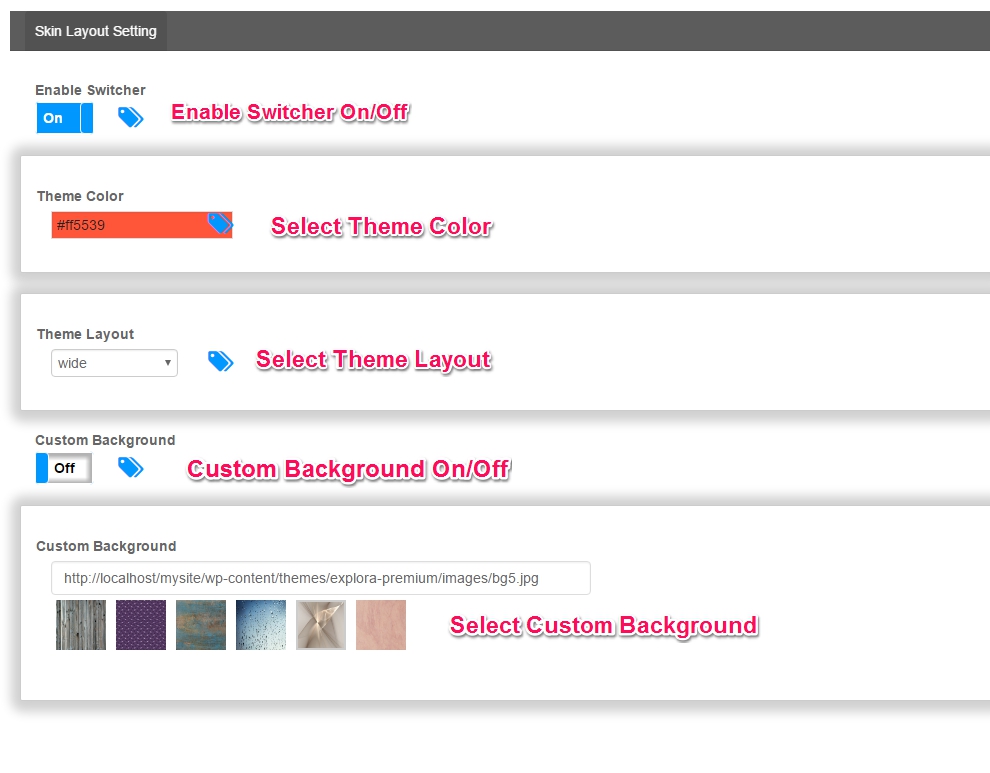
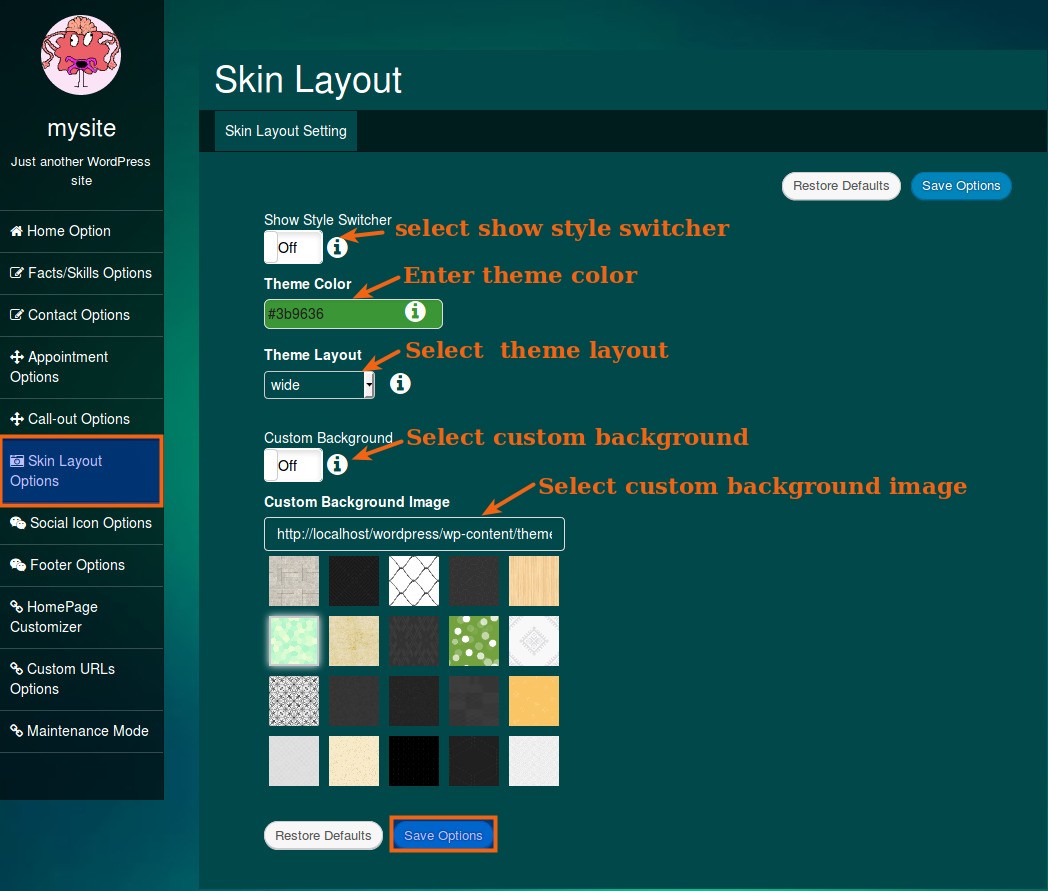
12. Skin Layout Setting
You can customize Skin Layout Setting in Theme Options Settings.
Go to Admin Dashboard → Appearance → Theme Options → Skin Layout Option.
In Skin Layout Setting, you can set
- Set Theme Color
- Set Theme Layout
- Set Custom Background On/Off
- Set Background Image
Please follow below image for Quick Skin Layout Settings.
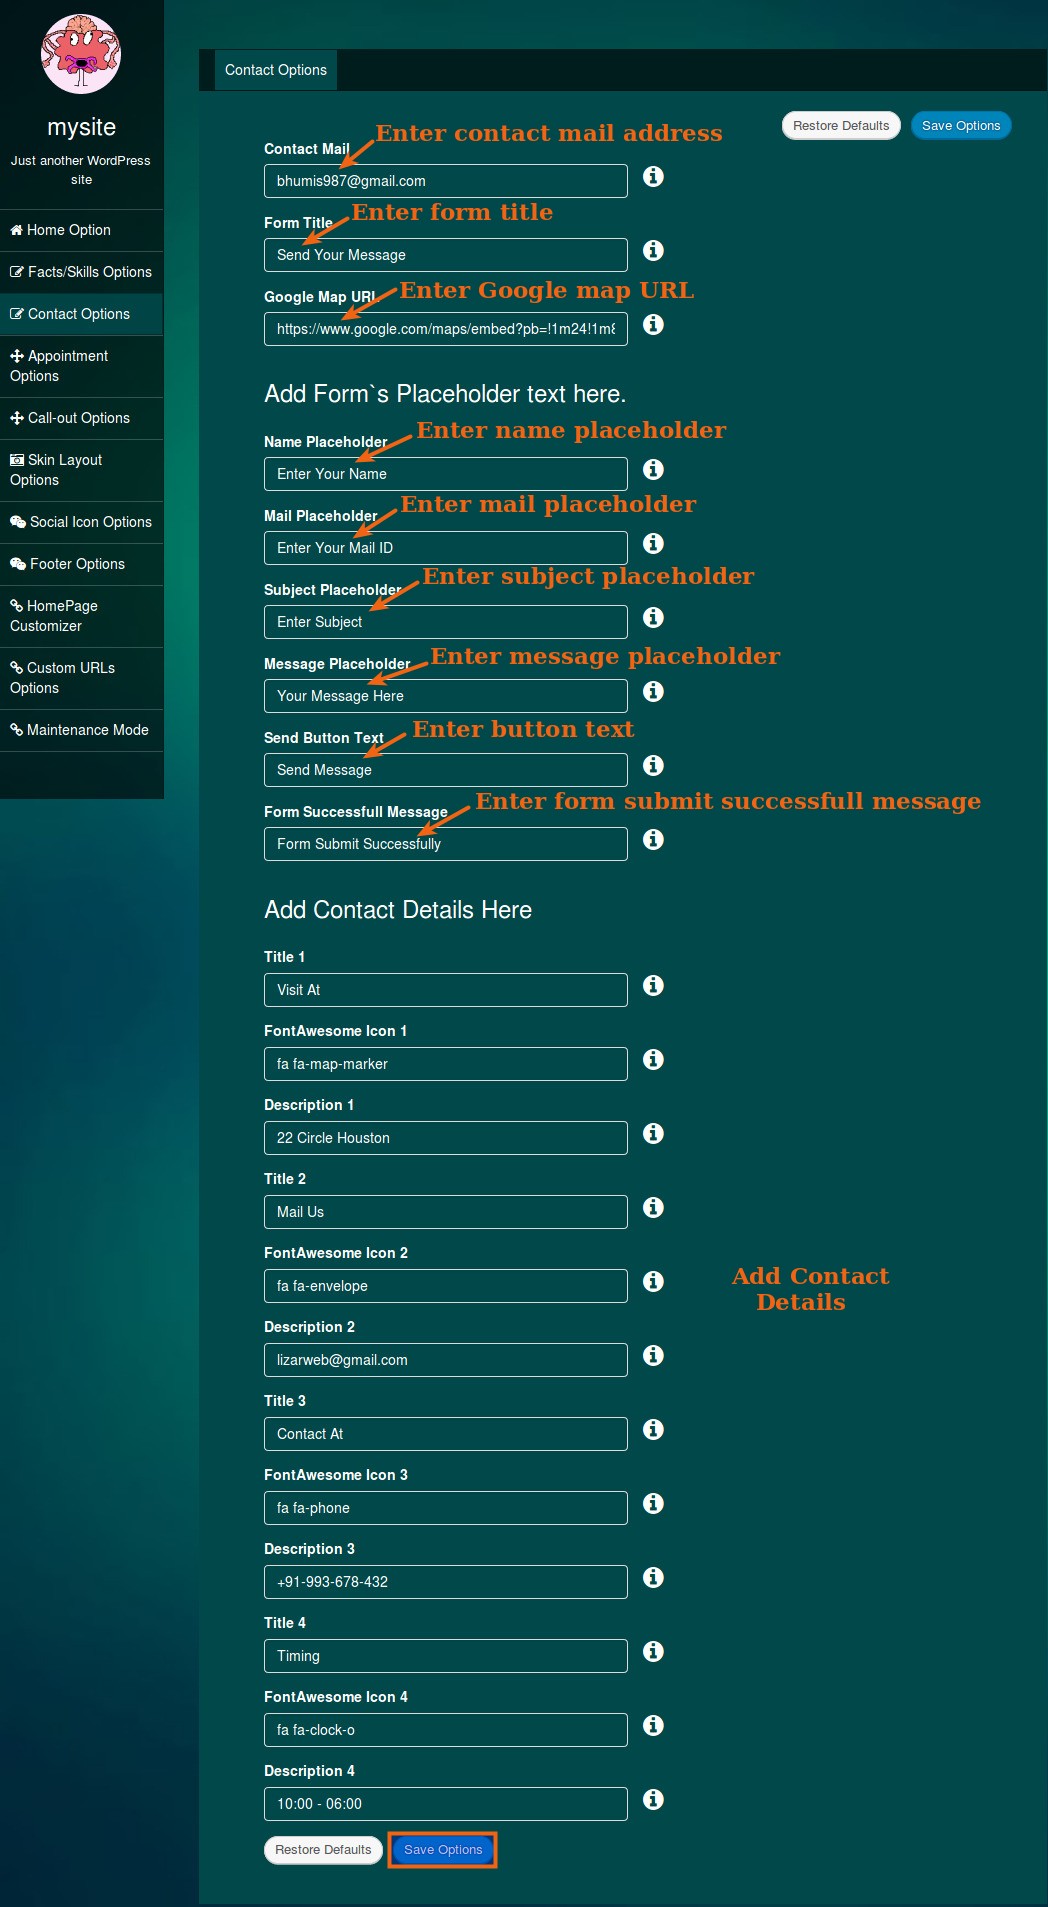
13. Contact Setting
You can customize Contact in Theme Options Settings.
Go to Admin Dashboard → Appearance → Theme Options → Contact Option.
In Contact Settings, you can set
- Set Contact Form Title
- Set Form Submit Message
- Add Placeholder Setting(Name, Email, Contact, Subject, Message)
- Set Submit Button
- Set Site Name/ Title
- Set Contact Icon 1, Contact Icon 2, Contact Icon 3
- Set Contact Details 1, Contact Details 2, Contact Details 3
- Google Map Embedded URL
Please follow below image for Quick Contact Settings.

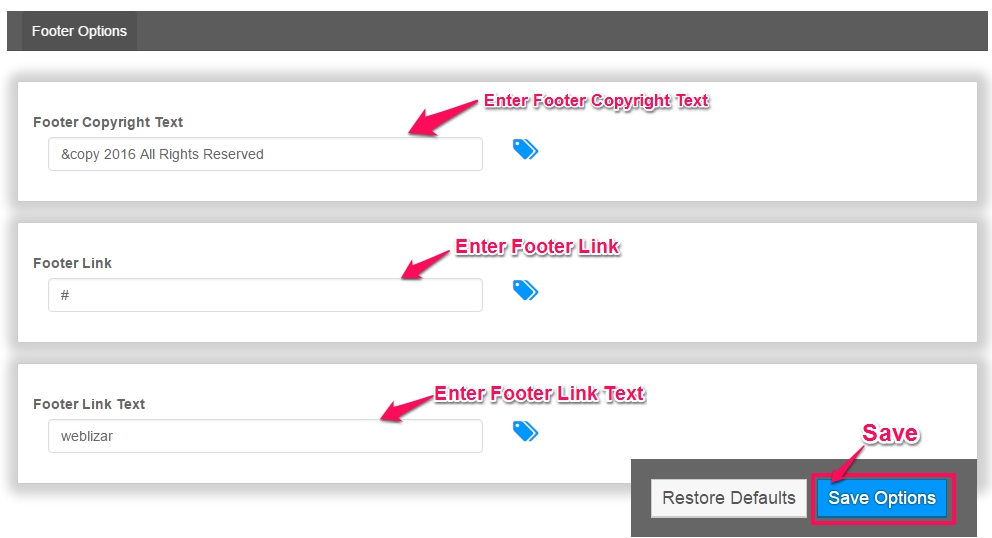
14. Footer Setting
Theme Footer have two Parts.
- Widget Area
- Custom Footer Bar
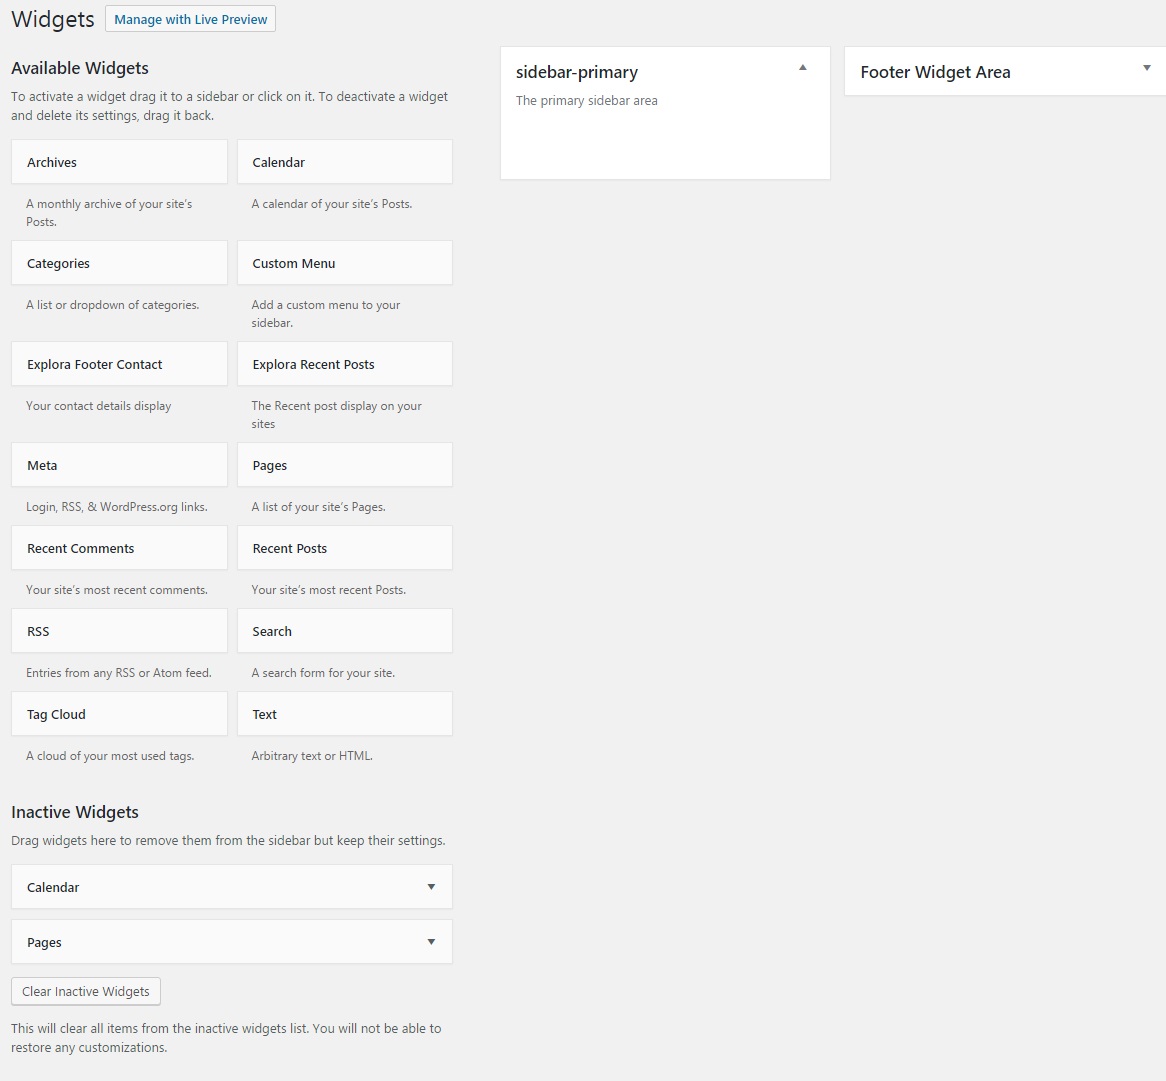
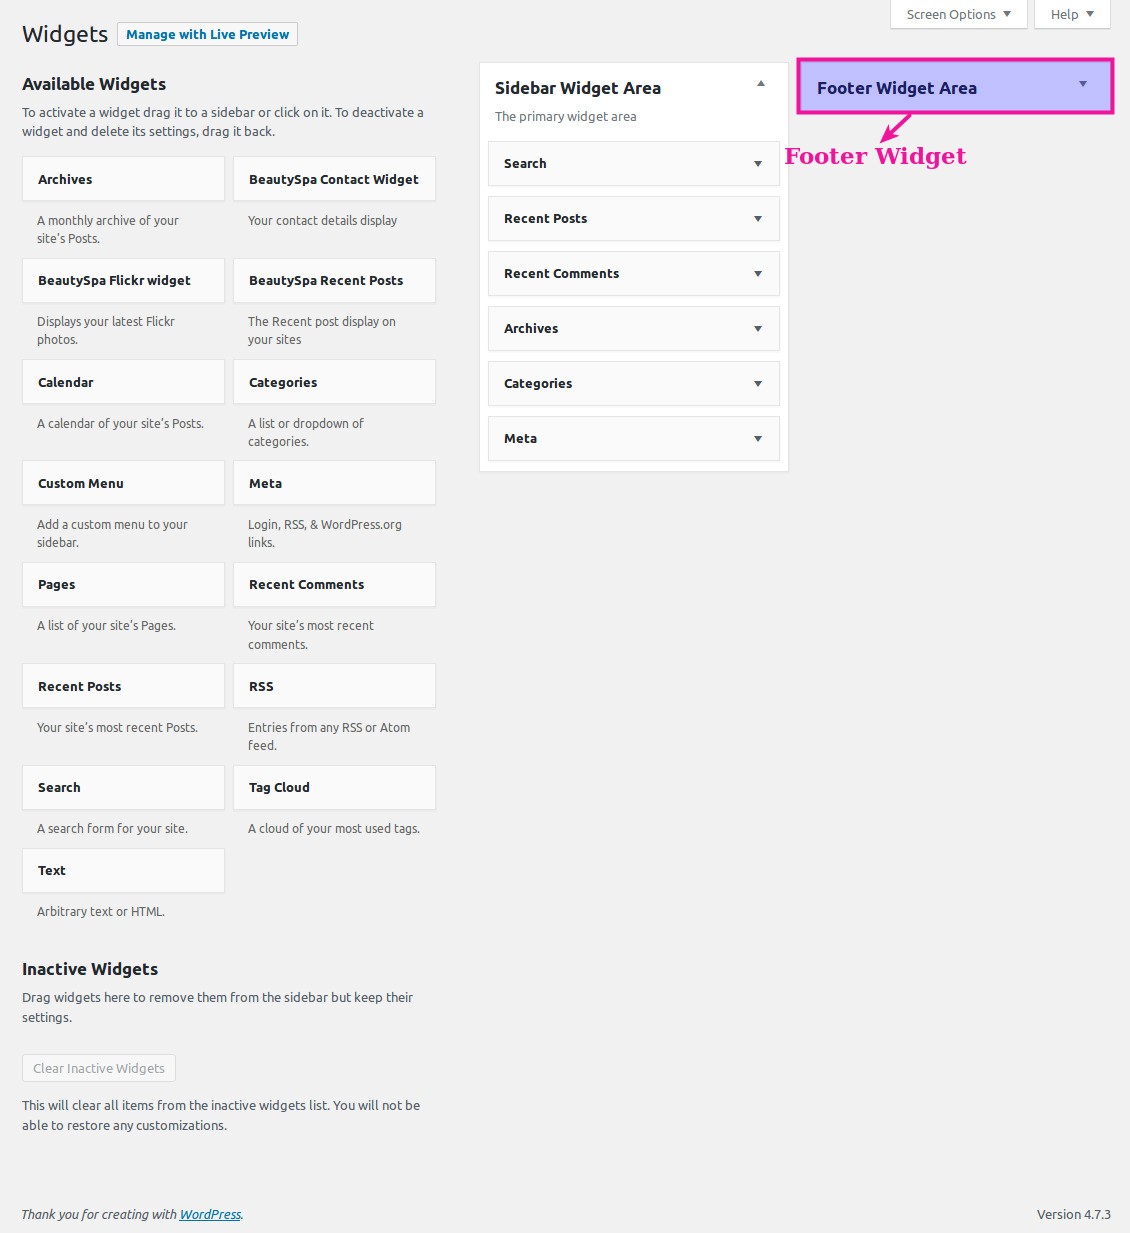
14.1 Widget Area
Theme Footer Widget Area have default Widgets.
Please go to Admin Dashboard → Appearance → Widgets.
And Drag-Drop Widget to Footer Widget Area to add Footer Widget Area.
Please follow below image for Quick Settings.
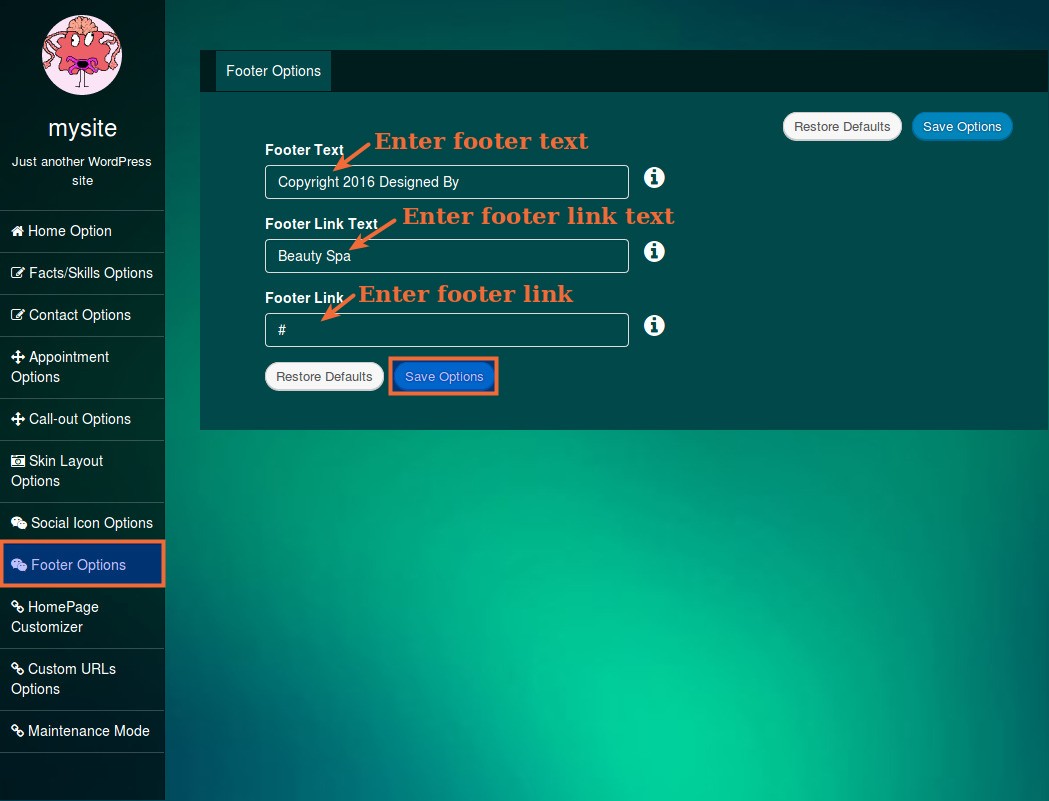
14.2 Custom Footer Bar
In custom Footer Bar there is two part
Social Icon Can be Customize from Social Media Options.
Please go to Admin Dashboard → Appearance → Theme Options → Footer Options.
In Footer Options Settings, following settings can be customized
- Set Footer Copyright Text
- Set Footer Link’s Text
- Set Footer Link
Please follow below image for Quick Footer Settings.
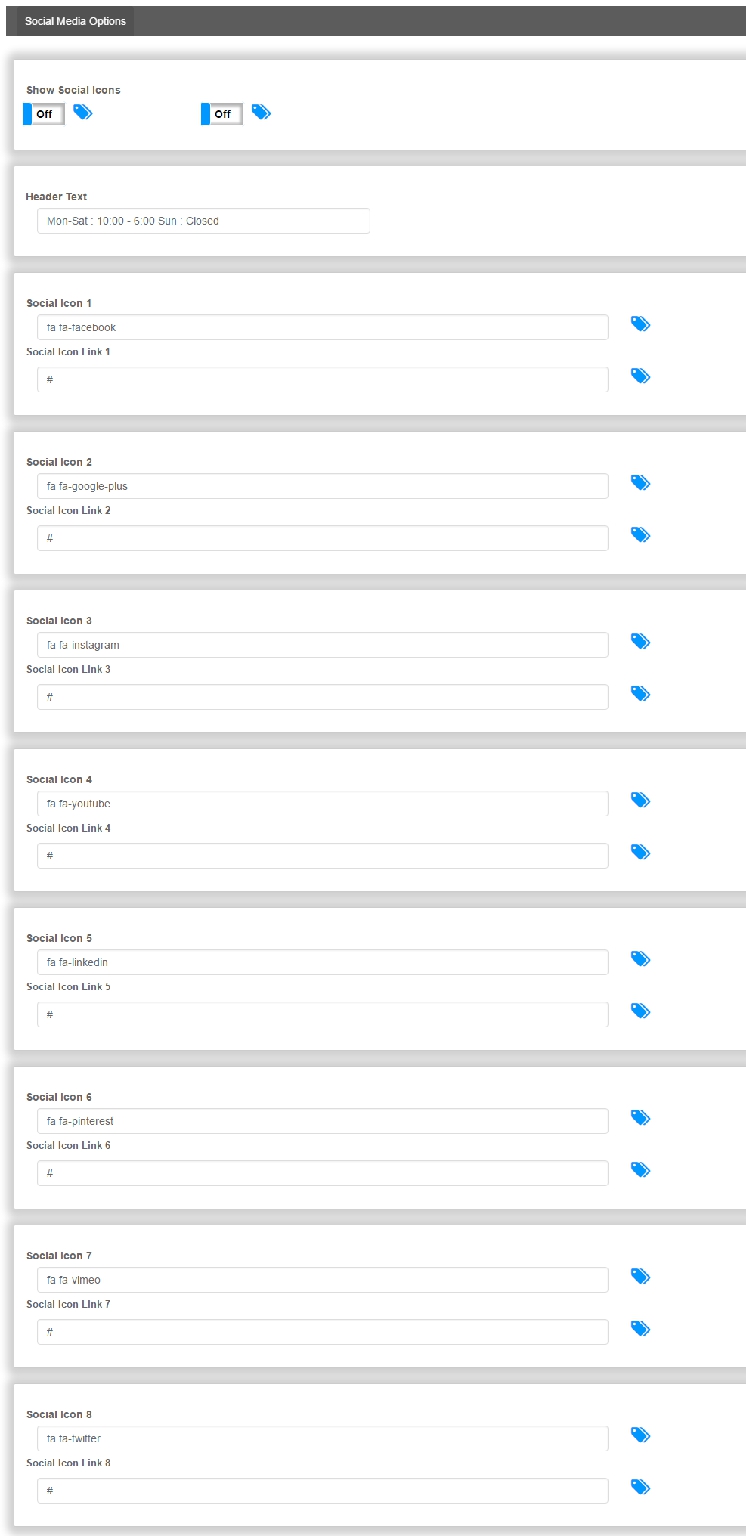
15. Social Media Options
You can customize Social Icon Setting in Theme Options Settings.
Go to Admin Dashboard → Appearance → Theme Options → Social Option.
In Social option, you can set
- Social Icon Link Setting
Please follow below image for Quick Social Icon Settings.
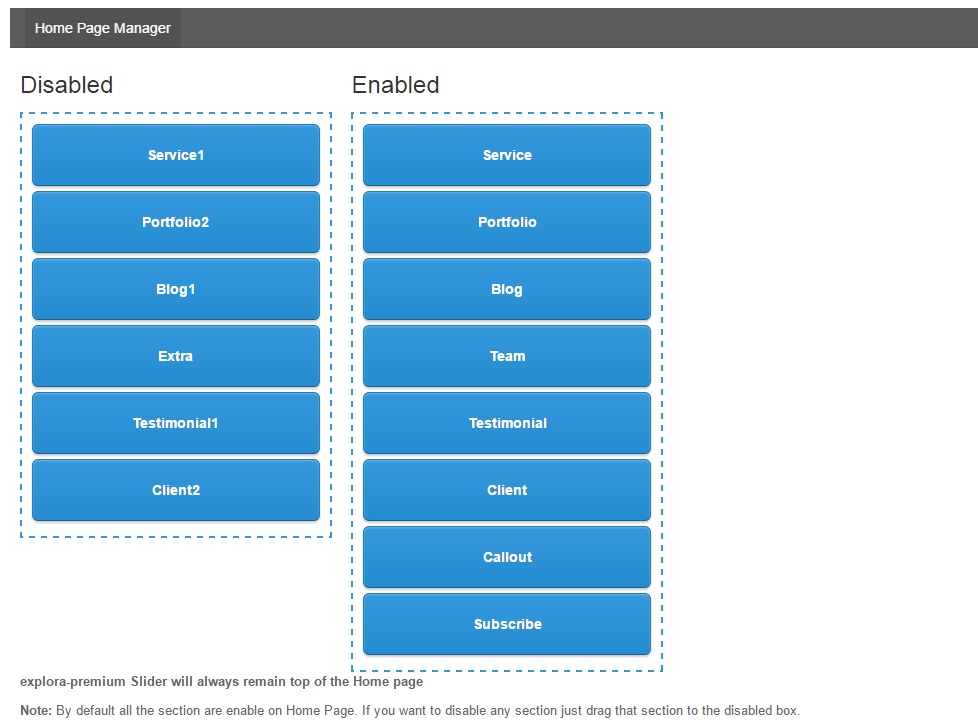
16. Home Page Manager
Using Home Page Manager settings, sections on Home Page can be remove and move.
The Explora slider is always on the Top.
To access Home Page Customizer go to Admin Dashboard → Appearance → Theme Options → Home Page Manager.
Here section can be enabled/disable and move using DRAG N DROP.
Please follow below image for Quick Settings.
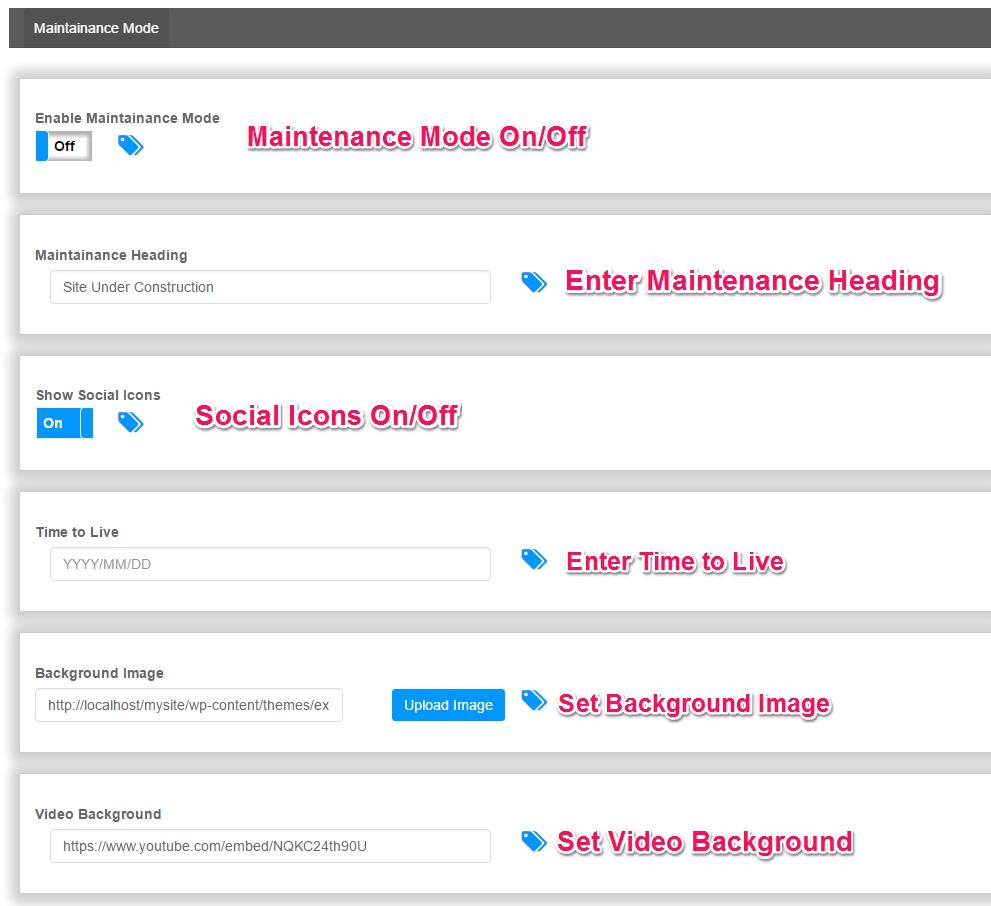
17. Maintenance Mode
Explora provides an option to use your own Maintenance Mode.
You can Enable/Disable Maintenance Page at Admin Dashboard → Appearance → Theme Options → Maintenance Mode.
In Maintenance Mode Settings, you can set
- Set Enable Maintainance Mode
- Set Maintainance Heading
- Show Social Icons ON/OFF
- Set Time to Live
- Set Background Image
- Set Video Background
Please follow below image for Quick Maintenance Settings.
How To Add Embedded Video Url
For a quick view, please follow below image.

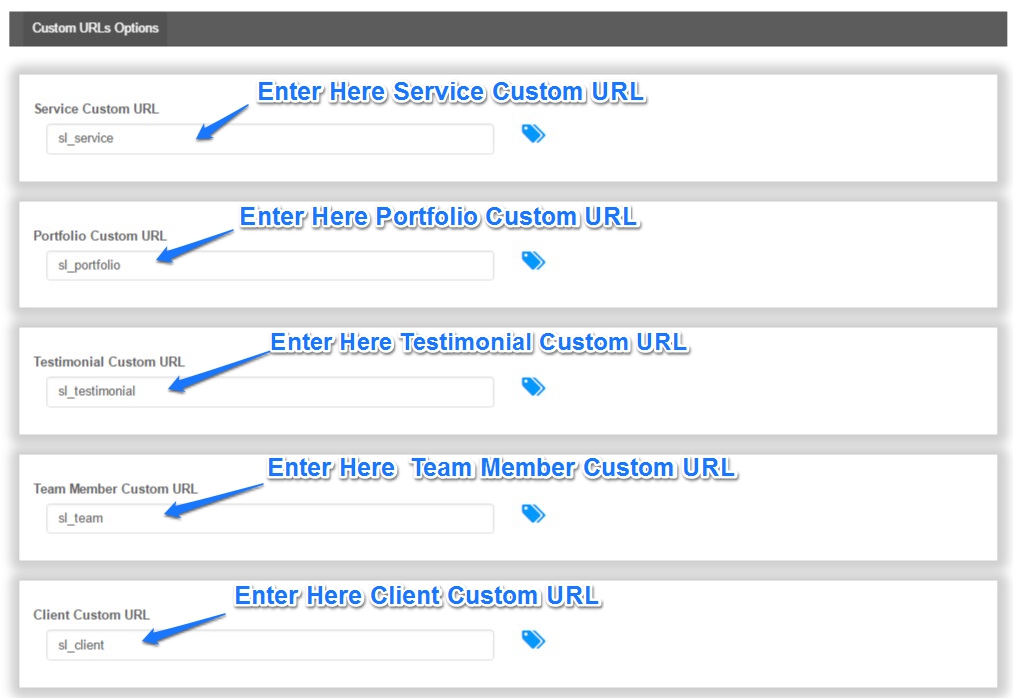
18. Custom URL Setting
Explora provides an option to use your own custom URL for custom post types.
You can use custom URLs at Admin Dashboard → Appearance → Theme Options → Custom URL’s Options.
You have to refresh Permalinks to apply these changes. Please change your URLs here, save the change. Then go to Admin Dashboard → Settings→ Permalinks.
Here change the permalink to another format and save. Now revert to your permalink type and again save.
In Custom Settings, you can set
- Add Portfolio Custom URL
Please follow below image for Quick Settings.

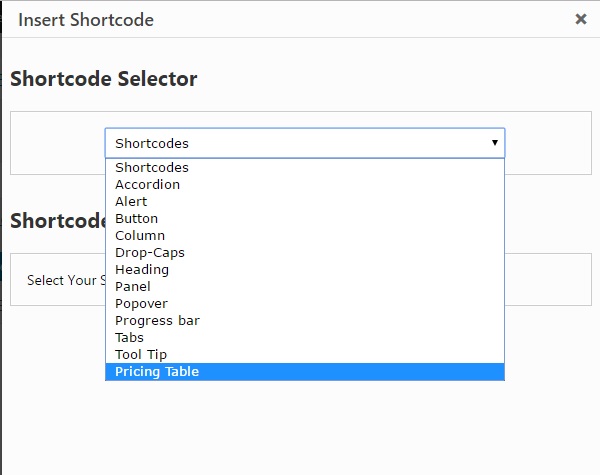
19. Short-codes
Theme provide many shortcodes.
You can see them in below Image.
Click on Shortcode Button → Select Short-code type from Option → Provide Relative Information → Click on insert
Please follow below Images.

To use shortcode please follow Image.

It’s simple to use.
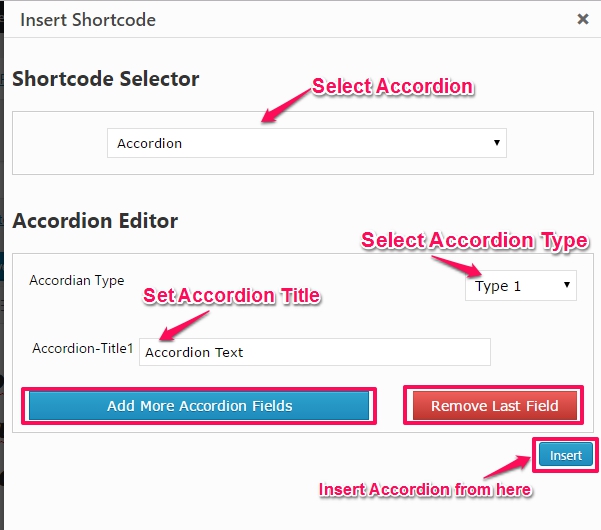
19.1 Accordion

After clicking on insert button You found shortcode, As given in below image.

copy this shortcode and paste in a page where you want to show shortcode.
See Demo Here http://demo.weblizar.com/explora-premium/shortcodes/accordions/
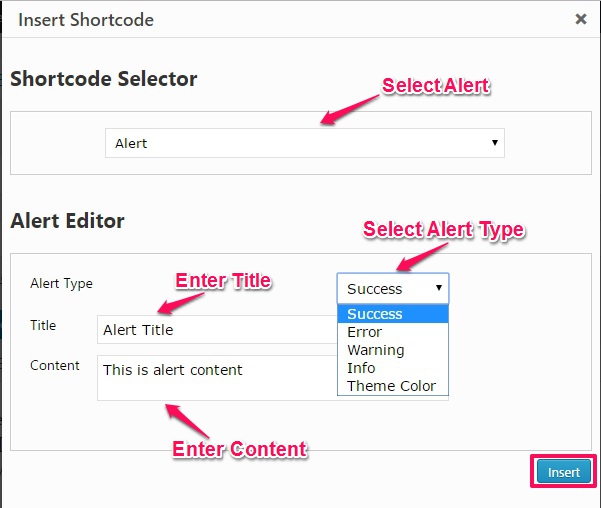
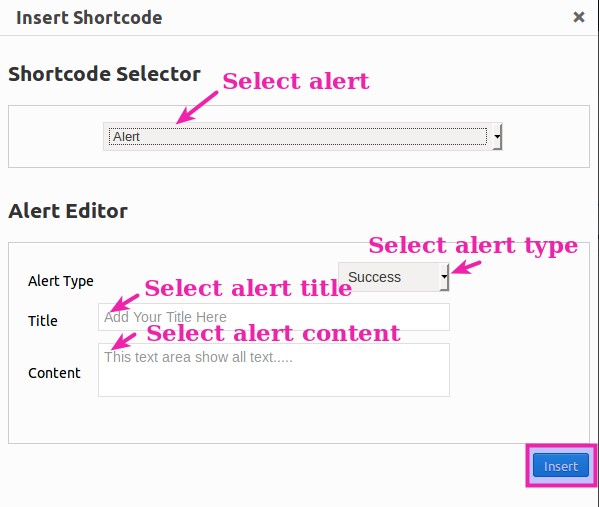
19.2 Alert

See Demo Here http://demo.weblizar.com/explora-premium/shortcodes/alerts/
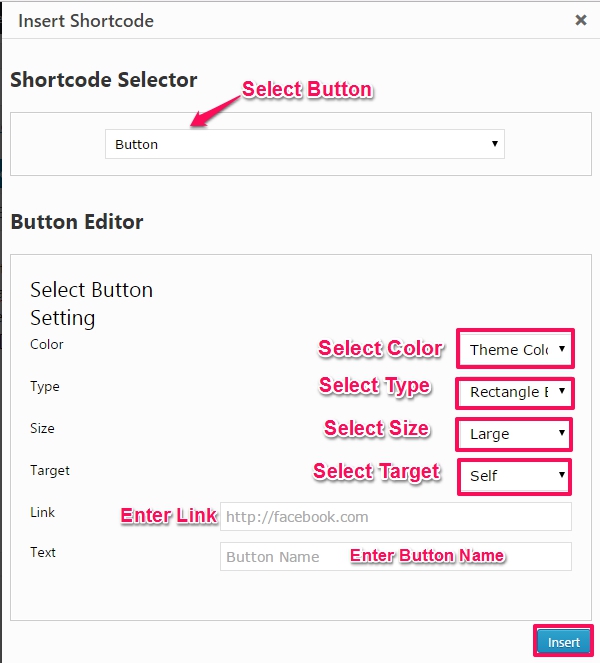
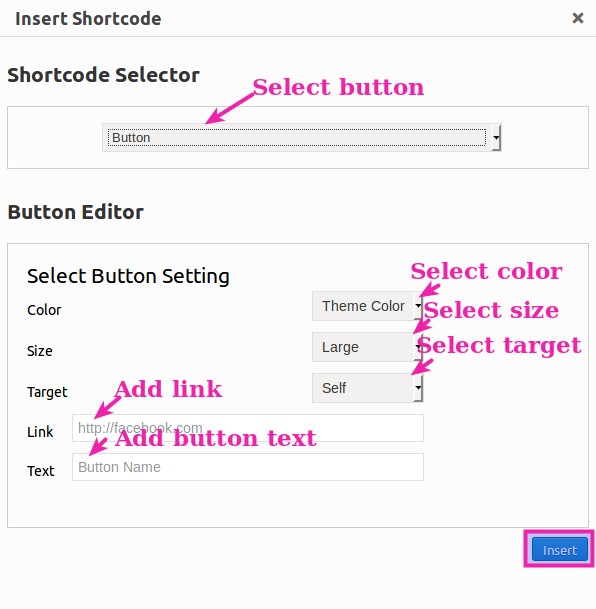
19.3 Button

See Demo Here http://demo.weblizar.com/explora-premium/shortcodes/buttons/
19.4 Column
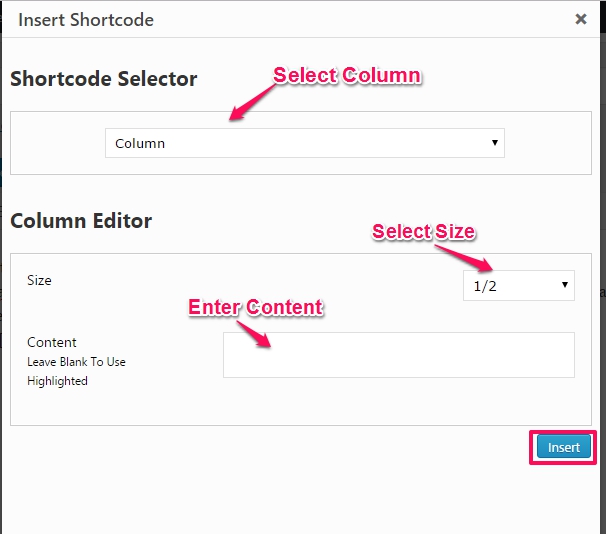
See Demo Here http://demo.weblizar.com/explora-premium/shortcodes/columns/
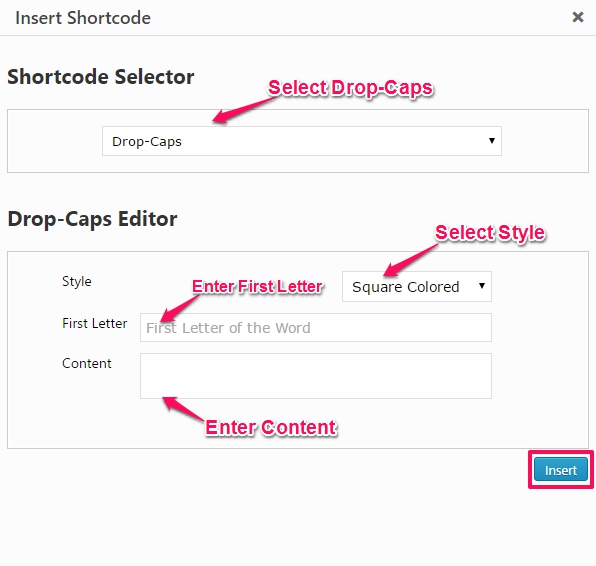
19.5 Drop-Caps

See Demo Here http://demo.weblizar.com/explora-premium/shortcodes/drop-caps/
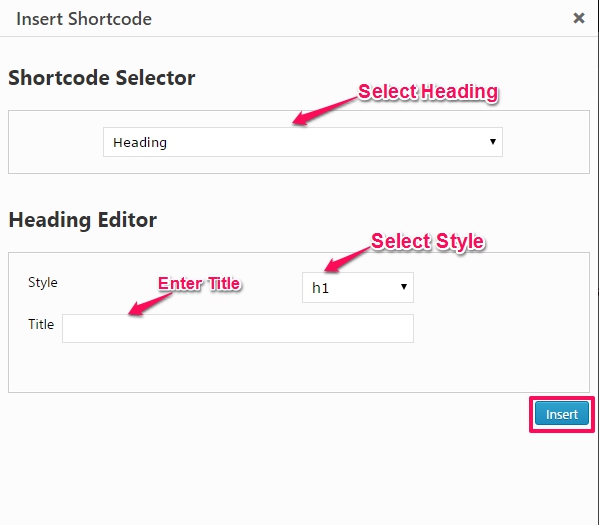
19.6 Heading

See Demo Here http://demo.weblizar.com/explora-premium/heading/
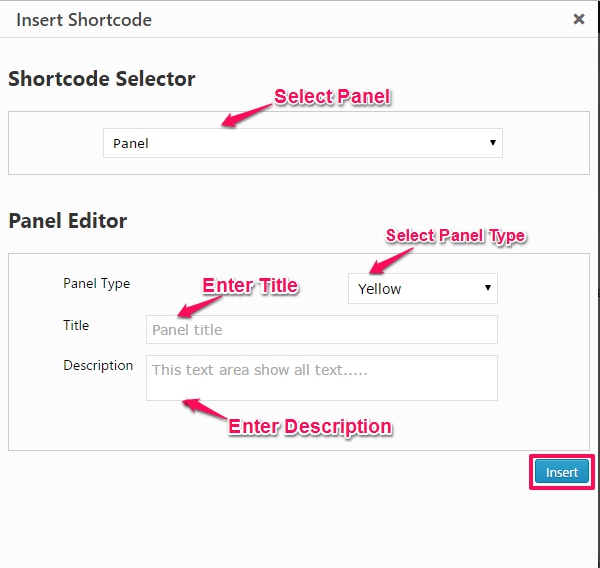
19.7 Panel

See Demo Here http://demo.weblizar.com/explora-premium/shortcodes/panels/
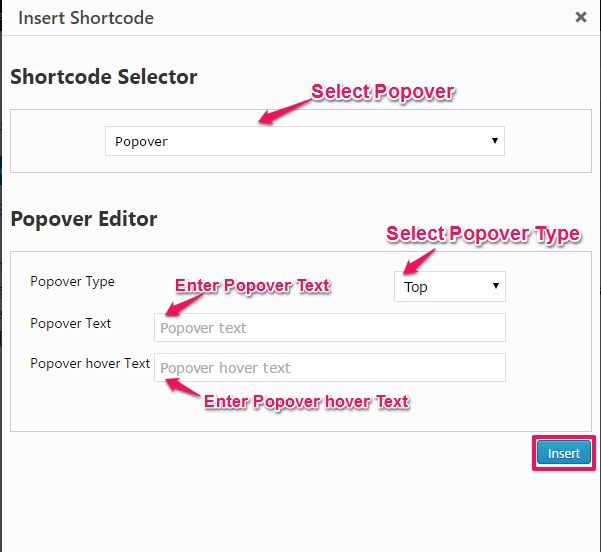
19.8 Popover

See Demo Here http://demo.weblizar.com/explora-premium/shortcodes/popovers-tooltip/
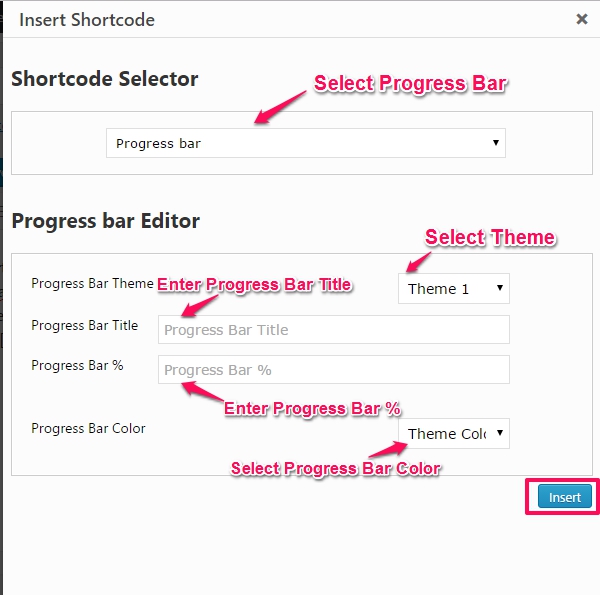
19.9 Progress Bar

See Demo Here http://demo.weblizar.com/explora-premium/shortcodes/progress-bars/
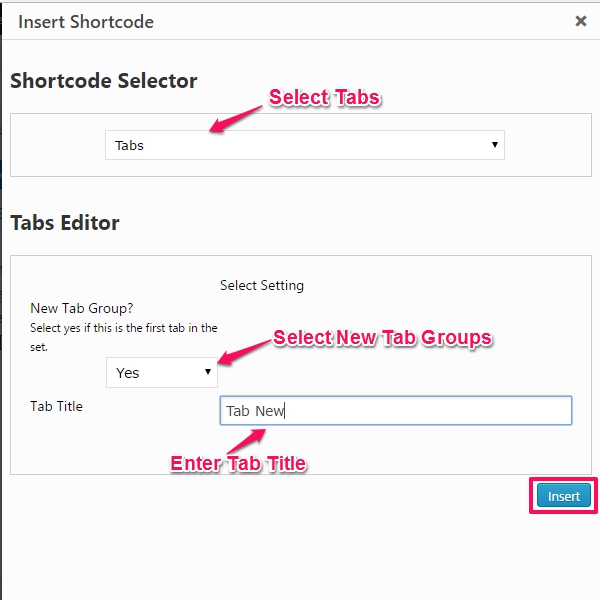
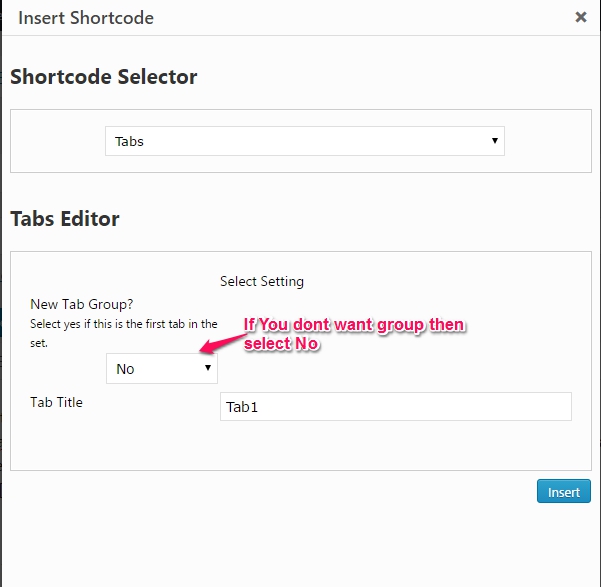
19.10 Tabs


See Demo Here http://demo.weblizar.com/explora-premium/shortcodes/tabs/
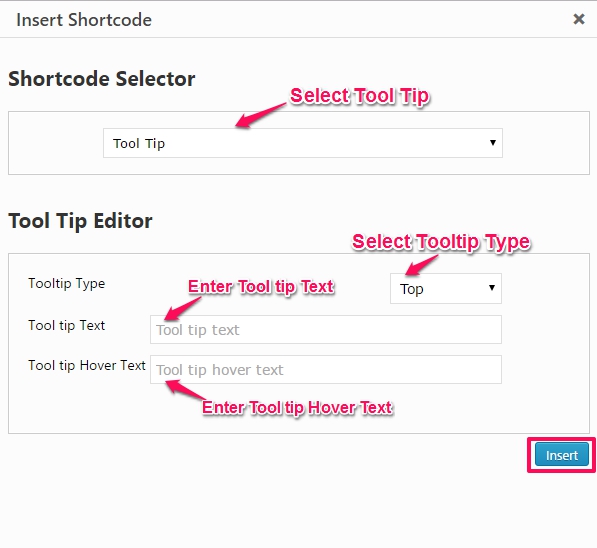
19.11 Tool Tip

See Demo Here http://demo.weblizar.com/explora-premium/shortcodes/popovers-tooltip/
19.12 Pricing Table
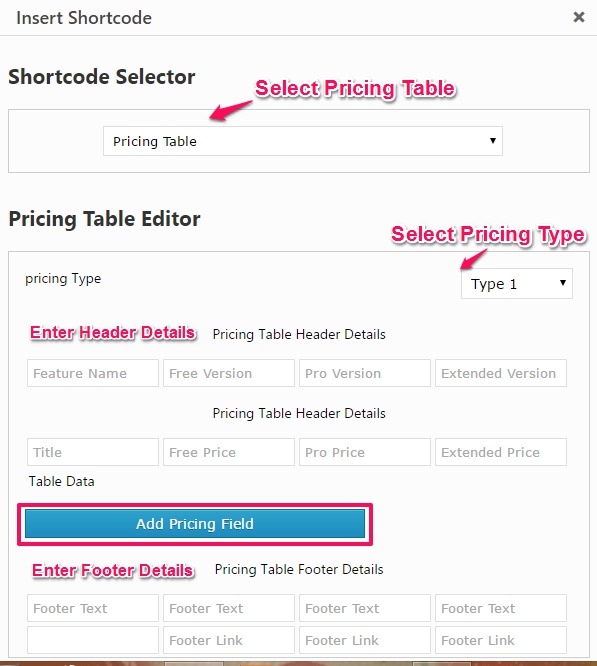
1. Add Feature Name Here
2. Add Feature Value/Name Here
3. Select Yes/No For Feature Value/Name
4. Add Pro Value Here
5. Select Yes/No For Pro Value
6. Add Extended Value
7. Select Yes/No For Extended Value
See Demo Here http://demo.weblizar.com/explora-premium/pricing-table/
15 Oct,
2016
2.1.4
Corporal Premium Documentation
Weblizar Docs 0 CommentCorporal Premium Theme is Responsive, Clean, Business Theme which is built with Bootstrap, FontAwesome with all Working Components Likes Contact Form, Portfolio, Blog and Much More. Corporal is Really Good Choice for Business, Portfolio, and Personal Web Portals.
Try Corporal Premium Theme: DEMO HERE
Key Contents
2.1 General Settings
2.1.1 Enable Front Page
2.1.2 Add Logo
2.1.3 Add Favicon
2.1.4 Breadcrumb Background Image
2.1.5 Google Analytic Code & Custom CSS Editor
4.1.1 Slider Type
4.1.2 Welcome Video Background
5.1 Customize corporal Service
6.1 Customize Corporal Portfolio
6.1.1 Column Type Portfolio
6.1.2 Carousel Type Portfolio
7.1 Customize Corporal Testimonial Section
9.1 Customizing Corporal Client Section
11. Corporal Members
12.1 Customize Corporal Fun Facts
13. Corporal Skills
13.1 Customizing Corporal Skills
14 Customizing Corporal subscription
16. Callout Setting
17. Footer Setting
17.1 Widget Area
17.2 Custom Footer Bar
19. Contact Setting
20. Template Setting
22. Home Page Customizer Setting
25. Theme Templates
26. Short-codes
26.1 Accordion
26.2 Alert
26.3 Button
26.4 Column
26.5 Drop-Caps
26.6 Heading
26.7 Panel
26.8 Popover
26.9 Progress Bar
26.10 Tabs
26.11 Tool Tip
Now, we are going through installation, configuration and publish theme. Follow the step by step guide:
1. Theme Installation
First, download your theme package from your Weblizar Amember Account.
Upload Theme package zip folder using theme installer wordPress option Otherwise Any FTP (FillZilla)
We recommend you upload theme zip package using FTP( FillZill/Bitwise), In your host-server-directory\wp-content\themes\
After that Activate theme into WordPress site Admin Dashboard -> Appearance ->themes.
Now the theme is successfully installed on our site, step up to the next step.

2. Setup Home Page
Corporal theme home page has 13 different sections. These sections can be customized with the theme options page.
You can access theme options page at Admin Dashboard → Appearance → Theme Options.
A look of Theme Options page is Here.

Now all settings are explained one by one.
2.1 General Settings
In this section, you can enable front-page, add a logo , logo size, Site Favicon, add a background image to breadcrumbs, add custom CSS, add google analytic code etc.
Please go to Admin Dashboard → Appearance → Theme Options → Home Options →General Settings.
Please refer below image for Quick Settings.

2.1.1 Enable Front-page
To Enable front-page go to Admin Dashboard → Appearance → Theme Options → General Settings.
And slide Home-Page or Custom Page to ON.
2.1.2 Add Logo
To add Logo go to Admin Dashboard → Appearance → Theme Options → General Settings.
Now click on Custom Logo Button and upload your logo image or select from Media Library.
Follow image
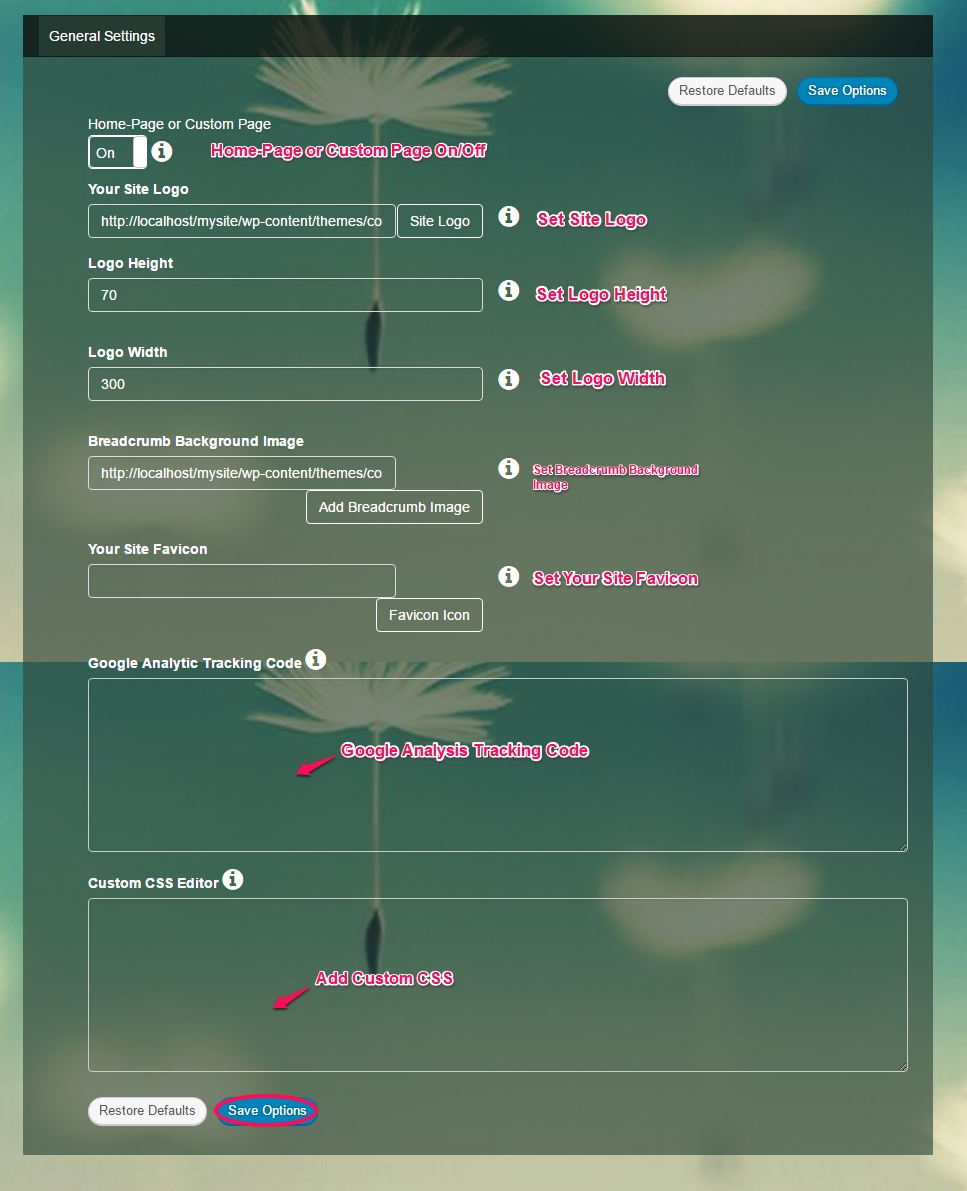
You can further customize the logo’s height and width from Logo Height and Logo Width settings.
NOTE : Logo height is Set to 70px for fixed header, if fixed header is enabled and when you scroll the page, Logo will set to 70px height in fixed menu.
2.1.3 Add Favicon
To add Favicon go to Admin Dashboard → Appearance → Theme Options → Home Options → General Settings.
Now click on Favicon Icon Button and upload your logo image or select from Media Library.
2.1.4
To add Breadcrumb Background Image go to Admin Dashboard → Appearance → Theme Options → General Settings.
And Click on Upload image in Header Background Image setting.
2.1.5 Google Analytic Code & Custom CSS Editor
Google Analytic Code and custom CSS can be added to theme using Theme’s General Settings.
Note:Please add Google Analytic Code without script tag. Please don’t use >, < like symbol in custom CSS editor.
3. Corporal Header
The theme provides 4 templates for Header.
Go to Admin Dashboard → Theme Option → Header Option and fill related details.
For a quick view, please follow below image.
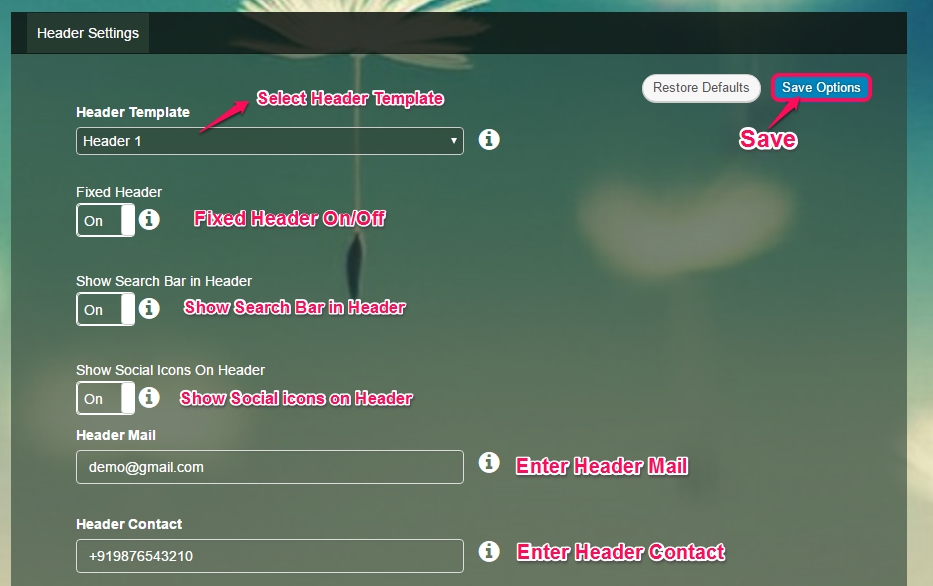
3.1 Fixed Header
To Fixed Header, slide Fixed Header button to ON and save the changes.
3.2 Search Bar in Header
To add Search Bar in Header, slide Show Search Bar in Header button to ON and save the changes.
3.3 Show Social icon on Header
To add Social icon in Header, slide Show Social icon on Header button to ON and save the changes.
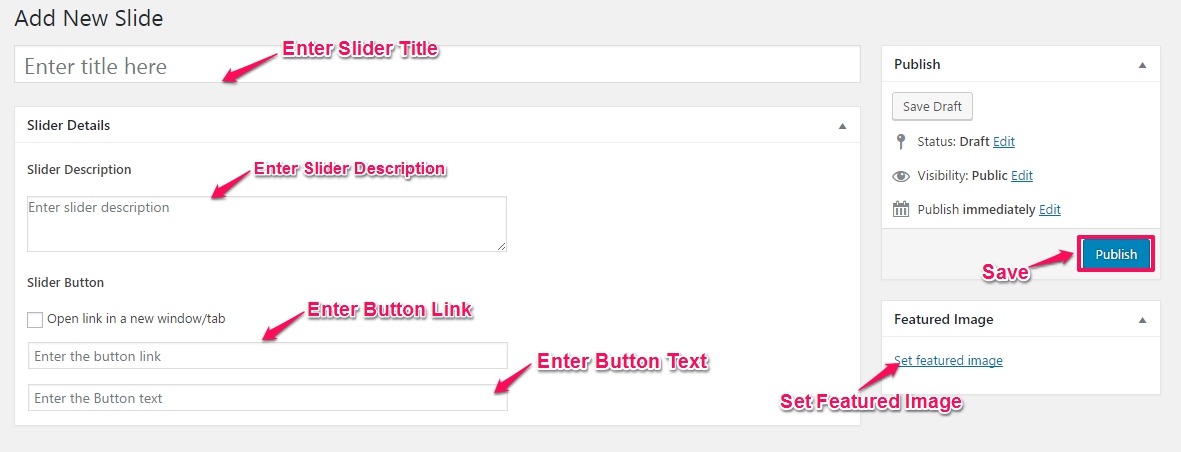
4. Corporal Slider
Add a slide to Corporal Slider.
Go to Admin Dashboard → Corporal Slider → Add New Slide and fill related details.
For a quick view, please follow below image.
4.1 Customize corporal Slider
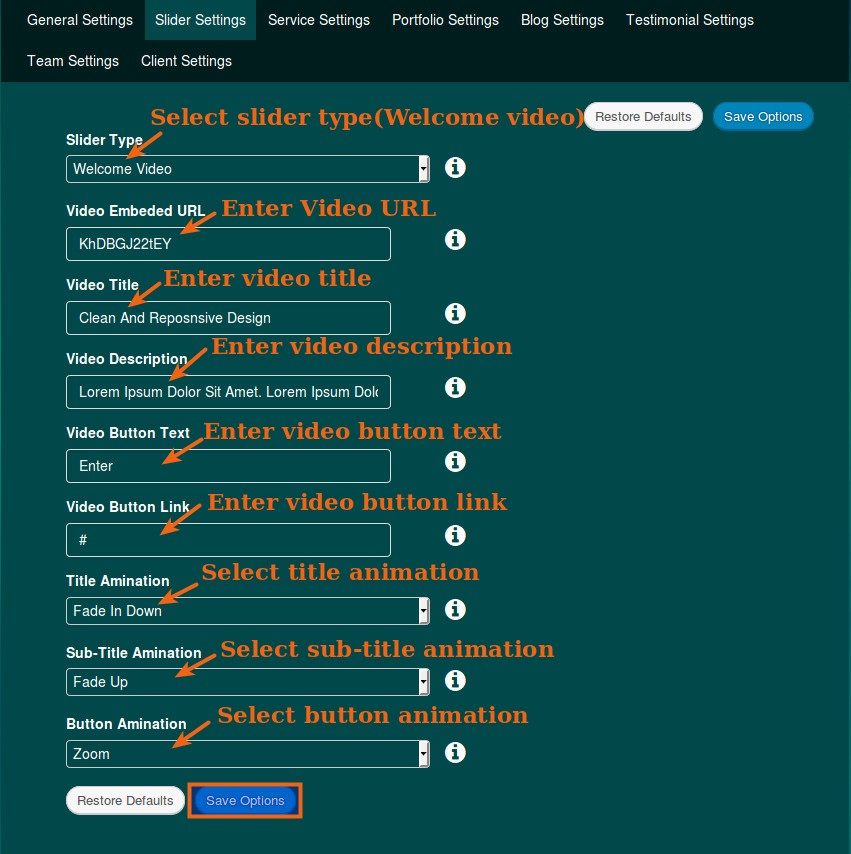
Theme Slider have Four types. In which three is image slider and one is video slider.
1. Slider Type
2. Welcome Video Background
4.1.1 Slider Type
You can customize Corporal Slider in Theme Options Settings.
Go to Admin Dashboard → Appearance → Theme Options → Slider Option.
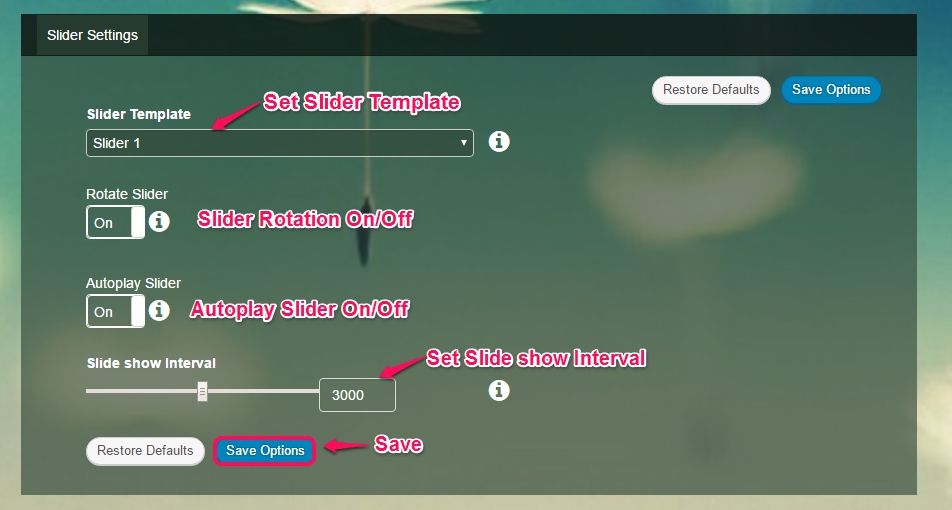
In Slider Settings, you can set
- Set Slider Template(Slider 1, Slider 2 , Slider 3)
- Set Slider Rotation
- Set interval time.
- Set Autoplay
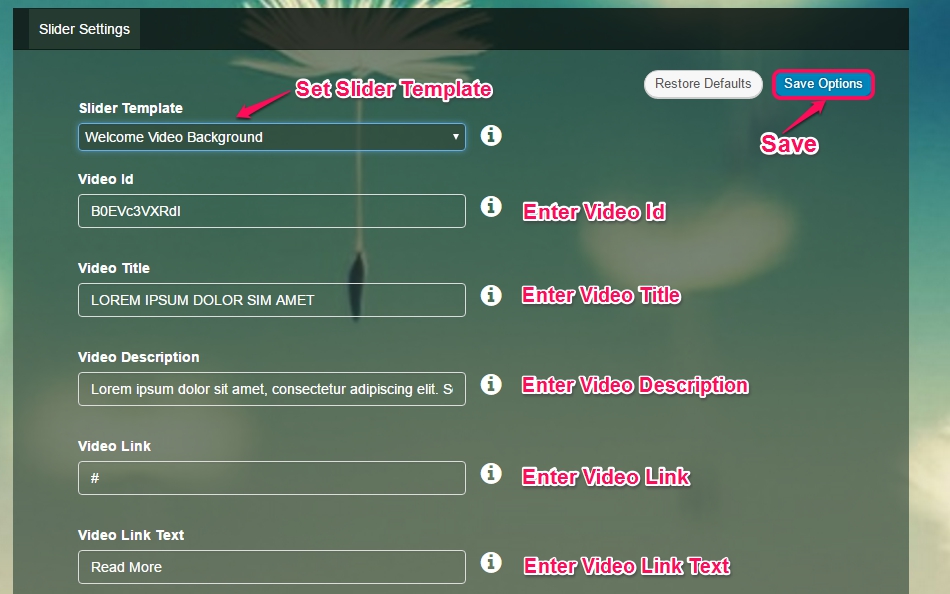
4.1.2 Welcome Video Slider
In Welcome Video Settings, you can set
- Set Video Id
- Set Video Title
- Add Video Description
- Set Video Link
- Add Video Link Text
Please follow below image for Quick Slider Settings.
4.1.2.1 How To Add Embedded Video Url
For a quick view, please follow below image.

Please add this video code into video Id.
5. Corporal Services
Add Service to Corporal Services.
Go to Admin Dashboard → Corporal Service → Add New Service and fill related details.
For a quick view, please follow below image.
Note: To show services on the homepage you have to add font awesome icon if you do not add this field, Service will not show on homepage.
5.1 Customize Corporal Services
You can customize Corporal Services in Theme Options Settings.
Go to Admin Dashboard → Appearance → Theme Options → Service Option.
In Service Option, you can set
- Service Template
- Service Description
- Service Heading
- Service Column Layout
- Service To Be Shown
Please follow below image for Quick Service Settings.
6. Corporal Portfolio
Add Portfolio to Corporal Portfolios.
Go to Admin Dashboard → Corporal Portfolio→ Add New Portfolio and fill related details.
For a quick view, please follow below image.
6.1 Customize Corporal Portfolio
The Portfolio has 4 type of Templates. In which three are column type Portfolio and rest one is Carousel Type Portfolio.
1. Column type Portfolio
2. Carousel Type Portfolio
6.1.1 Column type Portfolio
You can customize Portfolio in Theme Options Settings.
Go to Admin Dashboard → Appearance → Theme Options → Portfolio Option.
In Column type Portfolio Option, you can set
- Set Portfolio Template
- Portfolio Section Heading
- Portfolio Section Description
- Set Portfolio Category
- Portfolio Column Layout
Please follow below image for Quick Portfolio Settings.
6.1.2 Carousel Type Portfolio
In Carousel Portfolio Option, you can set
- Portfolio Section Heading
- Portfolio Section Description
- Portfolio Slides
- Slideshow Interval
Please follow below image for Quick Portfolio Settings.
7. Corporal Testimonials
Add Testimonial to Corporal Testimonials.
Go to Admin Dashboard → Corporal Testimonial → Add New Testimonial and fill related details.
For a quick view, please follow below image.
7.1 Customize Corporal Testimonial Section
You can customize Corporal Testimonial Section in Theme Options Settings.
Go to Admin Dashboard → Appearance → Theme Options → Testimonial Option.
In Testimonial Option, you can set
- Set Testimonial Template
- Testimonial Section Heading
- Testimonial Slider Rotation Setting
- Testimonials Background
- Set AutoPlay
- Testimonial Slider Show
Please follow below image for Quick Testimonial Settings.
8. Corporal Blog
You can customize Blog in Theme Options Settings.
Go to Admin Dashboard → Appearance → Theme Options → Blog Option.
In Blog Option, you can set
- Set Blog Template
- Blog Section Heading
- Blog Section Description
- Set AutoPlay
- Set Rotation
- Blog Post Slide Interval
Please follow below image for Quick Blog Settings.

Note:Blog 2 template show only 4 recent posts, which have feature image.
9. Corporal Client
Add Member to Corporal Client.
Go to Admin Dashboard → Corporal Clients → Add New Client and fill related details.
For a quick view, please follow below image.
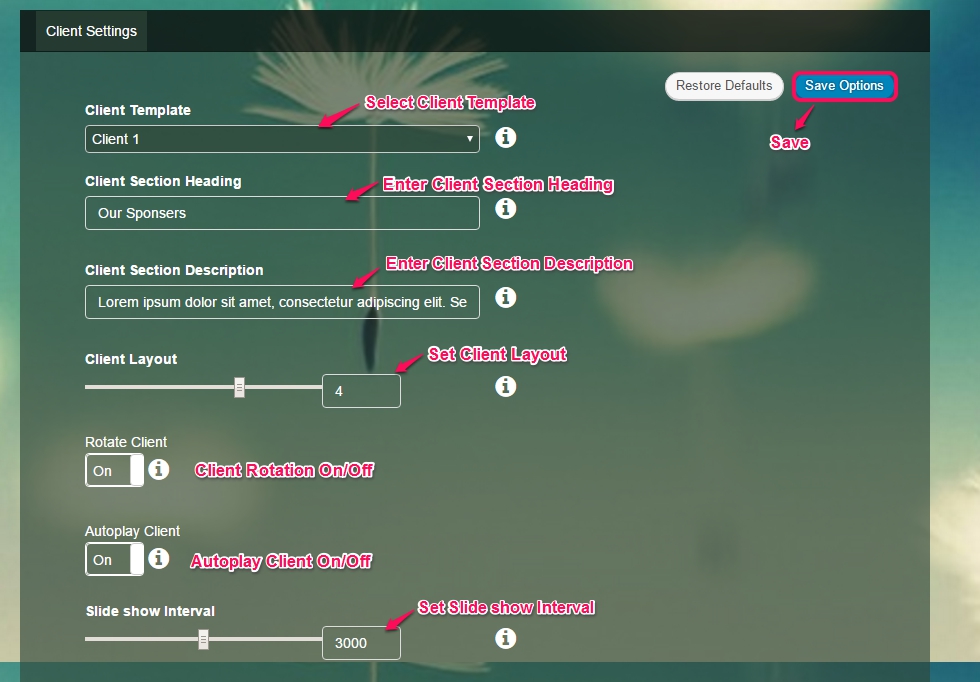
9.1 Customize Corporal Client Section
You can customize Corporal Client Section in Theme Options Settings.
Go to Admin Dashboard → Appearance → Theme Options → Client Option.
In Client Option, you can set
- Set Client Template
- Client Section Heading
- Client Description
- Set Client Layout
- Set Rotation
- Set Autoplay
- Set Slide Show Interval
Please follow below image for Quick Client Settings.
10. Customize Corporal Team
The Team has 4 type of Templates. In which three are column type Team and rest one is Carousel Type Team.
1. Column Type Team
2. Carousel Type Team
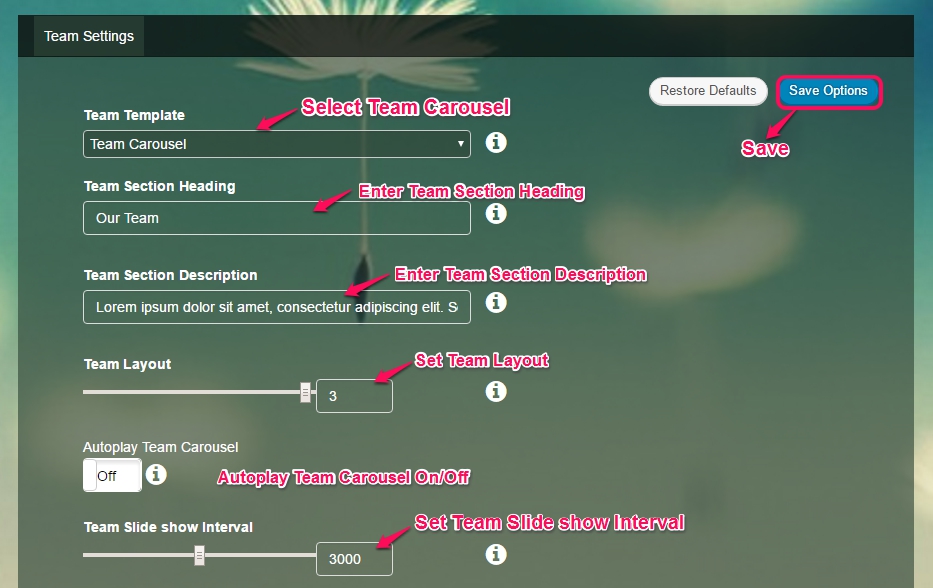
10.1 Column type Team
You can customize Team in Theme Options Settings.
Go to Admin Dashboard → Appearance → Theme Options → Team Option.
In Team Option, you can set
- Set Team Template
- Team Section Heading
- Team Section Description
- Set Team Layout
Please follow below image for Quick Team Settings.

10.2 Carousel type Team
You can customize Team in Theme Options Settings.
Go to Admin Dashboard → Appearance → Theme Options → Team Option.
In Team Option, you can set
- Carousel Autoplay
- Set Team Layout
Please follow below image for Quick Team Settings.
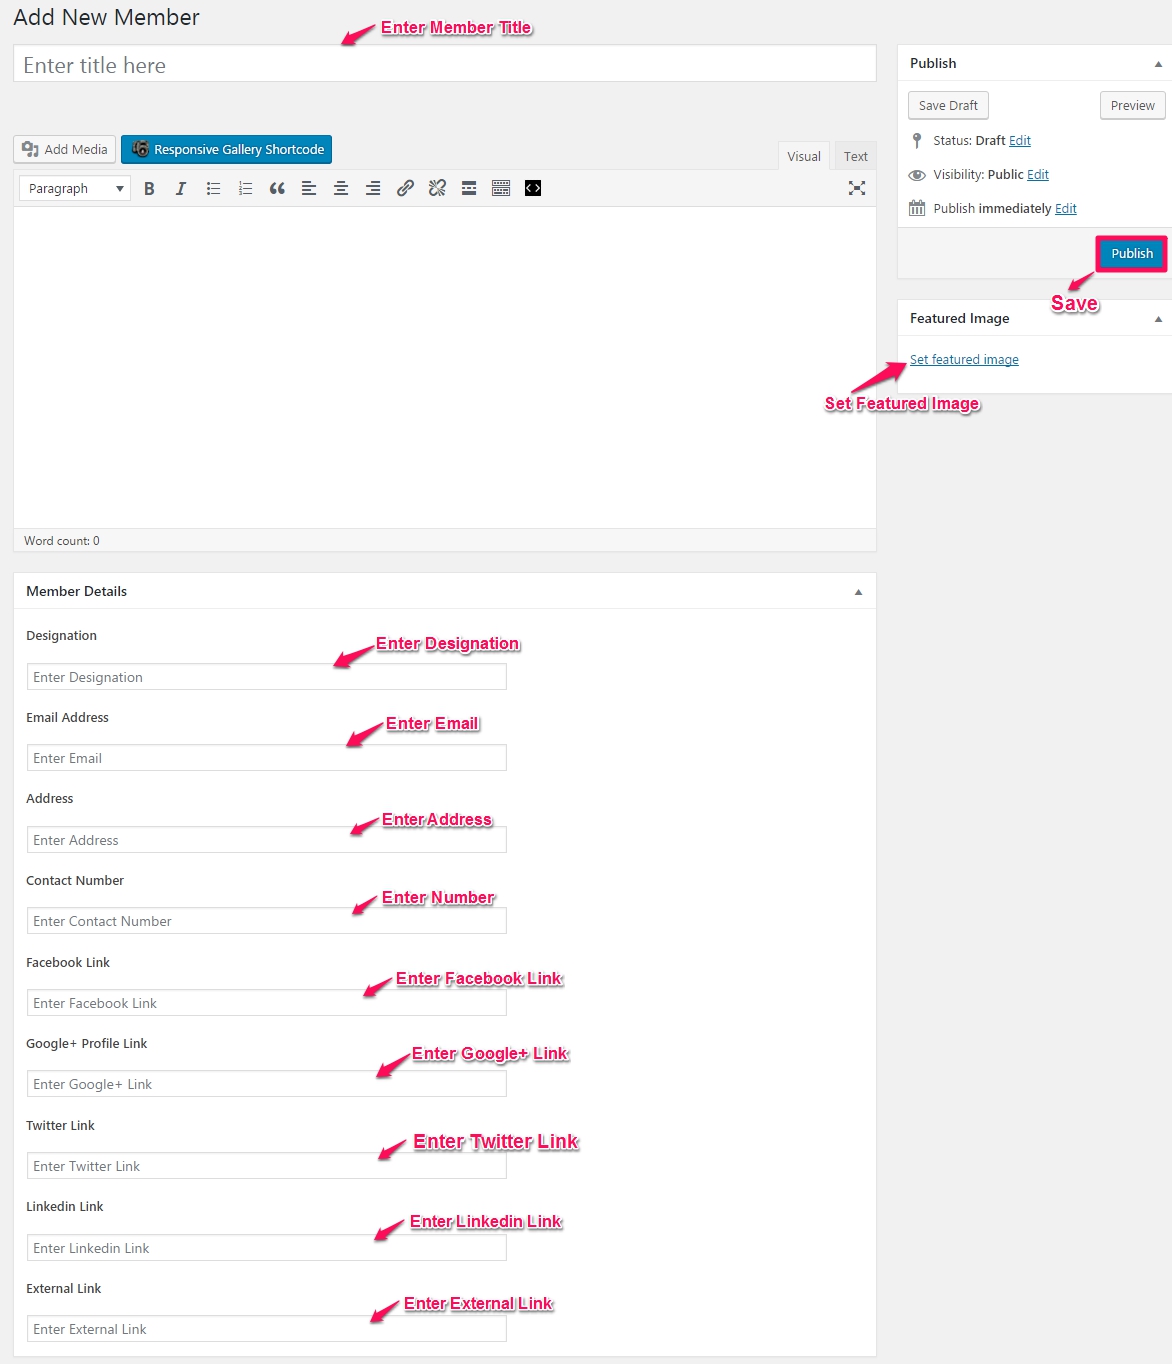
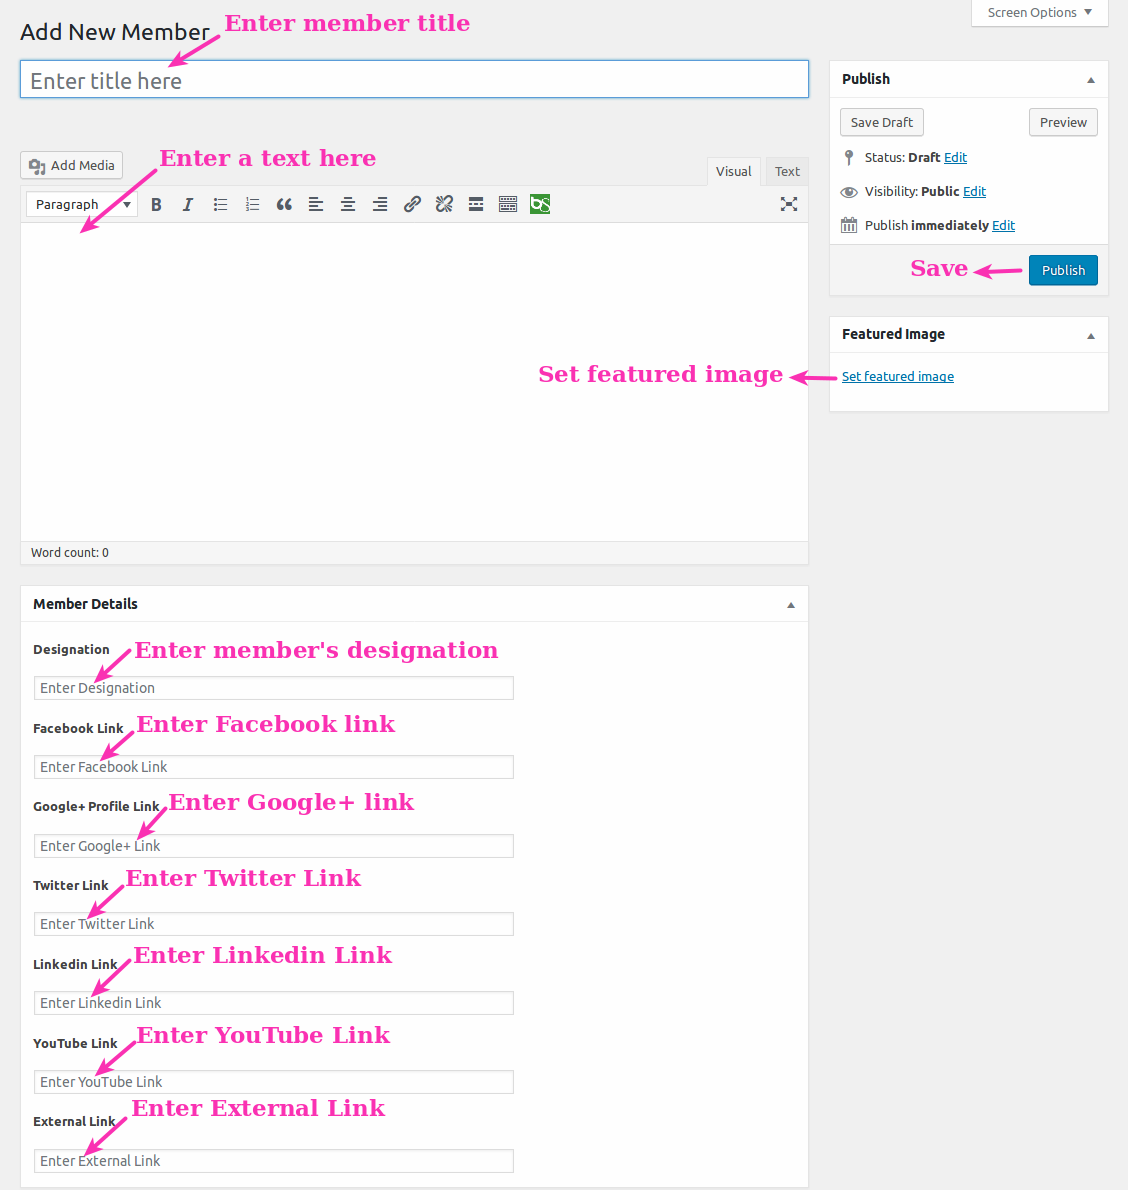
11. Corporal Members
Add Member to Corporal Members.
Go to Admin Dashboard →Corporal Members → Add New Member and fill related details.
For a quick view, please follow below image.
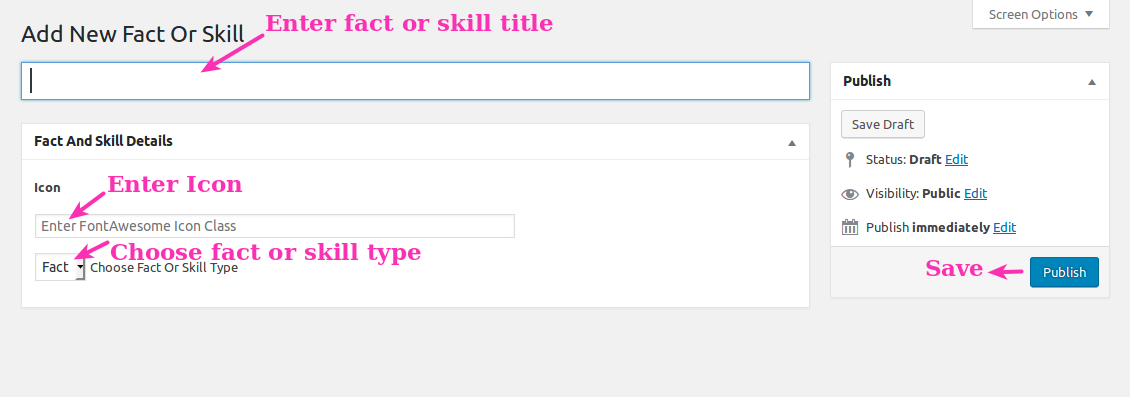
12. Corporal Fun Facts
You can customize Fun Facts in Theme Options Settings.
Go to Admin Dashboard → Corporal Facts → Add New Fact and fill related details.
For a quick view, please follow below image.

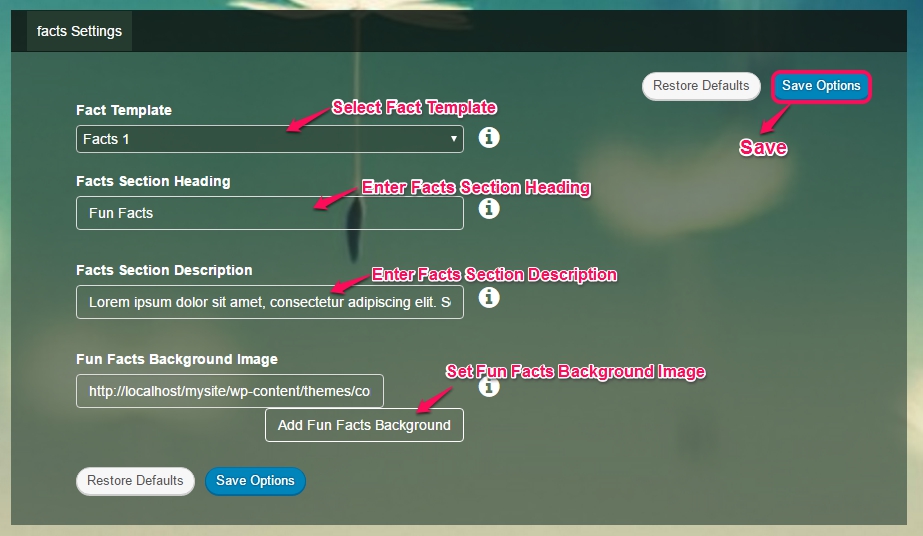
12.1 Customize Corporal Fun Facts Section
You can customize Fun Facts in Theme Options Settings.
Go to Admin Dashboard → Appearance → Theme Options → Fun Facts Option.
In Fun Facts Option, you can set
- Set Fact Template
- Facts Section Heading
- Facts Section Description
- Set Fun Fact Background
Please follow below image for Quick Fun Facts Settings.
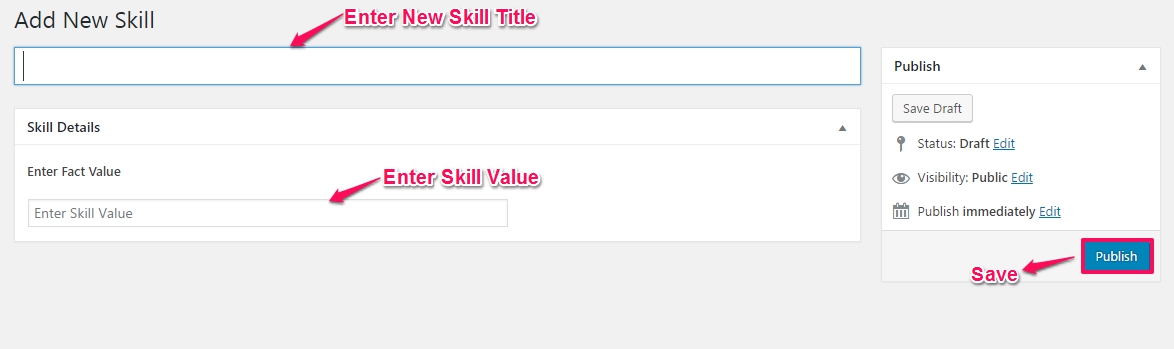
13. Corporal Skills
You can customize Skills in Theme Options Settings.
Go to Admin Dashboard → Corporal Skills → Add New Skills and fill related details.
For a quick view, please follow below image.
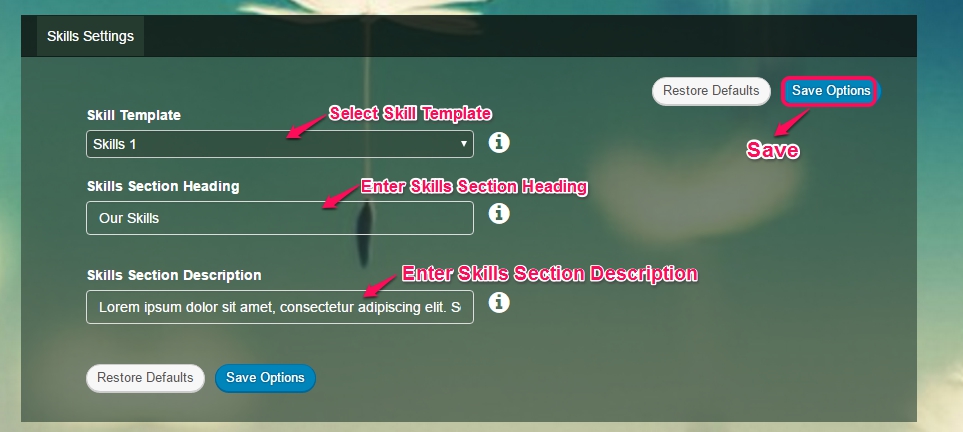
13.1 Customize Corporal Skills Section
You can customize Skills in Theme Options Settings.
Go to Admin Dashboard → Appearance → Theme Options → skills Option.
In skills Option, you can set
- Set skills Template
- Skills Heading
- Skills Description
Please follow below image for Quick skills Settings.
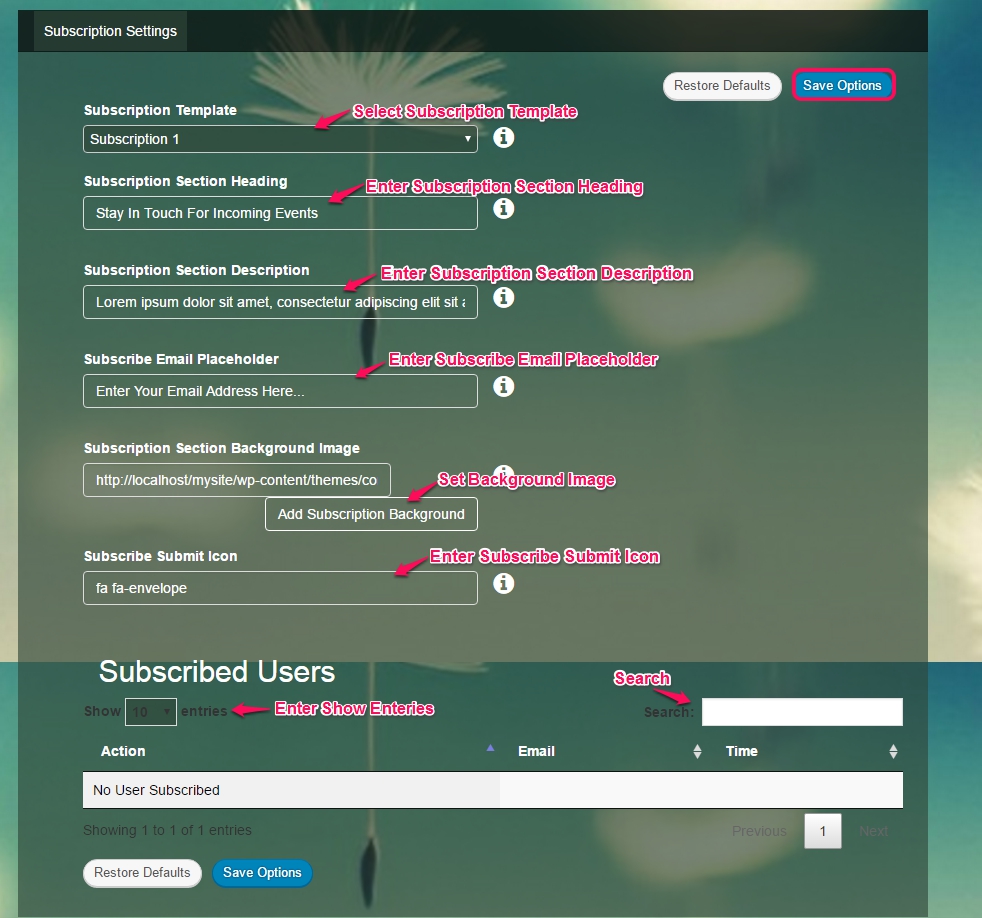
14. Corporal Subscription Customize
You can customize Subscription in Theme Options Settings.
Go to Admin Dashboard → Appearance → Theme Options → Subscription Option.
In Subscription Option, you can set
- Set Subscription Template
- Set Subscription Heading
- Set Subscription Description
Please follow below image for Quick Subscription Settings.
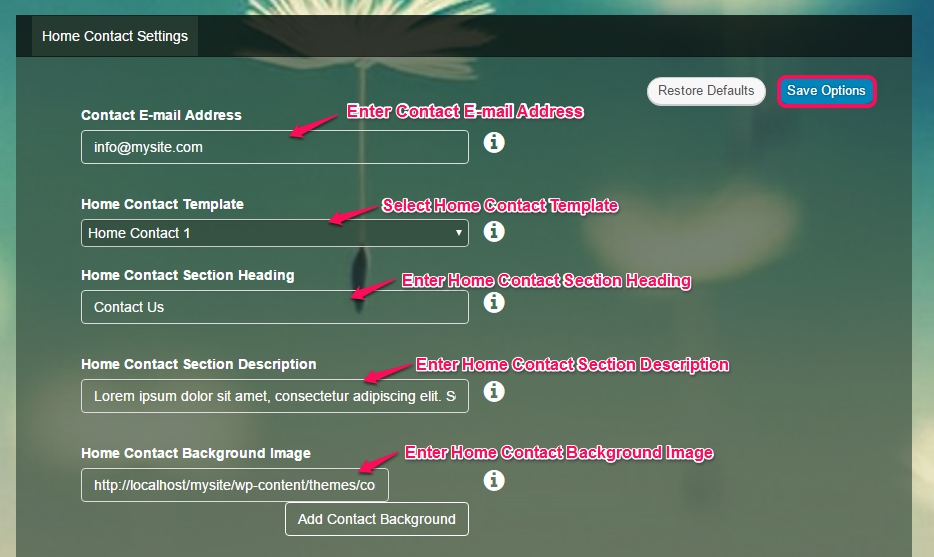
15. Corporal Home Contact Customize
You can customize home contact in Theme Options Settings.
Go to Admin Dashboard → Appearance → Theme Options → Home Contact Option.
In home contact Option, you can set
- Set home contact Template
- Set home contact Heading
- Set home contact Description
- Set Home Contact Background Image
Please follow below image for Quick Home contact Settings.
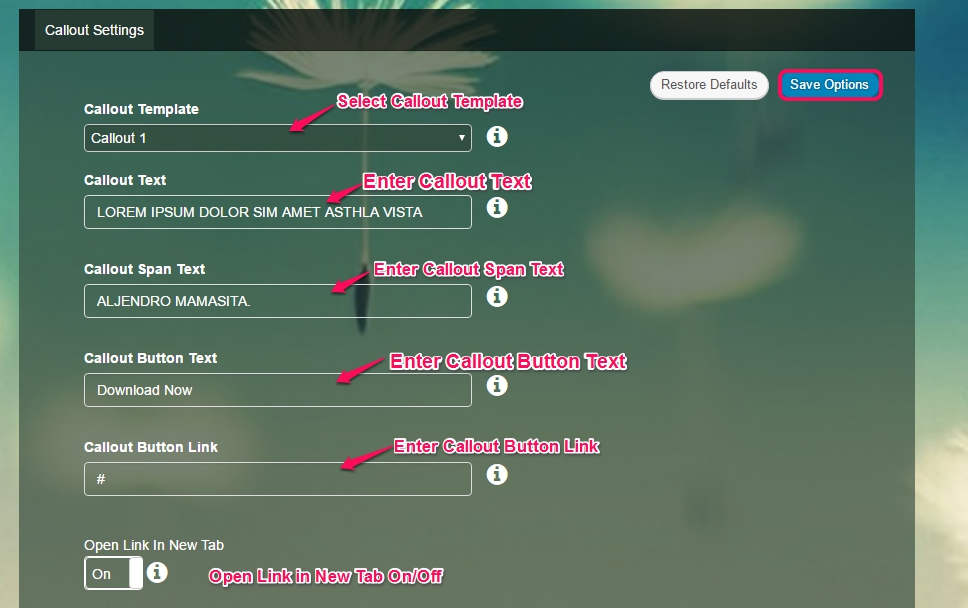
16. Callout Setting
You can customize Callout in Theme Options Settings.
Go to Admin Dashboard → Appearance → Theme Options → Callout Option.
In Callout Settings, you can set
- Set Callout Template
- Set Callout Text
- Set Callout Span Text
- Set Callout Button Text
- Set Callout Button Link
- Set Callout Open Tab Setting
Please follow below image for Quick Callout Settings.
17. Footer Setting
Theme Footer have two Parts.
- Widget Area
- Custom Footer Bar
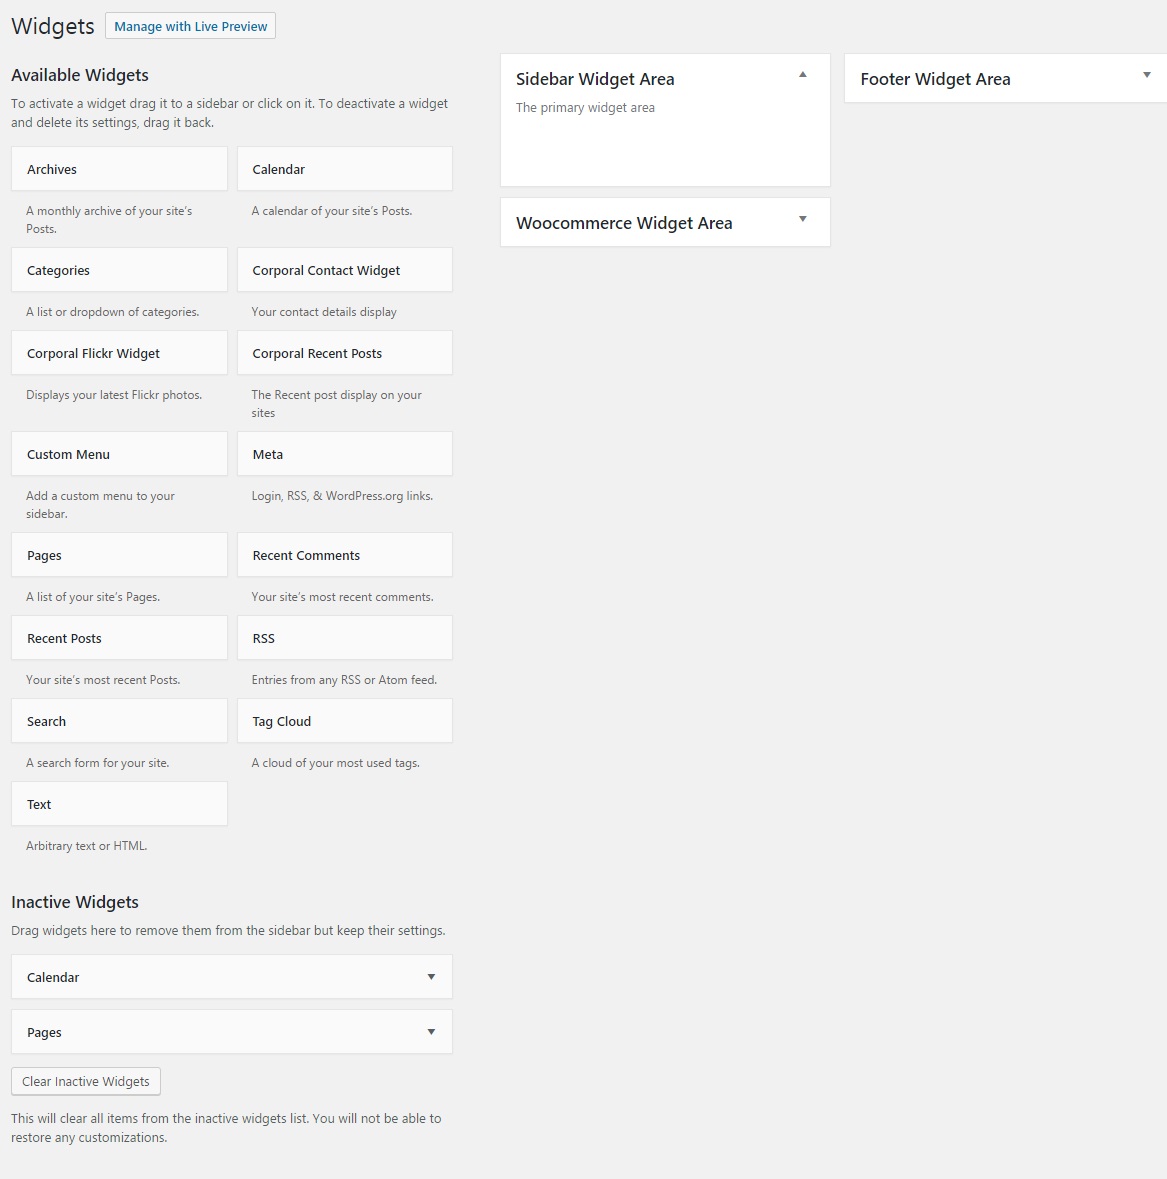
17.1 Widget Area
Theme Footer Widget Area have default Widgets.
Please go to Admin Dashboard → Appearance → Widgets.
And Drag-Drop Widget to Footer Widget Area to add Footer Widget Area.
Please follow below image for Quick Settings.
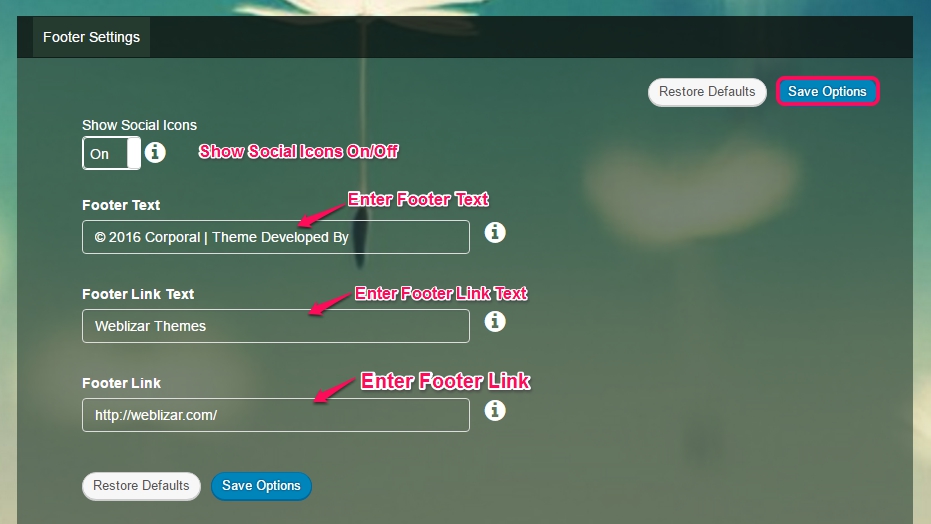
17.2 Custom Footer Bar
In custom Footer Bar there is two part
- Social Icons: Social Icon Can be Customize from Social Media Options.
- Credit Text: This Part can customize from Footer Options.
Please go to Admin Dashboard → Appearance → Theme Options → Footer Options.
In Footer Options Settings, following settings can be customized
- Set Footer Social Icon
- Set Footer Text
- Set Footer Link’s Text
- Set Footer Link
Please follow below image for Quick Footer Settings.
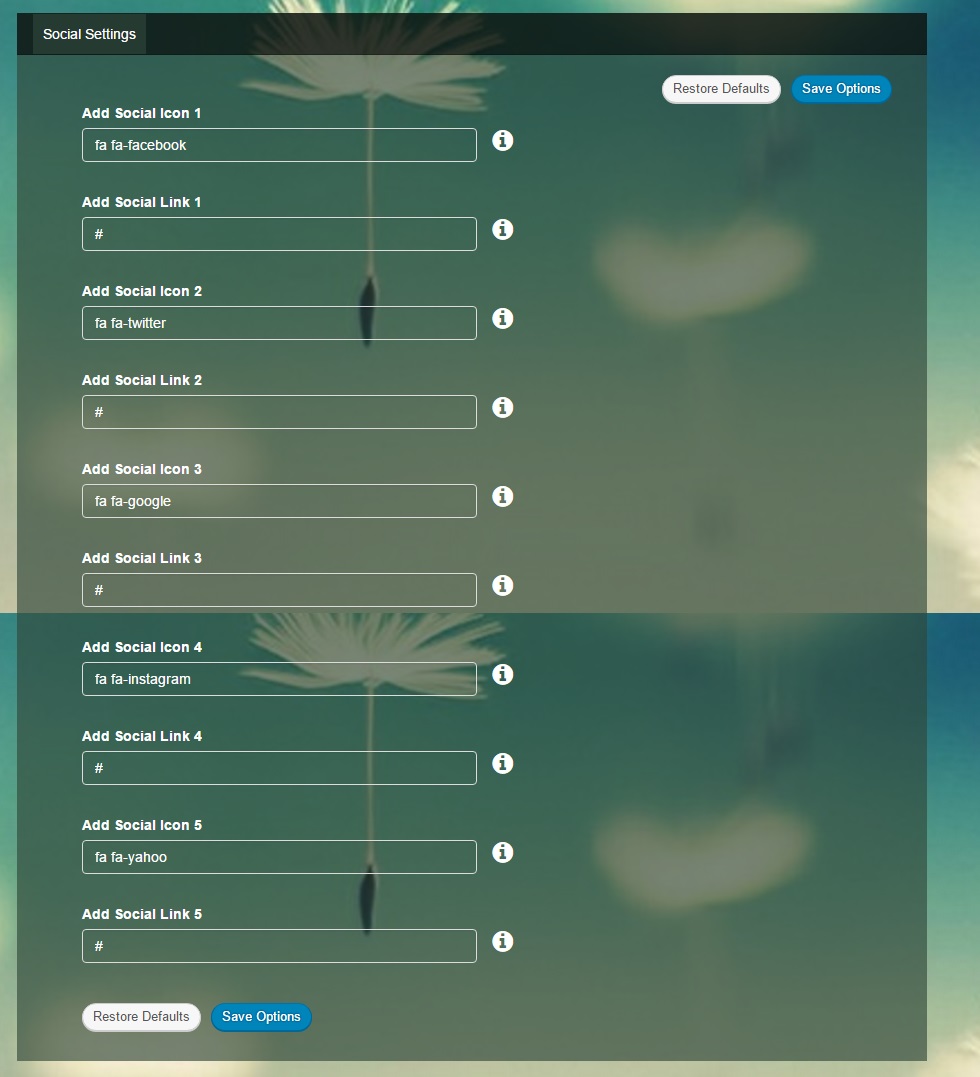
18. Social Icon Setting
You can customize Social Icon Setting in Theme Options Settings.
Go to Admin Dashboard → Appearance → Theme Options → Social Option.
In Social option, you can set
- Social Icon Link Setting
Please follow below image for Quick Social Icon Settings.
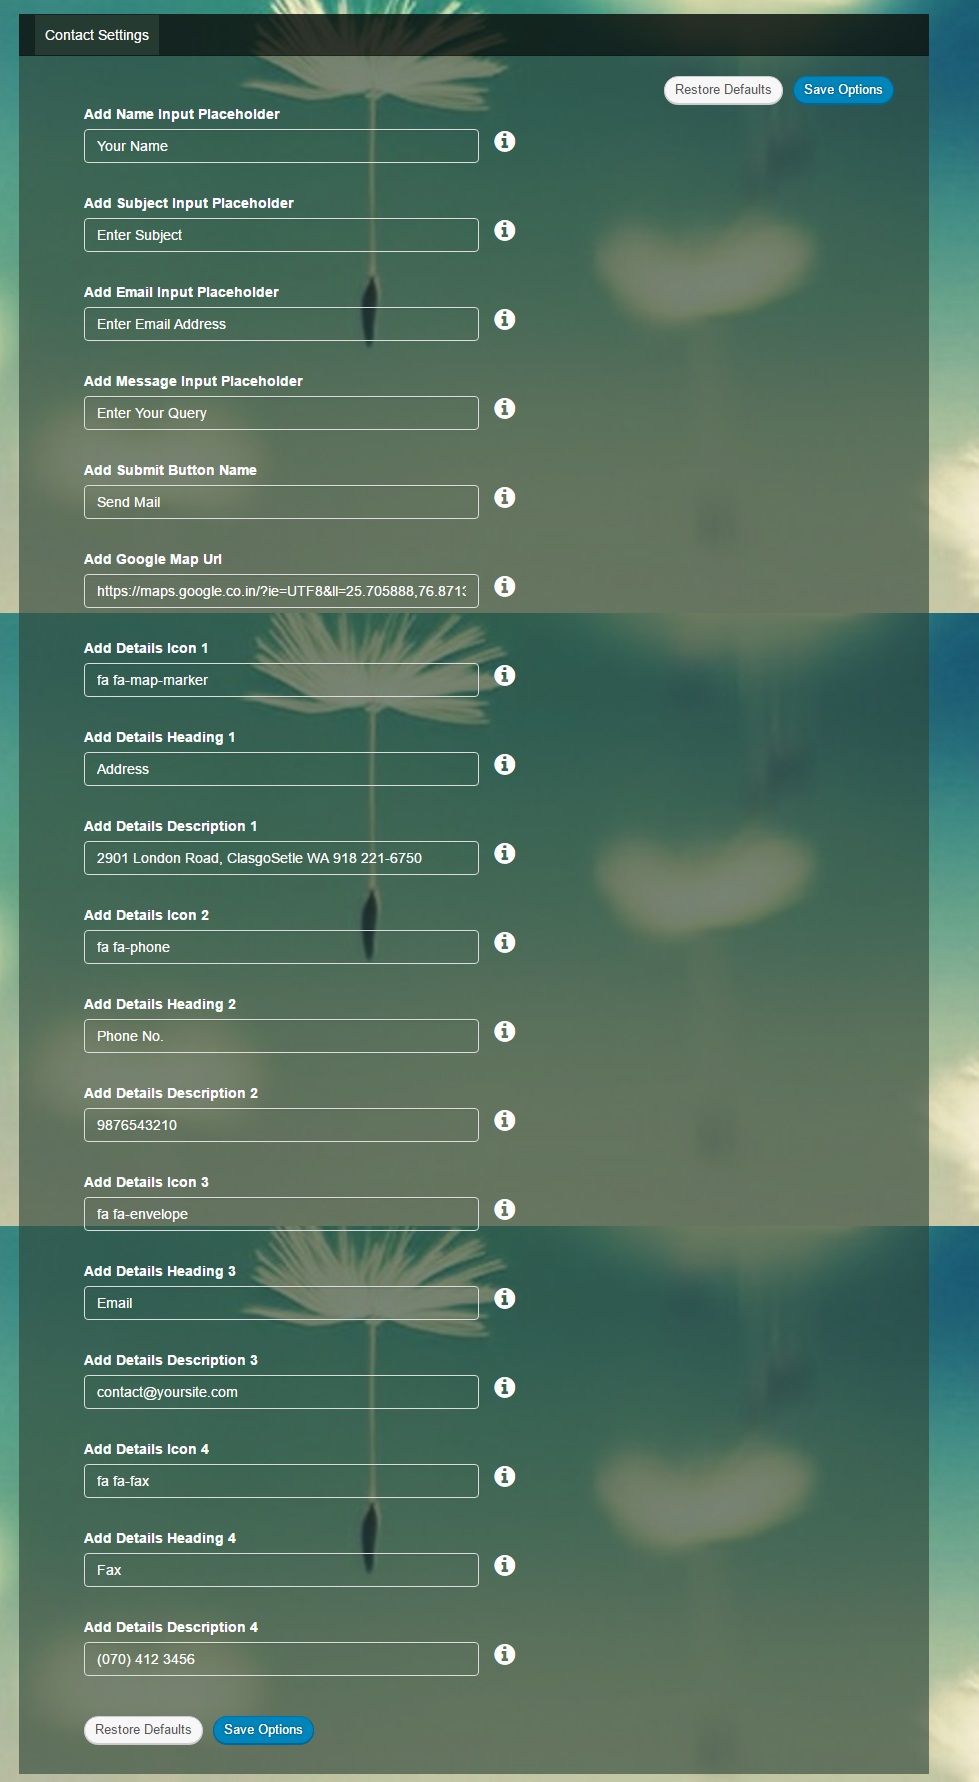
19. Contact Setting
You can customize Contact in Theme Options Settings.
Go to Admin Dashboard → Appearance → Theme Options → Contact Option.
In Contact Settings, you can set
- Add Mail
- Set Contact Form Title
- Set Contact URL
- Add Placeholder Setting
- Add Contact Details
Please follow below image for Quick Contact Settings.
20. Template Setting
You can customize Template Option in Theme Options Settings.
Go to Admin Dashboard → Appearance → Theme Options → About Template Option.
In Template Settings, you can set
- Show Testimonial Section In About Us Template
- Show Client Section In About Us Template
Please follow below image for Quick Template Settings.

21. Theme Layout Setting
You can customize Theme Layout Setting in Theme Options Settings.
Go to Admin Dashboard → Appearance → Theme Options → Theme Layout Option.
In Theme Layout Setting, you can set
- Set Theme Color
- Set Theme Layout
- Set Custom Background On/Off
- Set Background Image
Please follow below image for Quick Theme Layout Settings.

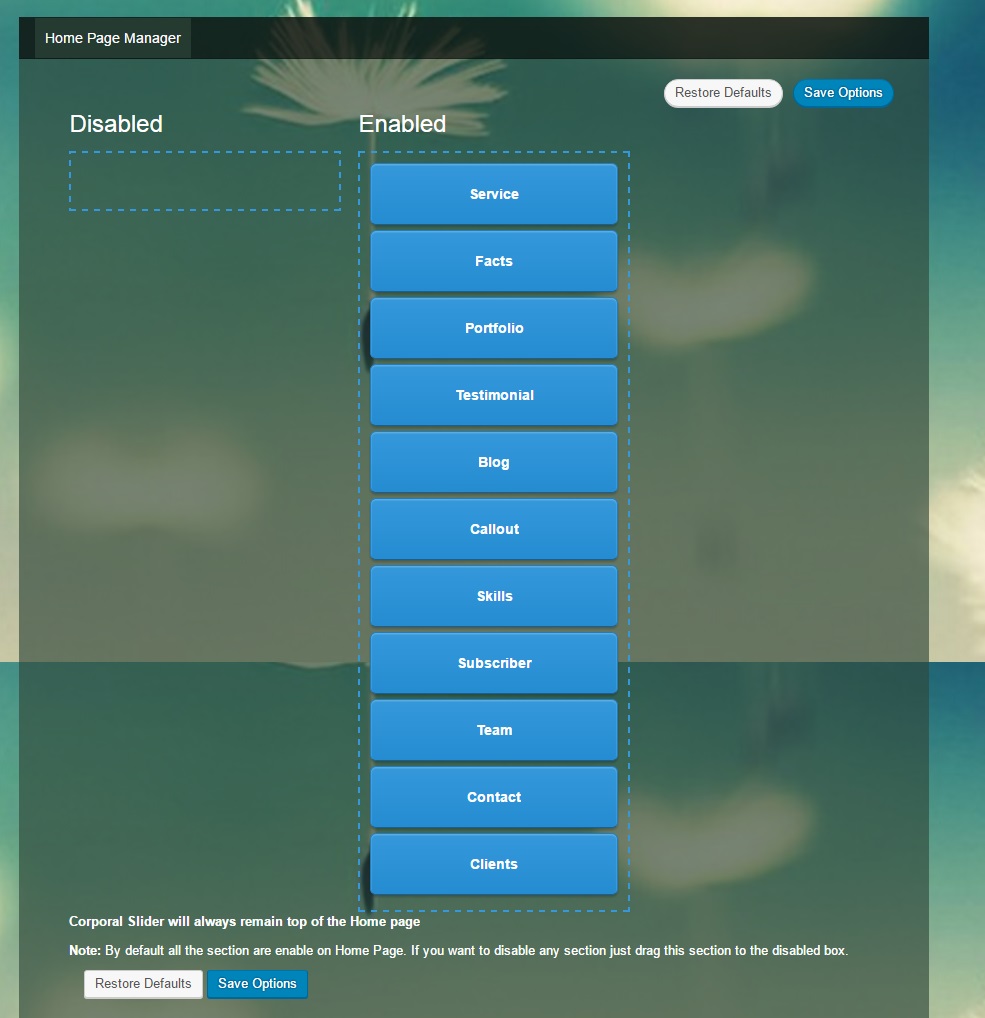
22. Home Page Customizer Setting
Using Home Page Customizer settings, sections on Home Page can be remove and move.
The corporal slider is always on the Top.
To access Home Page Customizer go to Admin Dashboard → Appearance → Theme Options → Home Page Customizer.
Here section can be enabled/disable and move using DRAG N DROP.
Please follow below image for Quick Settings.
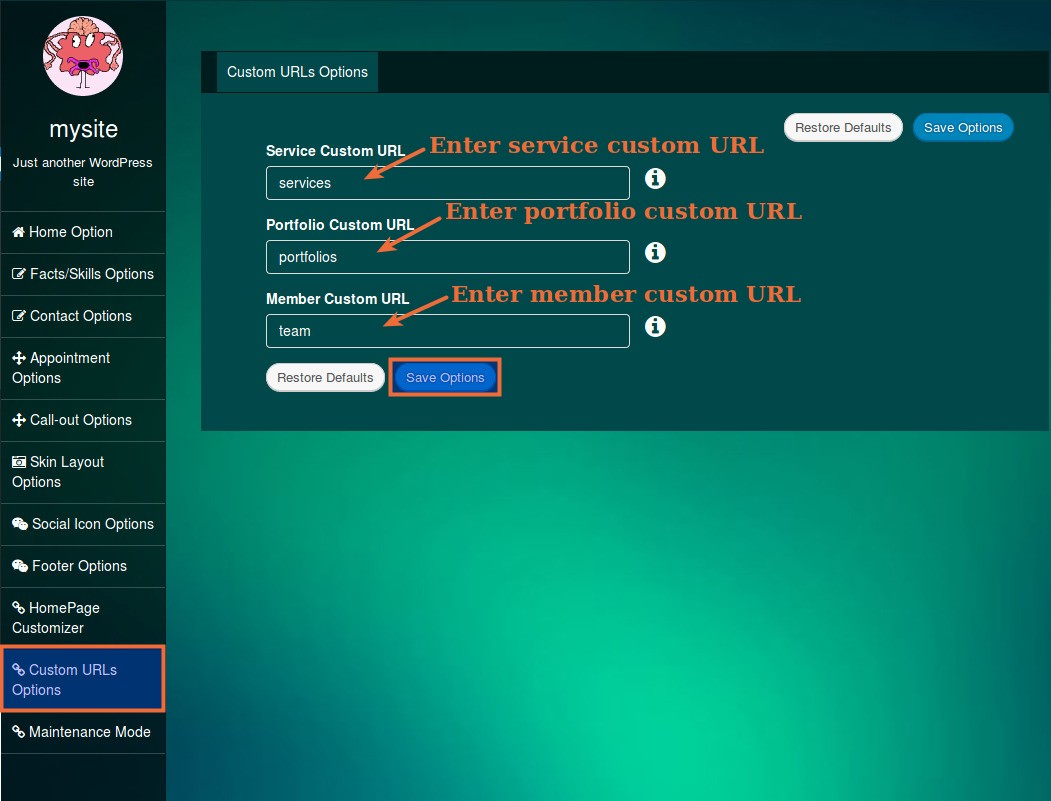
23. Custom URL Setting
Corporal provides an option to use your own custom URL for custom post types.
You can use custom URLs at Admin Dashboard → Appearance → Theme Options →Custom URL’s Options.
You have to refresh Permalinks to apply these changes. Please change your URLs here, save the change. Then go to Admin Dashboard → Settings→ Permalinks.
Here change the permalink to another format and save. Now revert to your permalink type and again save.
In Custom Settings, you can set
- Add Service Custom URL
- Add Portfolio Custom URL
- Add Member Custom URL
Please follow below image for Quick Settings.
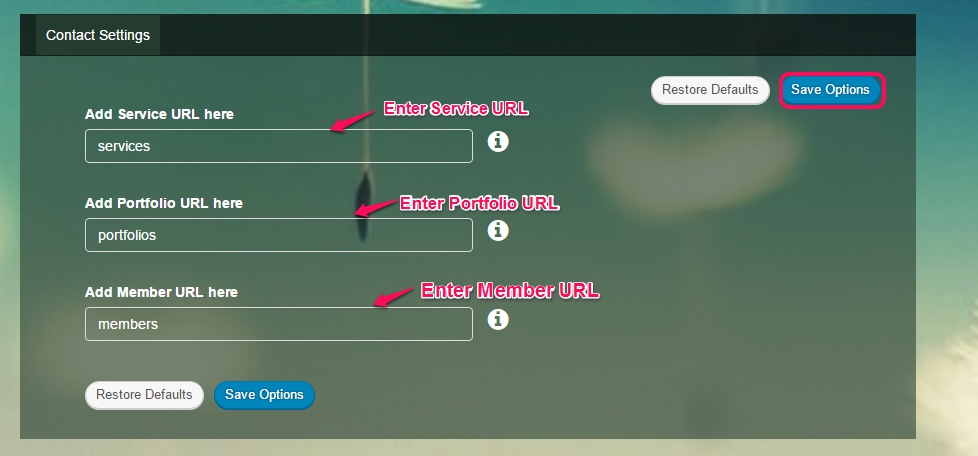
Note: After changing custom URL you have to re-save permalink setting. To re-save permalink setting please go to Admin Dashboard >> Settings >> Permalinks and click on save button.
24. Maintenance Mode
Corporal provides an option to use your own Maintenance Mode.
You can Enable/Disable Maintenance Page at Admin Dashboard → Appearance → Theme Options → Maintenance Mode Option.
In Maintenance Mode Settings, you can set
- Set Comming Soon Mode
- Set Maintenance Mode
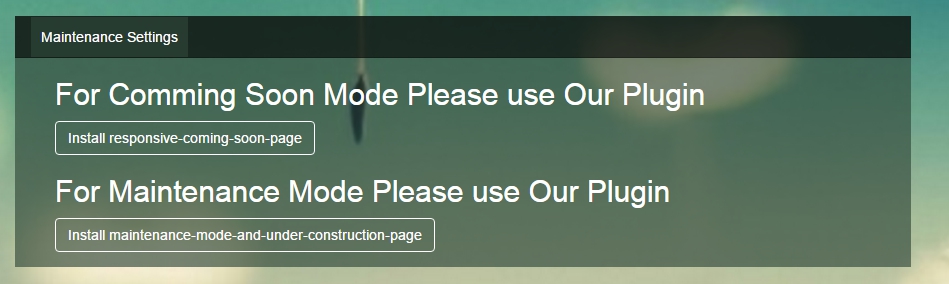
For Comming Soon Mode Setting You have to Install our Plugin.
For Maintenance Mode Mode Setting You have to Install our Plugin.https://wordpress.org/plugins/maintenance-mode-and-under-construction-page/Please follow below image for Quick Settings.
25 Theme Templates
Corporal Premium Theme provides about 18 templates.
There are some Details of them
25.1 Page Templates
- Default Template (Page With Right Sidebar)
- Page With Left Sidebar
- Full-Width Page
25.2 Blog Templates
- Blog With Left Sidebar
- Blog Full Width
- Blog Masonry 2 Column
- Blog Masonry 3 Column
- Blog Masonry 4 Column
- Blog Masonry 2 With Sidebar
25.3 Contact Us Templates
- Contact Template 1
- Contact Template 2
- Contact Template 3
25.4 About Us Templates
- About Us Template 1
- About Us Template 2
- About Us Template 3
25.5 Portfolio Templates
- Portfolio 2 Column
- Portfolio 3 Column
- Portfolio 4 Column
You can see them at Corporal Premium Theme Demo
26. Short-codes
Theme provide many shortcodes.
You can see them in below Image.

To use shortcode please follow Image.
It’s simple to use.
Click on Shortcode Button → Select Short-code type from Option → Provide Relative Information → Click on insert
Please below Images.
26.1 Accordion

After clicking on insert button You found shortcode, As given in below image.

copy this shortcode and paste in a page where you want to show shortcode.
See Demo Here http://demo.weblizar.com/corporal-premium/shortcodes/accordions/
26.2 Alert
See Demo Here http://demo.weblizar.com/corporal-premium/shortcodes/alerts/
26.3 Button
See Demo Here http://demo.weblizar.com/corporal-premium/shortcodes/buttons/
26.4 Column

See Demo Here http://demo.weblizar.com/corporal-premium/shortcodes/columns/
26.5 Drop-Caps

See Demo Here http://demo.weblizar.com/corporal-premium/shortcodes/drop-caps/
26.6 Heading
26.7 Panel
See Demo Here http://demo.weblizar.com/corporal-premium/shortcodes/panels/
26.8 Popover

See Demo Here http://demo.weblizar.com/corporal-premium/shortcodes/popovers-tooltip/
26.9 Progress Bar
See Demo Here http://demo.weblizar.com/corporal-premium/shortcodes/progress-bars/
26.10 Tabs


See Demo Here http://demo.weblizar.com/corporal-premium/shortcodes/tabs/
26.11 Tool Tip
See Demo Here http://demo.weblizar.com/corporal-premium/shortcodes/popovers-tooltip/
01 Aug,
2016
Scoreline Premium Documentation
Weblizar Docs 0 CommentScoreline is a responsive and fully customizable template for Business and Multi-purpose theme. You can use it for your business, portfolio, blogging or any type of site.
Try Scoreline Premium Theme: DEMO HERE
Key Contents
2.1 General Settings
2.1.1 Enable Front Page
2.1.2 Add Logo
2.1.3 Add Favicon
2.1.4 Google Analytic Code & Custom CSS Editor
3.1 Customize Scoreline Slider
4.1 Customize Scoreline Service
5.1 Customizing Scoreline Portfolio
7.1 Customize Scoreline Team/Member
8.1 Customize Scoreline Testimonial Section
9.1 Customize Scoreline Client Section
13. Contact Setting
14. Footer Setting
14.1 Widget Area
14.2 Custom Footer Bar
19. Theme Templates
20. Short-codes
20.1 Accordion
20.2 Alert
20.3 Button
20.4 Column
20.5 Drop-Caps
20.6 Heading
20.7 Panel
20.8 Popover
20.9 Progress Bar
20.10 Tabs
20.11 Tool Tip
20.12 Portfolio
20.13 Blog
1. Theme Installation
First, download your theme package from your Weblizar Amember Account.
Upload Theme package zip folder using theme installer wordPress option Otherwise Any FTP (FillZilla)
We recommend you upload theme zip package using FTP( FillZill/Bitwise), In your host-server-directory\wp-content\themes\
After that Activate theme into WordPress site Admin Dashboard -> Appearance ->themes.
Now the theme is successfully installed on our site, step up to the next step.
2. Setup Home Page
Our theme home page has 10 different sections. These sections can be customized with the theme options page.
You can access theme options page at Admin Dashboard → Appearance → Theme Options.
Now all settings are explained one by one.
2.1 General Settings
In this section, you can enable Front-Page, Add Logo , Add Fevicon, Add custom CSS, add Google Analytic code etc.
Please go to Admin Dashboard → Appearance → Theme Options → Home Options →General Settings.
Please refer below image for Quick Settings.
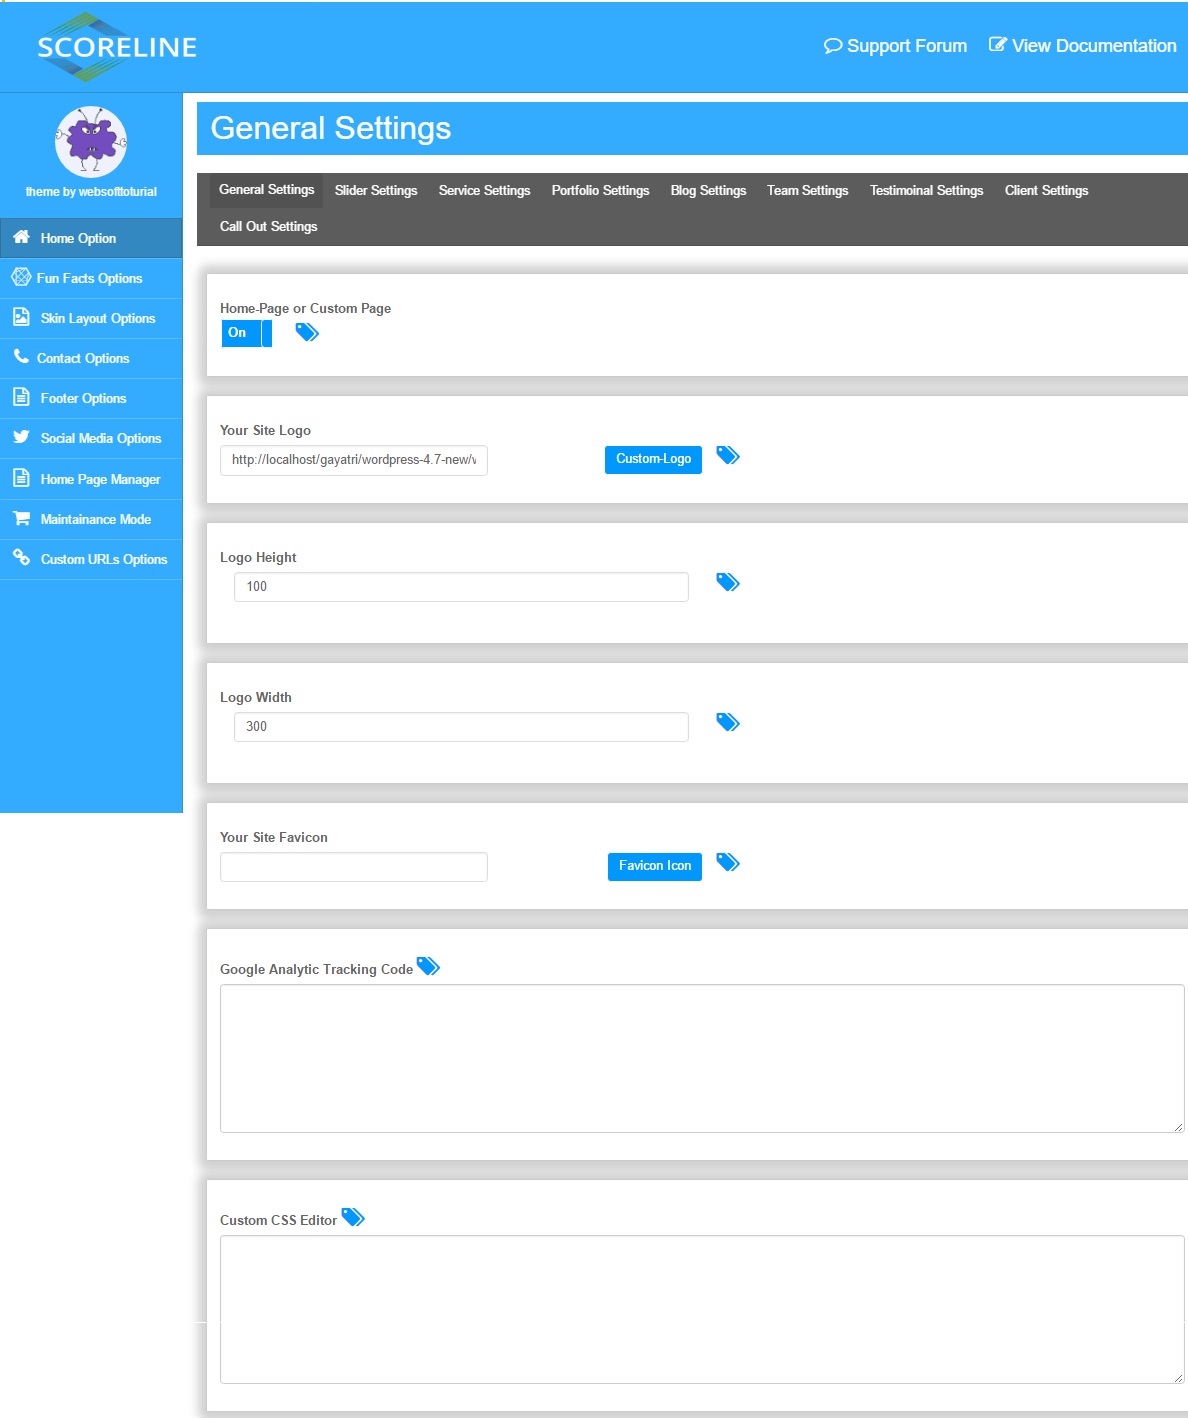
2.1.1 Enable Front-page
To Enable Front-Page go to Admin Dashboard → Appearance → Theme Options → Home Options →General Settings.
And slide Home-Page or Custom Page to ON.
2.1.2 Add Logo
To add Logo go to Admin Dashboard → Appearance → Theme Options → Home Options →General Settings.
Now click on Custom Logo Button and upload your logo image or select from Media Library.
Follow image
![]()
You can further customize the logo’s height and width from Logo Height and Logo Width settings.
2.1.3 Add Favicon
To add Favicon go to Admin Dashboard → Appearance → Theme Options → Home Options →General Settings.
Now click on Favicon Icon Button and upload your Fevicon image or select from Media Library.
2.1.4 Google Analytic Code & Custom CSS Editor
Google Analytic Code and custom CSS can be added to theme using Theme’s General Settings.
Note:Please add Google Analytic Code without script tag. Please don’t use >, < like symbol in custom CSS editor.
3. Scoreline Slider
To add slide to Scoreline Slider.
Go to Admin Dashboard →Scoreline Slider →Add New Slide and fill related details.
For a quick view, please follow below image.

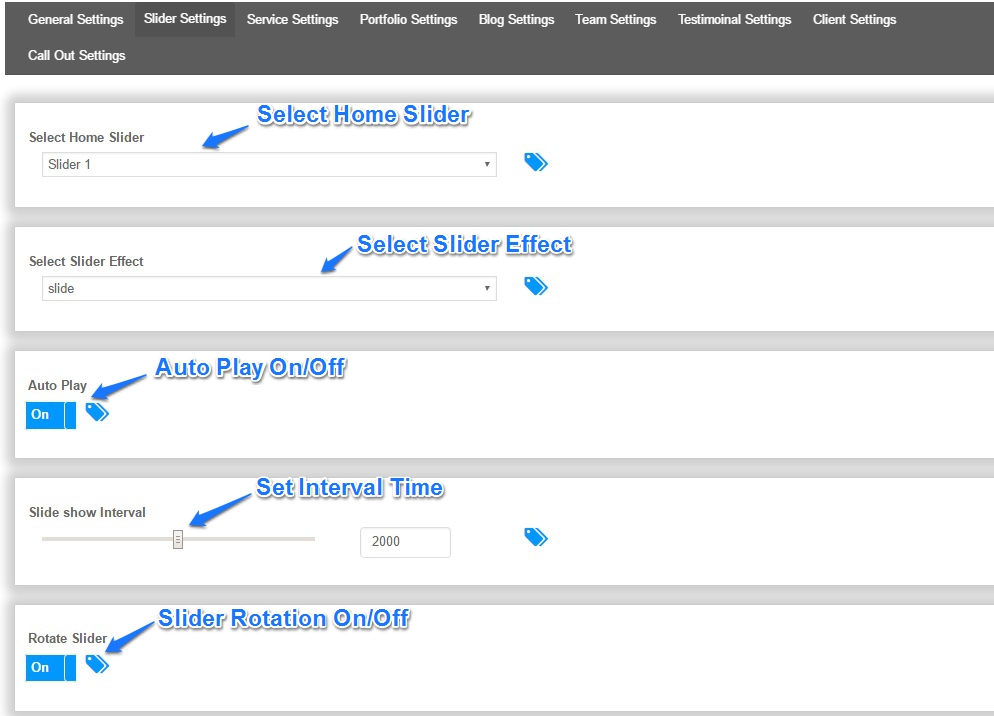
3.1 Customize Scoreline Slider
Theme Slider have two types.
1. Slider with 2 Effects.
2. Coverflow Slider
3.1.1 Slider with 2 Effects
You can customize Scoreline Slider in Theme Options Settings.
Go to Admin Dashboard → Appearance → Theme Options → Home Options →Slider Settings.
In Slider Settings, you can set
- Auto-play ON/OFF
- Set interval time.
- Set slider to rotate all slides.
Please follow below image for Quick Slider Settings.
3.1.2 Coverflow Slider
Common Settings-
- Auto-play ON/OFF
- Set interval time.
- Set slider to rotate all slides.
You can customize Scoreline Slider in Theme Options Settings.
Go to Admin Dashboard → Appearance → Theme Options → Home Options → Slider Settings → Slider Type.

4. Scoreline Services
Add Service to Scoreline Services.
Go to Admin Dashboard → Scoreline Services → Add New Service and fill related details.
For a quick view, please follow below image.

Note: To show services on the homepage you have to add either font awesome icon or feature image if you do not add this field, Service will show default image on homepage.
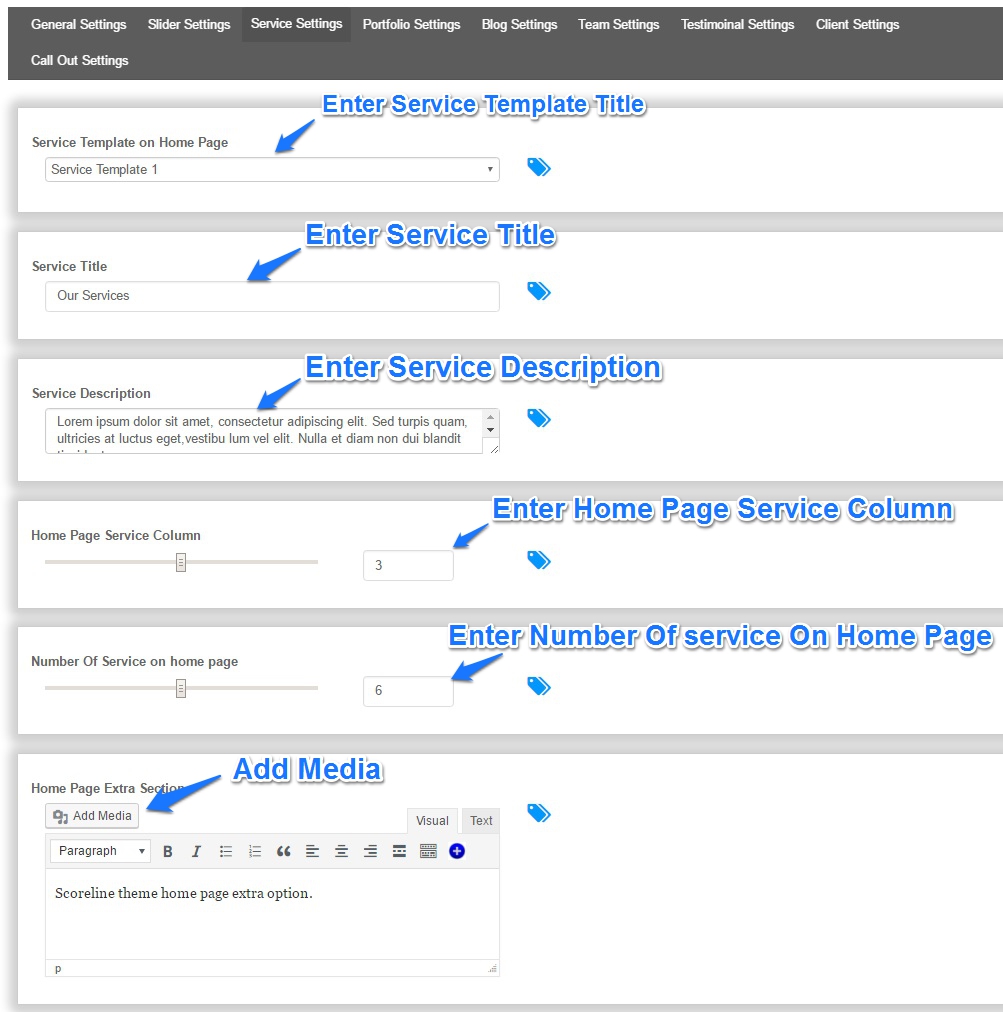
4.1 Customize Scoreline Services
You can customize Scoreline Services in Theme Options Settings.
Go to Admin Dashboard → Appearance → Theme Options → Home Option → Service Settings.
In Service Settings, you can set
- Set Service Template
- Service Title
- Service Description
- Service Column
- No. of Service show on Home Page
Please follow below image for Quick Service Settings.
5. Scoreline Portfolio
Add Portfolio to Scoreline Portfolios.
Go to Admin Dashboard → Scoreline Portfolio→ Add New Item and fill related details.
For a quick view, please follow below image.

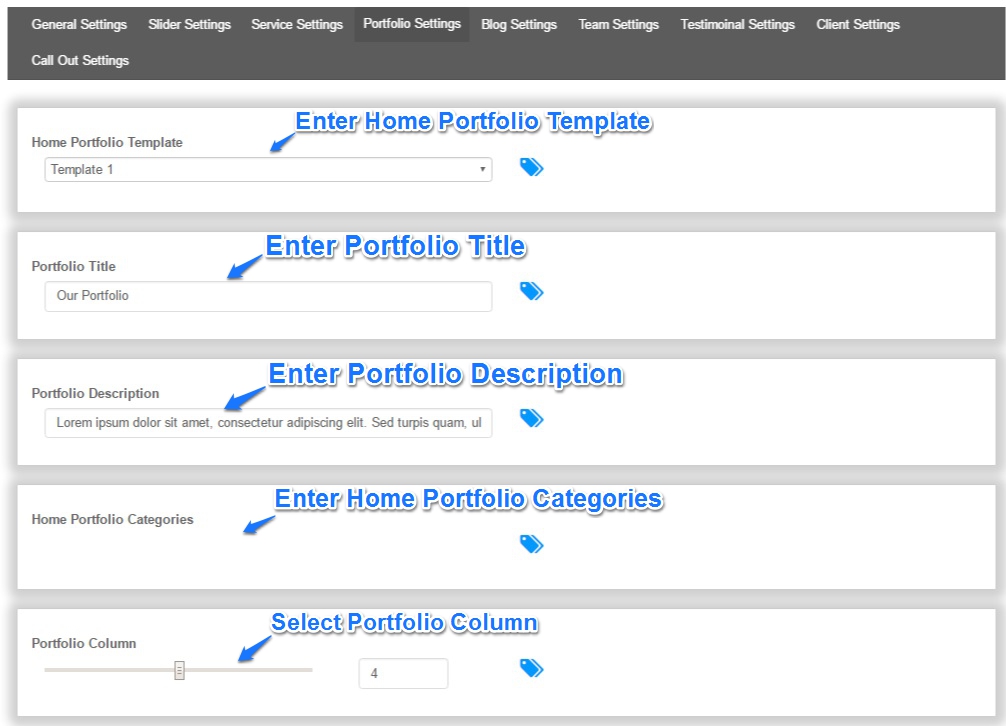
5.1 Customize Scoreline Portfolio
You can customize Portfolio in Theme Options Settings.
Go to Admin Dashboard → Appearance → Theme Options → Home Option → Portfolio Settings.
In Portfolio Settings, you can set
- Portfolio Template
- Portfolio Section Title
- Portfolio Section Description
- Portfolio Column Layout
- Set Portfolio Categories to show on Home Page
Please follow below image for Quick Portfolio Settings.
6. Scoreline Blog
You can customize Blog in Theme Options Settings.
Go to Admin Dashboard → Appearance → Theme Options → Home Options → Blog Settings.
In Blog Settings, you can set
- Set Blog Template
- Blog Section Title
- Blog Section Description
- Blog Column Layout
- Set Blog Items to Show on Home Page
- Set AutoPlay
- Set Interval
Please follow below image for Quick Blog Settings.

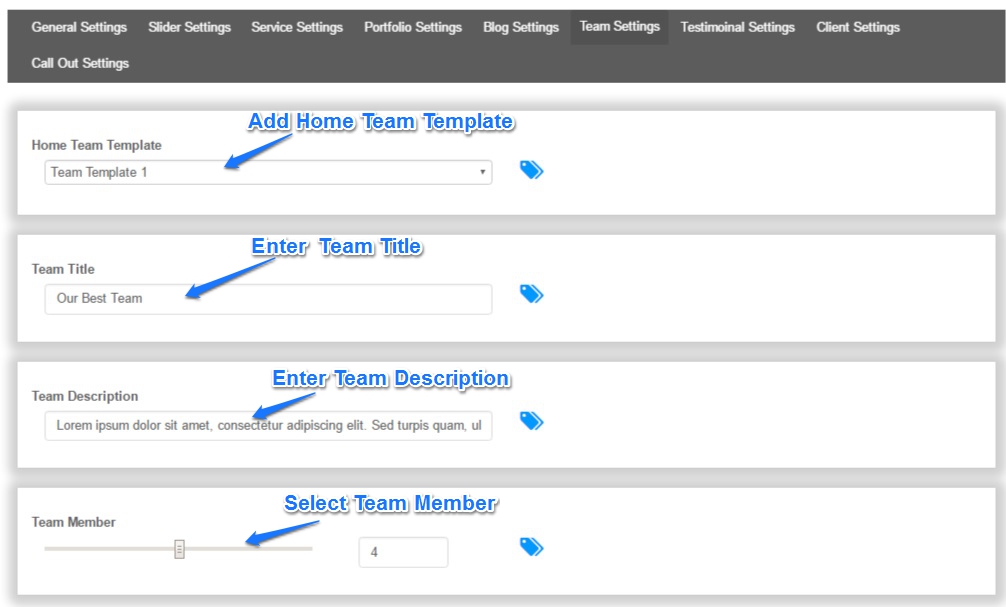
7. Scoreline Team/ Member
Add Team/Member to Scoreline Team.
Go to Admin Dashboard →Scoreline Team→Add New Team Member and fill related details.
For a quick view, please follow below image.

7.1 Customize Scoreline Team/Member
You can customize Team/Member in Theme Options Settings.
Go to Admin Dashboard → Appearance → Theme Options → Home Option → Team Settings.
In Portfolio Settings, you can set
- Team Template
- Team Section Title
- Team Section Description
- Set Team to show on Home Page
Please follow below image for Quick Team Settings.
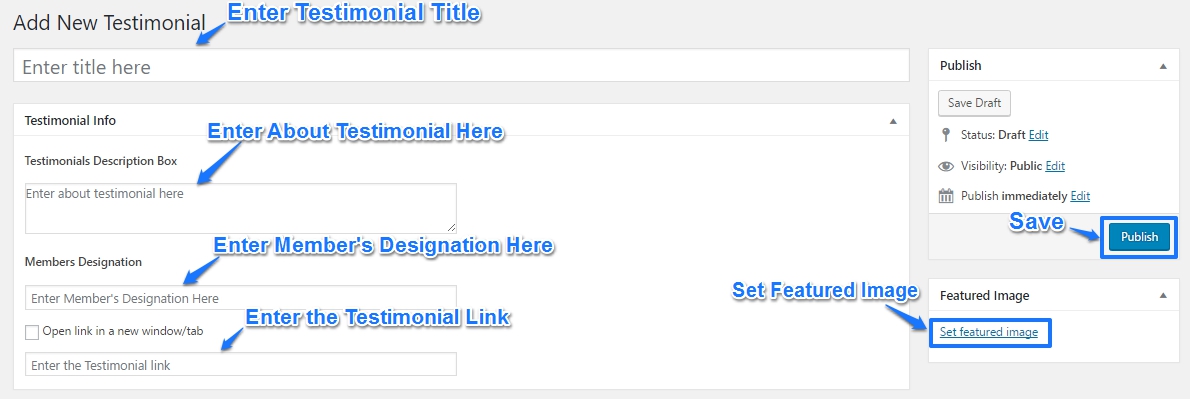
8. Scoreline Testimonials
To add Testimonial to Scoreline Testimonials.
Go to Admin Dashboard → Scoreline Testimonial → Add New Testimonial and fill related details.
For a quick view, please follow below image.
8.1 Customize Scoreline Testimonial Section
You can customize Scoreline Testimonial Section in Theme Options Settings.
Go to Admin Dashboard → Appearance → Theme Options → Home Option →Testimonial Settings.
In Testimonial Settings you can set
- Testimonial Template
- Testimonial Section Title
- Testimonial Description
- Testimonials Background Image
- Testimonial Slide Item show on Home Page
- Set Auto Play
- Set Time Interval
Please follow below image for Quick Testimonial Settings.

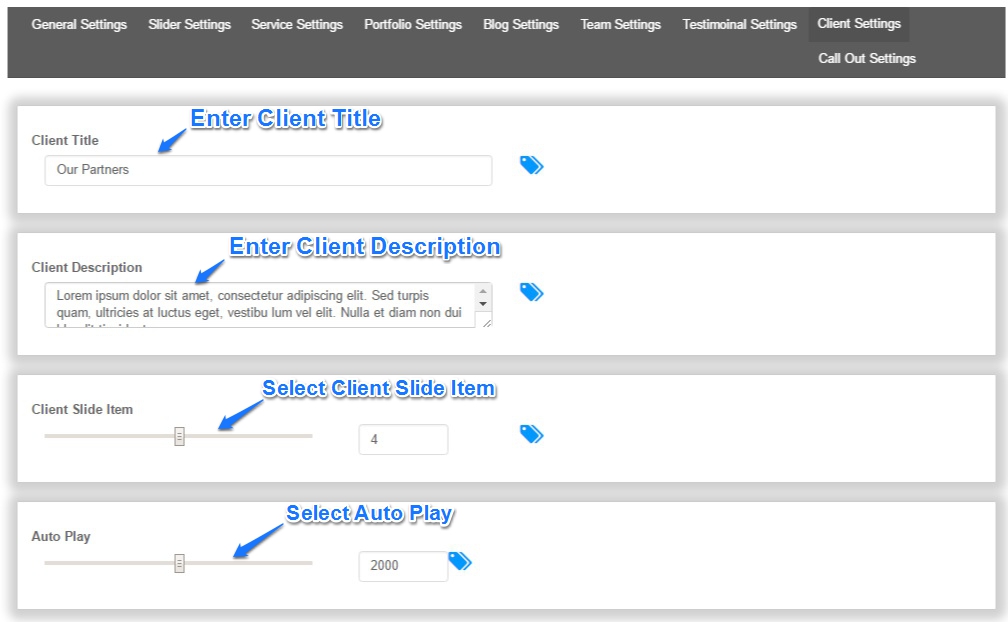
9. Scoreline Client
Add Client to Scoreline Client.
Go to Admin Dashboard →Scoreline Client →Add New Client and fill related details.
For a quick view, please follow below image.

9.1 Customize Scoreline Client Section
You can customize Scoreline Client Section in Theme Options Settings.
Go to Admin Dashboard → Appearance → Theme Options → Home Option →Client Settings.
In Client Settings, you can set
- Client Section Title
- Client Description
- Set Interval
- Set Client Slide
Please follow below image for Quick Client Settings.
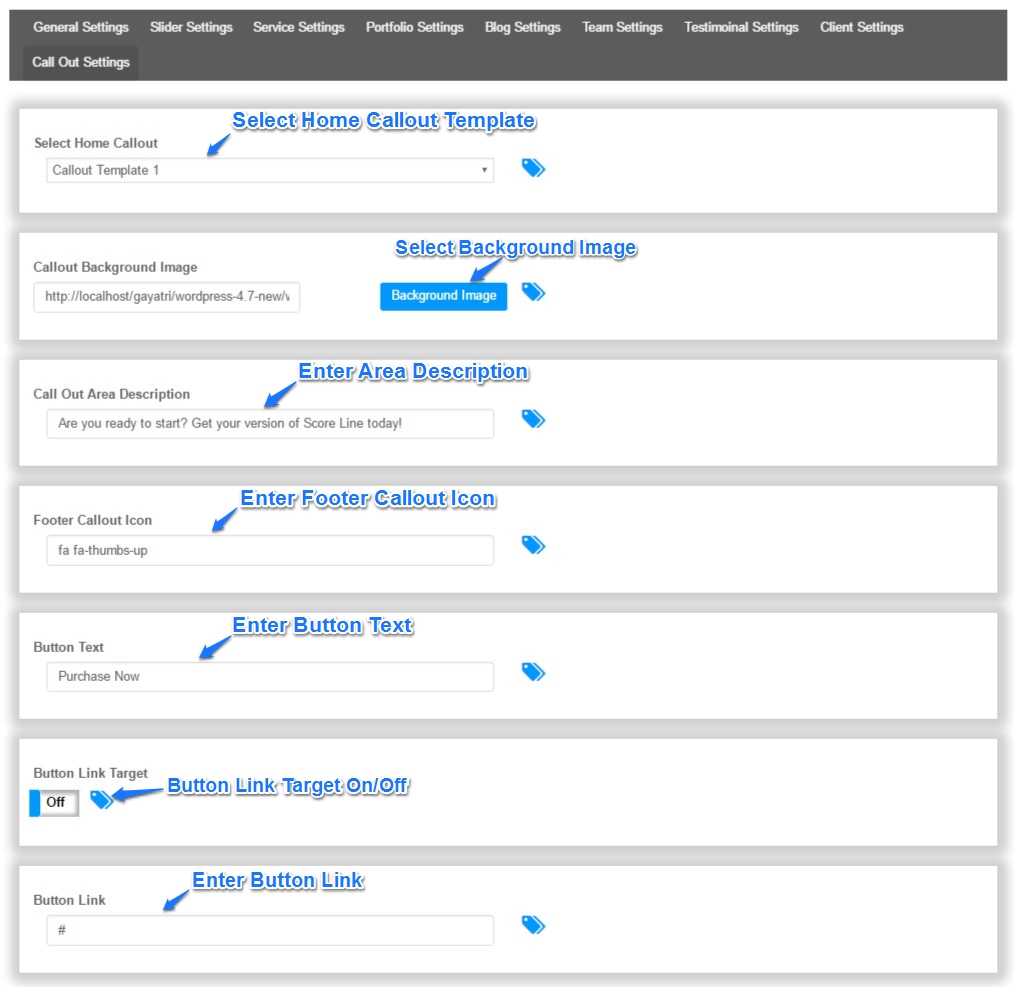
10. Scoreline Callout
You can customize Callout in Theme Options Settings.
Go to Admin Dashboard → Appearance → Theme Options → Home Options → Call out Settings.
In Callout Settings, you can set
- Callout Template
- Add Callout icon
- Set Callout Description
- Set Callout Button Text
- Set Callout Button Target
- Set Callout Button Link
Please follow below image for Quick Callout Settings.
Common Settings
- Callout Template
- Add Callout icon
- Set Callout Description
- Set Callout Button Text
- Set Callout Button Target
- Set Callout Button Link
- Set Callout Background
You can customize Scoreline Callout in Theme Options Settings.
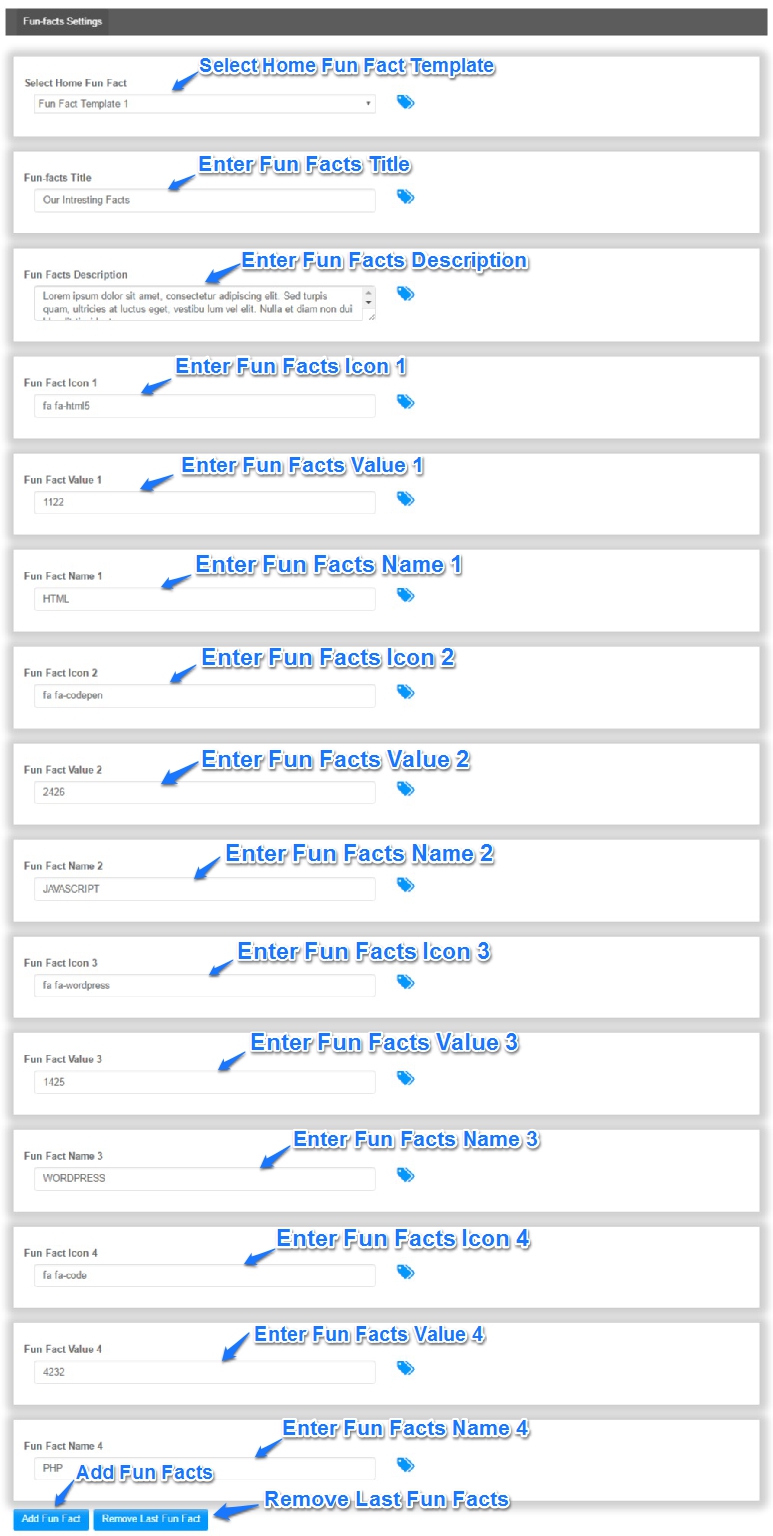
11. Scoreline Fun Facts
You can customize Callout in Theme Options Settings.
Go to Admin Dashboard → Appearance → Theme Options → Fun Facts Settings.
In Fun Fact Settings, you can set
- Fun Fact Template
- Fun Fact Section Title
- Fun Fact Section Description
- Fun Fact Icon
- Fun Facts Value
- Fun Fact Name
- Add more Fun Fact
- Remove Last Fun Fact
Please follow below image for Quick Fun Facts Settings.
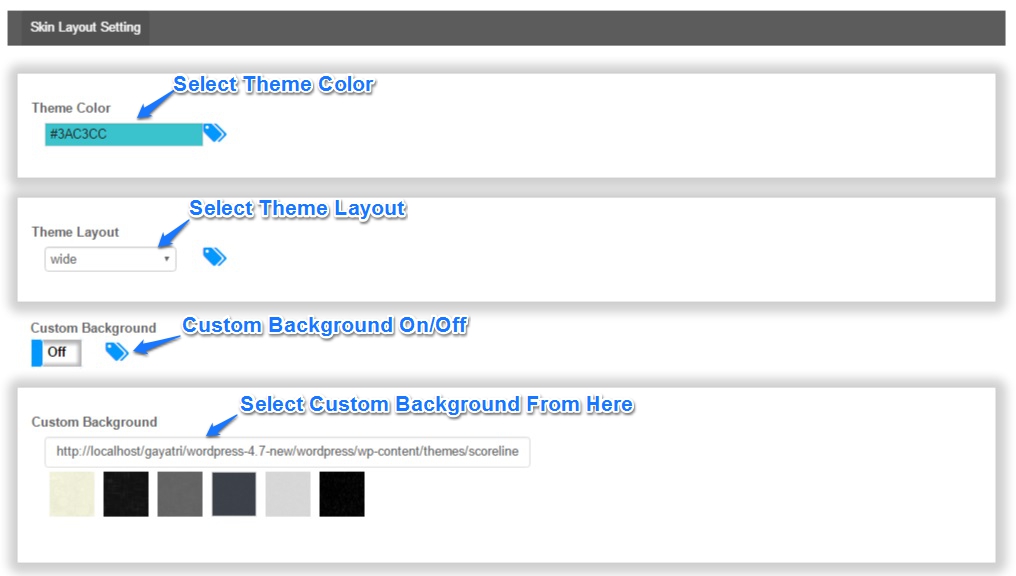
12. Skin Layout Options
You can customize Skin Layout Setting in Theme Options Settings.
Go to Admin Dashboard → Appearance → Theme Options → Skin Layout Options.
In Skin Layout Setting, you can set
- Set Theme Color
- Set Theme Layout
- Set Custom Background On/Off
- Set Background Image
Please follow below image for Quick Skin Layout Settings.
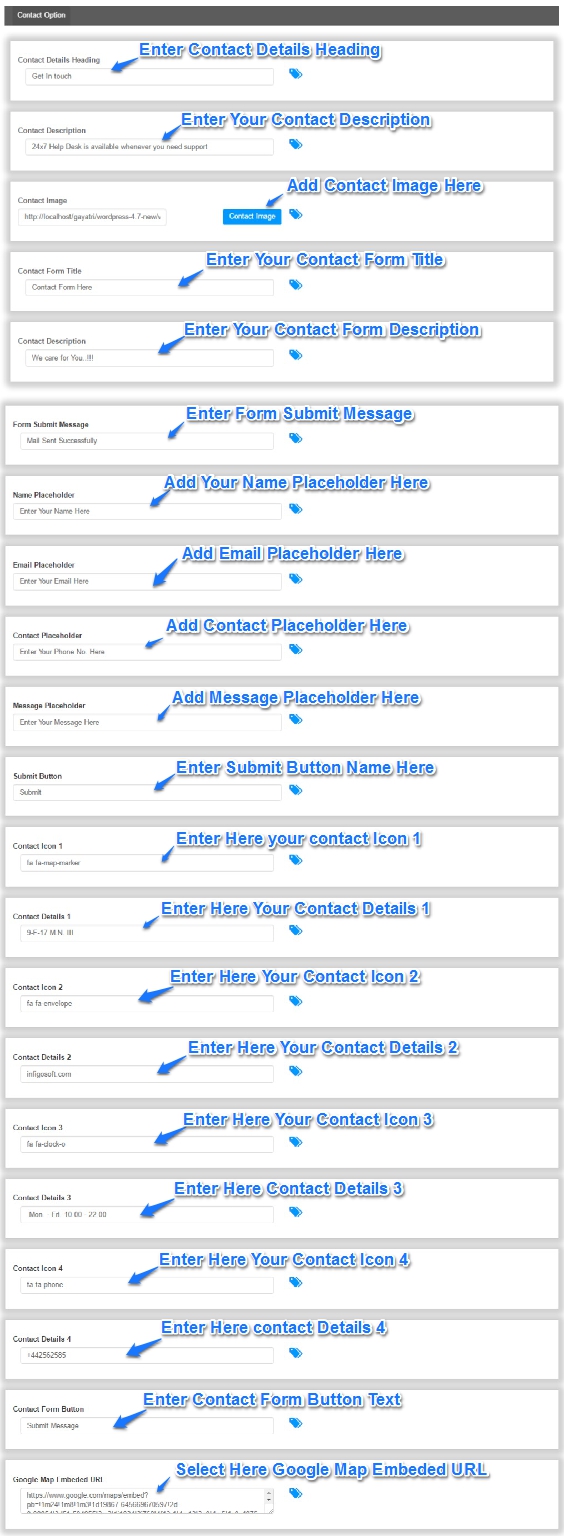
13. Contact Setting
You can customize Contact in Theme Options Settings.
Go to Admin Dashboard → Appearance → Theme Options → Contact Options.
In Contact Settings, you can set
- Add Mail
- Set Contact Form Title
- Set Contact URL
- Add Placeholder Setting
- Add Contact Details
Please follow below image for Quick contact Settings.
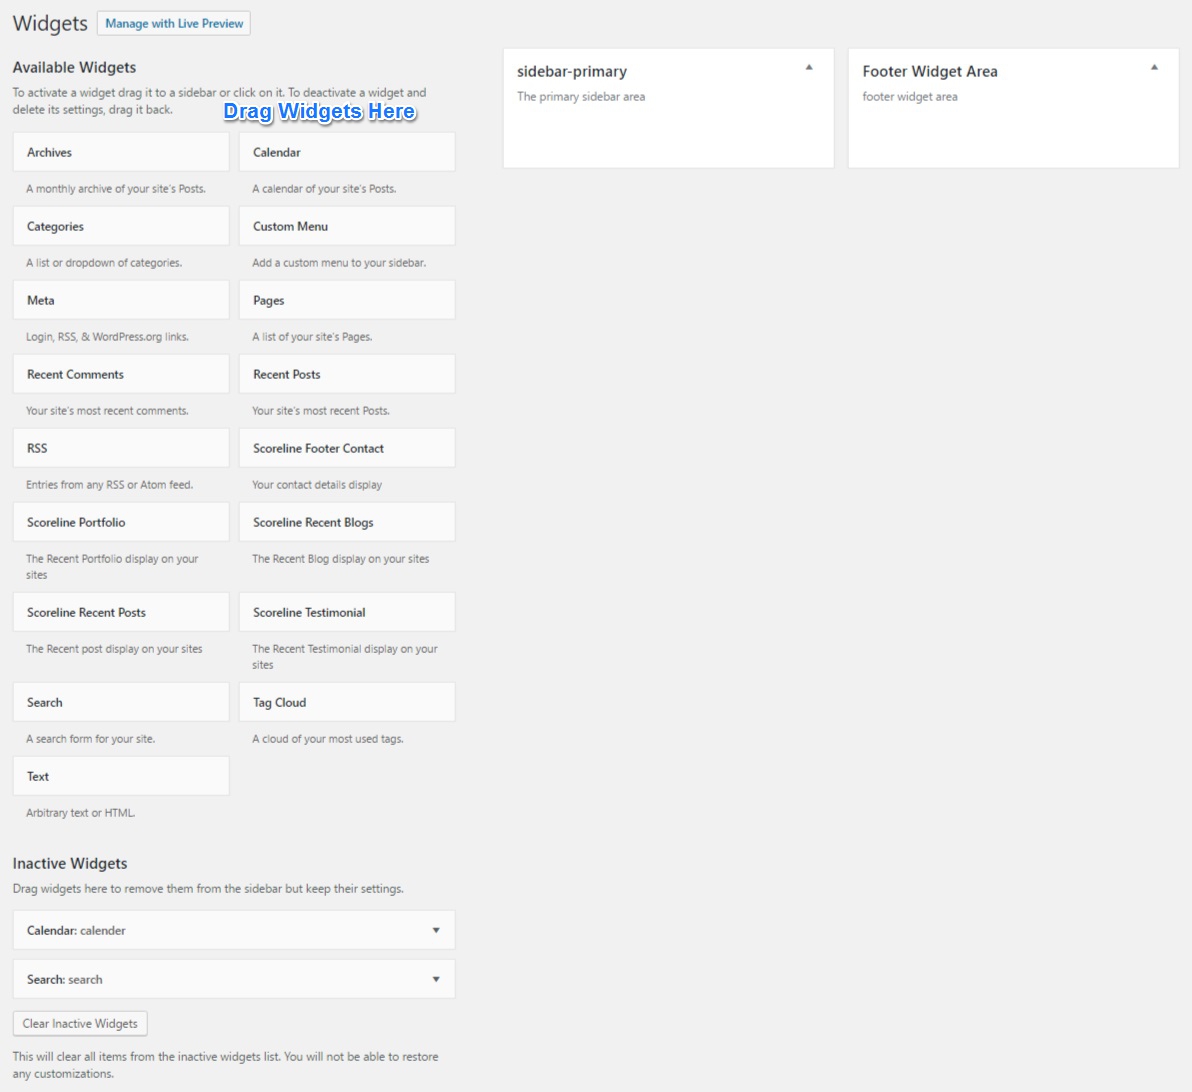
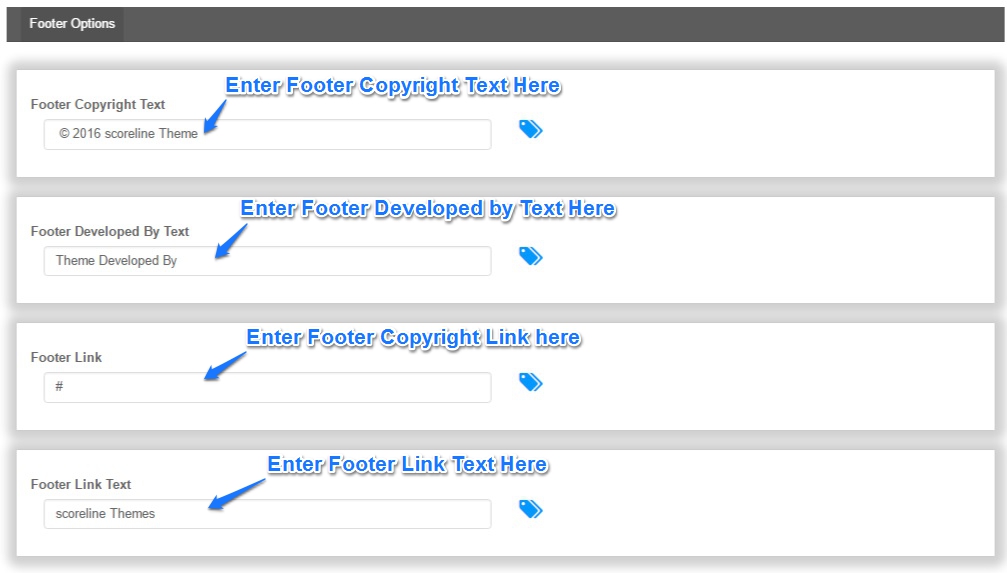
14. Footer Setting
Theme Footer have two Parts.
- Widget Area
- Custom Footer Bar
14.1 Widget Area
Theme Footer Widget Area have default Widgets.
Please go to Admin Dashboard → Appearance → Widgets.
And Drag-Drop Widget to Footer Widget Area to add Footer Widget Area.
Please follow below image for Quick Settings.
14.2 Custom Footer Bar
In custom Footer Bar there is two part
- Social Icons: Social Icon Can be Customize from Social Media Options.
- Credit Text: This Part can customize from Footer Options.
Please go to Admin Dashboard → Appearance → Theme Options → Footer Options.
In Footer Options Settings, following settings can be customized
- Set Footer Copyright Text
- Set Footer Developed By Text
- Set Footer Link’s Text
- Set Footer Link
Please follow below image for Quick Footer Settings.
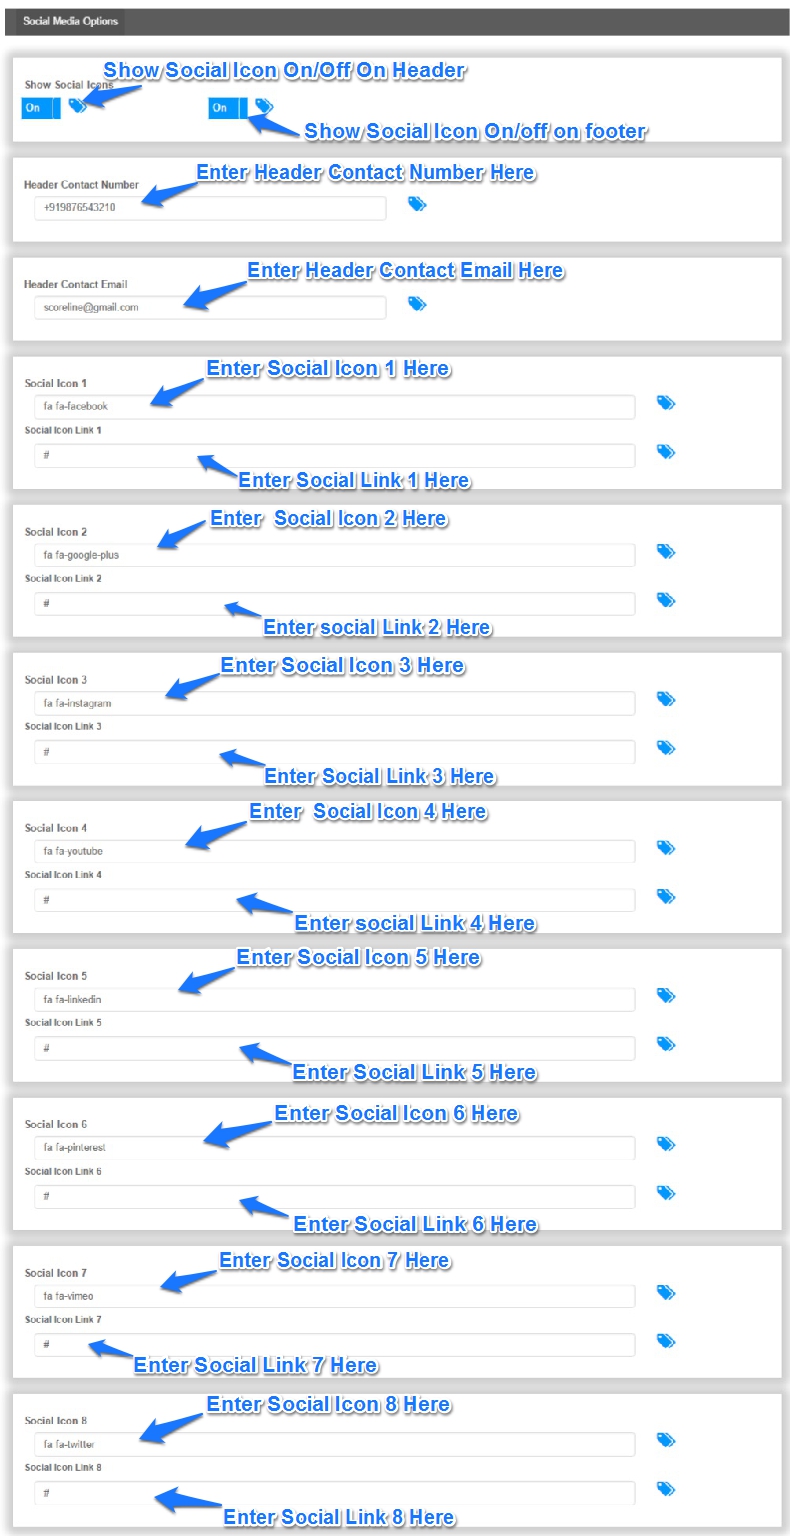
15. Social Icon Setting
You can customize Social Icon Setting in Theme Options Settings.
Go to Admin Dashboard → Appearance → Theme Options → Social Media Options.
In Social Icon Settings, you can set
- Set Icon On Header
- Set Icon On Footer
- Set Contact and Email
- Social Icon Link Setting
Please follow below image for Quick Social Icon Settings.
16. Home Page Manager Setting
Using Home Page Manager settings, sections on Home Page can be remove and move.
Scorline slider is always on the Top.
To access Home Page Manager go to Admin Dashboard → Appearance → Theme Options → Home Page Manager.
Here section can be enabled/disable and move using DRAG N DROP.
Please follow below image for Quick Settings.

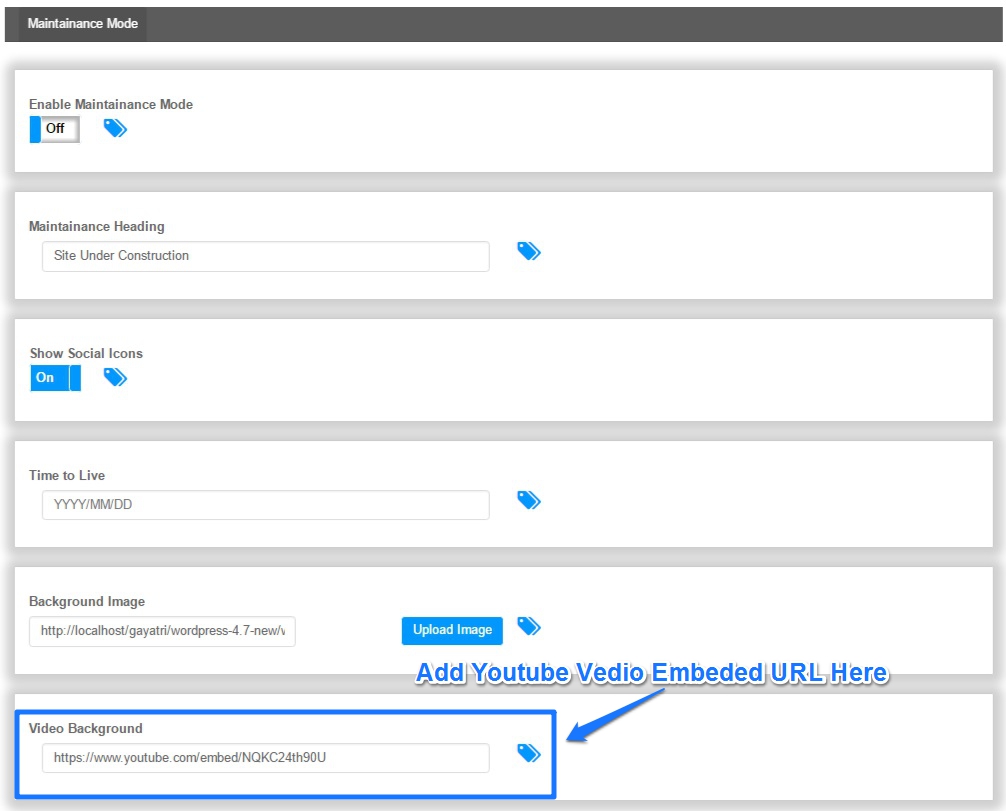
17. Maintainance Mode Setting
You can customize Maintainance in Theme Options Settings.
Go to Admin Dashboard → Appearance → Theme Options → Maintainance Mode.
In Maintainance Mode, you can set
- Set Maintainance Mode on/off
- Set Maintainance Heading
- Set Date
- Set Social Icons on/off
- Set Background Image
- Set Video Background
Please follow below image for Maintainance Mode settings.
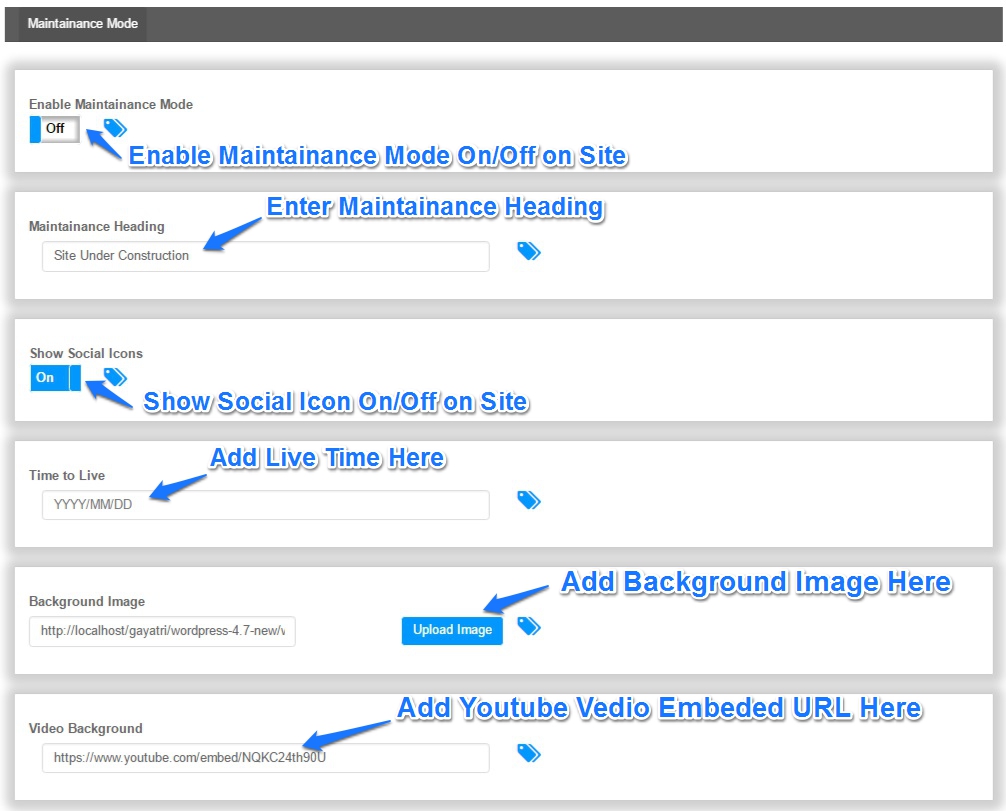
Please follow below image for get Video URL.
18. Custom URL Setting
Scoreline provides an option to use your own custom URL for custom post types.
You can use custom URLs at Admin Dashboard → Appearance → Theme Options →Custom URL’s Options.
You have to refresh Permalinks to apply these changes. Please change your URLs here, save the change. Then go to Admin Dashboard → Settings→ Permalinks.
Here change the permalink to another format and save. Now revert to your permalink type and again save.
In Custom Settings, you can set
- Add Service Custom URL
- Add Portfolio Custom URL
- Add Testimonial Custom URL
- Add Team Member Custom URL
- Add Client Custom URL
Please follow below image for Quick Settings.
Note: After changing custom URL you have to re-save permalink setting. To re-save permalink setting please go to Admin Dashboard >> Settings >> Permalinks and click on save button.
19. Theme Templates
Scoreline Premium Theme provides about 26 templates.
There is some Details of them
19.1 Page Templates
- Default Template (Page With Right Sidebar)
- Page With Left Sidebar
- page with Full Width
19.2 Blog Templates
- Blog With Left Sidebar
- Blog with Right Sidebar
- Blog 2 Column
- Blog 3 Column
- Blog 4 Column
- Blog 2 Column with Left Sidebar
- Blog 2 Column with Right Sidebar
19.3 Contact Us Templates
- Contact Us 1
- Contact Us 2
19.4 About Us Templates
- About Us 1
- About Us 2
- About Us 3
19.5 Portfolio Templates
- Portfolio Gallery
- Portfolio 2 Column
- Portfolio 3 Column
- Portfolio 4 Column
- Portfolio Column 2 with Vertical Tab
- Portfolio Column 3with Vertical Tab
19.6 Service Templates
- Service Template 1
- Service Template 2
- Service Template 3
- Service Template 4
- Service Template 5
20. Short-codes
Theme provide many shortcodes.
You can see them in below Image.

To use shortcode please follow Image.

20.1 Accordion

See Demo Here http://demo.weblizar.com/scoreline-premium/accordian/
20.2 Alert

See Demo Here http://demo.weblizar.com/scoreline-premium/alert/
20.3 Button

See Demo Here http://demo.weblizar.com/scoreline-premium/button/
20.4 Column

See Demo Here http://demo.weblizar.com/scoreline-premium/column/
20.5 Drop Caps

See Demo Here http://demo.weblizar.com/scoreline-premium/drop-caps/
20.6 Heading

See Demo Here http://demo.weblizar.com/scoreline-premium/heading/
20.7 Panel

See Demo Here http://demo.weblizar.com/scoreline-premium/panel/
20.8 Popover

See Demo Here http://demo.weblizar.com/scoreline-premium/popover/
20.9 Progress Bar

See Demo Here http://demo.weblizar.com/scoreline-premium/progress-bar/
20.10 Tabs


See Demo Here http://demo.weblizar.com/scoreline-premium/tabs/
20.11 Tool Tip

See Demo Here http://demo.weblizar.com/scoreline-premium/tooltip/
20.12 Portfolio
See Demo Here http://demo.weblizar.com/scoreline-premium/portfolio-2/
20.13 Blog
See Demo Here http://demo.weblizar.com/scoreline-premium/blog-2/
30 Jun,
2016
BeautySpa Premium Documentation
Weblizar Docs 0 CommentBeautySpa is a multi-purpose responsive theme coded & designed with a lot of care and love. You can use it for your business, portfolio, blogging or any type of site.
Try BeautySpa Premium Theme: DEMO HERE
Key Contents
2.1 General Settings
2.1.1 Enable Front Page
2.1.2 Add Logo
2.1.3 Add Favicon
2.1.4 Header Background Image
2.1.5 Google Analytic Code & Custom CSS Editor
3.1 Customize BeautySpa Slider
4.1 Customize BeautySpa Service
5.1 Customizing BeautySpa Portfolio
7.1 Customize BeautySpa Testimonial Section
9.1 Customizing BeautySpa Client Section
11.1 Customizing BeautySpa Facts and Skills
12. Contact Setting
14. Callout Setting
17. Footer Setting
17.1 Widget Area
17.2 Custom Footer Bar
20. Theme Templates
21.1 Slider Type
21.1.1 Add Background Image
21.1.2 Welcome Video Background
22. Short-codes
22.1 Accordion
22.2 Collapse
22.3 Alert
22.4 Button
22.5 Column
22.6 Drop-Caps
22.7 Heading
22.8 Panel
22.9 Popover
22.10 Progress Bar
22.11 Tabs
22.12 Tool Tip
22.13 Portfolio
22.14 Blog
Now, we are going through installation, configuration and publish theme. Follow the step by step guide:
1. Theme Installation
First, download your theme package from your Weblizar Amember Account.
Upload Theme package zip folder using theme installer wordPress option Otherwise Any FTP (FillZilla)
We recommend you upload theme zip package using FTP( FillZill/Bitwise), In your host-server-directory\wp-content\themes\
After that Activate theme into WordPress site Admin Dashboard -> Appearance ->themes.
Now the theme is successfully installed on our site, step up to the next step.
2. Setup Home Page
Our theme home page has 9 different sections. These sections can be customized with the theme options page.
You can access theme options page at Admin Dashboard → Appearance → Theme Options.
A look of Theme Options page is Here.

Now all settings are explained one by one.
2.1 General Settings
In this section, you can enable front-page, add a logo , add a background image to breadcrumbs, add custom CSS, add google analytic code etc.
Please go to Admin Dashboard → Appearance → Theme Options → Home Options →General Settings.
Please refer below image for Quick Settings.

2.1.1 Enable Front-page
To Enable front-page go to Admin Dashboard → Appearance → Theme Options → Home Options →General Settings.
And slide Home-Page or Custom Page to ON.
2.1.2 Add Logo
To add Logo go to Admin Dashboard → Appearance → Theme Options → Home Options →General Settings.
Now click on Custom Logo Button and upload your logo image or select from Media Library.
Follow image
![]()
You can further customize the logo’s height and width from Logo Height and Logo Width settings.
NOTE : Logo height is Set to 60px for fixed header, if fixed header is enabled and when you scroll the page, Logo will set to 60px height in fixed menu.
2.1.3 Add Favicon
To add Favicon go to Admin Dashboard → Appearance → Theme Options → Home Options →General Settings.
Now click on Favicon Icon Button and upload your logo image or select from Media Library.
2.1.4 Header Background Image
To add Header Background Image go to Admin Dashboard → Appearance → Theme Options → Home Options →General Settings.
And Click on Upload image in Header Background Image setting.
Theme Support Custom Header functionality.
To add Background Image via Custom Header, slide Custom Header Background button to ON save the changes.
Now go to Admin Dashboard → Appearance → Customize→Header Image and customize header image.
Theme supports Fixed Header functionality.
To add Fixed Header via Custom Header, slide Fixed Header button to ON save the changes.
Theme supports Show Search Bar in Header functionality.
To add Search Bar in Header via Custom Header, slide Show Search Bar in Header button to ON save the changes.
2.1.5 Google Analytic Code & Custom CSS Editor
Google Analytic Code and custom CSS can be added to theme using Theme’s General Settings.
Note:Please add Google Analytic Code without script tag. Please don’t use >, < like symbol in custom CSS editor.
3. BeautySpa Slider
To add a slide to BeautySpa Slider.
Go to Admin Dashboard →BeautySpa Slider →Add New Slide and fill related details.
For a quick view, please follow below image.
3.1 Customize BeautySpa Slider
Theme Slider have two types.
1. Slider Type
2. Welcome Video Background
3.1.1 Slider Type
You can customize BeautySpa Slider in Theme Options Settings.
Go to Admin Dashboard → Appearance → Theme Options → Home Options →Slider Settings.
In Slider Settings, you can set
- Auto-play ON/OFF
- Enable Pause On Hover.
- Set interval time.
- Set slider to rotate all slides.
3.1.2 Welcome Video Background
You can customize BeautySpa Slider in Theme Options Settings.
Go to Admin Dashboard → Appearance → Theme Options → Home Options → Slider Settings → Slider Type.
In Slider Settings, you can set
- Auto-play ON/OFF
- Enable Pause On Hover.
- Set interval time.
- Set slider to rotate all slides.
Common Settings-
- Set slider Title Animation,
- Set Sub Title Animation,
- Set Button Animation.
3.1.2.1 How To Add Embedded Video Url
For a quick view, please follow below image.

Please add this video code into video embedded URL.
4. BeautySpa Services
To add Service to BeautySpa Services.
Go to Admin Dashboard → BeautySpa Services → Add New Service and fill related details.
For a quick view, please follow below image.
Note: To show services on the homepage you have to add either font awesome icon or feature image if you do not add this field, Service will not show on homepage.
4.1 Customize BeautySpa Services
You can customize BeautySpa Services in Theme Options Settings.
Go to Admin Dashboard → Appearance → Theme Options → Home Options → Service Settings.
In Service Settings, you can set
- Service Heading
- Service Description
- Service Template
- Service Column
Please follow below image for Quick Service Settings.
5. BeautySpa Portfolio
To add Portfolio to BeautySpa Portfolios.
Go to Admin Dashboard → BeautySpa Portfolios→ Add New Portfolio and fill related details.
For a quick view, please follow below image.
5.1 Customize BeautySpa Portfolio
You can customize Portfolio in Theme Options Settings.
Go to Admin Dashboard → Appearance → Theme Options → Home Options → Portfolio Settings.
In Portfolio Settings, you can set
- Portfolio Section Title
- Portfolio Section Description
- Portfolio Column Layout
- Set Portfolio Template
Please follow below image for Quick Portfolio Settings.
6. BeautySpa Blog
You can customize Blog in Theme Options Settings.
Go to Admin Dashboard → Appearance → Theme Options → Home Options → Blog Settings.
In Blog Settings, you can set
- Blog Section Title
- Blog Section Description
- Blog Column Layout
- Set Blog Column
- Set AutoPlay
- Set Rotation
- Set Category
Please follow below image for Quick Blog Settings.
7. BeautySpa Testimonials
To add Testimonial to BeautySpa Testimonials.
Go to Admin Dashboard → BeautySpa Testimonials → Add New Testimonial and fill related details.
For a quick view, please follow below image.
7.1 Customize BeautySpa Testimonial Section
You can customize BeautySpa Testimonial Section in Theme Options Settings.
Go to Admin Dashboard → Appearance → Theme Options → Home Options →Testimonial Settings.
In Testimonial Settings you can set
- Testimonial Section Title
- Testimonial Description
- Testimonials Background
- Set AutoPlay
- Set Time Interval
Please follow below image for Quick Testimonial Settings.
8. BeautySpa Members
To add Member to BeautySpa Members.
Go to Admin Dashboard →BeautySpa Members →Add New Member and fill related details.
For a quick view, please follow below image.
9. BeautySpa Client
To add Member to BeautySpa Client.
Go to Admin Dashboard →BeautySpa Client →Add New Client and fill related details.
For a quick view, please follow below image.
9.1 Customize BeautySpa Client Section
You can customize BeautySpa Client Section in Theme Options Settings.
Go to Admin Dashboard → Appearance → Theme Options → Home Options →Client Settings.
In Client Settings, you can set
- Client Section Title
- Client Description
- Set Rotation
Please follow below image for Quick Client Settings.
10. Customize BeautySpa Team
You can customize Team in Theme Options Settings.
Go to Admin Dashboard → Appearance → Theme Options → Home Options →Team Settings.
In Team Settings, you can set
- Team Section Title
- Team Section Description
- Set Team Background
Please follow below image for Quick Team Settings.
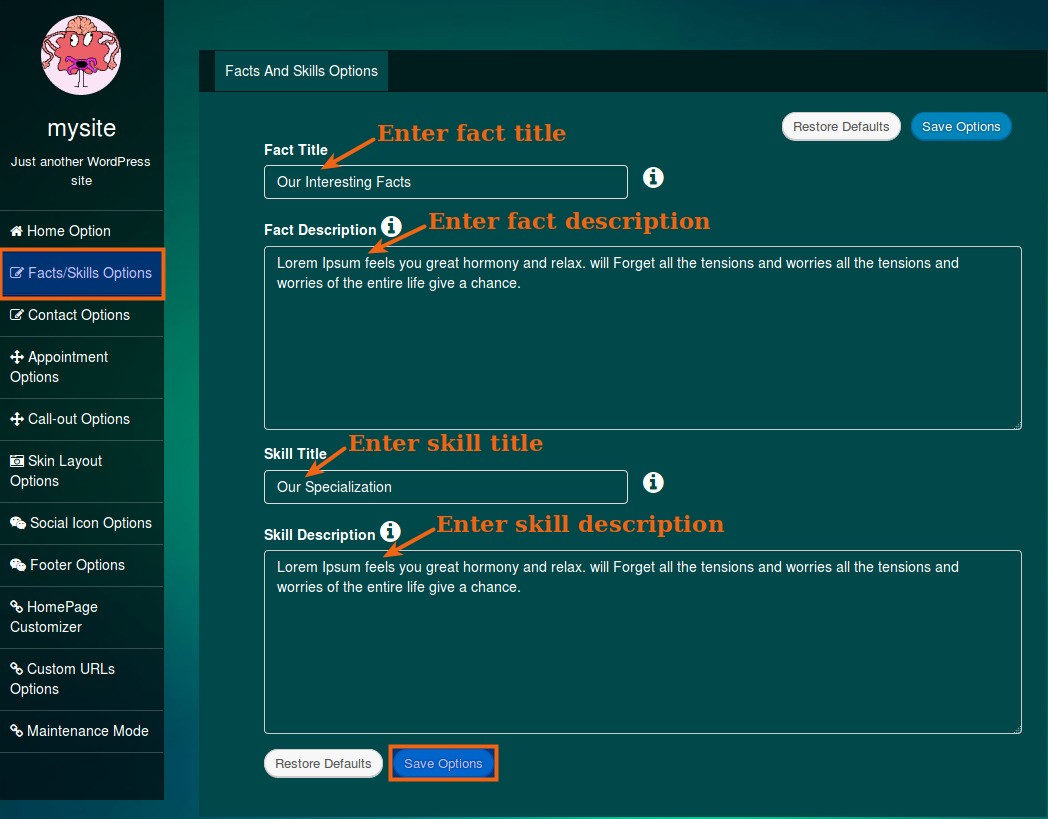
11. BeautySpa Facts and Skills
You can customize Facts And Skills in Theme Options Settings.
Go to Admin Dashboard →BeautySpa Facts And Skills → Add New Facts And Skills and fill related details.
For a quick view, please follow below image.
11.1 Customize BeautySpa Facts And Skills Section
You can customize Facts And Skills in Theme Options Settings.
Go to Admin Dashboard → Appearance → Theme Options → Facts And Skills Settings.
In Facts And Skills Settings, you can set
- Facts And Skills Section Title
- Facts And Skills Section Description
Please follow below image for Quick Facts And Skills Settings.
12. Contact Setting
You can customize Contact in Theme Options Settings.
Go to Admin Dashboard → Appearance → Theme Options → Contact Settings.
In Contact Settings, you can set
- Add Mail
- Set Contact Form Title
- Set Contact URL
- Add Placeholder Setting
- Add Contact Details
Please follow below image for Quick Team Settings.
Note: All mails, of contact us templates and Home Contact section, are mailed to the mail id that you set in contact mail option.
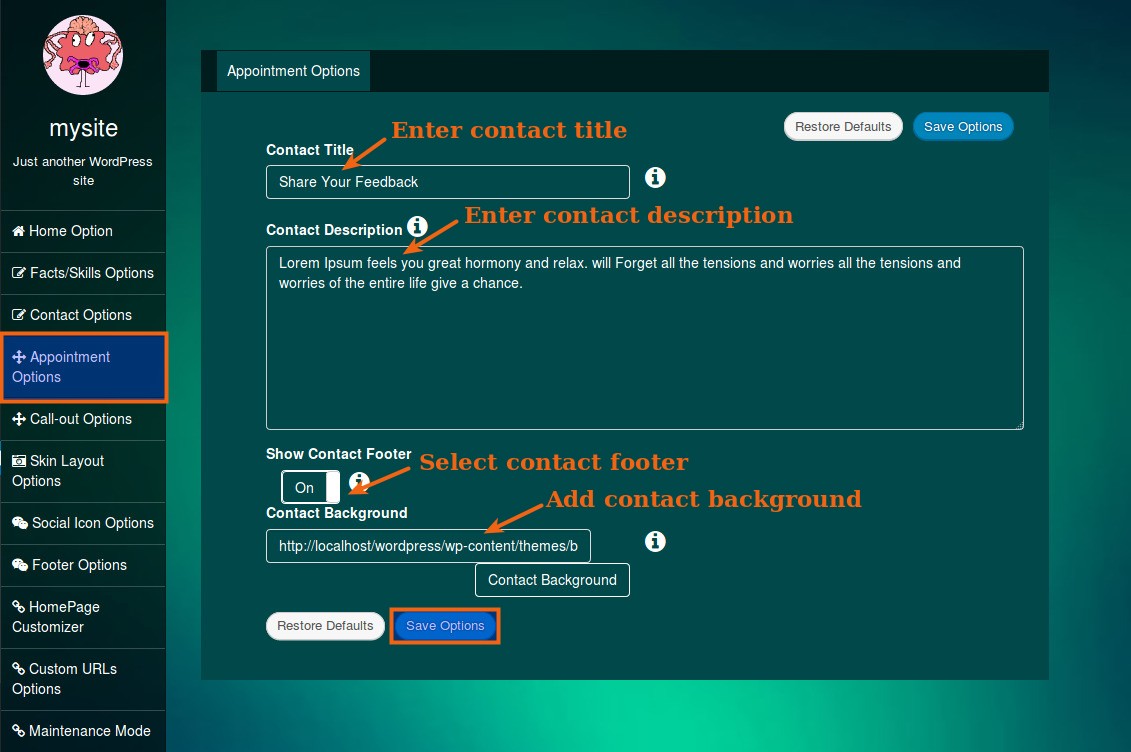
13. Appointment Setting
You can customize Appointment in Theme Options Settings.
Go to Admin Dashboard → Appearance → Theme Options → Appointment Settings.
In Appointment Settings, you can set
- Add Appointment Contact Title
- Add Appointment Description
- Set Appointment in Footer
- Set Appointment Contact Background
Please follow below image for Quick Appointment Settings.
14. Callout Setting
You can customize Callout in Theme Options Settings.
Go to Admin Dashboard → Appearance → Theme Options → Callout Settings.
In Callout Settings, you can set
- Add Callout icon
- Add Callout Title
- Set Callout Span Title
- Set Callout Description
- Set Callout Button Text
- Set Callout Button Link
- Add Callout Background
Please follow below image for Quick Callout Settings.
15. Skin Layout Setting
You can customize Skin Layout Setting in Theme Options Settings.
Go to Admin Dashboard → Appearance → Theme Options → Skin Layout Settings.
In Skin Layout Setting, you can set
- Set Switcher
- Set Theme Color
- Set Theme Layout
- Set Custom Background On/Off
- Set Background Image
Please follow below image for Quick Skin Layout Settings.
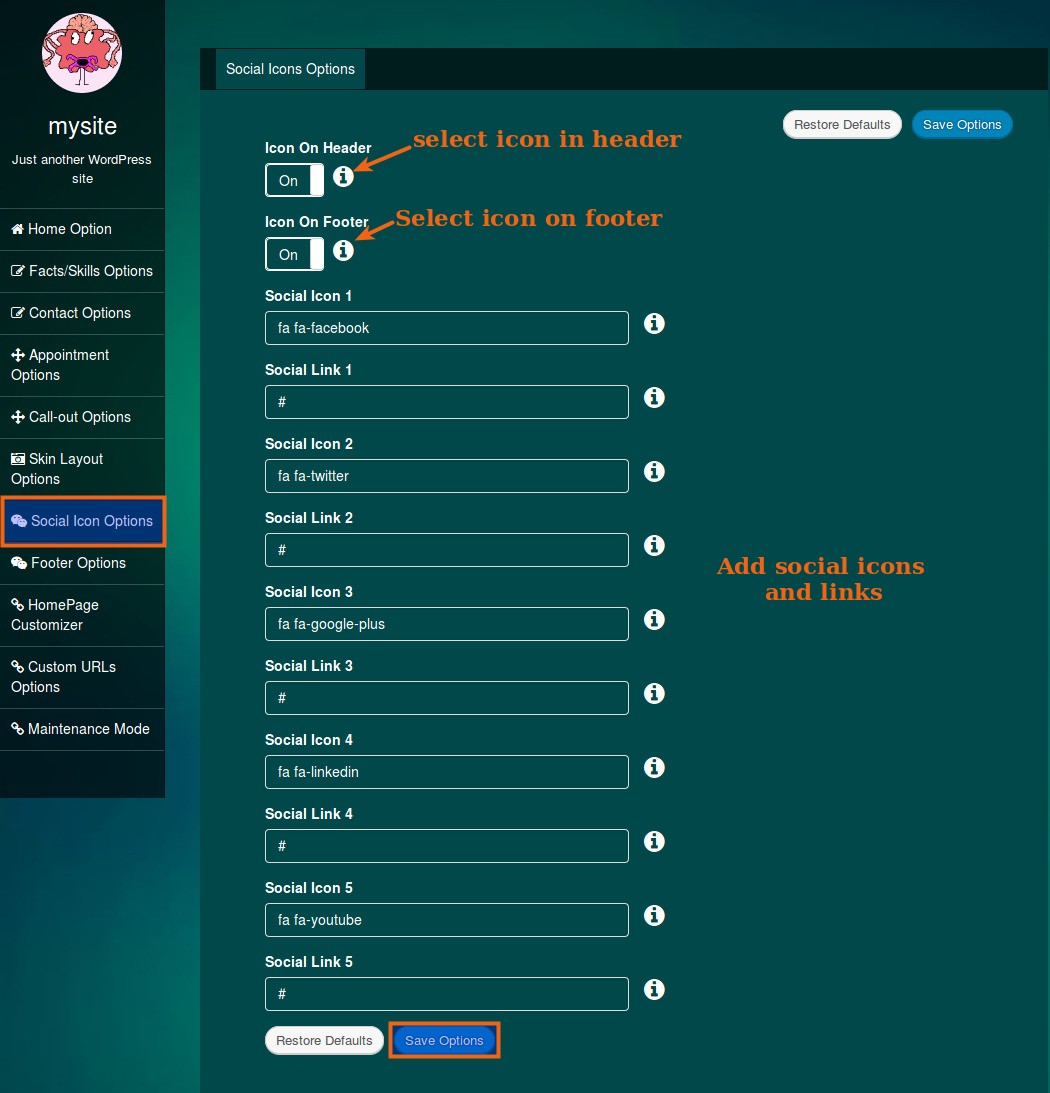
16. Social Icon Setting
You can customize Social Icon Setting in Theme Options Settings.
Go to Admin Dashboard → Appearance → Theme Options → Social Icon Settings.
In Social Icon Settings, you can set
- Set Icon On Header
- Set Icon On Footer
- Social Icon Link Setting
Please follow below image for Quick Social Icon Settings.
Note: All social icon are set to open in new tab.
17. Footer Setting
Theme Footer have two Parts.
- Widget Area
- Custom Footer Bar
17.1 Widget Area
Theme Footer Widget Area have default Widgets.
Please go to Admin Dashboard → Appearance → Widgets.
And Drag-Drop Widget to Footer Widget Area to add Footer Widget Area.
Please follow below image for Quick Settings.
17.2 Custom Footer Bar
In custom Footer Bar there is two part
- Social Icons: Social Icon Can be Customize from Social Media Options.
- Credit Text: This Part can customize from Footer Options.
Please go to Admin Dashboard → Appearance → Theme Options → Footer Options.
In Footer Options Settings, following settings can be customized
- Set Footer Text
- Set Footer Link’s Text
- Set Footer Link
Please follow below image for Quick Footer Settings.
18. Home Page Manager Setting
Using Home Page Manager settings, sections on Home Page can be remove and move.
BeautySpa slider is always on the Top.
To access Home Page Manager go to Admin Dashboard → Appearance → Theme Options → Home Page Manager.
Here section can be enabled/disable and move using DRAG N DROP.
Please follow below image for Quick Settings.

19. Custom URL Setting
BeautySpa provides an option to use your own custom URL for custom post types.
You can use custom URLs at Admin Dashboard → Appearance → Theme Options →Custom URL’s Options.
You have to refresh Permalinks to apply these changes. Please change your URLs here, save the change. Then go to Admin Dashboard → Settings→ Permalinks.
Here change the permalink to another format and save. Now revert to your permalink type and again save.
In Custom Settings, you can set
- Add Service Custom URL
- Add Portfolio Custom URL
- Add Member Custom URL
Please follow below image for Quick Settings.
Note: After changing custom URL you have to re-save permalink setting. To re-save permalink setting please go to Admin Dashboard >> Settings >> Permalinks and click on save button.
20 Theme Templates
BeautySpa Premium Theme provides about 22 templates.
There is some Details of them
20.1 Page Templates
- Default Template (Page With Right Sidebar)
- Page With Left Sidebar
- Full Width Page
20.2 Blog Templates
- Blog With Left Sidebar
- Blog Masonry Full Width
- Blog Masonry 2 Column
- Blog Masonry 3 Column
- Blog Masonry 4 Column
- Blog Full Width
20.3 Contact Us Templates
- Contact Us 1
- Contact Us 2
20.4 About Us Templates
- About Us 1
- About Us 2
20.5 Portfolio Templates
- Portfolio Gallery
- Portfolio 2 Column
- Portfolio 3 Column
- Portfolio 4 Column
- Portfolio1
- Portfolio Vertical
20.6 Service Templates
- Service Template 1
- Service Template 2
- Service Template 3
You can see them at BeautySpa Theme Demo
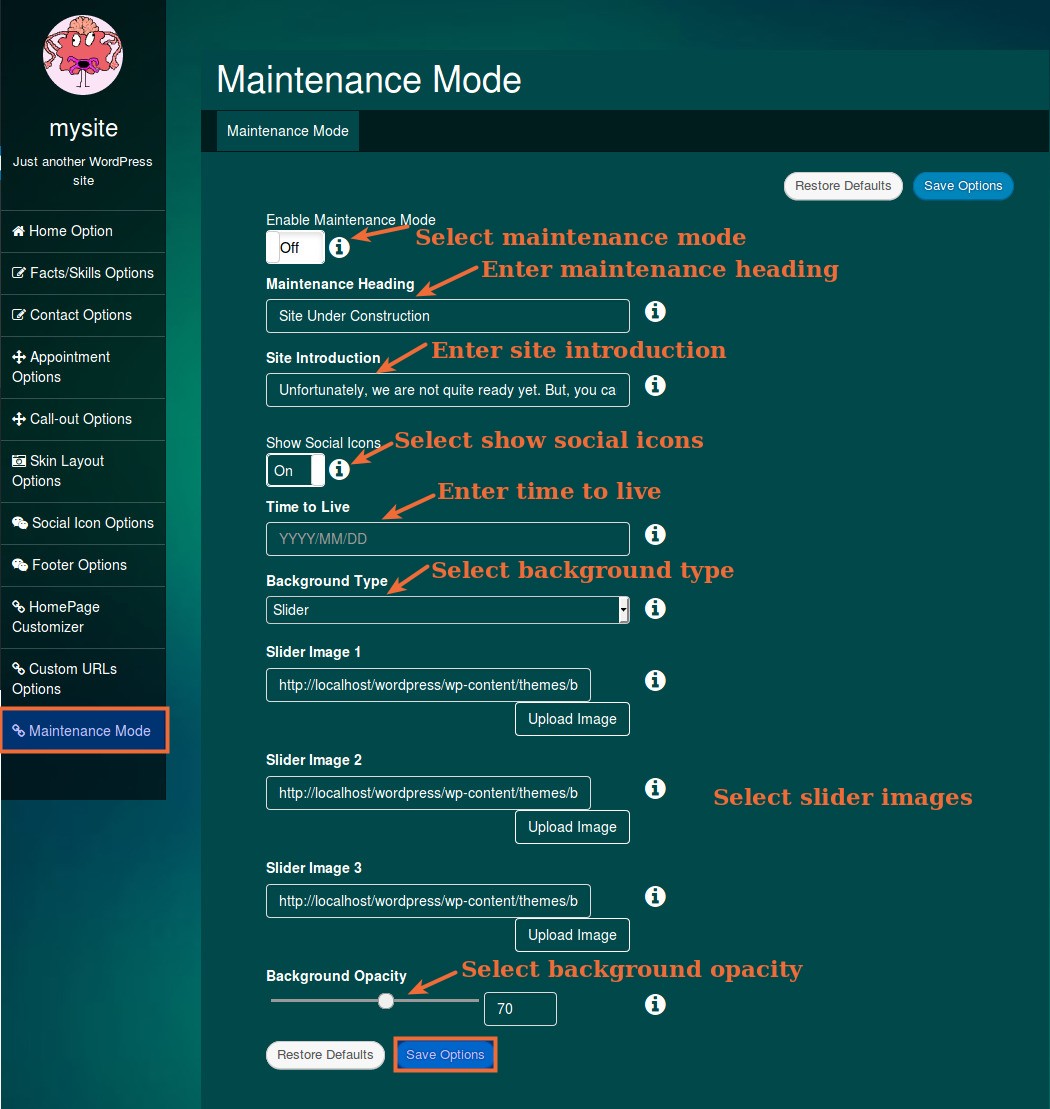
21. Maintenance Mode
BeautySpa maintenance Mode have Two Types.
1. Slider Type
2. Welcome Video Background.
21.1 Slider Type
You can Enable/Disable Maintenance Page at Admin Dashboard → Appearance → Theme Options → Maintenance Mode Option.
In Maintenance Mode Settings, you can set
- Set Maintenance Mode On/Off
- Add Maintenance Mode Heading
- Add Site Introduction
- Set Social Icon(Social icons are set in Theme Option → Social option)
- Set Date
- Set Background Type
- Set Background Opacity
Please follow below image for Quick Settings.
21.1.1 Add Background Image
Now click on Custom Logo Button and upload your logo image or select from Media Library.
After Select Image Follow Below Image.

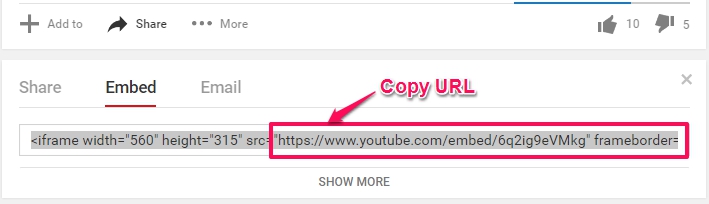
21.2 Welcome Video Background
You can select background video slider to follow below image.

If you add Youtube URL in Settings, then video background will be shown. If you want to show Image background only, please not provide Video URL.
Please follow below Image to get your Youtube Video URL.
22. Short-codes
Theme provide many shortcodes.
You can see them in below Image.

To use shortcode please follow Image.
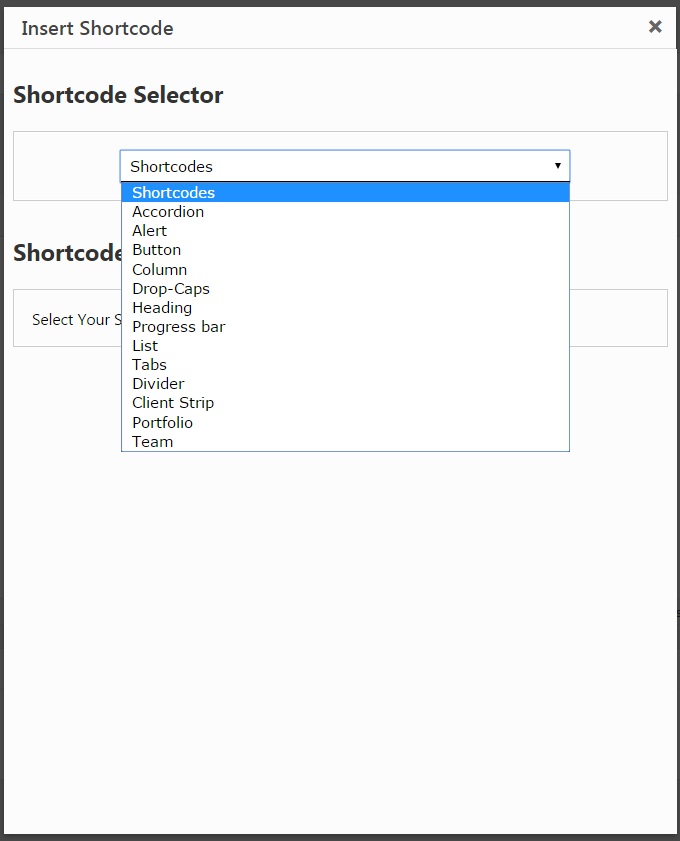
It’s simple to use.
Click on Shortcode Button →Select Short-code type from Option→ Provide Relative Information→ Click on insert
Please below Images.
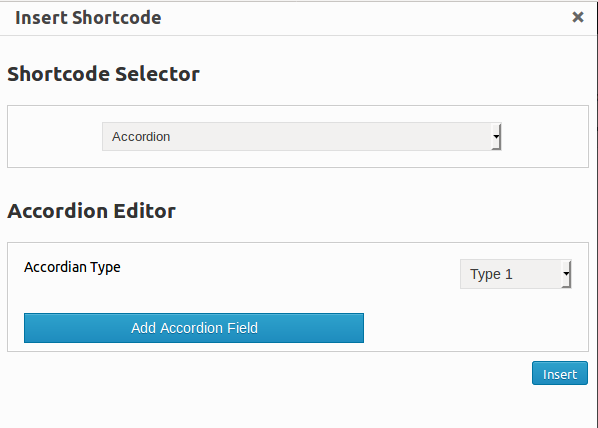
22.1 Accordion
After clicking on insert button You found shortcode, As given in below image.

copy this shortcode and paste in a page where you want to show shortcode.
See Demo Here http://demo.weblizar.com/beautyspa-premium/shortcodes/accordian/
22.2 Collapse
For add collapse follow below image.
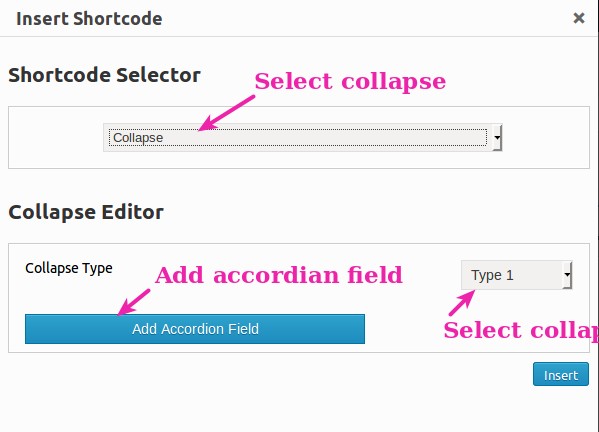
See Demo Here http://demo.weblizar.com/beautyspa-premium/shortcodes/collapse/
22.3 Alert
See Demo Here http://demo.weblizar.com/beautyspa-premium/shortcodes/alerts/
22.4 Button
See Demo Here http://demo.weblizar.com/beautyspa-premium/shortcodes/buttons/
22.5 Column

22.6 Drop-Caps
See Demo Here http://demo.weblizar.com/beautyspa-premium/shortcodes/drop-caps/
22.7 Heading

22.8 Panel

See Demo Here http://demo.weblizar.com/beautyspa-premium/shortcodes/panels/
22.9 Popover
See Demo Here http://demo.weblizar.com/beautyspa-premium/popovers/
22.10 Progress Bar

See Demo Here http://demo.weblizar.com/beautyspa-premium/shortcodes/1823-2/
22.11 Tabs


See Demo Here http://demo.weblizar.com/beautyspa-premium/shortcodes/tabs/
22.12 Tool Tip

See Demo Here http://demo.weblizar.com/beautyspa-premium/popovers/
22.13 Portfolio
See Demo Here http://demo.weblizar.com/beautyspa-premium/shortcodes/portfolio/
22.14 Blog
See Demo Here http://demo.weblizar.com/beautyspa-premium/shortcodes/posts/
VERIFIED BY